# Managed Google Play iframe
> [!IMPORTANT]
> **Tip:** To view a working example of the iframe, try the [Android
> Management Experience](https://enterprise.google.com/android/experience).
With the **managed Google Play iframe**, you can embed managed Google Play
directly in your EMM console to offer customers a unified mobility management
experience.
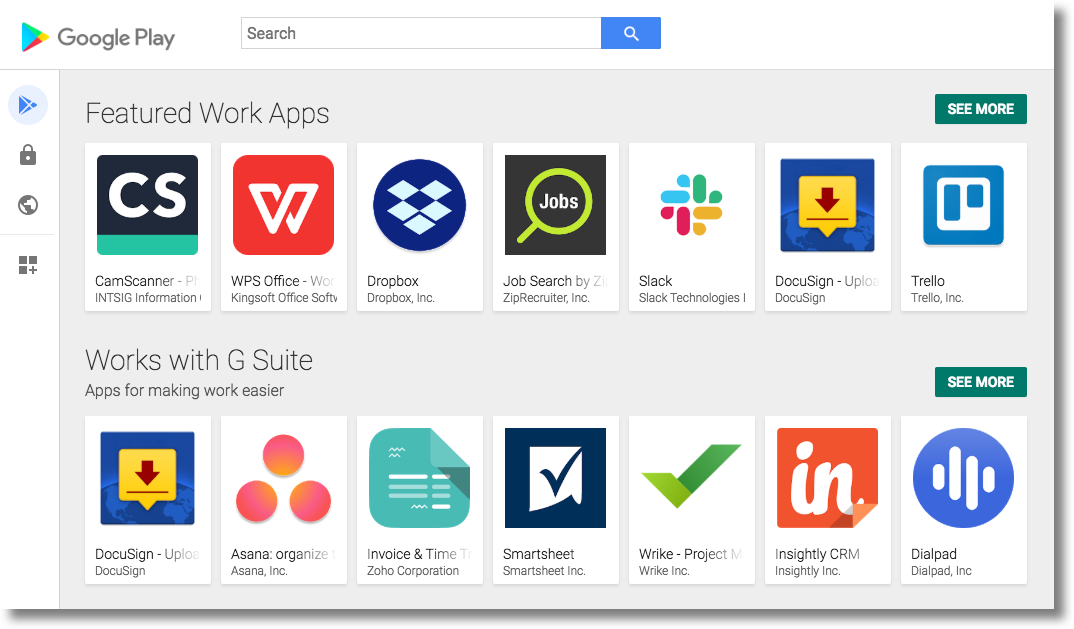 **Figure 1.** The managed Google Play iframe showing the Search apps page.
The iframe contains a title bar and an expandable side menu. From the menu,
users can navigate to different pages:
- [Search apps](https://developers.google.com/android/work/play/emm-api/managed-play-iframe#search-apps): Allows IT admins to search for and browse Google Play apps, view app details, and select apps.
- [Private apps](https://developers.google.com/android/work/play/emm-api/managed-play-iframe#private-apps): Allows IT admins to publish and manage private apps for their enterprise.
- [Web apps](https://developers.google.com/android/work/play/emm-api/managed-play-iframe#web-apps): Allows IT admins to publish and distribute website shortcuts as apps.
- [Organize apps](https://developers.google.com/android/work/play/emm-api/managed-play-iframe#organize-apps): Allows IT admins to configure how apps are organized in the Play Store app on their user's devices.
All pages are enabled in the iframe by default, but can be disabled individually
(see [Add the iframe to your console](https://developers.google.com/android/work/play/emm-api/managed-play-iframe#add_the_iframe_to_your_console)).
*** ** * ** ***
## Features
This section describes the features available in the managed Google Play iframe.
For information on how to embed the iframe and implement these features, see
[Add the iframe to your console](https://developers.google.com/android/work/play/emm-api/managed-play-iframe#add_the_iframe_to_your_console).
## Search apps
The Search apps page (shown in **Figure 1.**) lets IT admins search for, browse, and
select Google Play apps.
### Search box
A search box in the title bar is enabled on the page by default. The search box supports features
such as auto-suggest and returns results from apps listed publicly on Google Play. The search
results are displayed within the iframe.
> [!NOTE]
> **Note:** If you already have a search feature built into your console, you can disable the search box and pass search queries in the iframe's URL instead. See **URL
> parameters** in [Step 2: Render the iframe](https://developers.google.com/android/work/play/emm-api/managed-play-iframe#step_2_render_the_iframe) for more details.
> [!NOTE]
> **Note:** If you are searching for private or web apps, use your enterprise ID in order to better find these apps. To see your enterprise ID, click on the person-gear icon at the top right corner of the iFrame and copy the text from the ID field.
## Private apps
 **Figure 2.** Private app details screen
The Private apps page allows IT admins to publish and manage private apps directly from your EMM
console. To streamline private app publishing for IT admins, the page:
- Silently creates a Play Console account on behalf of the enterprise and grants admin access to IT admins.
- Waives the $25 USD Play Console registration fee previously required to publish apps.
- Requires only an app's [AAB](https://developer.android.com/guide/app-bundle) or APK and title.
- Publishes apps in as little as 10 minutes (compared to 2 hours in the Play Console).
**Note:** apps published from the Private apps page can never be made public.
> [!NOTE]
> **Note:** To learn more about Publishing Private Apps to your customers, go [here](https://support.google.com/work/android/topic/9496238).
The first time an IT admin publishes an app in the iframe, the iframe silently creates a Play
Console account on behalf of the enterprise. If they **make advanced edits**, they're prompted
to sign in with a Google Account---this can be any Google Account (e.g. Gmail, Cloud Identity).
This Google Account is added as an admin of the enterprise's Play Console account. Afterwards, an
IT admin can use their Google Account to sign into the Play Console directly, where they
can:
- [Add and
manage admin accounts](https://support.google.com/googleplay/android-developer/answer/2528691).
- Add advanced app details, including descriptions, screenshots, and more.
- Unpublish apps.
Instructions for IT admins on how to use the Private apps page is available in the
[managed Google Play Help
Center.](https://support.google.com/googleplay/work/answer/9146439)
### Select button
After an app is published, an IT admin can edit its title and APK in the app details page. The
app details page also displays a **SELECT** button (see **Figure 2** ). You need to specify
the action that takes place when the IT admin clicks this button (see
`onproductselect` in [Step 3. Handle iframe
events](https://developers.google.com/android/work/play/emm-api/managed-play-iframe#step_3_handle_iframe_events)).
## Web apps
 **Figure 3.** The web apps creation form.
The Web apps page lets IT admins publish website shortcuts as private apps to managed Google Play.
Web apps are identifiable by their package name (`productId`) and typically take 10
minutes to publish. After publishing, they're automatically approved for their enterprise can be
distributed to users just like any other approved app. Web apps are compatible with other managed
Play iframe features: they're searchable in the Play Search page and can be added to
collections.
> [!WARNING]
> **Warning:** A web app's title and icon must comply with [Google Play Developer Program
> Policies](https://play.google.com/about/developer-content-policy/). Apps that don't comply won't be published and will remain listed as **Not available
> yet**.
The web app creation form requires a title, HTTPS or HTTP URL, and icon image (512 x 512 JPG or
32-bit PNG). Additionally, IT admins can choose from the three display options:
- **Full screen:** The app opens in full screen mode, hiding the device's status bar and navigation bar.
- **Standalone (default):** The app shows the device's status bar and navigation bar.
- **Minimal UI:** The app shows the device's status bar and navigation bar, the app's URL, and a refresh option. For HTTP URLs, this is the only available option.
**Important:** Web apps open in the user's selected default browser (*Settings\>Apps\>Default apps\>Browser app*). Features (e.g., fullscreen, standalone mode, minimal UI) depend on the user selected default browser's compatibility. It is important to note that some browsers may not support all of these features. IT admins should verify browser compatibility before deployment.
The Web apps page also lets IT admins edit and delete web apps. Deleting a web app removes it
from a user's managed Google Play store, but the user may still have access to it if the app is
already installed on their device. To delete a web app from a user's device, see
[delete apps](https://developers.google.com/android/work/play/emm-api/delete). Instructions for users on how to
create and edit web apps are available in the
[managed Google Play Help
Center](https://support.google.com/googleplay/work/answer/9147423).
### Select button
After a web app is published, its details page includes a SELECT button. You need to specify the
action (for example, distribute the app) that takes place when the IT admin clicks on this button
(see `onproductselect` in
[Step 3. Handle
iframe events](https://developers.google.com/android/work/play/emm-api/managed-play-iframe#step_3_handle_iframe_events)).
## Organize apps
 **Figure 4.** The managed Google Play iframe showing the Organize apps page.
The Organize apps page lets IT admins organize apps into collections (also called
*clusters*). For example, an IT admin can create an *Essentials* collection for
frequently used apps or an *Expenses* collection for apps related to tracking expenses,
logging travel, etc. Collections are displayed in the Play Store homepage on user's devices.
EMM's must utilize the [`SELECT mode`](https://developers.google.com/android/work/play/emm-api/managed-play-iframe#url_parameters) in the iframe URL's parameters to allow searching and adding of apps
to collections.
On user's devices, the Play Store app only displays apps from a collection that are available for
the user (or device). If a collection doesn't include any apps that are available to the user (or
device), the collection won't appear in the Play Store.
 **Figure 5.** App collections (*clusters*)
on a device.
IT admins can also edit, delete, and copy existing collections in the organize apps page. User
instructions for how to perform these tasks are available in the
[Managed Google Play Help
Center](https://support.google.com/googleplay/work/answer/9146438).
*** ** * ** ***
## Add the iframe to your console
### Step 1. Generate a web token
To generate a web token that identifies the enterprise, call
[`Enterprises.createWebToken`](https://developers.google.com/android/work/play/emm-api/v1/enterprises/createWebToken).
The following example shows how to retrieve the token using the [Google Play EMM
API Client Library for Java](https://developers.google.com/api-client-library/java/apis/androidenterprise/v1).
All pages in the iframe are enabled by default. When generating a web token, you
can specify which page(s) to disable. The example below disables Private apps,
Web apps, and Organize apps.
```
public AdministratorWebToken getAdministratorWebToken(
String enterpriseId) throws IOException {
AdministratorWebTokenSpec tokenSpec = new AdministratorWebTokenSpec();
tokenSpec.setParent("https://my-emm-console.com");
tokenSpec.setPlaySearch(new AdministratorWebTokenSpecPlaySearch());
tokenSpec.setPrivateApps(new AdministratorWebTokenSpecPrivateApps().setEnabled(false));
tokenSpec.setWebApps(new AdministratorWebTokenSpecWebApps().setEnabled(false));
tokenSpec.setStoreBuilder(new AdministratorWebTokenSpecStoreBuilder().setEnabled(false));
return androidEnterprise
.enterprise()
.createWebToken(enterpriseId, tokenSpec)
.execute();
}
```
You need to include the returned token, along with other parameters, when
rendering the iframe in your console.
### Step 2. Render the iframe
Here's an example of how to render the managed Play iframe:
This code generates an iframe inside the container `div`. Attributes
to be applied to the iframe tag can be set with the 'attributes' option, as
above.
#### URL parameters
The table below lists all the available parameters for the iframe that can be added to the URL
as URL parameters, e.g:
```
'url': 'https://play.google.com/work/embedded/search?token=web_token&mode=SELECT&showsearchbox=TRUE',
```
| Parameter | Page | Required | Description |
|---|---|---|---|
| `token` | N/A | Yes | The token returned from [Step 1](https://developers.google.com/android/work/play/emm-api/managed-play-iframe#1_generate_a_web_token). |
| `iframehomepage` | N/A | No | The initial page displayed when the iframe is rendered. Possible values are `PLAY_SEARCH`, `WEB_APPS`, `PRIVATE_APPS`, and `STORE_BUILDER` (organize apps). If not specified, the following order of precedence determines which page is displayed: 1. `PLAY_SEARCH`, 2. `PRIVATE_APPS`, 3. `WEB_APPS`, 4. `STORE_BUILDER`. |
| `locale` | N/A | No | A well-formed [BCP 47 language tag](https://www.w3.org/International/articles/language-tags/) that is used to localize the content in the iframe. If not specified, the default value is `en_US`. |
| `mode` | Search apps | No | `SELECT`: lets IT admins select apps. `APPROVE` (default): lets IT admins select, approve, and un-approve apps. > [!WARNING] > **Deprecated:** This mode is deprecated, use `SELECT` instead. > **This method will no longer be accessible by anyone after September 30, 2025. > `APPROVE` mode only works if `PlaySearch.ApproveApps` is set to > `true` in the web token.** |
| `showsearchbox` | Search apps | No | `TRUE` (default): displays the search box and initiates the search query from within the iframe. `FALSE`: the search box is not displayed. |
| `search` | Search apps | No | Search string. If specified, the iframe directs the IT admin to search results with the specified string. > [!NOTE] > **Note:** Only include this parameter when the search box is located outside of the iframe (`showsearchbox = FALSE`). |
### Step 3. Handle iframe events
You should also handle the following events as part of your integration.
| Event | Description |
|---|---|
| `onproductselect` | The user selects or approves an app. This returns an object containing: { "packageName": The package name of the app, e.g. "com.google.android.gm", "productId": The product ID of the app, e.g. "app:com.google.android.gm", "action": The type of action performed on the document. Possible values are: "approved", "unapproved" or "selected." If you implement the iframe in SELECT mode, the only possible value is "selected". } |
The sample below shows how to listen for `onproductselect`:
```
iframe.register('onproductselect', function(event) {
console.log(event);
}, gapi.iframes.CROSS_ORIGIN_IFRAMES_FILTER);
```