Ein Actions-Projekt fasst alle Ihre Aktionen in einem einzigen Container zusammen. Ich
dieses Projekt in Actions on Google veröffentlichen, damit Google Assistant weiß,
und dialogorientiert.
<ph type="x-smartling-placeholder"></ph>
Abbildung 1: Projektstruktur für Aktionen
Sie verwenden die folgenden Komponenten auf niedriger Ebene, um Ihr Actions-Projekt zu erstellen:
Einstellungen und Ressourcen definieren Projektmetadaten
und Ressourcen wie Projektsymbole. Google verwendet diese Informationen, um
Ihre Aktionen an das Assistant-Verzeichnis übertragen, damit Nutzer
.
Intents stellen eine auszuführende Aufgabe dar, z. B. einige
Nutzereingabe oder Systemereignis,
das verarbeitet werden muss. Die häufigste Art von
Intents, die Sie verwenden, sind User Intents. Mit diesen Intents können Sie
Wortgruppen, die auf natürliche Weise durch das NLU (Natural Language Understanding) erweitert werden
viele weitere ähnliche Wortgruppen in die Suchmaschine ein. Der NLU verwendet die Aggregation
diese Wortgruppen zum Trainieren eines Sprachmodells, das Assistant verwendet, um Nutzer
Eingabe. Wenn während einer Unterhaltung eine Nutzereingabe mit der Sprache des Intents übereinstimmt
-Modell, sendet die Assistant-Laufzeit den Intent an deine Aktion, damit sie
und den Nutzenden antworten.
Mit Typen können Sie strukturierte Daten aus Nutzereingaben extrahieren. Von
Trainingsformulierungen mit Typen annotiert, kann die NLU relevante, strukturierte Daten
Daten für Sie, sodass Sie keine offenen Eingaben parsen müssen.
Scenes-Prozess-Intents und die wichtigsten Logikausführer für
deine Aktionen. Sie können Slot-Füllung ausführen, bedingte Logik auswerten,
an den Nutzer senden und sogar externe Webdienste aufrufen,
Geschäftslogik. In Kombination mit Intents bieten dir Szenen eine wirkungsvolle Möglichkeit,
bestimmte Nutzereingaben oder Systemereignisse zu erkennen und entsprechende
Logik.
Mit Prompts werden statische oder dynamische Antworten definiert, mit denen Sie
den Nutzenden antworten.
Mit Webhooks können Sie zusätzliche Arbeit an Webdienste delegieren.
(Auftragsausführung), z. B. das Validieren von Daten oder das Generieren von Prompts. Meine Aktionen
mit der Auftragsausführung über ein JSON-basiertes Webhook-Protokoll kommunizieren.
Mit der Funktion Interactive Canvas können Sie
mit Web-Apps, die HTML, CSS und JavaScript nutzen.
Projekt erstellen
Sie müssen ein Projekt in der Actions Console erstellen, bevor Sie für die Entwicklung
Google Assistant So erstellst du ein Projekt:
Geben Sie einen Namen für Ihr Projekt ein und klicken Sie auf Projekt erstellen.
Wählen Sie im Bildschirm Welche Art von Aktion möchten Sie erstellen? die Option
wählen Sie eine Kategorie aus, die am besten zu Ihrem Projekt passt, und klicken Sie auf Weiter.
Wählen Sie auf dem Bildschirm How do you want to build it (Wie möchten Sie es erstellen) eine Build-Methode aus.
und klicken Sie auf Jetzt erstellen. Sie können beispielsweise mit einer leeren
Projekt oder anhand einer Stichprobe.
<ph type="x-smartling-placeholder">
Projektinformationen definieren
Die Einstellungen und Ressourcen Ihres Projekts definieren Informationen über Ihr Projekt wie
Unterstützung von Features und Oberflächen, unterstützte Sprachen, Anzeigename, Beschreibung
Logos und mehr. In der folgenden Tabelle werden die wichtigsten Einstellungen und Ressourcen beschrieben.
die Sie bereitstellen. Actions on Google verwendet diese
Informationen zur Bereitstellung und Veröffentlichung Ihres Projekts im Assistant
Verzeichnis.
Name
Beschreibung
Verzeichnisdaten
Stellt Informationen bereit, damit Actions on Google Ihre
in das Assistant-Verzeichnis. Umfasst Metadaten und Beschreibungen
Projekt und Bildressourcen für Logos und Bannerbilder.
Geografische Ausrichtung
Konfiguriert die Sprachen, in denen deine Aktionen verfügbar sind.
Oberflächenfunktionen
Konfiguriert die Oberflächen, auf denen deine Aktionen verfügbar sind.
Informationen zum Unternehmen
Gibt Kontaktinformationen für Ihr Unternehmen an.
Markenverifizierung
Verknüpfe eine Website oder Android-App, die dir gehört, um zusätzliche Vorteile zu erhalten
wie reservierte Aufrufnamen und Websiteverknüpfungen in deinen Aktionen.
Release
Konfiguriert verschiedene Test- und Produktions-Releases für deine Aktion
für Tests und die Produktion.
Assistant-Links
Erlaube Nutzern, deine Aktionen über deine Web-Properties aufzurufen.
So definieren Sie Projektinformationen:
Rufen Sie die Actions Console auf und öffnen Sie
für Ihr Projekt.
Klicken Sie auf den Tab Bereitstellen, um Projektinformationen anzugeben.
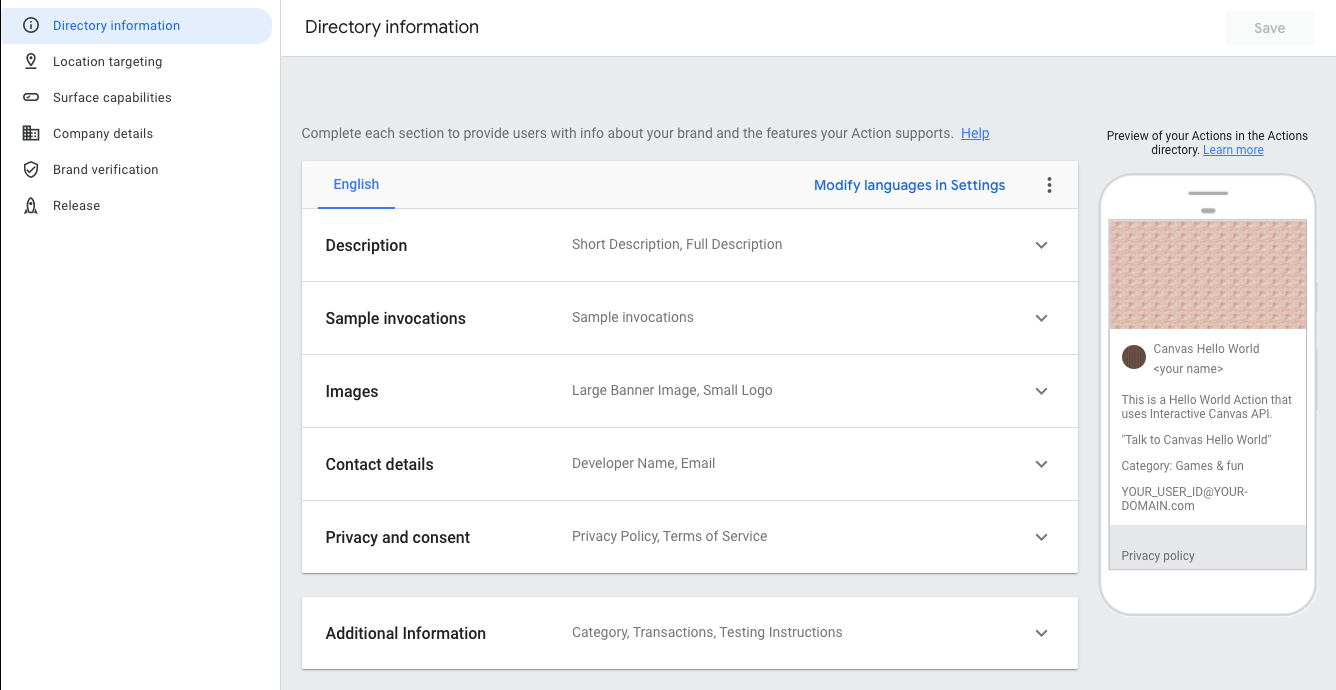
Abbildung 2. Projektinformationen im Feld „Bereitstellen“ angeben
der Konsole.
Projekte im Simulator testen
Die Actions Console bietet einen Simulator für die Vorschau Ihrer Aktionen. Die
können Sie Informationen zur Fehlerbehebung einsehen, Gerätefunktionen einstellen,
Sprache und mehr.
Abbildung 3. Die Hauptbereiche des Simulators: (1) Nutzereingabe,
(2) Geräteansicht, (3) Optionen und Einstellungen sowie (4) Unterhaltungsprotokoll.
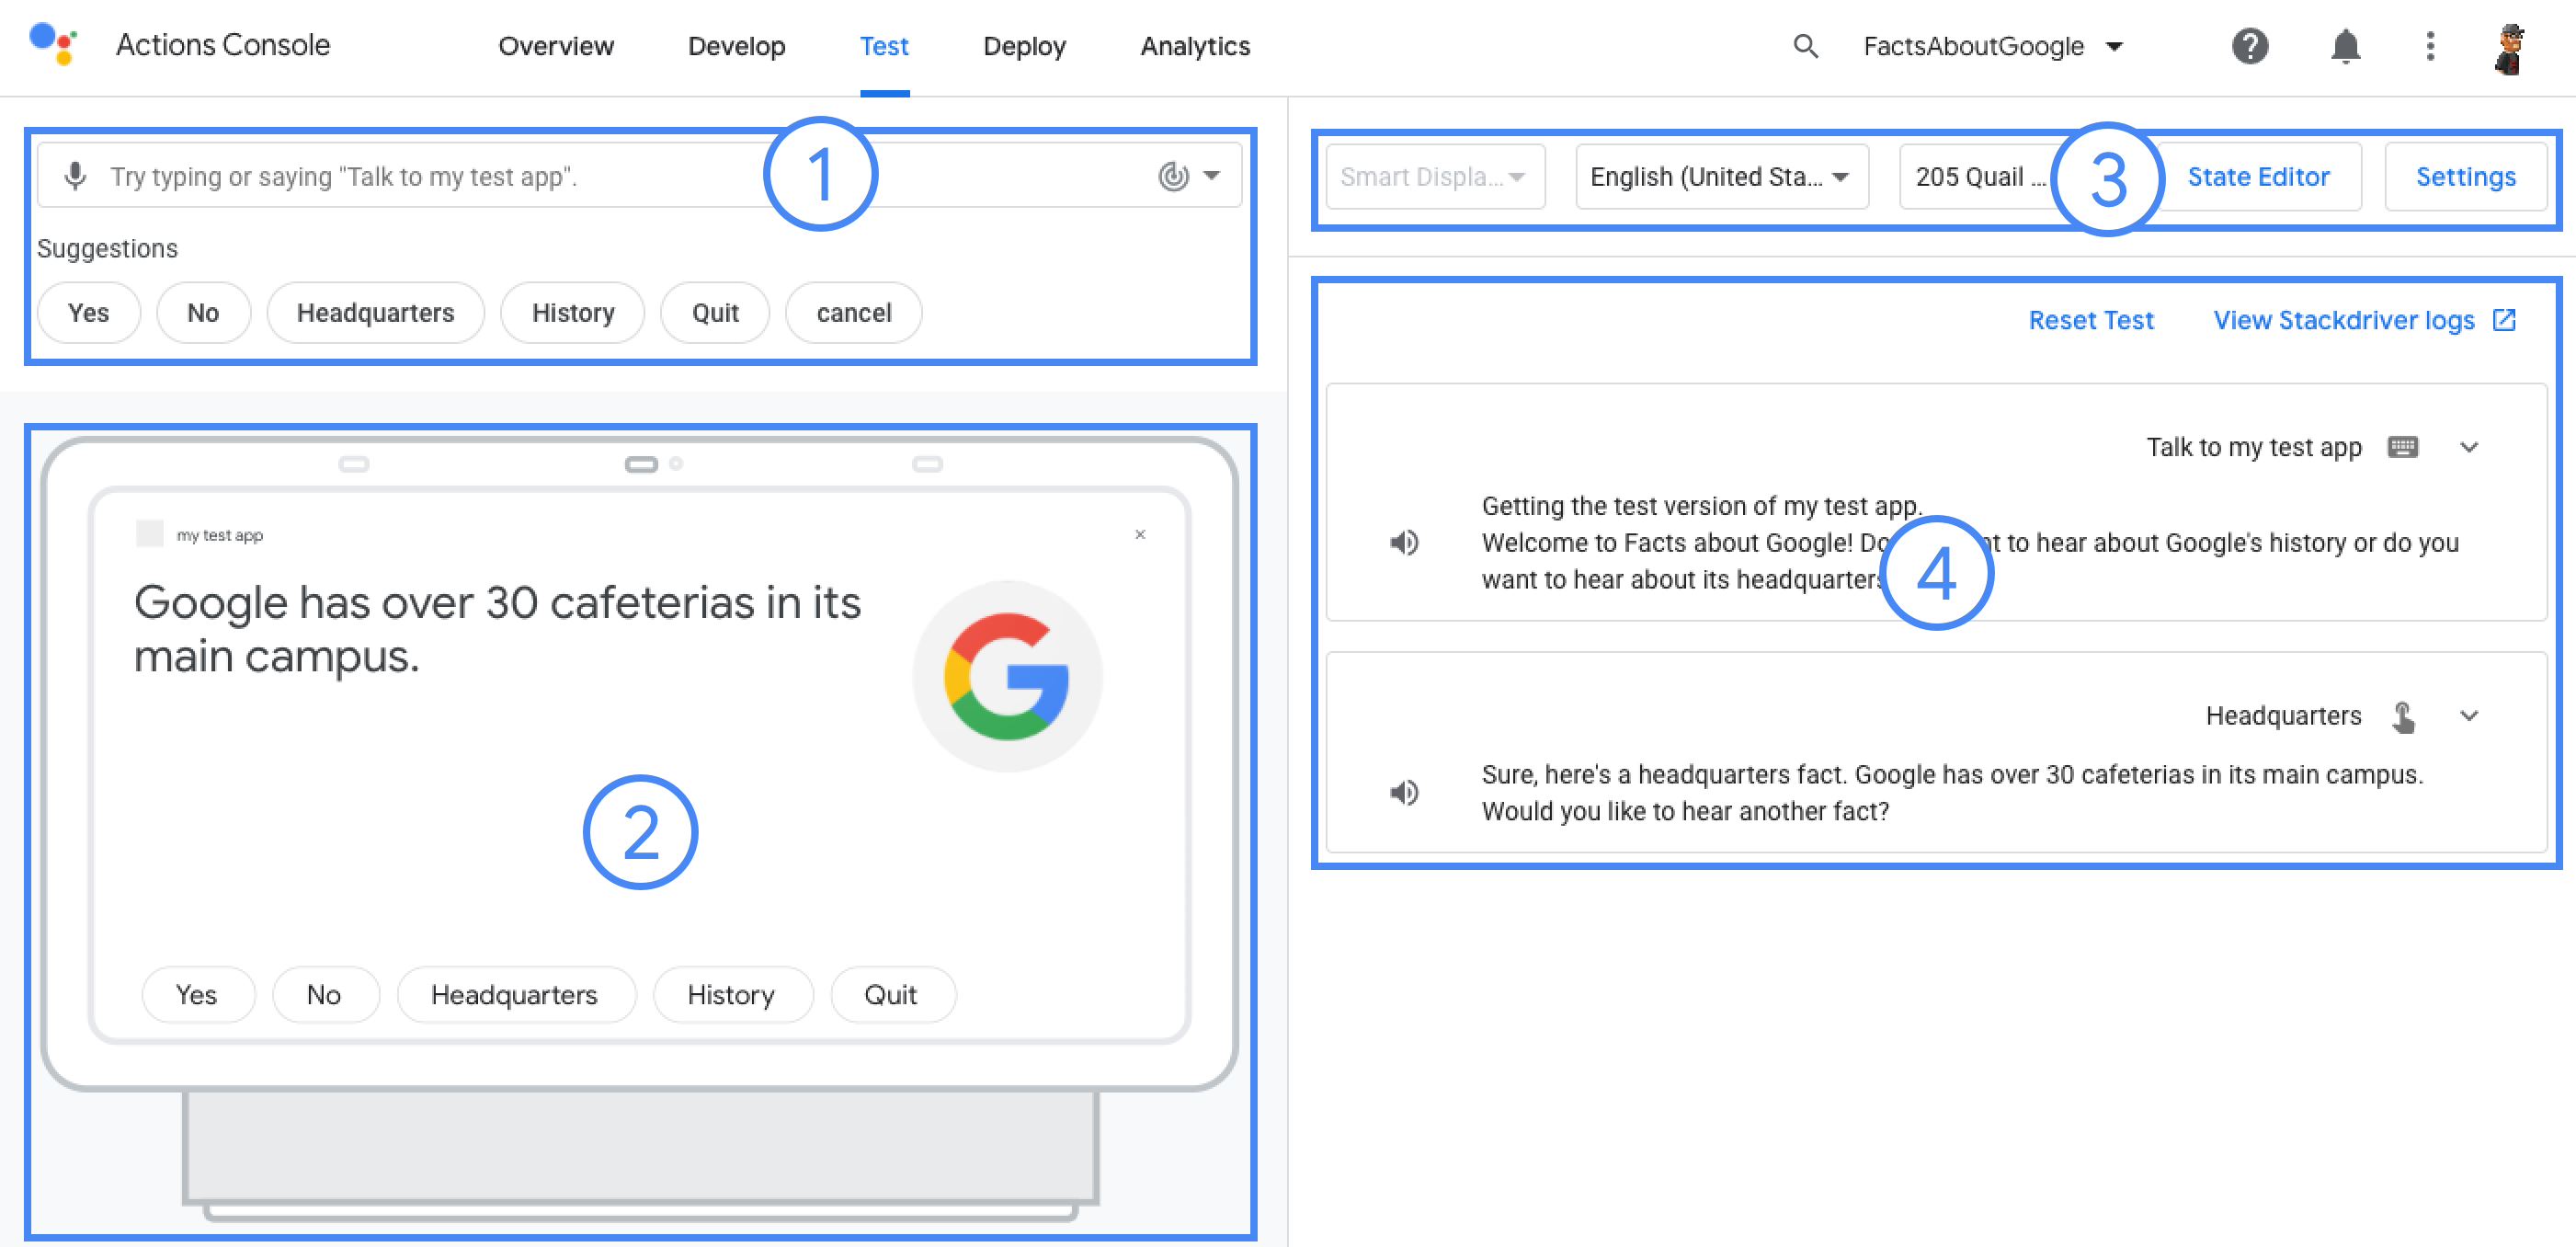
So testen Sie ein Projekt:
Rufen Sie die Actions Console auf und öffnen Sie Ihr Projekt.
Klicken Sie auf den Tab Test, um auf den Simulator zuzugreifen.
[null,null,["Zuletzt aktualisiert: 2025-07-26 (UTC)."],[[["\u003cp\u003eAn Actions project enables the creation of conversational experiences for Google Assistant by packaging all actions into a single container for publishing.\u003c/p\u003e\n"],["\u003cp\u003eBuilding an Actions project involves utilizing components such as intents, types, scenes, prompts, webhooks and more for defining user interactions and logic.\u003c/p\u003e\n"],["\u003cp\u003eDefining project information in the Actions console, including directory information, locales and surfaces, is crucial for publishing and deploying to the Assistant directory.\u003c/p\u003e\n"],["\u003cp\u003eThe Actions console simulator provides a comprehensive environment for testing projects with features such as debugging, device settings, and locale simulation.\u003c/p\u003e\n"]]],[],null,["# Build projects\n\nActions Builder Actions SDK \n\nAn Actions project packages all of your Actions into a single container. You\npublish this project to Actions on Google so Google Assistant knows how to discover\nand invoke your conversational experiences.\n**Figure 1**. Actions project structure\n\nYou use the following low-level components to build your Actions project:\n\n- [**Settings and resources**](#define_project_information) define project metadata\n and resources like project icons. Google uses this information to publish\n your Actions to the Assistant directory, so that users can discover and invoke\n them.\n\n- [**Intents**](../intents) represent a task to be carried out, such as some\n user input or a system event that needs processing. The most common type of\n intent you'll use are user intents. These intents let you declare training\n phrases that are naturally expanded by the NLU (natural language understanding)\n engine to include many more, similar phrases. The NLU uses the aggregation of\n these phrases to train a language model that the Assistant uses to match user\n input. During a conversation, if some user input matches the intent's language\n model, the Assistant runtime sends the intent to your Action, so that it can\n process it and respond to the user.\n\n- [**Types**](../types) let you extract structured data from user input. By\n annotating training phrases with types, the NLU can extract relevant, structured\n data for you, so you don't have to parse open-ended input.\n\n- [**Scenes**](../scenes) process intents and are the main logic executors for\n your Actions. They can do slot-filling, evaluate conditional logic, return\n prompts to the user, and even call on external web services to carry out\n business logic. In combination with intents, scenes give you a powerful way to\n detect specific user input or system events and to carry out corresponding\n logic.\n\n- [**Prompts**](../prompts) define static or dynamic responses that you use to\n respond back to users.\n\n- [**Webhooks**](../webhooks) let you delegate extra work to web services\n (fulfillment), such as validating data or generating prompts. Your Actions\n communicate with your fulfillment through a JSON-based, webhook protocol.\n\n- [**Interactive Canvas**](/assistant/interactivecanvas) lets you create rich\n and immersive experiences with web apps that utilize HTML, CSS, and JavaScript.\n\nCreate a project\n----------------\n\nYou must create a project in the Actions console before you can develop for\nGoogle Assistant. To create a project:\n\n1. Go to the [Actions console](//console.actions.google.com/).\n2. Click **New project**.\n3. Enter a name for your project and click **Create Project** .\n4. In the **What kind of Action do you want to build?** screen, select a category that best represents your project and click **Next**.\n5. In the **How do you want to build it** screen, select a way to build and click **Start building**. For example, you can start with an empty project or with a sample.\n\n| **Key Point:** If you are building for Interactive Canvas, follow these additional steps:\n|\n| 1. If you did not select the **Game** card on the **What type of Action\n| do you want to build?** screen, click **Deploy** in the top navigation. Under **Additional Information** , select the **Games \\& fun** category. Click **Save**.\n| 2. Click **Develop** in the top navigation of the Actions console.\n| 3. Click **Interactive Canvas** in the left navigation.\n| 4. Under **Does your Action use Interactive Canvas?** , select **Yes**.\n| 5. **Optional** : Enter your web app URL into the **Set your default web app URL** field. This action adds a default `Canvas` response with the URL field to your Main invocation.\n| 6. Click **Save**.\n\n\u003cbr /\u003e\n\nDefine project information\n--------------------------\n\n| **Note:** See the [Directory information](/assistant/console/directory-information) documentation for more details on how to manage project information.\n\nYour project's settings and resources define information about your project like\nfeature and surface support, supported locales, display name, description,\nlogos, and more. The following table describes the main settings and resources\nyou provide. Actions on Google uses this\ninformation to deploy and publish your project to the [Assistant\ndirectory](//assistant.google.com/explore).\n\n| Name | Description |\n|-----------------------|-------------------------------------------------------------------------------------------------------------------------------------------------------------------------------------------------------------|\n| Directory information | Provides information so that Actions on Google can publish your project to the Assistant directory. Includes metadata and desecriptions about your project and image resources for logos and banner images. |\n| Location targeting | Configures the locales that your Actions are available in. |\n| Surface capabilities | Configures the surfaces that your Actions are available on. |\n| Company details | Specifies contact information for your company. |\n| Brand verification | Connect a website or Android app that you own to gain extra benefits such as reserved invocation names and website linking within your Actions. |\n| Release | Configures different testing and production releases for your Action for testing and production. |\n| Assistant links | Let users invoke your Actions from your web properties. |\n\nTo define project information:\n\nTest projects in the simulator\n------------------------------\n\n| **Note:** See the [Actions simulator](/assistant/console/simulator) documentation for complete information about testing your projects.\n\nThe Actions console provides a simulator to preview your Actions in. The\nsimulator lets you see debug information, set device capabilities, simulate\nlocale, and more.\n**Figure 3.** The main areas of the simulator: (1) user input, (2) device view, (3) options and settings, and (4) conversation log.\n\nTo test a project:"]]