Mantieni tutto organizzato con le raccolte
Salva e classifica i contenuti in base alle tue preferenze.
Questa guida illustra come configurare l'ambiente per creare Azioni utilizzando
sia l'SDK Actions sia l'Action Builder. Dovrai svolgere le seguenti attività:
Installa Node.js: è necessario questo ambiente di runtime per utilizzare Node.js
nella libreria di distribuzione.
Installa l'interfaccia a riga di comando di Firebase: questo strumento a riga di comando consente di sviluppare e
eseguire il deployment delle dipendenze Firebase, ad esempio le app web per Interactive Canvas,
Firebase Hosting.
Installa lo strumento a riga di comando gactions: durante lo sviluppo con Actions
utilizzare questo strumento per creare, gestire e implementare il pacchetto Action
l'Azione.
Crea un progetto Actions: un progetto Actions è il container logico.
per le Azioni conversazionali. Devi crearne uno nella console Actions prima di
possono iniziare a creare.
Inizializza ed esegui il deployment di un esempio: questo semplice esempio mostra come ottenere
ha iniziato a creare Azioni con Interactive Canvas.
Una volta completata questa guida rapida, puoi sincronizzare il tuo progetto Actions tra
il tuo ambiente di sviluppo locale e l'esperienza web di Actions Builder.
Installare Node.js e l'interfaccia a riga di comando di Firebase
Scarica e installa Node.js in base al file Node.js
per utilizzare la nostra libreria di distribuzione. L'installazione di Node.js
ti consente di installare l'interfaccia a riga di comando di Firebase con npm e, in un secondo momento, per eseguire
il completamento delle conversazioni a livello locale.
Installa e configura l'interfaccia a riga di comando di Firebase in base alle
alla documentazione di Firebase. L'interfaccia a riga di comando di Firebase ti consente di eseguire il deployment
Canvas dell'app web in Firebase Hosting e, se necessario, esegui il deployment manuale
il deployment a Cloud Functions for Firebase.
Installa lo strumento a riga di comando gactions
Installa lo strumento di interfaccia a riga di comando (CLI) di gactions scaricando un
di installazione del pacchetto, decomprimerlo e configurare il percorso di esecuzione.
Per installare e configurare i gruppi, segui questi passaggi:
Scarica il pacchetto appropriato per il tuo sistema operativo:
Estrai il pacchetto in una posizione a tua scelta e aggiungi il file binario al tuo
la variabile PATH dell'ambiente. In alternativa, estrai il pacchetto
località già presente nella variabile PATH (ad es. /usr/local/bin).
Su Linux e Mac, abilita le autorizzazioni di esecuzione se necessario:
chmod +x PATH_TO/gactions
Esegui questo comando per autenticare l'interfaccia a riga di comando. Questo comando
avvia un flusso di autenticazione e richiede un browser web:
gactions login
Al termine del flusso, l'interfaccia a riga di comando esegue automaticamente l'autenticazione.
Creare e configurare un progetto
Prima di poter utilizzare lo strumento a riga di comando gactions, devi creare un progetto in
la console Azioni e concedere ai gazioni l'accesso al progetto. Per creare e impostare
per creare un progetto, segui questi passaggi:
Fai clic su Nuovo progetto, inserisci un nome per il progetto e fai clic su Crea progetto.
Seleziona una categoria e fai clic su Avanti.
Seleziona Progetto vuoto e fai clic su Inizia a creare.
Abilita l'API Actions nella console Google Cloud seguendo
le istruzioni in Attivare e disattivare
di terze parti.
In questo modo i gazioni possono interagire con il tuo progetto.
Ottieni l'esempio di Hello World
L'esempio interattivo Hello World mostra come creare un'azione semplice
progetto con una singola azione basata su Interactive Canvas.
Crea una directory vuota e inizializza l'esempio di Canvas interattivo in
quella directory. Ad esempio, il seguente codice inizializza l'esempio in una
Directory interactive-canvas-sample/, utilizzata come esempio
in questo documento:
Apri il file interactive-canvas-sample/sdk/settings/settings.yaml e
cambia il valore del campo projectId nell'ID del tuo progetto.
Esegui il deployment dell'esempio e testalo
Dopo aver configurato l'esempio, puoi eseguire il deployment dell'app web Interactive Canvas e
il tuo progetto Actions. Questo processo crea una versione bozza delle azioni
di cui puoi eseguire il deployment nel simulatore di Actions per l'anteprima e il test:
Dalla directory interactive-canvas-sample/, esegui questo comando
per eseguire il deployment dell'app web Interactive Canvas (i contenuti dei tag public/
).
Puoi vedere una versione sottoposta a rendering dell'app web all'URL restituito dal
Interfaccia a riga di comando di Firebase in un browser:
https://PROJECT_ID.web.app.
Apri il file interactive-canvas-sample/sdk/webhooks/ActionsOnGoogleFulfillment/index.js e
Sostituisci il valore della variabile CANVAS_URL con l'URL dell'app web del tuo progetto.
const CANVAS_URL = 'https://PROJECT_ID.web.app';
Dalla directory interactive-canvas-sample/sdk/, esegui questo comando
per eseguire il push della versione locale del tuo progetto Actions alla console come
versione bozza:
gactions push
Dalla directory interactive-canvas-sample/sdk/, esegui questo comando
per testare il tuo progetto Actions nel simulatore:
gactions deploy preview
Apri il link restituito dallo strumento a riga di comando per accedere al simulatore.
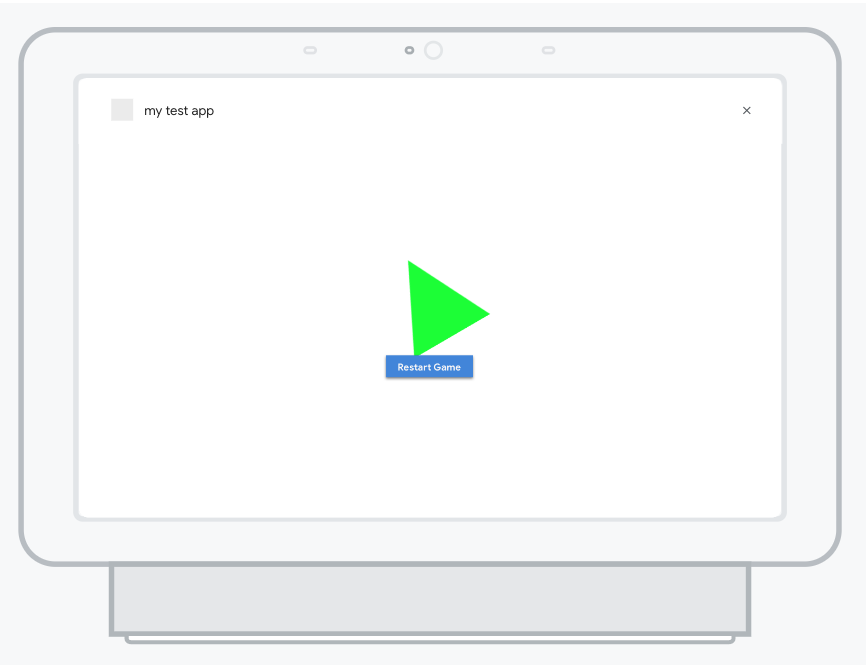
Nel simulatore, inserisci "Parla con l'esempio della tela interattiva" per avviare l'azione. Tu
dovrebbe essere visualizzato un triangolo rotante basato sull'applicazione web di cui è stato eseguito il deployment
https://PROJECT_ID.web.app
Figura 1. Il simulatore che visualizza l'anteprima del progetto Actions.
[null,null,["Ultimo aggiornamento 2025-07-26 UTC."],[[["\u003cp\u003eThis guide helps you set up your environment for building Google Actions using the Actions SDK and Actions Builder.\u003c/p\u003e\n"],["\u003cp\u003eYou'll install necessary tools like Node.js, Firebase CLI, and the \u003ccode\u003egactions\u003c/code\u003e command-line tool.\u003c/p\u003e\n"],["\u003cp\u003eThe guide includes steps to create an Actions project, initialize a sample, and deploy it for testing in the Actions simulator.\u003c/p\u003e\n"],["\u003cp\u003eYou'll learn to deploy the Interactive Canvas web app to Firebase Hosting and push your local Actions project to the console.\u003c/p\u003e\n"],["\u003cp\u003eAfter completing the setup, you can preview and test your Action in the Actions simulator by invoking it with a specific phrase.\u003c/p\u003e\n"]]],["To set up for building Actions, install Node.js and the Firebase CLI for fulfillment and web app deployment. Install the `gactions` CLI by downloading and configuring the appropriate package, then authenticate using `gactions login`. In the Actions console, create a new project, enable the Actions API, and use `gactions init` to set up the Interactive Canvas sample. Deploy the web app with `firebase deploy`, update the `CANVAS_URL` and push the Action using `gactions push`. Finally, preview and test the action in the simulator using `gactions deploy preview`.\n"],null,["# Actions SDK and Builder quick start guide\n\nThis guide walks you through setting up your environment to build Actions using\nboth the Actions SDK and Actions Builder. You'll carry out the following tasks:\n\n- **Install Node.js:** You need this runtime environment to use our Node.js fulfillment library.\n- **Install the Firebase CLI:** This command-line tool lets you develop and deploy Firebase dependencies, such as web apps for [Interactive Canvas](/assistant/interactivecanvas), to Firebase Hosting.\n- **Install the gactions command-line tool:** When developing with the Actions SDK, you use this tool to create, manage, and deploy the Action package for your Action.\n- **Create an Actions project:** An [Actions project](/assistant/conversational/build/projects) is the logical container for your Conversational Actions. You have to create one in the Actions console before you can start building.\n- **Initialize and deploy a sample:** This simple sample shows you how to get started building Actions powered by Interactive Canvas.\n\nOnce you complete this quick start, you can sync your Actions project between\nyour local development environment and the web experience of Actions Builder.\n\nInstall Node.js and the Firebase CLI\n------------------------------------\n\nDownload and install [Node.js](https://nodejs.org/) according to the Node.js\ndocumentation to use our fulfillment library. Your installation of Node.js also\nallows you to install the Firebase CLI with [npm](https://www.npmjs.com/), and later, to run your\nconversational fulfillment implementation locally.\n\nInstall and set up the [Firebase CLI](https://firebase.google.com/docs/cli#setup_update_cli) according\nto the Firebase documentation. The Firebase CLI lets you deploy an Interactive\nCanvas web app to Firebase Hosting and, if necessary, manually deploy\nfulfillment to Cloud Functions for Firebase.\n\nInstall the gactions command-line tool\n--------------------------------------\n\nInstall the gactions command line interface (CLI) tool by downloading an\ninstallation package, unpacking it, and configuring your execution path.\n\nTo install and configure gactions, follow these steps:\n\n1. Download the appropriate package for your operating system:\n\n | Platform | Package | Checksum |\n |----------|----------------------------------------------------------------------------------|---------------------------------------------------------------------------------------|\n | Windows | [Download](https://dl.google.com/gactions/v3/release/gactions-sdk_windows.zip) | [SHA256](https://dl.google.com/gactions/v3/release/gactions-sdk_windows.zip.sha256) |\n | Linux | [Download](https://dl.google.com/gactions/v3/release/gactions-sdk_linux.tar.gz) | [SHA256](https://dl.google.com/gactions/v3/release/gactions-sdk_linux.tar.gz.sha256) |\n | Mac OS | [Download](https://dl.google.com/gactions/v3/release/gactions-sdk_darwin.tar.gz) | [SHA256](https://dl.google.com/gactions/v3/release/gactions-sdk_darwin.tar.gz.sha256) |\n\n2. Extract the package to a location of your choice and add the binary to your\n environment's `PATH` variable. Alternatively, extract the package to a\n location that's already in your `PATH` variable (for example, `/usr/local/bin`).\n\n3. On Linux and Mac, enable execute permissions if necessary:\n\n ```scdoc\n chmod +x PATH_TO/gactions\n ```\n4. Run the following command to authenticate the CLI. This command\n starts an authentication flow and requires a web browser:\n\n ```text\n gactions login\n ```\n\n When the flow is complete, the CLI automatically authenticates.\n\nCreate and set up a project\n---------------------------\n\n| **Note:** Actions project creation is not supported in the gactions CLI.\n\nBefore you can use the gactions command-line tool, you must create a project in\nthe Actions console and give gactions access to the project. To create and set\nup a project, do the following:\n\n1. Go to the [Actions console](https://console.actions.google.com).\n2. Click **New project** , enter a project name, and click **Create project**.\n3. Select a category and click **Next**.\n4. Select **Blank project** and click **Start building**.\n5. Enable the **Actions API** in the Google Cloud console by following the instructions in [Enable and disable\n APIs](https://support.google.com/googleapi/answer/6158841). This allows gactions to interact with your project.\n\nGet the hello world sample\n--------------------------\n\nThe hello world interactive sample shows you how to build a simple Actions\nproject with a single Action powered by Interactive Canvas.\n\n1. Create an empty directory and initialize the Interactive Canvas sample in\n that directory. For example, the following code initializes the sample in an\n `interactive-canvas-sample/` directory, which is used as an example\n throughout this document:\n\n gactions init interactive-canvas --dest interactive-canvas-sample\n cd interactive-canvas-sample\n\n2. Open the `interactive-canvas-sample/sdk/settings/settings.yaml` file and\n change the value of the `projectId` field to your project's ID.\n\n | **Note:** To get your project's ID, first open your project in the Actions console and click the more *more_vert* icon. Then, select **Project settings** and copy the string in the **Project ID** field.\n\nDeploy and test the sample\n--------------------------\n\nAfter you set up the sample, you can deploy the Interactive Canvas web app and\nyour Actions project. This process creates a draft version of your Actions\nproject that you can deploy to the Actions simulator for previewing and testing:\n\n1. From the `interactive-canvas-sample/` directory, run the following command\n to deploy the Interactive Canvas web app (the contents of the `public/`\n directory).\n\n firebase deploy --project \u003cvar translate=\"no\"\u003ePROJECT_ID\u003c/var\u003e --only hosting\n\n You can see a rendered version of the web app at the URL returned by the\n Firebase CLI in a browser:\n `https://`\u003cvar translate=\"no\"\u003ePROJECT_ID\u003c/var\u003e`.web.app`.\n2. Open the `interactive-canvas-sample/sdk/webhooks/ActionsOnGoogleFulfillment/index.js` file and\n change the value of the `CANVAS_URL` variable to your project's web app URL.\n\n const CANVAS_URL = 'https://\u003cvar translate=\"no\"\u003ePROJECT_ID\u003c/var\u003e.web.app';\n\n3. From the `interactive-canvas-sample/sdk/` directory, run the following\n command to push the local version of your Actions project to the console as a\n draft version:\n\n gactions push\n\n | **Note:** You'll see some warnings related to not having some project settings and resources defined. You can safely ignore them or now.\n4. From the `interactive-canvas-sample/sdk/` directory, run the following\n command to test your Actions project in the simulator:\n\n gactions deploy preview\n\n | **Note:** If you are using a new project, you need to enable the [Cloud Functions\n | API](https://console.cloud.google.com/apis/library/cloudfunctions.googleapis.com) and associate a billing account with your project in Google Cloud. You can enable the Cloud Functions API by visiting the [Cloud Console](https://console.cloud.google.com/billing).\n5. Open the link that the command-line tool returns to go to the simulator.\n\n6. In the simulator, enter *\"Talk to Interactive canvas sample\"* to start the Action. You\n should see a spinning triangle powered by the web app deployed at\n `https://`\u003cvar translate=\"no\"\u003ePROJECT_ID\u003c/var\u003e`.web.app`\n\n **Figure 1**. The simulator previewing the Actions project"]]