Actions SDK'sı ve Oluşturucu hızlı başlangıç kılavuzu
Koleksiyonlar ile düzeninizi koruyun
İçeriği tercihlerinize göre kaydedin ve kategorilere ayırın.
Bu kılavuzda,
hem Actions SDK'sı hem de İşlem Oluşturucu. Aşağıdaki görevleri gerçekleştireceksiniz:
Node.js'yi yükleme: Node.js'mizi kullanmak için bu çalışma zamanı ortamına ihtiyacınız vardır
sipariş karşılama kitaplığını kullanır.
Firebase CLI'ı yükleme: Bu komut satırı aracı,
Etkileşimli Tuval için web uygulamaları gibi Firebase bağımlılıklarını
Firebase Barındırma.
Gactions komut satırı aracını yükleme: Actions ile geliştirme yaparken
SDK'nız varsa bu aracı kullanarak Action paketi oluşturabilir, yönetebilir ve dağıtabilirsiniz
İşleminiz.
Actions projesi oluşturma:Actions projesi, mantıksal kapsayıcıdır
Conversational Actions'ta nasıl kullanılır? İşlemi yapmadan önce Actions konsolunda bir hesap oluşturmanız gerekir
oluşturmaya başlayabilir.
Bir örneği başlatma ve dağıtma: Bu basit örnek,
Etkileşimli Tuval tarafından desteklenen İşlemler oluşturmaya başladı.
Bu hızlı başlangıcı tamamladıktan sonra, Actions projenizi
yerel geliştirme ortamınıza ve Actions Builder'ın web deneyimine göz atın.
Node.js'yi ve Firebase CLI'ı yükleme
Node.js'ye göre Node.js'yi indirip yükleyin
kullanmaları gerektiğini anlıyoruz. Node.js yüklemeniz de
npm ile Firebase CLI'ı yüklemenize ve sonrasında
yerel olarak konuşmayı karşılama uygulaması.
Firebase CLI'yı
daha fazla bilgi edineceksiniz. Firebase CLI ile etkileşimli bir
Canvas web uygulamasını Firebase Hosting'e ve gerekirse manuel olarak dağıtma
Cloud Functions for Firebase'e istek karşılama.
gactions komut satırı aracını yükleme
gactions komut satırı arayüzü (KSA) aracını indirmek için
paketi açma ve yürütme yolunuzu yapılandırma.
Gaction'ları yüklemek ve yapılandırmak için aşağıdaki adımları uygulayın:
Paketi istediğiniz konuma çıkarın ve ikili dosyayı
ortamın PATH değişkeni Alternatif olarak, paketi bir
PATH değişkeninizde zaten bulunan konum (örneğin, /usr/local/bin).
Linux ve Mac'te, gerekiyorsa yürütme izinlerini etkinleştirin:
chmod +x PATH_TO/gactions
CLI'nin kimliğini doğrulamak için aşağıdaki komutu çalıştırın. Bu komut
başlatan kimlik doğrulama akışı için web tarayıcısı gerekir:
gactions login
Akış tamamlandığında CLI otomatik olarak kimliğini doğrular.
Proje oluşturma ve ayarlama
gactions komut satırı aracını kullanmadan önce
Actions konsolunu kullanarak ve önemli kişilere projeye erişim izni vererek. Oluşturmak ve ayarlamak
aşağıdakileri yapın:
Yeni proje'yi tıklayın, bir proje adı girin ve Proje oluştur'u tıklayın.
Bir kategori seçip İleri'yi tıklayın.
Boş proje'yi seçin ve Derlemeye başla'yı tıklayın.
Aşağıdaki adımları uygulayarak Google Cloud Console'da Actions API'yi etkinleştirin
Etkinleştirme ve devre dışı bırakma
API'ler.
Bu, grupların projenizle etkileşim kurmasına olanak tanır.
Hello World örneğini indirme
hello World etkileşimli örneği, basit bir Eylemin nasıl oluşturulacağını gösterir
tek bir Action'a sahip olması gerekir.
Boş bir dizin oluşturun ve Etkileşimli Tuval örneğini şurada başlatın:
o dizine eklenir. Örneğin, aşağıdaki kod örneği şurada başlatır:
Örnek olarak kullanılan interactive-canvas-sample/ dizini
genel hatlarıyla inceleyeceğiz:
interactive-canvas-sample/sdk/settings/settings.yaml dosyasını açın ve
projectId alanının değerini projenizin kimliğiyle değiştirin.
Örneği dağıtma ve test etme
Örneği ayarladıktan sonra, Etkileşimli Tuval web uygulamasını dağıtabilir ve
eyleme dökülebilir. Bu işlem, İşlemlerinizin taslak sürümünü oluşturur
Eylem simülatörüne dağıtarak önizleme ve test etme işlemlerini yapabilirsiniz:
interactive-canvas-sample/ dizininden aşağıdaki komutu çalıştırın
(public/
dizin).
Web uygulamasının oluşturulmuş bir sürümünü,
Tarayıcıdaki Firebase CLI:
https://PROJECT_ID.web.app
interactive-canvas-sample/sdk/webhooks/ActionsOnGoogleFulfillment/index.js dosyasını açın ve
CANVAS_URL değişkeninin değerini projenizin web uygulaması URL'si ile değiştirin.
const CANVAS_URL = 'https://PROJECT_ID.web.app';
interactive-canvas-sample/sdk/ dizininden aşağıdaki komutu çalıştırın
komutuna dahil etmek için, İşlemler projenizin yerel sürümünü bir
taslak sürüm:
gactions push
interactive-canvas-sample/sdk/ dizininden aşağıdaki komutu çalıştırın
komutuna ekleyerek simülatörde Actions projenizi test edebilirsiniz:
gactions deploy preview
Komut satırı aracının simülatöre gitmek için döndürdüğü bağlantıyı açın.
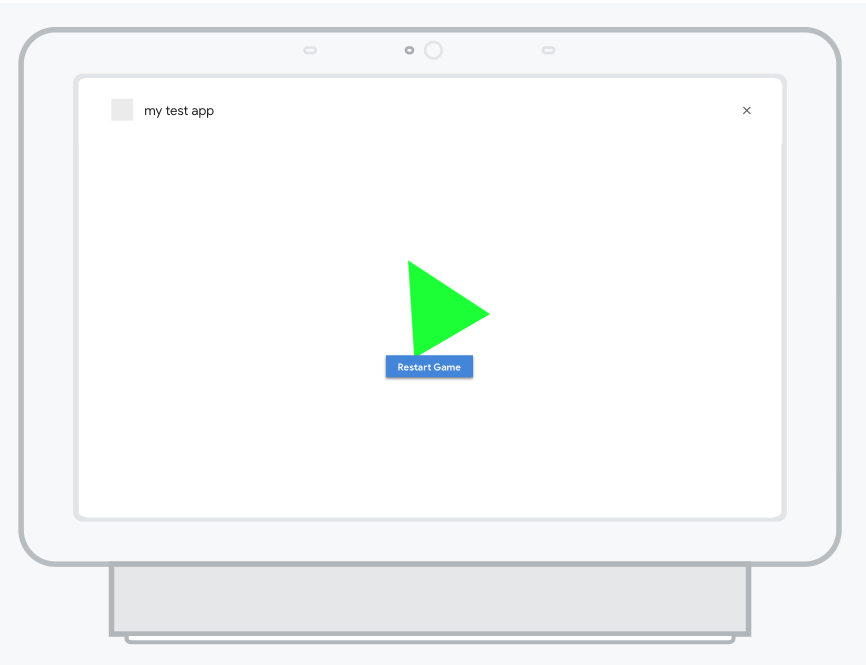
İşlemi başlatmak için simülasyon aracında "Etkileşimli tuval örneğiyle konuş" ifadesini girin. Siz
şurada dağıtılan web uygulaması tarafından desteklenen dönen bir üçgen göreceksiniz:
https://PROJECT_ID.web.app.
[null,null,["Son güncelleme tarihi: 2025-07-26 UTC."],[[["\u003cp\u003eThis guide helps you set up your environment for building Google Actions using the Actions SDK and Actions Builder.\u003c/p\u003e\n"],["\u003cp\u003eYou'll install necessary tools like Node.js, Firebase CLI, and the \u003ccode\u003egactions\u003c/code\u003e command-line tool.\u003c/p\u003e\n"],["\u003cp\u003eThe guide includes steps to create an Actions project, initialize a sample, and deploy it for testing in the Actions simulator.\u003c/p\u003e\n"],["\u003cp\u003eYou'll learn to deploy the Interactive Canvas web app to Firebase Hosting and push your local Actions project to the console.\u003c/p\u003e\n"],["\u003cp\u003eAfter completing the setup, you can preview and test your Action in the Actions simulator by invoking it with a specific phrase.\u003c/p\u003e\n"]]],["To set up for building Actions, install Node.js and the Firebase CLI for fulfillment and web app deployment. Install the `gactions` CLI by downloading and configuring the appropriate package, then authenticate using `gactions login`. In the Actions console, create a new project, enable the Actions API, and use `gactions init` to set up the Interactive Canvas sample. Deploy the web app with `firebase deploy`, update the `CANVAS_URL` and push the Action using `gactions push`. Finally, preview and test the action in the simulator using `gactions deploy preview`.\n"],null,["# Actions SDK and Builder quick start guide\n\nThis guide walks you through setting up your environment to build Actions using\nboth the Actions SDK and Actions Builder. You'll carry out the following tasks:\n\n- **Install Node.js:** You need this runtime environment to use our Node.js fulfillment library.\n- **Install the Firebase CLI:** This command-line tool lets you develop and deploy Firebase dependencies, such as web apps for [Interactive Canvas](/assistant/interactivecanvas), to Firebase Hosting.\n- **Install the gactions command-line tool:** When developing with the Actions SDK, you use this tool to create, manage, and deploy the Action package for your Action.\n- **Create an Actions project:** An [Actions project](/assistant/conversational/build/projects) is the logical container for your Conversational Actions. You have to create one in the Actions console before you can start building.\n- **Initialize and deploy a sample:** This simple sample shows you how to get started building Actions powered by Interactive Canvas.\n\nOnce you complete this quick start, you can sync your Actions project between\nyour local development environment and the web experience of Actions Builder.\n\nInstall Node.js and the Firebase CLI\n------------------------------------\n\nDownload and install [Node.js](https://nodejs.org/) according to the Node.js\ndocumentation to use our fulfillment library. Your installation of Node.js also\nallows you to install the Firebase CLI with [npm](https://www.npmjs.com/), and later, to run your\nconversational fulfillment implementation locally.\n\nInstall and set up the [Firebase CLI](https://firebase.google.com/docs/cli#setup_update_cli) according\nto the Firebase documentation. The Firebase CLI lets you deploy an Interactive\nCanvas web app to Firebase Hosting and, if necessary, manually deploy\nfulfillment to Cloud Functions for Firebase.\n\nInstall the gactions command-line tool\n--------------------------------------\n\nInstall the gactions command line interface (CLI) tool by downloading an\ninstallation package, unpacking it, and configuring your execution path.\n\nTo install and configure gactions, follow these steps:\n\n1. Download the appropriate package for your operating system:\n\n | Platform | Package | Checksum |\n |----------|----------------------------------------------------------------------------------|---------------------------------------------------------------------------------------|\n | Windows | [Download](https://dl.google.com/gactions/v3/release/gactions-sdk_windows.zip) | [SHA256](https://dl.google.com/gactions/v3/release/gactions-sdk_windows.zip.sha256) |\n | Linux | [Download](https://dl.google.com/gactions/v3/release/gactions-sdk_linux.tar.gz) | [SHA256](https://dl.google.com/gactions/v3/release/gactions-sdk_linux.tar.gz.sha256) |\n | Mac OS | [Download](https://dl.google.com/gactions/v3/release/gactions-sdk_darwin.tar.gz) | [SHA256](https://dl.google.com/gactions/v3/release/gactions-sdk_darwin.tar.gz.sha256) |\n\n2. Extract the package to a location of your choice and add the binary to your\n environment's `PATH` variable. Alternatively, extract the package to a\n location that's already in your `PATH` variable (for example, `/usr/local/bin`).\n\n3. On Linux and Mac, enable execute permissions if necessary:\n\n ```scdoc\n chmod +x PATH_TO/gactions\n ```\n4. Run the following command to authenticate the CLI. This command\n starts an authentication flow and requires a web browser:\n\n ```text\n gactions login\n ```\n\n When the flow is complete, the CLI automatically authenticates.\n\nCreate and set up a project\n---------------------------\n\n| **Note:** Actions project creation is not supported in the gactions CLI.\n\nBefore you can use the gactions command-line tool, you must create a project in\nthe Actions console and give gactions access to the project. To create and set\nup a project, do the following:\n\n1. Go to the [Actions console](https://console.actions.google.com).\n2. Click **New project** , enter a project name, and click **Create project**.\n3. Select a category and click **Next**.\n4. Select **Blank project** and click **Start building**.\n5. Enable the **Actions API** in the Google Cloud console by following the instructions in [Enable and disable\n APIs](https://support.google.com/googleapi/answer/6158841). This allows gactions to interact with your project.\n\nGet the hello world sample\n--------------------------\n\nThe hello world interactive sample shows you how to build a simple Actions\nproject with a single Action powered by Interactive Canvas.\n\n1. Create an empty directory and initialize the Interactive Canvas sample in\n that directory. For example, the following code initializes the sample in an\n `interactive-canvas-sample/` directory, which is used as an example\n throughout this document:\n\n gactions init interactive-canvas --dest interactive-canvas-sample\n cd interactive-canvas-sample\n\n2. Open the `interactive-canvas-sample/sdk/settings/settings.yaml` file and\n change the value of the `projectId` field to your project's ID.\n\n | **Note:** To get your project's ID, first open your project in the Actions console and click the more *more_vert* icon. Then, select **Project settings** and copy the string in the **Project ID** field.\n\nDeploy and test the sample\n--------------------------\n\nAfter you set up the sample, you can deploy the Interactive Canvas web app and\nyour Actions project. This process creates a draft version of your Actions\nproject that you can deploy to the Actions simulator for previewing and testing:\n\n1. From the `interactive-canvas-sample/` directory, run the following command\n to deploy the Interactive Canvas web app (the contents of the `public/`\n directory).\n\n firebase deploy --project \u003cvar translate=\"no\"\u003ePROJECT_ID\u003c/var\u003e --only hosting\n\n You can see a rendered version of the web app at the URL returned by the\n Firebase CLI in a browser:\n `https://`\u003cvar translate=\"no\"\u003ePROJECT_ID\u003c/var\u003e`.web.app`.\n2. Open the `interactive-canvas-sample/sdk/webhooks/ActionsOnGoogleFulfillment/index.js` file and\n change the value of the `CANVAS_URL` variable to your project's web app URL.\n\n const CANVAS_URL = 'https://\u003cvar translate=\"no\"\u003ePROJECT_ID\u003c/var\u003e.web.app';\n\n3. From the `interactive-canvas-sample/sdk/` directory, run the following\n command to push the local version of your Actions project to the console as a\n draft version:\n\n gactions push\n\n | **Note:** You'll see some warnings related to not having some project settings and resources defined. You can safely ignore them or now.\n4. From the `interactive-canvas-sample/sdk/` directory, run the following\n command to test your Actions project in the simulator:\n\n gactions deploy preview\n\n | **Note:** If you are using a new project, you need to enable the [Cloud Functions\n | API](https://console.cloud.google.com/apis/library/cloudfunctions.googleapis.com) and associate a billing account with your project in Google Cloud. You can enable the Cloud Functions API by visiting the [Cloud Console](https://console.cloud.google.com/billing).\n5. Open the link that the command-line tool returns to go to the simulator.\n\n6. In the simulator, enter *\"Talk to Interactive canvas sample\"* to start the Action. You\n should see a spinning triangle powered by the web app deployed at\n `https://`\u003cvar translate=\"no\"\u003ePROJECT_ID\u003c/var\u003e`.web.app`\n\n **Figure 1**. The simulator previewing the Actions project"]]