Mantieni tutto organizzato con le raccolte
Salva e classifica i contenuti in base alle tue preferenze.
Dopo aver creato il fulfillment webhook, eseguine il deployment in produzione e connetti
all'Azione. I passaggi seguenti mostrano come configurare il tuo ambiente
per il deployment in Cloud Functions for Firebase per l'hosting in produzione. Tuttavia,
puoi scegliere qualsiasi piattaforma di hosting web che supporti le richieste HTTPS
per ospitare il fulfillment.
Se hai già eseguito il deployment del webhook su una piattaforma di hosting web, puoi
passa a Collega il webhook all'azione. Tieni presente che l'ultimo
I passaggi della procedura seguente variano a seconda che utilizzi Dialogflow o
SDK Actions.
Esegui il deployment in Cloud Functions for Firebase
Configura e inizializza l'interfaccia a riga di comando di Firebase. Se il comando seguente ha esito negativo con
un errore EACCES, potresti dover
modificare le autorizzazioni npm.
npminstall-gfirebase-tools
Autentica lo strumento Firebase con il tuo Account Google:
firebase login
Vai alla directory del progetto di azione e inizializza Firebase. Sarai
ti viene chiesto di selezionare le funzionalità dell'interfaccia a riga di comando di Firebase da configurare per
Progetto Actions. Scegli Functions e altre funzionalità che ti potrebbero interessare.
come Firestore, quindi premi Invio per confermare e continuare:
cd <cloud_function_dir>
firebase init
Associa lo strumento Firebase al progetto Actions selezionandolo utilizzando
i tasti freccia per spostarti nell'elenco dei progetti:
Dopo aver scelto il progetto, lo strumento Firebase avvia la configurazione di Functions
che ti chiede quale lingua vuoi usare. Seleziona utilizzando i tasti freccia e
premi Invio per continuare.
=== Functions Setup A functions directory will be created in your project with a Node.js
package pre-configured. Functions can be deployed with firebase deploy.
? What language would you like to use to write Cloud Functions? (Use arrow keys)
> JavaScript
TypeScript
Scegli se utilizzare ESLint per rilevare probabili bug e applicare lo stile
digitando Y o N:
? Do you want to use ESLint to catch probable bugs and enforce style? (Y/n)
Per ottenere le dipendenze del progetto, digita Y nel prompt:
? Do you want to install dependencies with npm now? (Y/n)
Una volta completata la configurazione, verrà visualizzato un output simile al seguente:
✔ Firebase initialization complete!
Installa la dipendenza actions-on-google:
cd <cloud_function_dir>/functions
npm install actions-on-google
Recupera le dipendenze di fulfillment ed esegui il deployment della funzione di fulfillment:
npm install
firebase deploy --only functions
Il deployment richiede alcuni minuti. Al termine, vedrai l'output
in modo simile al seguente. Avrai bisogno dell'URL della funzione per accedere
Dialogflow.
✔ Deploy complete! Project Console: https://console.firebase.google.com/project/exampleproject-123/overview
Function URL (cloudFunctionName): https://us-central1-exampleproject-123.cloudfunctions.net/cloudFunctionName
Collega il webhook all'azione
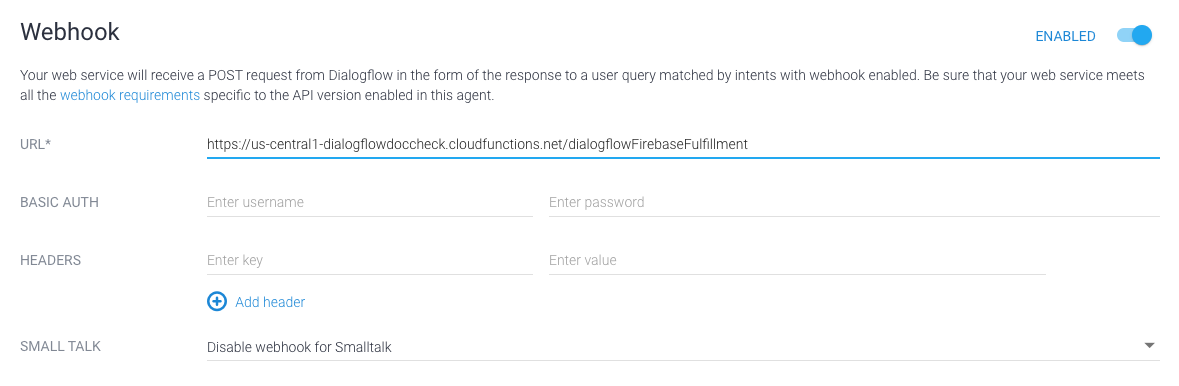
Se utilizzi Dialogflow: nella sezione
Console Dialogflow, vai a
Fulfillment, imposta il pulsante Webhook su ATTIVATO e sostituiscilo
l'URL nel campo URL con l'URL della funzione.
Se utilizzi l'SDK Actions: crea un oggetto
all'interno dell'oggetto conversations per dichiarare il completamento nell'Azione
pacchetto:
[null,null,["Ultimo aggiornamento 2025-07-26 UTC."],[[["\u003cp\u003eThis guide explains how to deploy your Action's webhook fulfillment to a production environment, primarily focusing on Cloud Functions for Firebase.\u003c/p\u003e\n"],["\u003cp\u003eYou need Node.js and the Firebase CLI installed and authenticated to deploy your fulfillment function to Firebase.\u003c/p\u003e\n"],["\u003cp\u003eThe deployment process involves initializing Firebase within your Action project, selecting the desired language and configuration options, installing necessary dependencies, and finally deploying the function.\u003c/p\u003e\n"],["\u003cp\u003eAfter successful deployment, you'll receive a Function URL which needs to be connected to your Action in Dialogflow or declared in your Action package for Actions SDK.\u003c/p\u003e\n"],["\u003cp\u003eFor quicker development iterations, consider using tools like ngrok to expose your local fulfillment to the internet, but exercise caution as this can introduce security vulnerabilities.\u003c/p\u003e\n"]]],["To deploy a webhook to production, set up a hosting environment like Cloud Functions for Firebase. First, install Node.js and the Firebase CLI, then authenticate and initialize Firebase in your project directory. Choose `Functions` and your preferred language (JavaScript or TypeScript). Install dependencies, including `actions-on-google`. Deploy using `firebase deploy --only functions`. Finally, connect the webhook to your Action: in Dialogflow, enable the webhook and input the Function URL; in Actions SDK, declare the fulfillment within the `conversations` object of your Action package.\n"],null,["# Deploy fulfillment (Dialogflow)\n\nOnce you've built your webhook fulfillment, deploy it to production and connect\nit to your Action. The following steps show you how to set up your environment\nto deploy to [Cloud Functions for Firebase](/assistant/console/firebase-services) for production hosting. However,\nyou can choose any web hosting platform that supports HTTPS requests and\nresponses to host your fulfillment.\n\nIf you have already deployed your webhook to a web hosting platform, you can\nskip to [Connect the webhook to your Action](#connect). Note that the final\nsteps in the process below differ based on whether you use Dialogflow or the\nActions SDK.\n| **Note:** Your fulfillment must respond within 5 seconds or the Assistant ends your conversation due to a timeout.\n\nDeploy to Cloud Functions for Firebase\n--------------------------------------\n\n1. [Download and install Node.js](https://nodejs.org/).\n2. Set up and initialize the Firebase CLI. If the following command fails with\n an `EACCES` error, you may need to\n [change npm permissions](https://docs.npmjs.com/getting-started/fixing-npm-permissions).\n\n npm install -g firebase-tools\n\n3. Authenticate the Firebase tool with your Google account:\n\n firebase login\n\n4. Navigate to your Action project directory and initialize Firebase. You'll be\n asked to select which Firebase CLI features you want to set up for your\n Actions project. Choose `Functions` and other features you might want to use,\n like Firestore, then press Enter to confirm and continue:\n\n cd \u003ccloud_function_dir\u003e\n firebase init\n\n5. Associate the Firebase tool with your Actions project by selecting it using\n the arrow keys to navigate the projects list:\n\n | **Note:** You can skip this step by selecting **\\[don't setup a default project\\]** , but then you will need to do this association later using the command **firebase use --project**.\n6. After choosing the project, the Firebase tool starts the Functions setup\n asking you what language you want to use. Select using the arrow keys and\n press Enter to continue.\n\n ```\n === Functions Setup\n\n A functions directory will be created in your project with a Node.js\n package pre-configured. Functions can be deployed with firebase deploy.\n\n ? What language would you like to use to write Cloud Functions? (Use arrow keys)\n \u003e JavaScript\n TypeScript\n ```\n7. Choose if you want to use ESLint to catch probable bugs and enforce style\n typing `Y` or `N`:\n\n ```\n ? Do you want to use ESLint to catch probable bugs and enforce style? (Y/n)\n ```\n8. Get the project dependencies by typing `Y` to the prompt:\n\n ```\n ? Do you want to install dependencies with npm now? (Y/n)\n ```\n\n Once the setup is completed, you'll see an output similar to the following: \n\n ```\n ✔ Firebase initialization complete!\n ```\n9. Install the **actions-on-google** dependency:\n\n cd \u003ccloud_function_dir\u003e/functions\n npm install actions-on-google\n\n10. Get the fulfillment dependencies and deploy the fulfillment function:\n\n npm install\n firebase deploy --only functions\n\n The deployment takes a few minutes. Once completed, you'll see output\n similar to the following. You'll need the **Function URL** to enter in\n Dialogflow. \n\n ```\n ✔ Deploy complete!\n\n Project Console: https://console.firebase.google.com/project/exampleproject-123/overview\n Function URL (cloudFunctionName): https://us-central1-exampleproject-123.cloudfunctions.net/cloudFunctionName\n ```\n\nConnect the webhook to your Action\n----------------------------------\n\n**If you're using Dialogflow:** In the\n[Dialogflow console](https://console.dialogflow.com), go to\n**Fulfillment** , toggle the **Webhook** button to **ENABLED** , and replace\nthe url in the **URL** field with your **Function URL**.\n\n\n**If you're using Actions SDK:** Create an object\ninside the `conversations` object to declare your fulfillment in your Action\npackage: \n\n```text\n{\n \"actions\": [\n {\n \"description\": \"Default Welcome Intent\",\n \"name\": \"MAIN\",\n \"fulfillment\": {\n \"conversationName\": \"myFulfillmentFunction\"\n },\n \"intent\": {\n \"name\": \"actions.intent.MAIN\",\n \"trigger\": {\n \"queryPatterns\": [\n \"talk to myFulfillmentFunction\"\n ]\n }\n }\n }\n ],\n \"conversations\": {\n \"myFulfillmentFunction\": {\n \"name\": \"myFulfillmentFunction\",\n \"url\": \"https://us-central1-myprojectname-ab123.cloudfunctions.net/cloudFunctionName\"\n }\n },\n \"locale\": \"en\"\n}\n```\n| **Note:** You sometimes might want to do development and testing locally on your development machine for quicker iterations. However, your fulfillment must be addressable from the internet. To work around this, you can use a tool like [ngrok](https://ngrok.io), which allows you to create a tunnel from the internet into your development machine. Be aware that this makes your machine vulnerable to attacks, so use caution if you choose this development model."]]