
1. はじめに


最終更新日: 2021 年 9 月 13 日
支払いの受け取り
ビジネス メッセージで支払い情報を収集することで、会話プラットフォーム内でまったく新しいビジネス チャンスが生まれます。見込み顧客が、詳細を知りたい製品に関する問い合わせを送ってきたとします。お客様の質問に対する回答が得られたら、会話中に直接支払いゲートウェイを指定して取引を成立させることができます。

優れた決済エクスペリエンスを実現するためのポイント
優れた支払いエクスペリエンスとは、ユーザーが使い慣れた方法で支払いを行えるようにすることです。
ユーザーは支払い方法に好みがあり、支払い方法は世界各地で異なります。ビジネス メッセージでは、複数の支払い処理業者を統合することで、ユーザーの利便性を最大限に高めることができます。
ユーザーが支払いフローを完了したら、支払いが正常に完了した旨をユーザーに知らせます。ほとんどの決済代行業者には、支払いフローの完了時に選択した URL に HTTP リクエストを送信する成功または失敗のコールバックが含まれています。
作成するアプリの概要
Codelab シリーズの前のセクションでは、Bonjour Meal エージェントを拡張してアイテムのカタログを提示し、ユーザーがアイテムを追加または削除できるショッピング カートを作成し、ショッピング カートの合計価格を計算しました。このセクションでは、エージェントをさらに拡張して、ショッピング カートの内容に基づいて支払いを処理できるようにします。
この Codelab では、アプリで次のことをできるようにします。
- Stripe 支払いゲートウェイと統合する
- カートの価格に基づいてユーザーが支払いフローを完了できるようにする
- 会話サーフェスに通知を送信して、支払い状態をユーザーに知らせる
演習内容
- Stripe 決済代行業者と統合します。
- Stripe にリクエストを送信して、支払いセッションを開始します。
- Stripe からの支払いの成功または失敗のレスポンスを処理します。
必要なもの
- ビジネス メッセージで使用するために登録して承認を受けた GCP プロジェクト
- 手順については、デベロッパー サイトをご覧ください。
- バージョン 5 以降を搭載した Android デバイス、または Google マップ アプリを搭載した iOS デバイス
- ウェブ アプリケーション プログラミングの経験
- インターネット接続
2. 依存関係を追加する
requirements.txt の更新
Stripe 決済代行業者と統合されるため、Stripe Python クライアント ライブラリを使用できます。バージョンなしで stripe を requirements.txt に追加し、最新バージョンの依存関係を取得します。
これは、Google Cloud App Engine Python ランタイムに Stripe Python モジュールを含めるために必要です。
requirements.txt
...
stripe
...
bopis/views.py の準備
bopis/views.py の先頭で、django.shortcuts から render をインポートし、django.http から JsonResponse をインポートします。さらに、Stripe Python クライアント ライブラリへの呼び出しをサポートするには、stripe をインポートする必要があります。
...
from django.shortcuts import render
from django.http import JsonResponse
import stripe
...
3. Stripe の操作
Stripe.com でアカウントを作成する
この Codelab ではたった今 Stripe を使用しましたが、ウェブ統合をサポートする任意のプロセッサと統合できます。stripe.com でアカウントを作成します。このプロファイルは、第三者の決済代行業者と直接統合する方法をテストおよび教育する目的で使用されます。
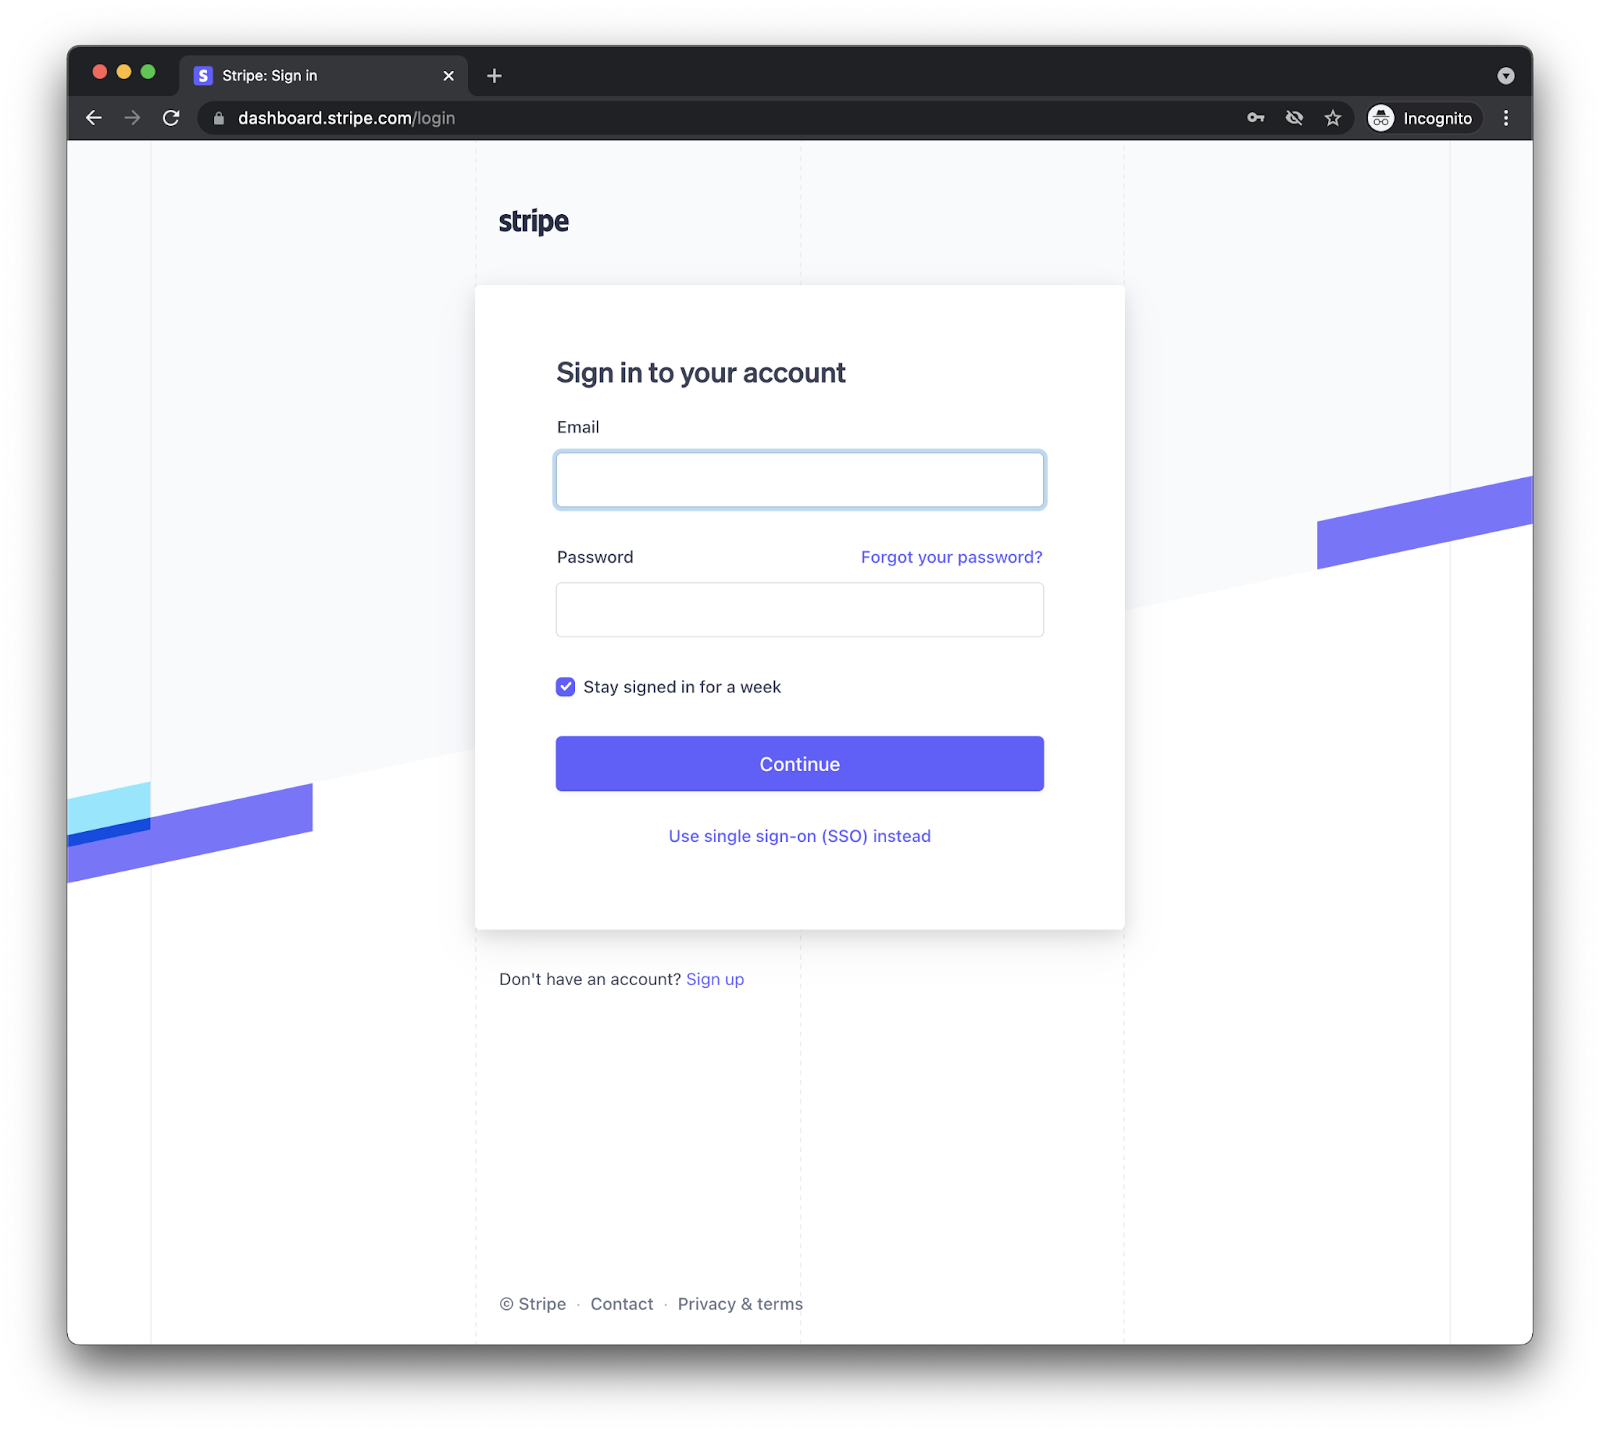
アカウントを作成してログインすると、次のようなダッシュボードが表示されます。

「テストモード」で動作していることを確認して、上のスクリーンショットで示したように [デベロッパー] ボタンをクリックし、API キーを探します。公開キーと秘密鍵の 2 つの API キーセットが表示されます。Stripe でお支払い取引を行うには、この 2 つのキーが必要です。
bopis/views.py を更新する
アプリケーションは両方のキーセットを必要とするため、views.py で更新してください。
stripe.api_key プロパティで直接秘密鍵を設定し、Stripe デベロッパー ダッシュボードにある秘密鍵の値を割り当てることができます。次に、STRIPE_PUBLIC_KEY というグローバル変数を作成し、公開可能な鍵に設定します。
さらに、Stripe は管理するウェブページにリダイレクトする必要があるため、アプリケーションの公開可能なドメインを追加するための追加のグローバル変数を作成します。
これらの変更が終了すると、次のようになります。
stripe.api_key = 'sk_test_abcde-12345'
STRIPE_PUBLIC_KEY = 'pk_test_edcba-54321'
YOUR_DOMAIN = 'https://<GCP_PROJECT_ID>.appspot.com'
Stripe の設定に必要な手順は以上です。
4. 購入手続き機能
ショッピング カートの合計金額関数を更新する
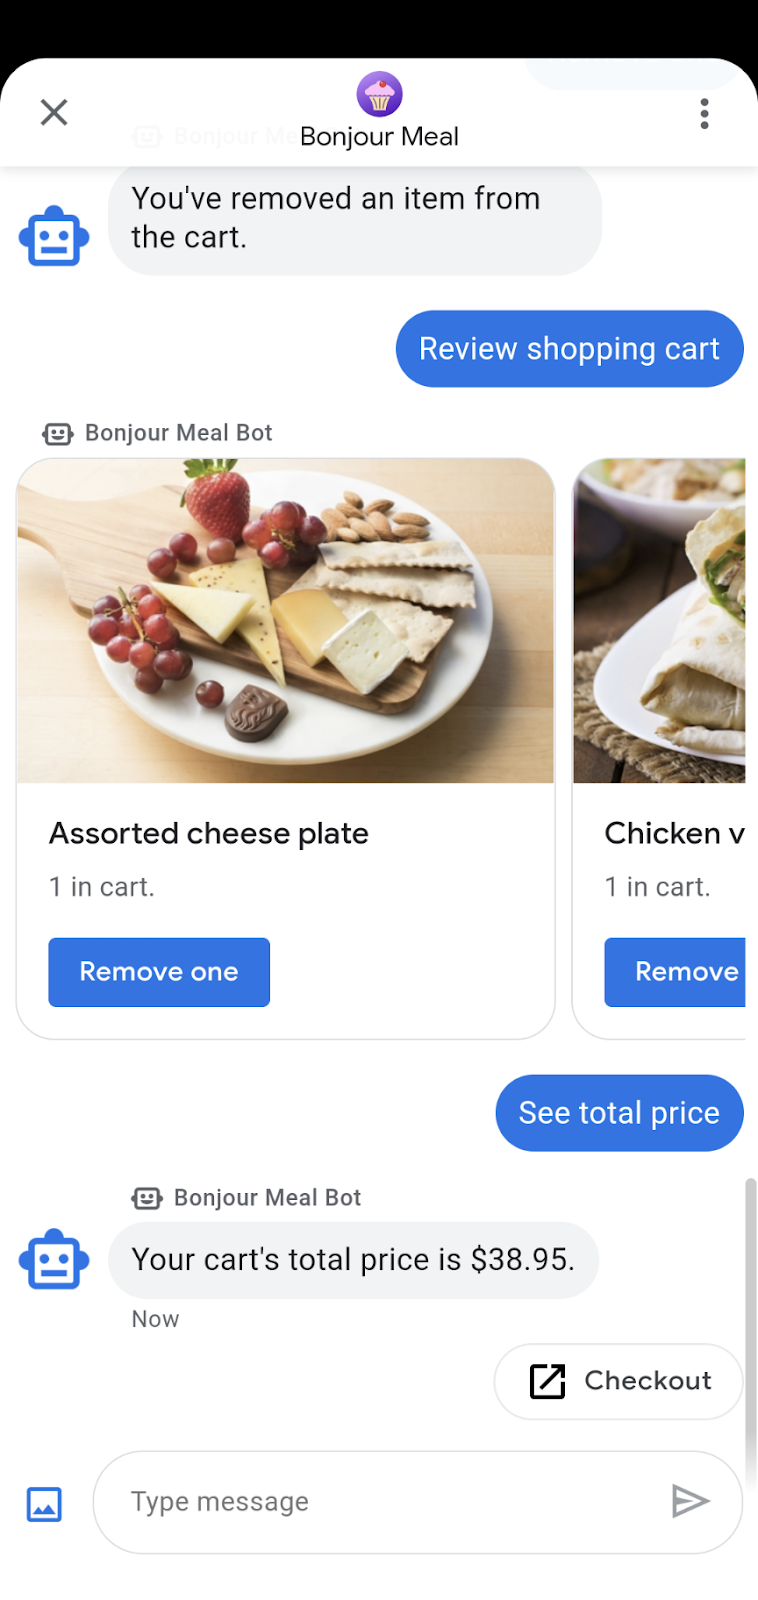
現在、send_shopping_cart_total_price 関数はショッピング カートの価格を指定するメッセージのみを送信します。購入手続きページの URL を開くための推奨アクションを追加しましょう。
def send_shopping_cart_total_price(conversation_id):
  """Sends shopping cart price to the user through Business Messages.

  Args:
    conversation_id (str): The unique id for this user and agent.
  """
  cart_price = get_cart_price(conversation_id)

  message_obj = BusinessMessagesMessage(
      messageId=str(uuid.uuid4().int),
      representative=BOT_REPRESENTATIVE,
      text=f'Your cart\'s total price is ${cart_price}.',
      suggestions=[
          BusinessMessagesSuggestion(
              action=BusinessMessagesSuggestedAction(
                  text='Checkout',
                  postbackData='checkout',
                  openUrlAction=BusinessMessagesOpenUrlAction(
                      url=f'{YOUR_DOMAIN}/checkout/{conversation_id}'))),
      ]
    )

  send_message(message_obj, conversation_id)
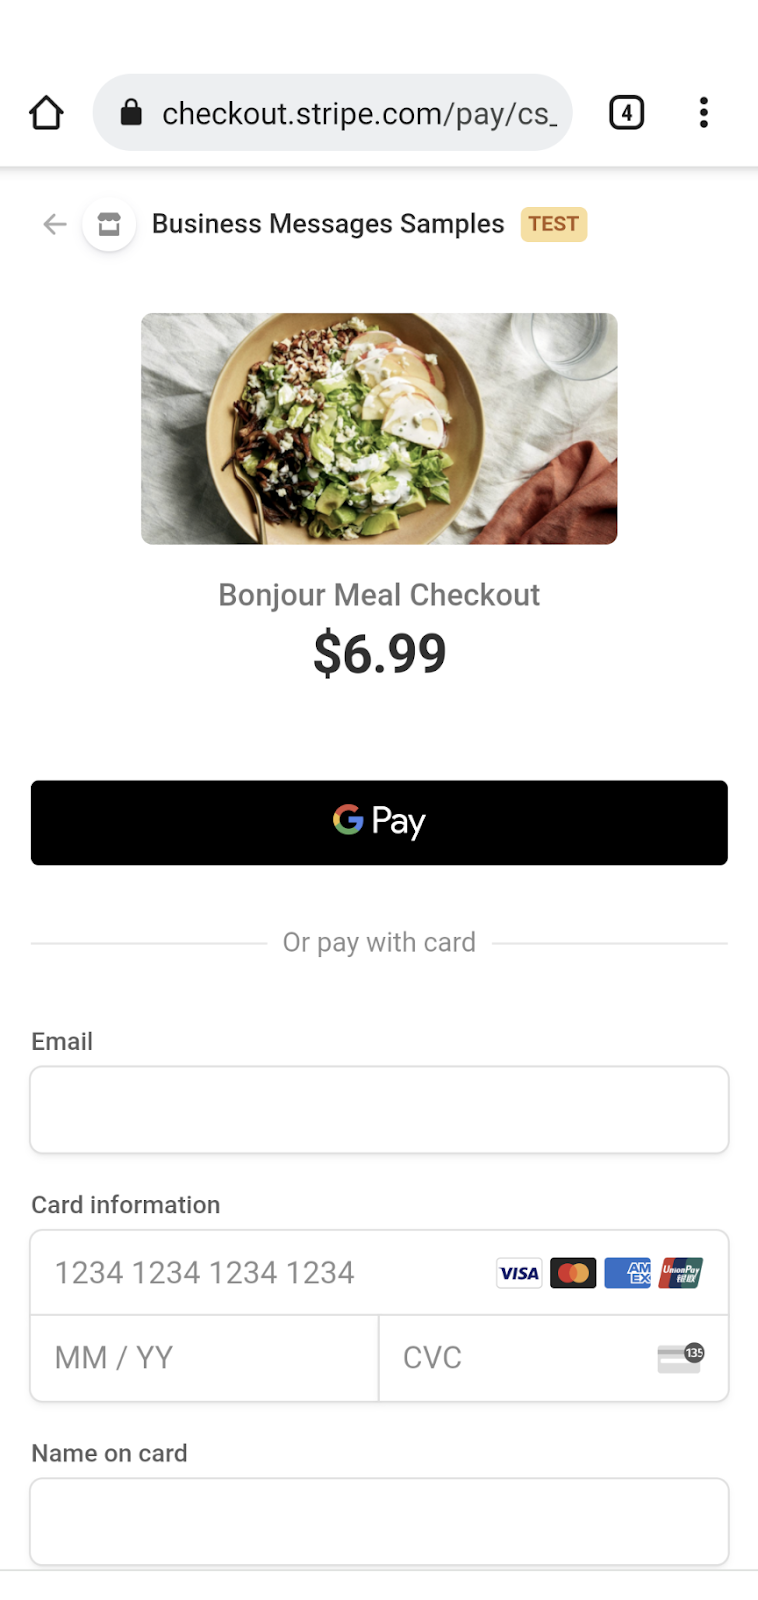
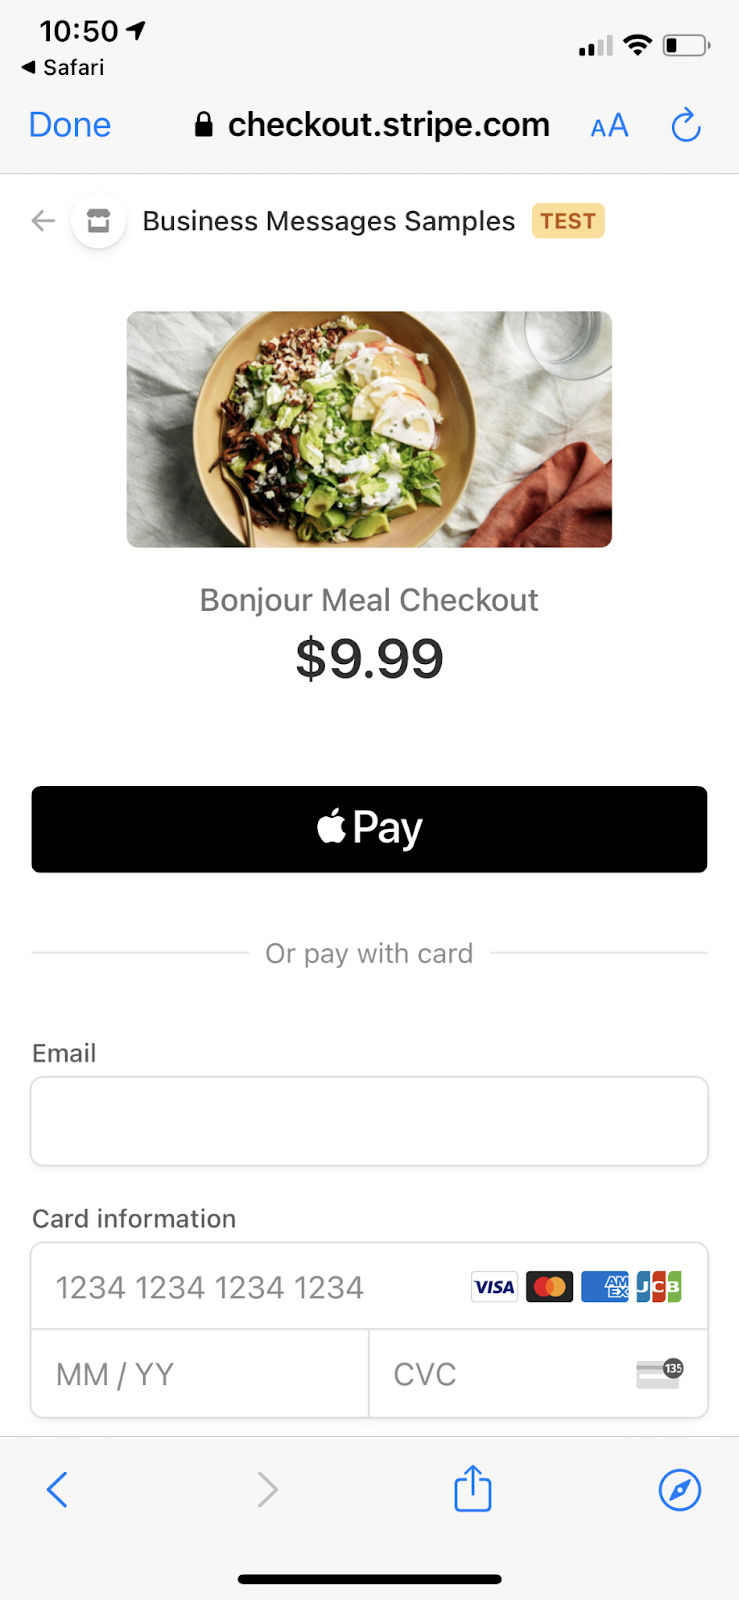
ユーザーがこの Action をタップすると、合計金額と、Stripe でお支払いを開始するためのボタンが表示されるウェブページが表示されます。
このフローに対応するシンプルなウェブページを構築しましょう。
プロジェクトのソースコードで、bopis という名前のディレクトリを見つけます。bopis に templates という新しいディレクトリを作成し、template 内に bopis という名前の別のディレクトリを作成します。これは、templates ディレクトリ内でアプリ名を指定する Django 設計パターンです。Django アプリ間のテンプレートの混同を減らすことができます。
これで、パスが bopis/templates/bopis/ のディレクトリが作成されます。このディレクトリに HTML ファイルを作成して、ウェブページを提供できます。Django では、これらをブラウザにレンダリングするテンプレートと呼んでいます。checkout.html から始めましょう。
このディレクトリに、checkout.html を作成します。次のコード スニペットは、購入手続きボタンとカートの価格を表示します。また、Stripe 購入手続きを開始するための JavaScript も含まれています。
{% load static %}

<!DOCTYPE html>
<html>
  <head>
    <title>Purchase from Bonjour Meal</title>

    <script src="https://js.stripe.com/v3/"></script>
    <style>
      .description{
        font-size: 4em;
      }
      button {
        color: red;
        padding: 40px;
        font-size: 4em;
      }
    </style>
  </head>
  <body>
    <section>
      <img
        src="https://www.google.com/images/branding/googlelogo/2x/googlelogo_color_272x92dp.png"
        alt="Bonjour Meal Restaurant"
      />
      <div class="product">
        <div class="description">
          <h3>Your Bonjour Meal Total</h3>
          <h5>${{cart_price}}</h5>
        </div>
      </div>
      <button type="button" id="checkout-button">Checkout</button>
    </section>
  </body>
  <script type="text/javascript">
    // Create an instance of the Stripe object with your publishable API key
    var stripe = Stripe("{{stripe_public_key}}");
    var checkoutButton = document.getElementById("checkout-button");

    checkoutButton.addEventListener("click", function () {
      fetch("/create-checkout-session/{{conversation_id}}", {
        method: "POST",
      })
        .then(function (response) {
          return response.json();
        })
        .then(function (session) {
          return stripe.redirectToCheckout({ sessionId: session.id });
        })
        .then(function (result) {
          // If redirectToCheckout fails due to a browser or network
          // error, you should display the localized error message to your
          // customer using error.message.
          if (result.error) {
            alert(result.error.message);
          }
        })
        .catch(function (error) {
          console.error("Error:", error);
        });
    });
  </script>
</html>
URL がリクエストされた場合は、このウェブページへのルートが必要です。購入手続きの提案アクションの openUrlAction の値が {YOUR_DOMAIN}/checkout/{conversation_id} に設定されています。これは https://<GCP-Project-ID>.appspot.com/checkout/abc123-cba321-abc123-cba321 のような形で表されます。このルートを作成する前に、HTML テンプレート内の JavaScript を確認してみましょう。
...
  <script type="text/javascript">
    // Create an instance of the Stripe object with your publishable API key
    var stripe = Stripe("{{stripe_public_key}}");
    var checkoutButton = document.getElementById("checkout-button");

    checkoutButton.addEventListener("click", function () {
      fetch("/create-checkout-session/{{conversation_id}}", {
        method: "POST",
      })
        .then(function (response) {
          return response.json();
        })
        .then(function (session) {
          return stripe.redirectToCheckout({ sessionId: session.id });
        })
        .then(function (result) {
          // If redirectToCheckout fails due to a browser or network
          // error, you should display the localized error message to your
          // customer using error.message.
          if (result.error) {
            alert(result.error.message);
          }
        })
        .catch(function (error) {
          console.error("Error:", error);
        });
    });
  </script>
...
上記のコード スニペットを一緒に確認しましょう。
- まず、公開鍵を使用して Stripe エンティティを作成します。このエンティティは、ビュー関数のコンテキスト(別の Django パラダイム)から渡されます。
- 次に、スニペットは ID が
checkout-buttonの要素をページ上で検索します。 - その要素にイベント リスナーが追加されます。
このイベント リスナーは、ユーザーがこのボタンをタップまたはタップすると、URL({YOUR_DOMAIN}/create-checkout-session/{conversation_id}.)で指定したウェブサーバーへの POST リクエストが開始されます。
ウェブサーバーのロジックを以下のスニペットに示します。ユーザーが ID「&」や「checkout-button」のボタンをタップすると、カート内の価格を指定する Stripe API を使用して作成された Stripe セッション ID が返されると想定できます。
サーバーが有効なセッション ID を生成できた場合、アプリケーション ロジックはユーザーを Stripe のチェックアウト ページにリダイレクトします。リダイレクトしなかった場合は、標準 JavaScript メッセージを表示してユーザーにエラーを表示します。
最初は urlpatterns 配列に新しいパスを追加して、購入手続きページをサポートし、セッション ID を生成するようにします。urls.py の urlpatterns 配列に次のコードを追加します。
...
path('checkout/<str:conversation_id>', bopis_views.payment_checkout),
path('create-checkout-session/<str:conversation_id>', bopis_views.create_checkout_session),
...
次に、views.py にビュー関数を作成して、checkout.html テンプレートを返し、Stripe 購入手続きセッションを生成します。
...

def payment_checkout(request, conversation_id):
  """Sends the user to a payment confirmation page before the payment portal.

  Args:
    request (HttpRequest): Incoming Django request object
    conversation_id (str): The unique id for this user and agent.

  Returns:
    Obj (HttpResponse): Returns an HTTPResponse to the browser
  """

  cart_price = get_cart_price(conversation_id)
  context = {'conversation_id': conversation_id,
             'stripe_public_key': STRIPE_PUBLIC_KEY,
             'cart_price': cart_price
            }
  return render(request, 'bopis/checkout.html', context)


@csrf_exempt
def create_checkout_session(request, conversation_id):
  """Creates a Stripe session to start a payment from the conversation.

  Args:
    request (HttpRequest): Incoming Django request object
    conversation_id (str): The unique id for this user and agent.

  Returns:
    Obj (HttpResponse): Returns an HTTPResponse to the browser
  """
  cart_price = get_cart_price(conversation_id)
  try:
    checkout_session = stripe.checkout.Session.create(
        payment_method_types=['card'],
        line_items=[
            {
                'price_data': {
                    'currency': 'usd',
                    'unit_amount': int(cart_price*100),
                    'product_data': {
                        'name': 'Bonjour Meal Checkout',
                        'images': ['https://storage.googleapis.com/bonjour-rail.appspot.com/apple-walnut-salad.png'],
                    },
                },
                'quantity': 1,
            },
        ],
        mode='payment',
        success_url=YOUR_DOMAIN + '/success/' + conversation_id,
        cancel_url=YOUR_DOMAIN + '/cancel/' + conversation_id,
    )

    return JsonResponse({
        'id': checkout_session.id
    })

  except Exception as e:
    # Handle exceptions according to your payment processor's documentation
    # https://stripe.com/docs/api/errors/handling?lang=python
    return HttpResponse(e)

...
どちらの関数も Conversation_id を使用してショッピング カートをユーザーに関連付け、Stripe がユーザーに請求する価格を決定します。
支払いフローの前半は、この 2 つの方法で構成されます。これをデプロイしてエクスペリエンスをテストすると、Stripe 購入手続きフォームが表示されます。このフォームで、テスト クレジット カードで支払いを行うことができます。詳しくは、Visa チェックアウトのテストに関する Stripe デベロッパー向けドキュメントをご覧ください。
フローの後半は、Stripe からユーザーの支払いに関する返信を受け取った後に、そのユーザーを会話に復帰させる方法です。
5. Stripe レスポンス
支払いフローに参加するユーザーは、支払いを完了できたか、支払いを完了できなかったかのいずれかになります。create_checkout_session 関数で、success_url と cancel_url を定義しました。Stripe は、お支払いの状態に応じて、これら 2 つの URL のいずれかにリダイレクトされます。2 つのルートを urls.py で定義してから、bopis/views.py に 2 つのビュー関数を追加して、この 2 つのフローをサポートするようにします。
urls.py ファイルに次の行を追加します。
...
    path('success/<str:conversation_id>', bopis_views.payment_success),
    path('cancel/<str:conversation_id>', bopis_views.payment_cancel),
...
対応するビューは次のようになります。
...

def payment_success(request, conversation_id):
  """Sends a notification to the user prompting them back into the conversation.

  Args:
    request (HttpRequest): Incoming Django request object
    conversation_id (str): The unique id for this user and agent.

  Returns:
    Obj (HttpResponse): Returns an HTTPResponse to the browser
  """
  message_obj = BusinessMessagesMessage(
      messageId=str(uuid.uuid4().int),
      representative=BOT_REPRESENTATIVE,
      suggestions=[
          BusinessMessagesSuggestion(
              reply=BusinessMessagesSuggestedReply(
                  text='Check on order', postbackData='check-order')),
      ],
      text='Awesome it looks like we\'ve received your payment.')

  send_message(message_obj, conversation_id)

  return render(request, 'bopis/success.html')


def payment_cancel(request, conversation_id):
  """Sends a notification to the user prompting them back into the conversation.

  Args:
    request (HttpRequest): Incoming Django request object
    conversation_id (str): The unique id for this user and agent.

  Returns:
    Obj (HttpResponse): Returns an HTTPResponse to the browser
  """
  message_obj = BusinessMessagesMessage(
      messageId=str(uuid.uuid4().int),
      representative=BOT_REPRESENTATIVE,
      suggestions=[
          BusinessMessagesSuggestion(
              action=BusinessMessagesSuggestedAction(
                  text='Checkout',
                  postbackData='checkout',
                  openUrlAction=BusinessMessagesOpenUrlAction(
                      url=f'{YOUR_DOMAIN}/checkout/{conversation_id}'))),
      ],
      text='It looks like there was a problem with checkout. Try again?')

  send_message(message_obj, conversation_id)

  return render(request, 'bopis/cancel.html')

...
DOMAIN 定数で指定されたとおりに Stripe からドメインにリダイレクトされるので、テンプレートを使用して HTML レスポンスをレンダリングする必要があります。そうしないと、ウェブサイトがほとんど見えません。bopis/templates/bopis/ ディレクトリに 2 つのシンプルな HTML ファイルと checkout.html を作成します。
bm-django-echo-bot/bopis/templates/bopis/success.html
{% load static %}

<html>
<head>
  <title>Business Messages Payment Integration Sample!</title>
  <style>
    p{
      font-size: 4em;
    }
  </style>
</head>
<body>
  <section>

    <p>
      Checkout succeeded - We appreciate your business!
      <br/><br/>
      For support related questions, please email
      <a href="mailto:bm-support@google.com">bm-support@google.com</a>.

    </p>
  </section>
</body>
</html>
bm-django-echo-bot/bopis/templates/bopis/cancel.html
{% load static %}

<html>
<head>
  <title>Checkout canceled</title>
  <style>
    p{
      font-size: 4em;
    }
    </style>
</head>
<body>
  <section>
    <p>Checkout canceled - Forgot to add something to your cart? Shop around then come back to pay!</p>
  </section>
</body>
</html>
この 2 つのテンプレートにより、Stripe 統合によって支払いフローを完了するユーザーが、適切な URL にリダイレクトされ、それぞれのテンプレートが表示されます。また、ビジネス メッセージを通じて会話に戻るためのメッセージを受け取ることもできます。
6. 支払いを受け取ります。
これで、ビジネス メッセージ エージェントに支払い処理業者を統合できました。
このシリーズでは、ウェブ アプリケーションを Google Cloud App Engine にデプロイし、Business Communications Developer コンソールで Webhook を設定し、静的データベースを使用した在庫検索をサポートするようにアプリケーションを拡張し、Google Datastore を使用してショッピング カートを作成しました。シリーズの最後のパートでは、ウェブ統合をサポートする決済代行業者である Stripe を、このエクスペリエンスと統合しました。他の決済代行業者などとの連携が可能になりました。
次のステップ
準備が整ったら、以下のトピックをご覧になり、ビジネス メッセージで行える複雑な操作についてご確認ください。
リファレンス ドキュメント
- 返信の候補
- ビジネス メッセージのメッセージに関するリファレンス ドキュメント
- RichCard の JSON 定義