The Web Receiver SDK provides a built-in player UI. To implement this UI into
your custom Web Receiver app, you need to add the `cast-media-player` element to
the body of your HTML file.
CSS variables allow you to customize various `cast-media-player` properties,
including the player background, splash image, font family, and more. You can
add these variables with in-line CSS styles, a CSS stylesheet, or the
`style.setProperty` in Javascript.
In the next sections, learn how to customize each area of the media player
element. You can use the following templates to help you get started.
External
index.html
```html
```
js/receiver.js
```javascript
const context = cast.framework.CastReceiverContext.getInstance();
...
// Update style using javascript
let playerElement = document.getElementsByTagName("cast-media-player")[0];
playerElement.style.setProperty('--splash-image', 'url("http://some/other/image.png")');
...
context.start();
```
css/receiver.css
```css
body {
--playback-logo-image: url('http://some/image.png');
}
cast-media-player {
--theme-hue: 100;
--progress-color: rgb(0, 255, 0);
--splash-image: url('http://some/image.png');
--splash-size: cover;
}
```
Inline
```html
```
> [!NOTE]
> **Note:** In the following tables, a blank **Default value** indicates that no default exists.
## Playback logo
The playback logo displays in the upper-left corner of your receiver while
media plays. This property is separate from the `.logo` class. You can
customize the `--playback-logo-image` from the `body` selector.
body {
--playback-logo-image: url('image.png'); /* set from the body selector */
}
> [!IMPORTANT]
> **Key Point:** `--playback-logo-image` is the only variable that's set from the `body` selector. All other variables are set from the `cast-media-player` selector.
## Player background properties
`--background` variables set the background properties of the entire player,
visible during launch and playback. For example, you could set the entire
background to a white and silver linear gradient:
cast-media-player {
--background-image: linear-gradient(white, silver);
}
Web Receiver display:

You can use the following variables to customize `.background` properties:
### Variables and defaults
| Name | Default Value | Description |
|---|---|---|
| --background | black | [CSS background property](https://developer.mozilla.org/en-US/docs/Web/CSS/background) |
| --background-color | | [CSS background-color property](https://developer.mozilla.org/en-US/docs/Web/CSS/background-color) |
| --background-image | | [CSS background-image property](https://developer.mozilla.org/en-US/docs/Web/CSS/background-image) |
| --background-repeat | no-repeat | [CSS background-repeat property](https://developer.mozilla.org/en-US/docs/Web/CSS/background-repeat) |
| --background-size | cover | [CSS background-size property](https://developer.mozilla.org/en-US/docs/Web/CSS/background-size) |
### CSS template
cast-media-player {
--background:
--background-color:
--background-image:
--background-repeat:
--background-size:
}
## Logo properties
The `.logo` class is positioned in front of the `.background` class, and spans
the entire player. This class displays when your receiver is launching. If you
don't provide any `.splash` variables, the `.logo` class also displays when
your receiver is in an idle state.
The following example sets the `--logo-image` to an equalizer icon named
`welcome.png`. An image defaults to the center of your receiver:
cast-media-player {
--logo-image: url('welcome.png');
}
Web Receiver display:

You can use the following variables to customize `.logo` properties:
### Variables and defaults
| Name | Default Value | Description |
|---|---|---|
| --logo-background | | [CSS background property](https://developer.mozilla.org/en-US/docs/Web/CSS/background) |
| --logo-color | | [CSS background-color property](https://developer.mozilla.org/en-US/docs/Web/CSS/background-color) |
| --logo-image | | [CSS background-image property](https://developer.mozilla.org/en-US/docs/Web/CSS/background-image) |
| --logo-repeat | no-repeat | [CSS background-repeat property](https://developer.mozilla.org/en-US/docs/Web/CSS/background-repeat) |
| --logo-size | | [CSS background-size property](https://developer.mozilla.org/en-US/docs/Web/CSS/background-size) |
### CSS template
cast-media-player {
--logo-background:
--logo-color:
--logo-image:
--logo-repeat:
--logo-size:
}
## Splash properties
Similar to the `.logo` class, the `.splash` class spans the entire player. If
you set these properties, your `.splash` variables will override the `.logo`
variables when your receiver is idle. This means that you could use one set of
`.logo` properties at launch, and display separate backgrounds or images when
your receiver is idle.
For example, you could override the white and silver gradient background with
`dimgray`, and add an animated *waiting...* icon:
cast-media-player {
--splash-color: dimgray;
--splash-image: url('waiting.png');
}
Web Receiver display:

If you don't set these properties, your receiver defaults to your `.logo`
settings or app name when it's idle.
You can use the following variables to customize `.splash` properties:
### Variables and defaults
| Name | Default Value | Description |
|---|---|---|
| --splash-background | | [CSS background property](https://developer.mozilla.org/en-US/docs/Web/CSS/background) |
| --splash-color | | [CSS background-color property](https://developer.mozilla.org/en-US/docs/Web/CSS/background-color) |
| --splash-image | | [CSS background-image property](https://developer.mozilla.org/en-US/docs/Web/CSS/background-image) |
| --splash-repeat | | [CSS background-repeat property](https://developer.mozilla.org/en-US/docs/Web/CSS/background-repeat) |
| --splash-size | | [CSS background-size property](https://developer.mozilla.org/en-US/docs/Web/CSS/background-size) |
### CSS template
cast-media-player {
--splash-background:
--splash-color:
--splash-image:
--splash-repeat:
--splash-size:
}
## Slideshow
To have up to 10 images cycle through during idle state
(in place of the splash image), use the following slideshow
parameters.
### Variables and defaults
| Name | Default Value | Description |
|---|---|---|
| --slideshow-interval-duration | 10s | Time between images. |
| --slideshow-animation-duration | 2s | Duration of transition. |
| --slideshow-image-1 | | First image in slideshow. |
| --slideshow-image-2 | | Second image in slideshow. |
| --slideshow-image-3 | | Third image in slideshow. |
| --slideshow-image-4 | | Fourth image in slideshow. |
| --slideshow-image-5 | | Fifth image in slideshow. |
| --slideshow-image-6 | | Sixth image in slideshow. |
| --slideshow-image-7 | | Seventh image in slideshow. |
| --slideshow-image-8 | | Eighth image in slideshow. |
| --slideshow-image-9 | | Ninth image in slideshow. |
| --slideshow-image-10 | | Tenth image in slideshow. |
### CSS template
cast-media-player {
--slideshow-interval-duration:
--slideshow-animation-duration:
--slideshow-image-1:
--slideshow-image-2:
--slideshow-image-3:
--slideshow-image-4:
--slideshow-image-5:
--slideshow-image-6:
--slideshow-image-7:
--slideshow-image-8:
--slideshow-image-9:
--slideshow-image-10:
}
## Watermark properties
A `.watermark` displays while media is playing. This is typically a small,
transparent image that defaults to the bottom-right of your receiver.
You can use the following variables to customize `.watermark` properties:
### Variables and defaults
| Name | Default Value | Description |
|---|---|---|
| --watermark-background | | [CSS background property](https://developer.mozilla.org/en-US/docs/Web/CSS/background) |
| --watermark-color | | [CSS background-color property](https://developer.mozilla.org/en-US/docs/Web/CSS/background-color) |
| --watermark-image | | [CSS background-image property](https://developer.mozilla.org/en-US/docs/Web/CSS/background-image) |
| --watermark-position | bottom right | [CSS background-position property](https://developer.mozilla.org/en-US/docs/Web/CSS/background-position) |
| --watermark-repeat | no-repeat | [CSS background-repeat property](https://developer.mozilla.org/en-US/docs/Web/CSS/background-repeat) |
| --watermark-size | | [CSS background-size property](https://developer.mozilla.org/en-US/docs/Web/CSS/background-size) |
### CSS template
cast-media-player {
--watermark-background:
--watermark-color:
--watermark-image:
--watermark-position:
--watermark-repeat:
--watermark-size:
}
## Playback, ads, and other CSS properties
You can also customize ads, fonts, player images, and other properties from the
`cast-media-player` selector.
### Variables and defaults
| Name | Default Value | Description |
|---|---|---|
| --ad-title | Ad | Title of the ad. |
| --skip-ad-title | Skip ad | Text of the **Skip Ad** text box. |
| --break-color | hsl(hue, 100%, 50%) | Color for the ad break mark. |
| --font-family | Open Sans | Font family for metadata and the progress bar. |
| --spinner-image | Default image | The image to display while launching. |
| --buffering-image | Default image | The image to display while buffering. |
| --pause-image | Default image | The image to display while paused. |
| --play-image | | The image to show in metadata while playing. |
| --theme-hue | 42 | The [hue](https://en.wikipedia.org/wiki/Hue) to use for the player. |
| --progress-color | hsl(hue, 95%, 60%) | Color for progress bar. |
### CSS template
cast-media-player {
--ad-title:
--skip-ad-title:
--break-color:
--font-family:
--spinner-image:
--buffering-image:
--pause-image:
--play-image:
--theme-hue:
--progress-color:
}
For more information and additional illustrations, refer to
[Styled Media Receiver](https://developers.google.com/cast/docs/styled_receiver).
## Overscan
Layouts for TV have some unique requirements due to the evolution of TV
standards and the desire to always present a full screen picture to viewers. TV
devices can clip the outside edge of an app layout in order to ensure that the
entire display is filled. This behavior is generally referred to as overscan.
Avoid screen elements getting clipped due to overscan by incorporating a 10%
margin on all sides of your layout.
## Default audio UI
### MetadataType.MUSIC_TRACK
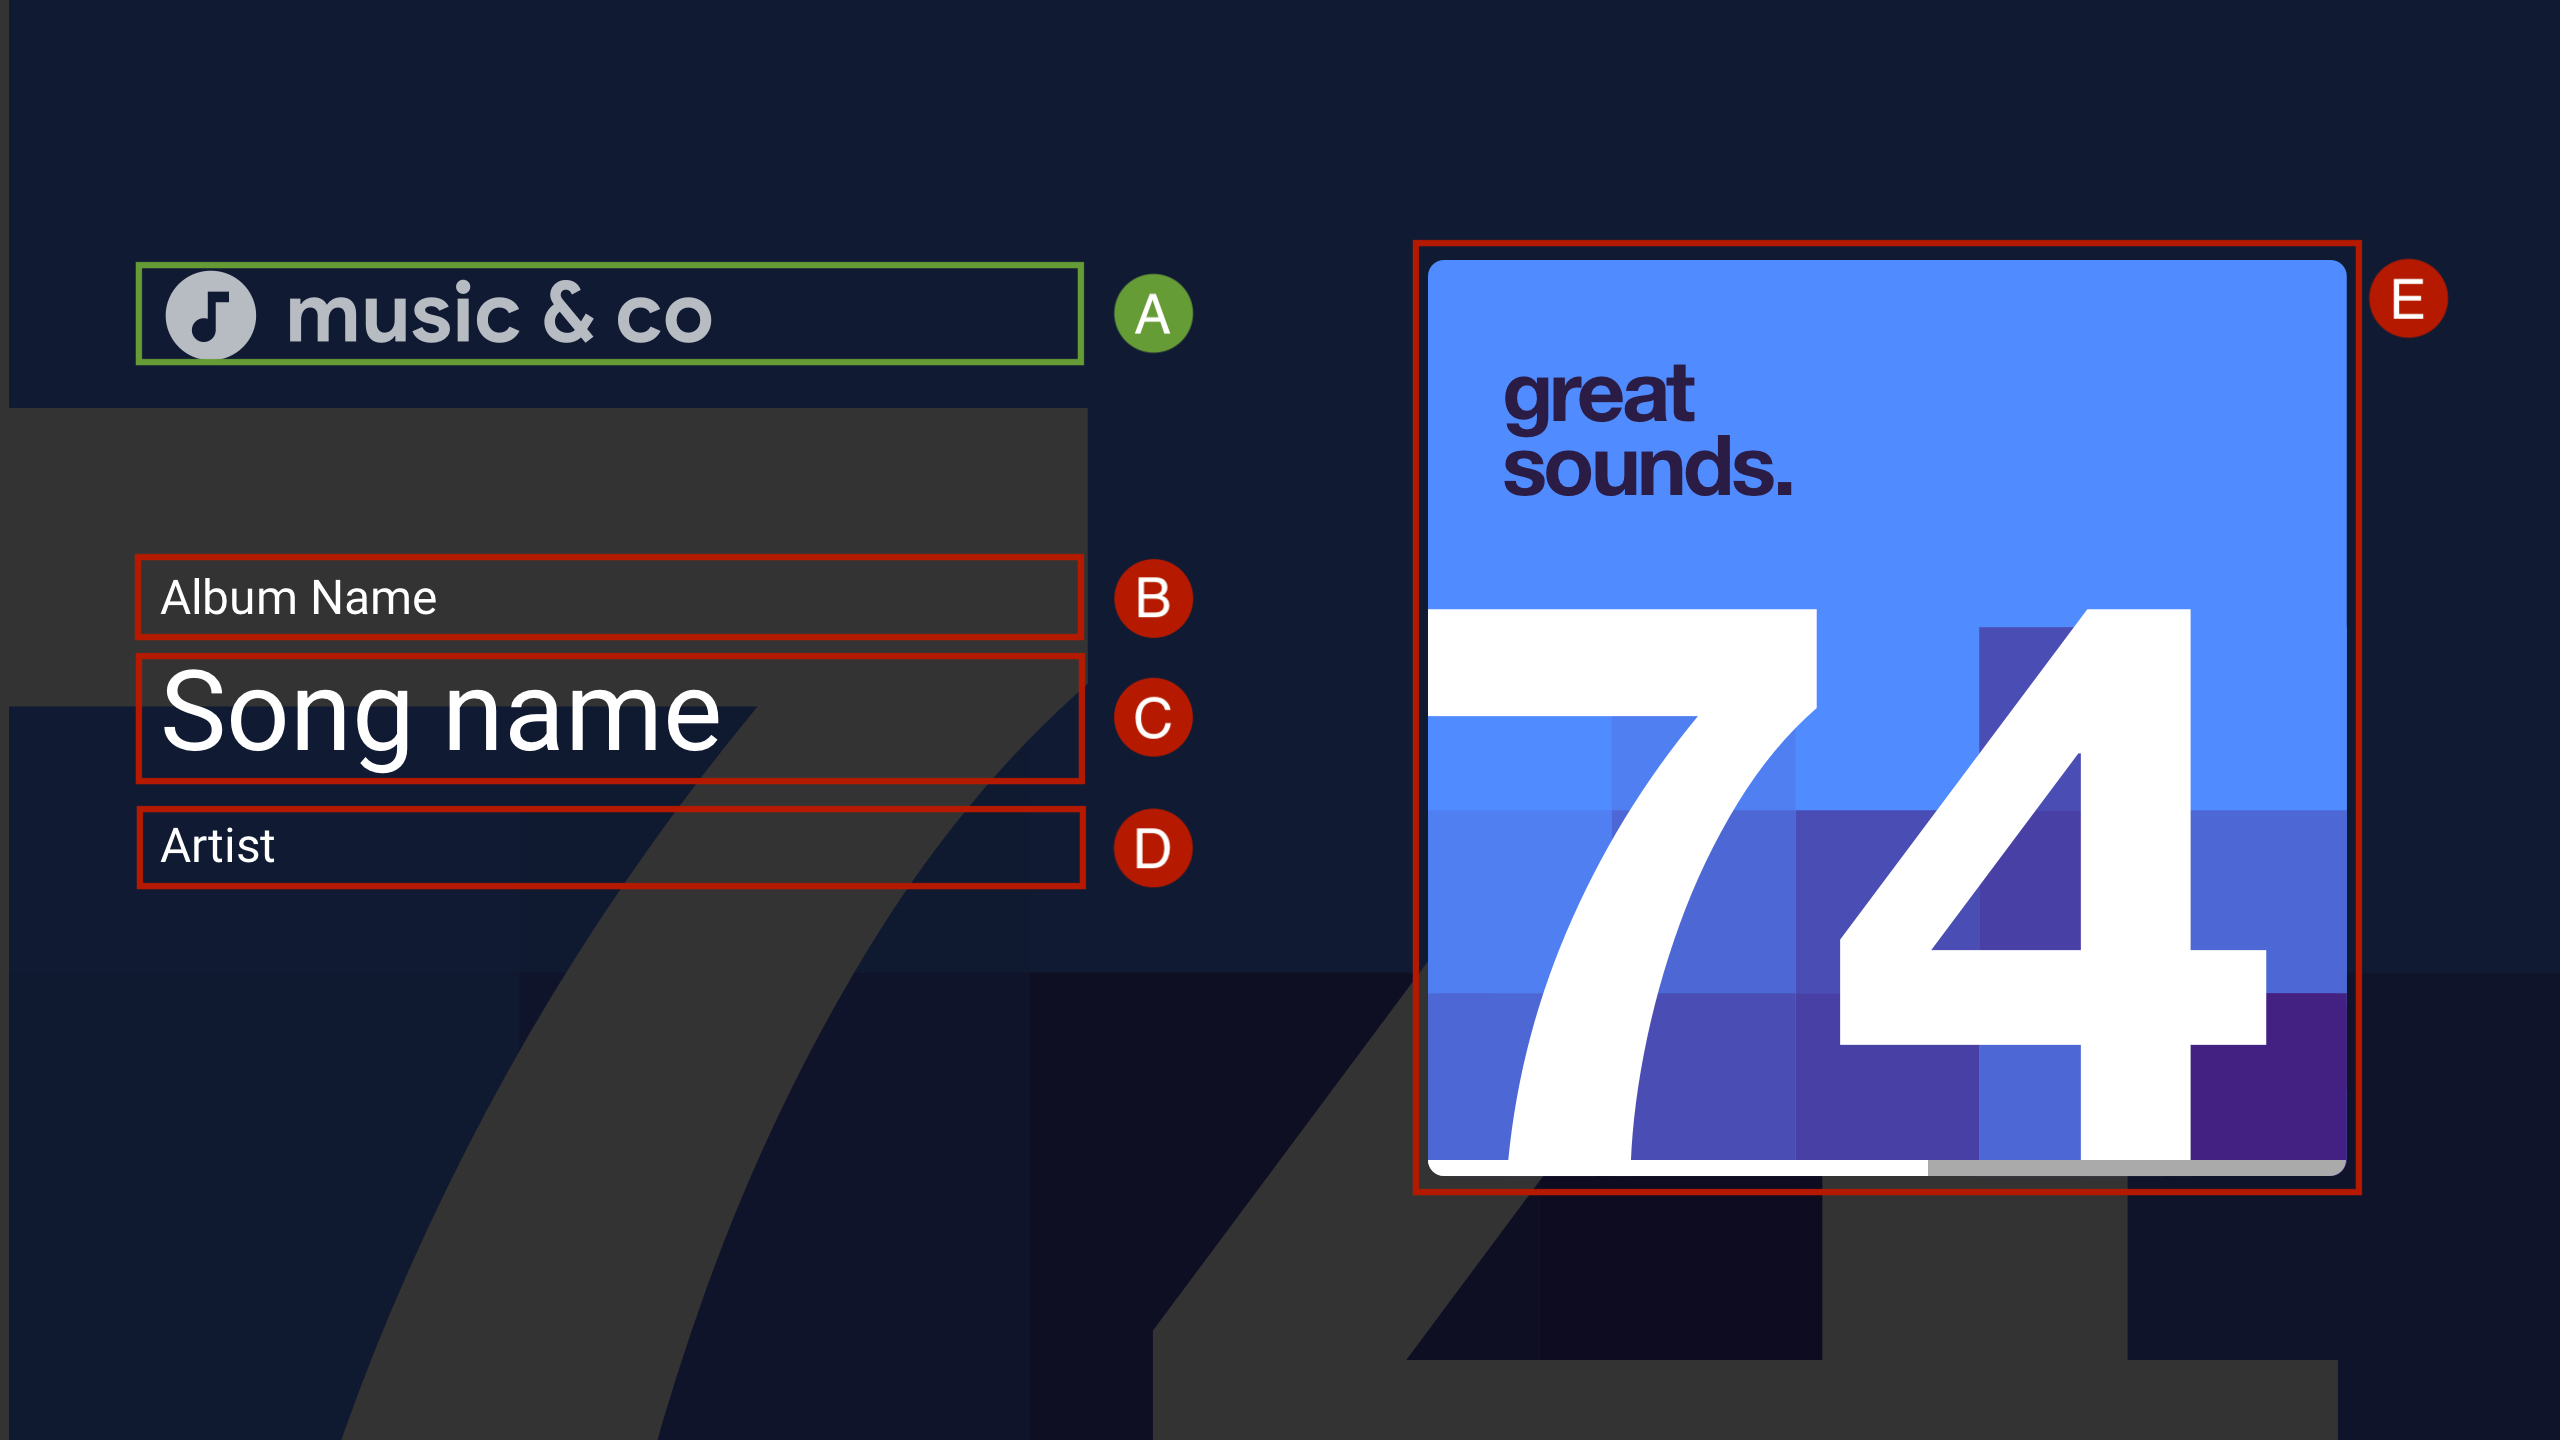
A. [`--logo-image`](https://developers.google.com/cast/docs/caf_receiver_features#styling_the_player)
B. [`MusicTrackMediaMetadata.albumName`](https://developers.google.com/cast/docs/reference/caf_receiver/cast.framework.messages.MusicTrackMediaMetadata#albumName)
C. [`MusicTrackMediaMetadata.title`](https://developers.google.com/cast/docs/reference/caf_receiver/cast.framework.messages.MusicTrackMediaMetadata#title)
D. [`MusicTrackMediaMetadata.albumArtist`](https://developers.google.com/cast/docs/reference/caf_receiver/cast.framework.messages.MusicTrackMediaMetadata#albumArtist), [`MusicTrackMediaMetadata.artist`](https://developers.google.com/cast/docs/reference/caf_receiver/cast.framework.messages.MusicTrackMediaMetadata#artist), or [`MusicTrackMediaMetadata.composer`](https://developers.google.com/cast/docs/reference/caf_receiver/cast.framework.messages.MusicTrackMediaMetadata#composer)
E. [`MusicTrackMediaMetadata.images[0]`](https://developers.google.com/cast/docs/reference/caf_receiver/cast.framework.messages.MusicTrackMediaMetadata#images)

F. [`MediaStatus.currentTime`](https://developers.google.com/cast/docs/reference/caf_receiver/cast.framework.messages.MediaStatus#currentTime)
G. [`MediaInformation.duration`](https://developers.google.com/cast/docs/reference/caf_receiver/cast.framework.messages.MediaInformation#duration)
H. Play / Pause
## Custom UI data binding
The Cast Web Receiver SDK supports using your own custom UI element rather than
the `cast-media-player`.
Custom UI data binding allows you to use your own custom UI element and use the
[`PlayerDataBinder`](https://developers.google.com/cast/docs/reference/caf_receiver/cast.framework.ui.PlayerDataBinder)
class to bind the UI to the player state instead of adding the
`cast-media-player` element to your receiver. The binder also supports sending
events for data changes, if the app does not support data binding.
const context = cast.framework.CastReceiverContext.getInstance();
const player = context.getPlayerManager();
const playerData = {};
const playerDataBinder = new cast.framework.ui.PlayerDataBinder(playerData);
// Update ui according to player state
playerDataBinder.addEventListener(
cast.framework.ui.PlayerDataEventType.STATE_CHANGED,
e => {
switch (e.value) {
case cast.framework.ui.State.LAUNCHING:
case cast.framework.ui.State.IDLE:
// Write your own event handling code
break;
case cast.framework.ui.State.LOADING:
// Write your own event handling code
break;
case cast.framework.ui.State.BUFFERING:
// Write your own event handling code
break;
case cast.framework.ui.State.PAUSED:
// Write your own event handling code
break;
case cast.framework.ui.State.PLAYING:
// Write your own event handling code
break;
}
});
context.start();
You should add at least one
[`MediaElement`](https://developer.mozilla.org/en-US/docs/Web/API/HTMLMediaElement)
to the HTML so that the Web Receiver can use it. If multiple `MediaElement`
objects are available, you should tag the `MediaElement` that you want the Web
Receiver to use. You do this by adding `castMediaElement` in the video's class
list, as shown below; otherwise, the Web Receiver will choose the first
`MediaElement`.
> [!NOTE]
> **Note:** Web Receiver currently discourages passing a custom `MediaElement` as you lose many benefits of using Web Receiver SDK.