同步多个不同的身份系统

Google Cloud Search 中的访问权限控制基于用户的 Google 账号。 将内容编入索引时,必须将各项内容中的所有 ACL 解析为有效的 Google 用户或 群组 ID(电子邮件地址)。

在许多情况下,代码库中不会直接存储 Google 账号的信息。相反,用户可以由本地账号表示,或使用联合登录与身份提供商和 ID(用户的电子邮件地址除外)来识别每个账号。此 ID 称为外部 ID

如果使用管理控制台创建身份源,可通过以下方式弥合多个身份系统之间的上述差异:

出现以下情况时,请使用身份源:

  • 代码库不知道以下用户的主电子邮件地址: Google Workspace 或 Google Cloud Directory 中的用户。
  • 代码库定义的访问权限控制群组与 Google Workspace 中基于电子邮件的群组。

身份源的优点是可通过将索引与身份映射分离来提高索引效率。利用这种分离,您就可以在创建 ACL 和将各项内容编入索引时推迟查询用户。

部署示例

下图 1 的示例说明了如何部署由企业使用的本地代码库和云端代码库。这两种代码库都使用不同类型的外部 ID 来引用用户。
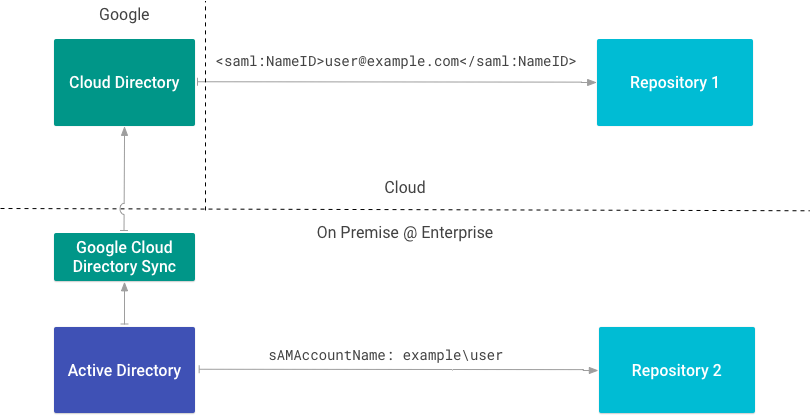
部署示例
图 1. 具有不同功能的企业部署示例 身份类型。

代码库 1 使用 SAML。因为 代码库 1 中知道用户的主电子邮件地址, Google Workspace 或 Cloud Directory,无需身份源。

代码库 2 直接与本地目录集成,并且 通过 sAMAccountName 属性标识用户。因为仓库 2 使用 sAMAccountName 属性作为外部 ID,身份源是 所需的资源。

创建身份源

如果您需要用到身份源,请参阅在 Cloud Search 中映射用户身份

在创建内容连接器之前,您必须先创建身份源,因为您需要身份源 ID 来创建 ACL 和将数据编入索引。如前所述,创建身份源时还会在 Cloud Directory 中创建自定义用户属性。利用此属性即可记录代码库中每个用户的外部 ID。该属性使用 惯例 IDENTITY_SOURCE_ID_identity

下表显示了两个身份源,一个用于将 SAM 账号名称 (sAMAccountName) 保存为外部 ID,另一个用于将用户 ID (uid) 保存为外部 ID。

身份源 用户属性 外部 ID
id1 id1_identity sAMAccountName
id2 id2_identity uid

请为用于引用企业中的用户的每个潜在外部 ID 创建一个身份源。

下表显示了具有 Google 账号和两个外部 ID(id1_identity 和 id2_identity)的用户及其值在 Cloud Directory 中的显示方式:

用户 电子邮件地址 id1_identity id2_identity
Ann ann@example.com example\ann 1001

在形成用于索引的 ACL 时,您可以使用三个不同的 ID(Google 电子邮件、sAMAccountName 和 uid)引用同一用户。

编写用户 ACL

使用 getUserPrincpal() 方法或 getGroupPrincipal() 方法使用提供的外部 ID 创建主账号。

以下示例演示了如何检索文件权限。这些权限包括有权访问该文件的每个用户的名称。

FilePermissionSample.java
/**
 * Sample for mapping permissions from a source repository to Cloud Search
 * ACLs. In this example, POSIX file permissions are used a the source
 * permissions.
 *
 * @return Acl
 * @throws IOException if unable to read file permissions
 */
static Acl mapPosixFilePermissionToCloudSearchAcl(Path pathToFile) throws IOException {
  // Id of the identity source for external user/group IDs. Shown here,
  // but may be omitted in the SDK as it is automatically applied
  // based on the `api.identitySourceId` configuration parameter.
  String identitySourceId = "abcdef12345";

  // Retrieve the file system permissions for the item being indexed.
  PosixFileAttributeView attributeView = Files.getFileAttributeView(
      pathToFile,
      PosixFileAttributeView.class,
      LinkOption.NOFOLLOW_LINKS);

  if (attributeView == null) {
    // Can't read, return empty ACl
    return new Acl.Builder().build();
  }

  PosixFileAttributes attrs = attributeView.readAttributes();
  // ...
}

以下代码段展示了如何创建拥有所有者的主账号 使用存储在属性中的外部 ID (externalUserName)。

FilePermissionSample.java
// Owner, for search quality.
// Note that for principals the name is not the primary
// email address in Cloud Directory, but the local ID defined
// by the OS. Users and groups must be referred to by their
// external ID and mapped via an identity source.
List<Principal> owners = Collections.singletonList(
    Acl.getUserPrincipal(attrs.owner().getName(), identitySourceId)
);

最后,以下代码段显示了如何创建有权读取该文件的用户的主账号。

FilePermissionSample.java
// List of users to grant access to
List<Principal> readers = new ArrayList<>();

// Add owner, group, others to readers list if permissions
// exist. For this example, other is mapped to everyone
// in the organization.
Set<PosixFilePermission> permissions = attrs.permissions();
if (permissions.contains(PosixFilePermission.OWNER_READ)) {
  readers.add(Acl.getUserPrincipal(attrs.owner().getName(), identitySourceId));
}
if (permissions.contains(PosixFilePermission.GROUP_READ)) {
  String externalGroupName = attrs.group().getName();
  Principal group = Acl.getGroupPrincipal(externalGroupName, identitySourceId);
  readers.add(group);
}
if (permissions.contains(PosixFilePermission.OTHERS_READ)) {
  Principal everyone = Acl.getCustomerPrincipal();
  readers.add(everyone);
}

掌握所有读取者和所有者的信息后,您便可以创建 ACL:

FilePermissionSample.java
// Build the Cloud Search ACL. Note that inheritance of permissions
// from parents is omitted. See `setInheritFrom()` and `setInheritanceType()`
// methods on the builder if required by your implementation.
Acl acl = new Acl.Builder()
    .setReaders(readers)
    .setOwners(owners)
    .build();

底层 REST API 使用 identitysources/IDENTITY_SOURCE_ID/users/EXTERNAL_ID 。我们回到前面的表格 如果您使用 Ann 的 id1_identity (SAMAccountName) 创建 ACL,该 ID 将 解析为:

identitysources/id1_identity/users/example/ann

整个 ID 被称为用户的中间 ID,因为它搭建了一个桥梁来联接外部 ID 和存储在 Cloud Directory 中的 Google ID。

如需了解对用于代码库的 ACL 进行建模的更多信息,请参阅 ACL

映射群组

除上述作用外,身份源还可用作 ACL 中使用的群组的命名空间。您可以使用此命名空间功能来创建和映射仅用于安全目的或存储在代码库的群组。

首先使用 Cloud Identity Groups API 创建群组并加入成员。要将群组与身份源关联,请使用身份源的资源名称作为群组的命名空间。

以下代码段显示了如何使用 Cloud Identity Groups API 创建群组:

CreateGroupCommand.java
String namespace = "identitysources/" + idSource;
Group group = new Group()
    .setGroupKey(new EntityKey().setNamespace(namespace).setId(groupId))
    .setDescription("Demo group")
    .setDisplayName(groupName)
    .setLabels(Collections.singletonMap("system/groups/external", ""))
    .setParent(namespace);
try {
  CloudIdentity service = Utils.buildCloudIdentityService();
  Operation createOperation = service.groups().create(group).execute();

  if (createOperation.getDone()) {
    // Note: The response contains the data for a Group object, but as
    // individual fields. To convert to a Group instance, either populate
    // the fields individually or serialize & deserialize to/from JSON.
    //
    // Example:
    // String json = service.getJsonFactory().toString(response);
    // Group createdGroup =  service.getObjectParser()
    //     .parseAndClose(new StringReader(json), Group.class);
    System.out.printf("Group: %s\n",
        createOperation.getResponse().toString());
  } else {
    // Handle case where operation not yet complete, poll for
    // completion. API is currently synchronous and all operations return
    // as completed.
    // ...
  }
} catch (Exception e) {
  System.err.printf("Unable to create group: %s", e.getMessage());
  e.printStackTrace(System.err);
}

创建群组 ACL

要创建群组 ACL,请使用 getGroupPrincipal() 方法使用提供的外部 ID 创建群组主账号。然后,构建 使用 Acl.Builder 如下所示:

FilePermissionSample.java
if (permissions.contains(PosixFilePermission.GROUP_READ)) {
  String externalGroupName = attrs.group().getName();
  Principal group = Acl.getGroupPrincipal(externalGroupName, identitySourceId);
  readers.add(group);
}

身份连接器

虽然您可以使用外部非 Google ID 来创建 ACL 和将各项内容编入索引,但在其外部 ID 解析为 Cloud Directory 中的 Google ID 之前,用户无法查看搜索内容。为此,有三种方法可以确保 Cloud Directory 掌握用户的 Google ID 和外部 ID 信息:

  • 通过管理控制台手动更新每个用户的配置文件。仅在使用一些用户配置文件来进行测试和原型设计时才建议使用此流程。
  • 使用 Directory API 将外部 ID 映射到 Google ID。对于无法使用身份连接器 SDK 的用户,建议使用此流程。
  • 创建身份连接器 使用 身份连接器 SDK。 此 SDK 简化了使用 Directory API 映射 ID 的流程。

身份连接器是用于将外部 ID 从企业身份(用户和群组)映射到 Google Cloud Search 使用的内部 Google 身份的程序。如果必须创建身份源,则必须先创建身份连接器。

举例来说,Google Cloud Directory Sync (GCDS) 就是一个身份连接器。此身份连接器将用户和群组信息从 Microsoft 的活动目录映射到 Cloud Directory 以及可能表示用户在其他系统中的身份的用户属性。

使用 REST API 同步身份

使用 update 方法和 REST API 同步身份。

重新映射身份

将内容的身份重新映射到其他身份后,您必须重新将内容编入索引 让新身份生效。例如,

  • 如果您尝试删除某个用户的映射,或将该映射重新映射到其他用户, 原始映射仍会保留,直到您重新编制索引为止。
  • 如果您删除了条目 ACL 中存在的映射组,然后创建了 拥有相同groupKey的新群组,那么新群组将不提供对 内容,直到将其重新编入索引。