
1. 简介
在本 Codelab 中,您将学习如何将 Dagger 迁移到 Hilt,以支持 Android 应用中的依赖项注入 (DI)。本 Codelab 将 Android 应用 Codelab 中的 Using Dagger 迁移到 Hilt。本 Codelab 旨在介绍如何规划迁移,并且在将每个 Dagger 组件迁移到 Hilt 的过程中保持应用正常运行,从而保证 Dagger 和 Hilt 在迁移期间能够并行工作。
依赖项注入有助于提高代码的可重用性,便于重构和测试。Hilt 基于流行的 DI 库 Dagger 构建而成,因此继承了 Dagger 提供的对编译时间正确性、运行时性能、可伸缩性和 Android Studio 支持。
由于许多 Android 框架类是由操作系统本身实例化而成,因此在 Android 应用中使用 Dagger 时会有关联的样板文件。Hilt 可通过自动生成和提供以下内容而消除大部分的此类样板:
- 用于集成 Android 框架类与 Dagger 的组件,若无此组件,您则需要手动创建。
- 组件的作用域注释,由 Hilt 自动生成。
- 预定义的绑定和限定符。
最重要的是,由于 Dagger 和 Hilt 可以共存,因此您可以根据需要迁移应用。
如果您在使用本 Codelab 时发现任何问题(代码漏洞、语法错误、措辞不清等),请通过 Codelab 左下角的"报告错误"链接来报告问题。
先决条件
- 有使用 Kotlin 语法的经验。
- 有使用 Dagge 的经验。
您将学习的内容
- 如何将 Hilt 添加到 Android 应用。
- 如何规划迁移策略。
- 如何将组件迁移到 Hilt 并保证现有的 Dagger 代码正常运行。
- 如何迁移作用域组件。
- 如何使用 Hilt 测试应用。
要求
- Android Studio 4.0 或更高版本。
2. 准备工作
获取代码
从 GitHub 中获取 Codelab 代码:
$ git clone https://github.com/googlecodelabs/android-dagger-to-hilt
或者,您可以下载 zip 文件形式的代码库:
打开 Android Studio
如果您需要下载 Android Studio,可以在 此处下载。
项目设置
本项目构建在多个 GitHub 分支中:
master是检出或下载的分支。是 Codelab 的入门知识。interop是 Dagger 和 Hilt 互操作分支。solution中含有本 Codelab 的解决方案,包括测试和 ViewModel。
我们建议您从 master 分支开始,按照自己的节奏逐步完成 Codelab。
在 Codelab 中,系统将显示您需要添加到项目的代码片段。在某些地方,您还必须删除代码, 我们将在代码片段的注释中明确标出这部分内容。
作为检查点,如果在特定步骤中需要帮助,您可以使用中间分支。
如要使用 Git 获取 solution 分支,请使用此命令:
$ git clone -b solution https://github.com/googlecodelabs/android-dagger-to-hilt
或从此处下载解决方案代码:
常见问题解答
运行示例应用
首先,我们来看看起始示例应用。按照下列说明在 Android Studio 中打开示例应用。
- 如果您下载了 zip 存档,请在本地解压缩文件。
- 在 Android Studio 中打开项目。
- 点击
 "Run"(运行)按钮,然后选择模拟器或连接 Android 设备。此时应会出现注册屏幕。
应用包含 4 个使用 Dagger 的不同流程(会用作 Activity 来实施):
- 注册:用户可以输入用户名和密码并接受我们的条款和条件进行注册。
- 登录:用户可以使用在注册流程中添加的凭据进行登录,也可以从应用注销。
- 主页:欢迎屏幕,用户可以查看有多少条未读通知。
- 设置:用户可以注销并刷新未读通知的数量(这将生成随机数量的通知)。
项目遵循典型的 MVVM 模式,将视图的所有复杂性都推延到 ViewModel 中。花点时间熟悉一下项目的结构。
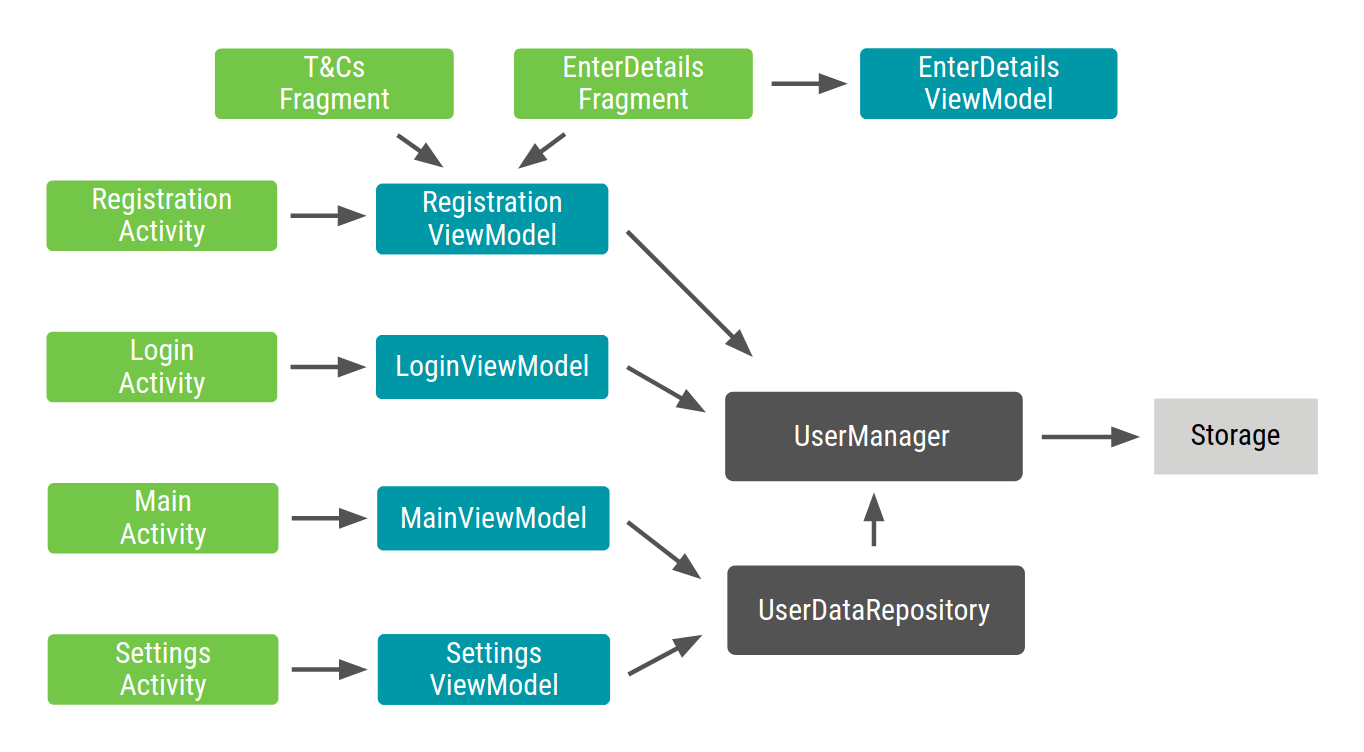
箭头表示对象之间的依赖关系。这就是我们所说的应用程序图:应用的所有类以及各个类之间的依赖关系。
master 分支中的代码会使用 Dagger 注入依赖项。无需手动创建组件,我们将重构应用程序以使用 Hilt 生成组件和其他与 Dagger 相关的代码。
Dagger 在应用中的设置如下图所示。某些类型上的点表示类型的作用域是提供它的组件:
3. 将 Hilt 添加到项目
为简单起见,已将 Hilt 依赖项添加到您最初下载的 master 分支中的该项目中。您无需将以下代码添加到项目中,因为此过程已完成。尽管如此,我们还是来看看在 Android 应用中使用 Hilt 需要做些什么。
除了库依赖项之外,Hilt 还会使用在项目中配置的 Gradle 插件。打开根(项目级)build.gradle 文件,在类路径中找到以下 Hilt 依赖项:
buildscript {
    ...
    ext.hilt_version = '2.28-alpha'
    dependencies {
        ...
        classpath "com.google.dagger:hilt-android-gradle-plugin:$hilt_version"
    }
}
打开 app/build.gradle 并检查 kotlin-kapt 插件正下方的 Hilt gradle 插件声明。
...
apply plugin: 'kotlin-kapt'
apply plugin: 'dagger.hilt.android.plugin'

android {
    ...
}
最后,Hilt 依赖项和注释处理器会包含在项目的同一个 app/build.gradle 文件中:
...
dependencies {
    implementation "com.google.dagger:hilt-android:$hilt_version"
    kapt "com.google.dagger:hilt-android-compiler:$hilt_version"
}
在您构建和同步项目时下载包括 Hilt 在内的所有库。让我们开始使用 Hilt!
4. 规划迁移
您可能很想一次将所有内容都迁移到 Hilt,但在实际项目中,您需要在保证应用构建和运行正常的情况下,将内容逐步迁移到 Hilt。
迁移到 Hilt 时,您需要将工作分成多个步骤。推荐的方法是从迁移应用或 @Singleton 组件开始,然后再迁移活动和片段。
在 Codelab 中,您需要先迁移 AppComponent,然后迁移应用程序的每个流程,迁移顺序是"注册"、"登录"、"主页"和"设置"。
在迁移过程中,您将删除所有 @Component 和 @Subcomponent 接口,并且用 @InstallIn 注释所有模块。
迁移后,应使用 @AndroidEntryPoint,对所有 Application/Activity/Fragment/View/Service/BroadcastReceiver 类进行注释, 并且还应删除所有代码实例化或传播组件。
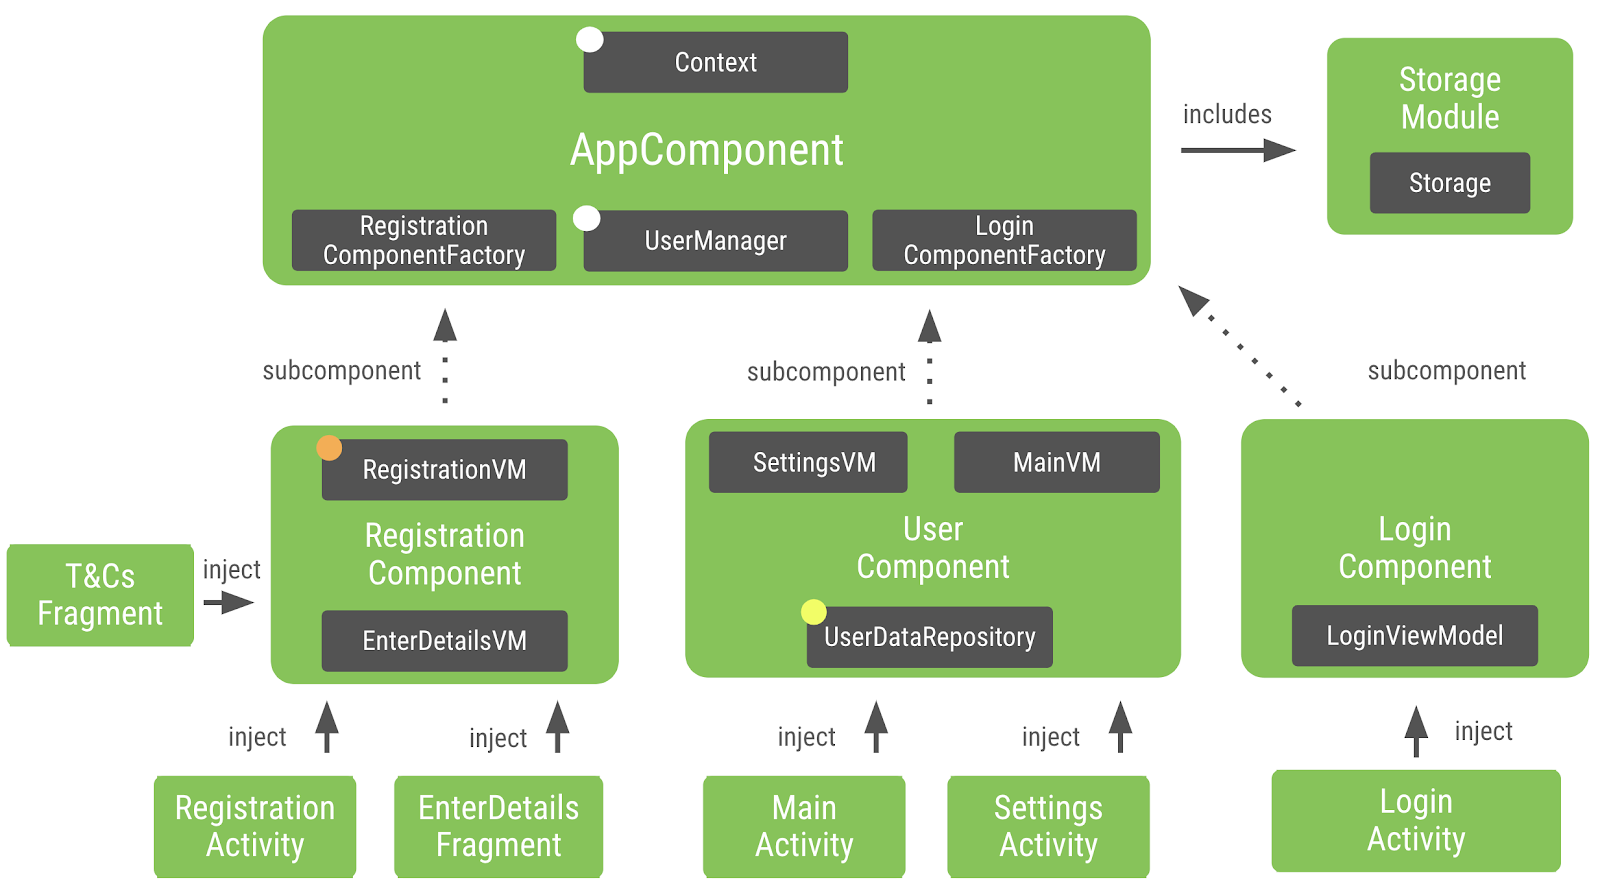
为了规划迁移,让我们从 AppComponent.kt 开始了解组件的层次结构。
@Singleton
// Definition of a Dagger component that adds info from the different modules to the graph
@Component(modules = [StorageModule::class, AppSubcomponents::class])
interface AppComponent {

    // Factory to create instances of the AppComponent
    @Component.Factory
    interface Factory {
        // With @BindsInstance, the Context passed in will be available in the graph
        fun create(@BindsInstance context: Context): AppComponent
    }

    // Types that can be retrieved from the graph
    fun registrationComponent(): RegistrationComponent.Factory
    fun loginComponent(): LoginComponent.Factory
    fun userManager(): UserManager
}
可使用 @Component 对 AppComponent 作出注释,其中包括两个模块:StorageModule 和 AppSubcomponents。
AppSubcomponents 有三个组件:RegistrationComponent、LoginComponent 和 UserComponent。
- 将
LoginComponent注入LoginActivity - 将
RegistrationComponent注入RegistrationActivity、EnterDetailsFragment和TermsAndConditionsFragment。此外,此组件的作用域为RegistrationActivity。
将 UserComponent 注入到 MainActivity 和 SettingsActivity。
对 ApplicationComponent 的引用可以替换为 Hilt 生成的组件(链接到所有生成的组件), 以映射到您在应用中迁移的组件。
5. 迁移应用组件
在本节中,您将迁移 AppComponent。您需要做一些基础工作,以保证您在以下步骤中将每个组件迁移到 Hilt 时,现有的 Dagger 代码能够正常运行。
如要初始化 Hilt 并开始生成代码,您需要用 Hilt 注释来注释 Application 类。
打开 MyApplication.kt 并将 @HiltAndroidApp 注释添加到该类。这些注释会指示 Hilt 触发代码生成,Dagger 将获取该代码并在其注释处理器中加以使用。
MyApplication.kt
package com.example.android.dagger

import android.app.Application
import dagger.hilt.android.HiltAndroidApp


@HiltAndroidApp
open class MyApplication : Application() {

    // Instance of the AppComponent that will be used by all the Activities in the project
    val appComponent: AppComponent by lazy {
        initializeComponent()
    }

    open fun initializeComponent(): AppComponent {
        // Creates an instance of AppComponent using its Factory constructor
        // We pass the applicationContext that will be used as Context in the graph
        return DaggerAppComponent.factory().create(applicationContext)
    }
}
1.迁移组件模块
首先,打开 AppComponent.kt。AppComponent 中包含两个已添加到 @Component 注释中的模块(StorageModule 和 AppSubcomponents)。您需要做的第一件事是迁移这两个模块,以便 Hilt 将其添加到生成的 ApplicationComponent 中。
为此,请打开 AppSubcomponents.kt,并使用 @InstallIn 注释来注释该类。在 @InstallIn 注释中利用参数,向适当的组件中添加模块。在本例中,当迁移应用级组件时,您应在 ApplicationComponent 中生成绑定。
AppSubcomponents.kt
// This module tells a Component which are its subcomponents
// Install this module in Hilt-generated ApplicationComponent
@InstallIn(ApplicationComponent::class)
@Module(
    subcomponents = [
        RegistrationComponent::class,
        LoginComponent::class,
        UserComponent::class
    ]
)
class AppSubcomponents
您需要在 StorageModule 中作出同样的更改。与上一步一样,打开 StorageModule.kt 并添加 @InstallIn 注释。
StorageModule.kt
// Tells Dagger this is a Dagger module
// Install this module in Hilt-generated ApplicationComponent
@InstallIn(ApplicationComponent::class)
@Module
abstract class StorageModule {

    // Makes Dagger provide SharedPreferencesStorage when a Storage type is requested
    @Binds
    abstract fun provideStorage(storage: SharedPreferencesStorage): Storage
}
通过 @InstallIn 注释再次告知 Hilt 将模块添加到 Hilt 生成的 ApplicationComponent 中。
现在我们回去检查 AppComponent.kt。AppComponent 为 RegistrationComponent、LoginComponent 和 UserManager 提供了依赖项。在接下来的步骤中,您需要准备这些组件以开展迁移工作。
2.迁移暴露的类型
当您将应用完全迁移到 Hilt 时,Hilt 支持您使用 入口点从 Dagger 手动请求依赖关系。通过使用入口点,您可以在迁移每个 Dagger 组件的过程中保持应用正常运行。在此步骤中,您将在 Hilt 生成的 ApplicationComponent 中通过手动查找依赖项来替换每个 Dagger 组件。
如要从 Hilt 生成的 ApplicationComponent 中获取 RegistrationActivity.kt 的 RegistrationComponent.Factory,您需要创建用 @InstallIn 注释的新 EntryPoint 接口。InstallIn 会指示 Hilt 从何处获取绑定。如要访问入口点,请使用 EntryPointAccessors 中相应的静态方法。参数应该是组件实例或充当组件持有者的 @AndroidEntryPoint 对象。
RegistrationActivity.kt
class RegistrationActivity : AppCompatActivity() {

    @InstallIn(ApplicationComponent::class)
    @EntryPoint
    interface RegistrationEntryPoint {
        fun registrationComponent(): RegistrationComponent.Factory
    }

    ...
}
现在,您需要用 RegistrationEntryPoint 替换与 Dagger 相关的代码。将 registrationComponent 的初始化更改为使用 RegistrationEntryPoint。进行此更 改后,RegistrationActivity 可以通过 Hilt 生成的代码访问其依赖项,直到将其迁移为使用 Hilt 为止。
RegistrationActivity.kt
        // Creates an instance of Registration component by grabbing the factory from the app graph
        val entryPoint = EntryPointAccessors.fromApplication(applicationContext, RegistrationEntryPoint::class.java)
        registrationComponent = entryPoint.registrationComponent().create()
接下来,您需要为所有其他暴露类型的组件做同样的基础工作。我们来继续处理 LoginComponent.Factory。像前面一样打开 LoginActivity 并创建一个用 @InstallIn 和 @EntryPoint 注释的 LoginEntryPoint 接口,但是要令 Hilt 组件中的 LoginActivity 的需求暴露出来。
LoginActivity.kt
    @InstallIn(ApplicationComponent::class)
    @EntryPoint
    interface LoginEntryPoint {
        fun loginComponent(): LoginComponent.Factory
    }
现在,Hilt 知道如何提供 LoginComponent,以及将旧的 inject() 调用替换为 EntryPoint 的 loginComponent()。
LoginActivity.kt
        val entryPoint = EntryPointAccessors.fromApplication(applicationContext, LoginEntryPoint::class.java)
        entryPoint.loginComponent().create().inject(this)
替换 AppComponent 中三种暴露类型中的两种,以与 Hilt EntryPoints 搭配使用。接下来,您需要对 UserManager 进行类似的更改。与 RegistrationComponent 和 LoginComponent 不同,UserManager 可同时用于 MainActivity 和 SettingsActivity。您只需要创建一次 EntryPoint 接口即可。注释的 EntryPoint 接口可用于两个活动。为简单起见,请在 MainActivity 中声明接口。
要创建 UserManagerEntryPoint 接口,请打开 MainActivity.kt,并用 @InstallIn 和 @EntryPoint 对其进行注释。
MainActivity.kt
    @InstallIn(ApplicationComponent::class)
    @EntryPoint
    interface UserManagerEntryPoint {
        fun userManager(): UserManager
    }
现在更改 UserManager 以使用 UserManagerEntryPoint。
MainActivity.kt
        val entryPoint = EntryPointAccessors.fromApplication(applicationContext, UserManagerEntryPoint::class.java)
        val userManager = entryPoint.userManager()
您需要在 SettingsActivity. 中进行同样的更改:打开 SettingsActivity.kt 并替换 UserManager 的注入方式。
SettingsActivity.kt
    val entryPoint = EntryPointAccessors.fromApplication(applicationContext, MainActivity.UserManagerEntryPoint::class.java)
    val userManager = entryPoint.userManager()
3.删除组件集
使用 @BindsInstance 将 Context 传递给 Dagger 组件是一种常见模式。但在 Hilt 中不需要这样做,因为其中已提供了可用作 预定义绑定的 Context。
通常需要 Context 来访问资源、数据库、共享首选项等。通过使用限定符 @ApplicationContext 和 @ActivityContext,Hilt 简化了对上下文的注入。
在迁移应用时,请检查哪些类型需要 Context 作为依赖项,并用 Hilt 提供的类型进行替换。
在本例中,SharedPreferencesStorage 将以 Context 作为依赖项。为了告诉 Hilt 注入上下文,打开 SharedPreferencesStorage.kt. SharedPreferences 需要应用程序的 Context,因此要在上下文参数中添加 @ApplicationContext 注释。
SharedPreferencesStorage.kt
class SharedPreferencesStorage @Inject constructor(
    @ApplicationContext context: Context
) : Storage {

//...
4.迁移注入方法
接下来,您需要检查 inject() 方法的组件代码,并用 @AndroidEntryPoint 注释相应的类。在我们的例子中,AppComponent 并未采取任何 inject() 方法,因此您无需理会。
5.删除 AppComponent 类
由于您已经为 AppComponent.kt 中列出的所有组件添加了 EntryPoint,因此可以删除 AppComponent.kt。
6.删除使用组件进行迁移的代码
您不再需要代码来初始化应用类中的自定义 AppComponent,而应用类将使用由 Hilt 生成的 ApplicationComponent。删除类主体中的所有代码。结束代码应类似于下面列出的代码。
MyApplication.kt
package com.example.android.dagger

import android.app.Application
import dagger.hilt.android.HiltAndroidApp


@HiltAndroidApp
open class MyApplication : Application()
这样,您就成功地将 Hilt 添加到了您的应用中,还删除了 AppComponent 并更改了 Dagger 代码以通过 Hilt 生成的 AppComponent 注入依赖项。当您在设备或模拟器上构建和测试应用时,该应用应该像往常一样正常运行。在下面几节中,我们将迁移各个 Activity 和 Fragment 以使用 Hilt。
6. 迁移 Activity 组件
您已经迁移了应用组件并做好了基础工作,现在可以逐个迁移各个组件。
我们首先来迁移登录流程。您应该使用 Hilt 为自己创建 LoginComponent 并在 LoginActivity 中加以使用,而不是手动完成此过程。
您可以遵循与上节中相同的步骤,但这次需要使用由 Hilt 生成的 ActivityComponent,因为我们将迁移由 Activity 管理的组件。
首先,打开 LoginComponent.kt。LoginComponent 中没有任何模块,因此您无需执行任何操作。要使 Hilt 为 LoginActivity 生成组件并将其注入,您需要使用 @AndroidEntryPoint 注释该活动。
LoginActivity.kt
@AndroidEntryPoint
class LoginActivity : AppCompatActivity() {

    //...
}
这是将 LoginActivity 迁移到 Hilt 所需添加的所有代码。由于 Hilt 将生成与 Dagger 相关的代码,所以您只需要做一些清理工作即可。删除 LoginEntryPoint 接口。
LoginActivity.kt
    //Remove
    //@InstallIn(ApplicationComponent::class)
    //@EntryPoint
    //interface LoginEntryPoint {
    //    fun loginComponent(): LoginComponent.Factory
    //}
接下来,删除 onCreate() 中的 EntryPoint 代码。
LoginActivity.kt
override fun onCreate(savedInstanceState: Bundle?) {
   //Remove
   //val entryPoint = EntryPoints.get(applicationContext, LoginActivity.LoginEntryPoint::class.java)
   //entryPoint.loginComponent().create().inject(this)

    super.onCreate(savedInstanceState)

    ...
}
由于 Hilt 将生成组件,因此请找到并删除 LoginComponent.kt。
LoginComponent 当前在 AppSubcomponents.kt 中被列为子组件。您可以安全地从子组件列表中删除 LoginComponent,因为 Hilt 会为您生成绑定。
AppSubcomponents.kt
// This module tells a Component which are its subcomponents
@InstallIn(ApplicationComponent::class)
@Module(
    subcomponents = [
        RegistrationComponent::class,
        UserComponent::class
    ]
)
class AppSubcomponents
这就是迁移 LoginActivity 以使用 Hilt 所需的全部过程。在本节中,您删除的代码比添加的代码要多得多,这太好了!使用 Hilt 时,不仅输入的代码会更少,而且这意味着需要维护和可能带来漏洞的代码也会更少。
7. 迁移 Activity 和 Fragment 组件
在本节中,您将迁移注册流程。为了规划迁移,我们看一下 RegistrationComponent。打开 RegistrationComponent.kt 并向下滚动到 inject() 函数。RegistrationComponent 会负责将依赖项注入 RegistrationActivity、EnterDetailsFragment 和 TermsAndConditionsFragment。
我们先迁移 RegistrationActivity。打开 RegistrationActivity.kt 并用 @AndroidEntryPoint 注释该类。
RegistrationActivity.kt
@AndroidEntryPoint
class RegistrationActivity : AppCompatActivity() {
    //...
}
现在 RegistrationActivity 已注册到 Hilt,您可以从 onCreate() 函数中删除 RegistrationEntryPoint 接口以及与 EntryPoint 相关的代码。
RegistrationActivity.kt
//Remove
//@InstallIn(ApplicationComponent::class)
//@EntryPoint
//interface RegistrationEntryPoint {
//    fun registrationComponent(): RegistrationComponent.Factory
//}


override fun onCreate(savedInstanceState: Bundle?) {
    //Remove
    //val entryPoint = EntryPoints.get(applicationContext, RegistrationEntryPoint::class.java)
    //registrationComponent = entryPoint.registrationComponent().create()

    registrationComponent.inject(this)
    super.onCreate(savedInstanceState)
    //..
}
Hilt 负责生成组件和注入依赖项,因此您可以删除 registrationComponent 变量和对已删除 Dagger 组件的注入调用。
RegistrationActivity.kt
// Remove
// lateinit var registrationComponent: RegistrationComponent


override fun onCreate(savedInstanceState: Bundle?) {
    //Remove
    //registrationComponent.inject(this)
    super.onCreate(savedInstanceState)

    //..
}
接下来,打开 EnterDetailsFragment.kt。与您在 RegistrationActivity 中所做的一样,用 @AndroidEntryPoint 注释 EnterDetailsFragment。
EnterDetailsFragment.kt
@AndroidEntryPoint
class EnterDetailsFragment : Fragment() {

    //...
}
由于 Hilt 将会提供依赖项,因此不需要对已删除 Dagger 组件的 inject() 调用。删除 onAttach() 函数。
下一步是迁移 TermsAndConditionsFragment。像上一步一样,打开 TermsAndConditionsFragment.kt,注释该类,然后删除 onAttach() 函数。结束代码应如下所示。
TermsAndConditionsFragment.kt
@AndroidEntryPoint
class TermsAndConditionsFragment : Fragment() {

    @Inject
    lateinit var registrationViewModel: RegistrationViewModel

    //override fun onAttach(context: Context) {
    //    super.onAttach(context)
    //
    //    // Grabs the registrationComponent from the Activity and injects this Fragment
    //    (activity as RegistrationActivity).registrationComponent.inject(this)
    //}

    override fun onCreateView(
        inflater: LayoutInflater,
        container: ViewGroup?,
        savedInstanceState: Bundle?
    ): View? {
        val view = inflater.inflate(R.layout.fragment_terms_and_conditions, container, false)

        view.findViewById<Button>(R.id.next).setOnClickListener {
            registrationViewModel.acceptTCs()
            (activity as RegistrationActivity).onTermsAndConditionsAccepted()
        }

        return view
    }
}
进行此更改后,您就迁移了 RegistrationComponent 中列出的所有活动和片段,因此可以删除 RegistrationComponent.kt。
删除 RegistrationComponent 后,需要从 AppSubcomponents 的子组件列表中删除其引用。
AppSubcomponents.kt
@InstallIn(ApplicationComponent::class)
// This module tells a Component which are its subcomponents
@Module(
    subcomponents = [
        UserComponent::class
    ]
)
class AppSubcomponents
只需再完成一项操作,即可完成注册流程的迁移。注册流程声明并使用其自己的作用域 ActivityScope。作用域会负责控制依赖项的生命周期。在本例中,您可利用 ActivityScope 告知 Dagger 在以 RegistrationActivity 开始的流程中注入 RegistrationViewModel 的相同实例。Hilt 会提供内置的 生命周期作用域以支持此过程。
打开 RegistrationViewModel,使用 Hilt 提供的 @ActivityScoped 更改 @ActivityScope 注释。
RegistrationViewModel.kt
@ActivityScoped
class RegistrationViewModel @Inject constructor(val userManager: UserManager) {

    //...
}
由于 ActivityScope 未在其他任何地方使用。因此您可以安全地删除 ActivityScope.kt。
现在运行应用并测试注册流程。您可以使用当前的用户名和密码登录,或者注销并重新注册一个新帐户,以确认该流程是否如往常一样正常运行。
目前,Dagger 与 Hilt 都能在应用中正常运行。Hilt 正在注入除 UserManager 之外的所有依赖项。在下一节中,您将通过迁移 UserManager,以从 Dagger 完全迁移到 Hilt。
8. 迁移另一个作用域组件
到目前为止,在此 Codelab 中,除了 UserComponent 组件外,您已成功将大多数示例应用迁移到 Hilt。您需要使用自定义作用域 @LoggedUserScope 来对 UserComponent 作出注释。这意味着 UserComponent 将向 @LoggedUserScope 注释的类注入 UserManager 的相同实例。
UserComponent 不会映射到任何可用的 Hilt 组件,因为其生命周期不是由 Android 类管理的。由于您无法在生成的 Hilt 层次结构中间中添加自定义组件,因此您有两个选择方案:
- 让 Hilt 和 Dagger 并排处于项目的当前阶段。
- 将作用域组件迁移到最接近的可用 Hilt 组件 (在本例中为
ApplicationComponent),并在需要时使用可空性。
你在上一步中已经实现了方案 #1。在这一步中,您将按照方案 #2 所述,将应用完全迁移到 Hilt。但是,在实际应用中,您可以自由选择更适合您的特定用例的方案。
在此步骤中,您需要将 UserComponent 迁移为 Hilt 的 ApplicationComponent 的一部分。如果该组件中有任何模块,则也要将这些模块安装在 ApplicationComponent 中。
UserComponent 中唯一的作用域类型是 UserDataRepository - 需要用 @LoggedUserScope 作出注释。由于 UserComponent 将与 Hilt 的 ApplicationComponent 融合,因此 UserDataRepository 将用 @Singleton 进行注释,并且您将更改逻辑,使其在用户注销时为空。
UserManager 已采用 @Singleton 注释,这意味着您可以在整个应用中提供相同的实例,并且可通过一些更改,使用 Hilt 实现相同的功能。我们先来更改 UserManager 和 UserDataRepository 的运行方式,因为您需要先做一些基础工作。
打开 UserManager.kt 并应用以下更改。
- 在构造函数中用
UserDataRepository替换UserComponent.Factory参数,因为您不再需要创建UserComponent的实例。UserManager.kt会以UserDataRepository作为依赖项 - 由于 Hilt 将生成组件代码,因此要删除
UserComponent及其设置器。 - 将
isUserLoggedIn()函数更改为从userRepository检查用户名,而不是检查userComponent。 - 将用户名作为参数添加到
userJustLoggedIn()函数中。 - 将
userJustLoggedIn()函数主体更改为用userDataRepository上的userName调用initData,而不是在迁移过程中要删除的userComponent。 - 将
username添加到registerUser()和loginUser()函数中的userJustLoggedIn()调用。 - 从
logout()函数中删除userComponent并用对userDataRepository.initData(username)的调用进行代替。
完成后,UserManager.kt 的最终代码应如下所示。
UserManager.kt
@Singleton
class UserManager @Inject constructor(
    private val storage: Storage,
    // Since UserManager will be in charge of managing the UserComponent lifecycle,
    // it needs to know how to create instances of it
    private val userDataRepository: UserDataRepository
) {

    val username: String
        get() = storage.getString(REGISTERED_USER)

    fun isUserLoggedIn() = userDataRepository.username != null

    fun isUserRegistered() = storage.getString(REGISTERED_USER).isNotEmpty()

    fun registerUser(username: String, password: String) {
        storage.setString(REGISTERED_USER, username)
        storage.setString("$username$PASSWORD_SUFFIX", password)
        userJustLoggedIn(username)
    }

    fun loginUser(username: String, password: String): Boolean {
        val registeredUser = this.username
        if (registeredUser != username) return false

        val registeredPassword = storage.getString("$username$PASSWORD_SUFFIX")
        if (registeredPassword != password) return false

        userJustLoggedIn(username)
        return true
    }

    fun logout() {
        userDataRepository.cleanUp()
    }

    fun unregister() {
        val username = storage.getString(REGISTERED_USER)
        storage.setString(REGISTERED_USER, "")
        storage.setString("$username$PASSWORD_SUFFIX", "")
        logout()
    }

    private fun userJustLoggedIn(username: String) {
        // When the user logs in, we create populate data in UserComponent
        userDataRepository.initData(username)
    }
}
现在已完成对 UserManager 的处理,您需要对 UserDataRepository 进行一些更改。打开 UserDataRepository.kt 并应用以下更改。
- 删除
@LoggedUserScope,因为此依赖项将由 Hilt 管理。 UserDataRepository已注入到UserManager中,为避免循环依赖,请从UserDataRepository的构造函数中删除UserManager参数。- 将
unreadNotifications更改为可空,并将设置器设为私有。 - 添加新的可空变量
username,并将设置器设为私有。 - 添加新函数
initData(),以将username和unreadNotifications设为随机数。 - 添加新函数
cleanUp(),以重置username和unreadNotifications计数。 将username设为空,将unreadNotifications设为 -1。 - 最后,在类主体中移动
randomInt()函数。
完成后,结束代码应如下所示。
UserDataRepository.kt
@Singleton
class UserDataRepository @Inject constructor() {

    var username: String? = null
        private set

    var unreadNotifications: Int? = null
        private set

    init {
        unreadNotifications = randomInt()
    }

    fun refreshUnreadNotifications() {
        unreadNotifications = randomInt()
    }
    fun initData(username: String) {
        this.username = username
        unreadNotifications = randomInt()
    }

    fun cleanUp() {
        username = null
        unreadNotifications = -1
    }

    private fun randomInt(): Int {
        return Random.nextInt(until = 100)
    }
}
要完成 UserComponent 的迁移,请打开 UserComponent.kt 并向下滚动至 inject() 方法。此依赖项可用于 MainActivity 和 SettingsActivity。我们先迁移 MainActivity。打开 MainActivity.kt 并用 @AndroidEntryPoint 注释该类。
MainActivity.kt
@AndroidEntryPoint
class MainActivity : AppCompatActivity() {

    //...
}
删除 UserManagerEntryPoint 接口,并从 onCreate() 中删除与入口点相关的代码。
MainActivity.kt
//@InstallIn(ApplicationComponent::class)
//@EntryPoint
//interface UserManagerEntryPoint {
//    fun userManager(): UserManager
//}

override fun onCreate(savedInstanceState: Bundle?) {
    //val entryPoint = EntryPoints.get(applicationContext, UserManagerEntryPoint::class.java)
    //val userManager = entryPoint.userManager()
    super.onCreate(savedInstanceState)

    //...
}
为 UserManager 声明 lateinit var,并用 @Inject 注释对其进行注释,以便 Hilt 可以注入依赖项。
MainActivity.kt
@Inject
lateinit var userManager: UserManager
由于 UserManager 将由 Hilt 注入,因此要删除对 UserComponent 的 inject() 调用。
MainActivity.kt
        //Remove
        //userManager.userComponent!!.inject(this)
        setupViews()
    }
}
这就是需要对 MainActivity 进行的所有处理。现在,您可以执行类似的更改来迁移 SettingsActivity。打开 SettingsActivity 并用 @AndroidEntryPoint 进行注释。
SettingsActivity.kt
@AndroidEntryPoint
class SettingsActivity : AppCompatActivity() {
    //...
}
为 UserManager 创建 lateinit var,并用 @Inject 进行注释。
SettingsActivity.kt
    @Inject
    lateinit var userManager: UserManager
删除入口点代码和对 userComponent() 的注入调用。完成后,onCreate() 函数应如下所示。
SettingsActivity.kt
    override fun onCreate(savedInstanceState: Bundle?) {

        super.onCreate(savedInstanceState)
        setContentView(R.layout.activity_settings)

        setupViews()
    }
现在,您可以清理未使用的资源以完成迁移。删除 LoggedUserScope.kt 和 UserComponent.kt,最后删除 AppSubcomponent.kt 类。
现在运行并再次测试应用。该应用的运行情况应该像往常与 Dagger 结合使用时一样。
9. 测试
在您完成将应用程序迁移到 Hilt 之前,还有一个关键步骤。到目前为止,您已经迁移了所有应用程序代码,但尚未迁移测试。Hilt 在测试中注入依赖项,就像在应用程序代码中一样。使用 Hilt 进行测试不需要维护,因为 Hilt 会为每个测试自动生成一组新的组件。
单元测试
我们先进行单元测试。对于单元测试,您不需要使用 Hilt,因为您可以直接调用目标类的构造函数以传递模拟依赖项,就像构造函数没有注释一样。
如果运行单元测试,您会看到 UserManagerTest 失败。在前面几节中,您已经在 UserManager 中做了大量的工作和更改,包括处理其构造函数参数。打开仍依赖于 UserComponent 和 UserComponentFactory 的 UserManagerTest.kt。由于您已经更改了 UserManager 的参数,因此请使用 UserDataRepository 的新实例来更改 UserComponent.Factory 参数。
UserManagerTest.kt
    @Before
    fun setup() {
        storage = FakeStorage()
        userManager = UserManager(storage, UserDataRepository())
    }
大功告成!再次运行测试,所有单元测试都应该通过。
添加测试依赖项
开始之前,请打开 app/build.gradle 并确认存在以下 Hilt 依赖项。Hilt 会使用 hilt-android-testing 来测试特定的注释。另外,由于 Hilt 需要为 androidTest 文件夹中的类生成代码,因此其注释处理器也必须能够在此处运行。
app/build.gradle
    // Hilt testing dependencies
    androidTestImplementation "com.google.dagger:hilt-android-testing:$hilt_version"
    kaptAndroidTest "com.google.dagger:hilt-android-compiler:$hilt_version"
UI 测试
Hilt 会为每个测试自动生成测试组件和测试应用。首先,打开 TestAppComponent.kt 以规划迁移。TestAppComponent 有 2 个模块 - TestStorageModule 和 AppSubcomponents。您已经迁移并删除了 AppSubcomponents,可以继续迁移 TestStorageModule。
打开 TestStorageModule.kt,并用 @InstallIn 注释来进行注释。
TestStorageModule.kt
@InstallIn(ApplicationComponent::class)
@Module
abstract class TestStorageModule {
    //...
您已完成所有模块的迁移,请继续并删除 TestAppComponent。
接下来,将 Hilt 添加到 ApplicationTest。您必须用 @HiltAndroidTest 注释任何使用 Hilt 的 UI 测试。此注释负责为每个测试生成 Hilt 组件。
打开 ApplicationTest.kt 并添加以下注释:
@HiltAndroidTest将告知 Hilt 为此测试生成组件。@UninstallModules(StorageModule::class)将告知 Hilt 卸载应用代码中声明的StorageModule,以便在测试期间注入TestStorageModule。- 您还需要将
HiltAndroidRule添加到ApplicationTest。此测试规则可用于管理组件的状态,并对测试执行注入。结束代码应如下所示。
ApplicationTest.kt
@UninstallModules(StorageModule::class)
@HiltAndroidTest
class ApplicationTest {

    @get:Rule
    var hiltRule = HiltAndroidRule(this)

    //...
由于 Hilt 会为每个工具测试生成一个新的 Application,因此我们需要指定在运行 UI 测试时应使用 Hilt 生成的 Application。为此,我们需要一个自定义的测试运行程序。
Codelab 应用已具有自定义测试运行程序。打开 MyCustomTestRunner.kt
Hilt 已附带 Application,可在名为 HiltTestApplication. 的测试中加以应用。您需要在 newApplication() 函数主体中用 HiltTestApplication::class.java 更改 MyTestApplication::class.java。
MyCustomTestRunner.kt
class MyCustomTestRunner : AndroidJUnitRunner() {

    override fun newApplication(cl: ClassLoader?, name: String?, context: Context?): Application {

        return super.newApplication(cl, HiltTestApplication::class.java.name, context)
    }
}
进行此更改后,现在可以安全地删除 MyTestApplication.kt 文件。继续并运行测试。所有测试都应通过。
10. [可选] 迁移 ViewModel
Hilt 包含可用于从其他 Jetpack 库(如 WorkManager 和 ViewModel)提供类的扩展。 本 Codelab 项目中的 ViewModel 是普通类,其并不能在 ViewModel 中扩展 架构组件。 在为 ViewModel 添加 Hilt 支持之前,我们需要先将应用中的 ViewModel 迁移到架构组件中。
如要与 ViewModel 集成,您需要将以下附加依赖项添加到 gradle 文件中。我们已为您添加了这些依赖项。请注意,除了库之外,您还需要添加一个在 Hilt 注释处理器之上运行的附加注释处理器:
// app/build.gradle file

...
dependencies {
  ...
  implementation "androidx.fragment:fragment-ktx:1.2.4"
  implementation 'androidx.hilt:hilt-lifecycle-viewmodel:$hilt_jetpack_version'
  kapt 'androidx.hilt:hilt-compiler:$hilt_jetpack_version'
  kaptAndroidTest 'androidx.hilt:hilt-compiler:$hilt_jetpack_version'
}
如要将普通类迁移到 ViewModel,您需要扩展 ViewModel()。
打开 MainViewModel.kt 并添加 : ViewModel()。完成上述操作,即可迁移到架构组件 ViewModel,但是您还需要告知 Hilt 如何提供 ViewModel 的实例。为此,要在 ViewModel 的构造函数中添加 @ViewModelInject 注释。将 @Inject 注释替换为 @ViewModelInject。
MainViewModel.kt
class MainViewModel @ViewModelInject constructor(
    private val userDataRepository: UserDataRepository
): ViewModel() {
//...
}
接下来,打开 LoginViewModel 并进行相同的更改。结束代码应如下所示。
LoginViewModel.kt
class LoginViewModel @ViewModelInject constructor(
    private val userManager: UserManager
): ViewModel() {
//...
}
同样,打开 RegistrationViewModel.kt,迁移到 ViewModel(),并添加 Hilt 注释。无需使用 @ActivityScoped 注释,因为您可使用扩展方法 viewModels() 和 activityViewModels() 控制此 ViewModel 的作用域。
RegistrationViewModel.kt
class RegistrationViewModel @ViewModelInject constructor(
    val userManager: UserManager
) : ViewModel() {
进行相同的更改以迁移 EnterDetailsViewModel 和 SettingViewModel。这两个类的结束代码应如下所示。
EnterDetailsViewModel.kt
class EnterDetailsViewModel @ViewModelInject constructor() : ViewModel() {
SettingViewModel.kt
class SettingsViewModel @ViewModelInject constructor(
     private val userDataRepository: UserDataRepository,
     private val userManager: UserManager
) : ViewModel() {
现在,所有 ViewModel 都已迁移到架构组件 Viewmodel 中,并使用 Hilt 注释对其进行了注释,您可以迁移它们的注入方式。
接下来,您需要更改 ViewModel 在视图层中初始化的方式。ViewModel 由操作系统创建而成,获取它们的方法是使用 by viewModels() 委托函数。
打开 MainActivity.kt,将 @Inject 注释替换为 Jetpack 扩展。注意,您还需要删除 lateinit、将 var 更改为 val 并标记字段 private。
MainActivity.kt
//    @Inject
//    lateinit var mainViewModel: MainViewModel
    private val mainViewModel: MainViewModel by viewModels()
同样,打开 LoginActivity.kt 并更改 ViewModel 的获取方式。
LoginActivity.kt
//    @Inject
//    lateinit var loginViewModel: LoginViewModel
    private val loginViewModel: LoginViewModel by viewModels()
接下来,打开 RegistrationActivity.kt 并应用同样的更改来获取 registrationViewModel。
RegistrationActivity.kt
//    @Inject
//    lateinit var registrationViewModel: RegistrationViewModel
    private val registrationViewModel: RegistrationViewModel by viewModels()
打开 EnterDetailsFragment.kt。替换 EnterDetailsViewModel 的获取方式。
EnterDetailsFragment.kt
private val enterDetailsViewModel: EnterDetailsViewModel by viewModels()
同样,替换 registrationViewModel 的获取方式,但是这次要使用 activityViewModels() 委托函数而非 viewModels().。注入 registrationViewModel 时,Hilt 将会注入活动级作用域的 ViewModel。
EnterDetailsFragment.kt
private val registrationViewModel: RegistrationViewModel by activityViewModels()
打开 TermsAndConditionsFragment.kt,然后再次使用 activityViewModels() 扩展函数代替 viewModels() 来获取 registrationViewModel.
TermsAndConditionsFragment.kt
private val registrationViewModel: RegistrationViewModel by activityViewModels()
最后,打开 SettingsActivity.kt 并迁移 settingsViewModel 的获取方式。
SettingsActivity.kt
private val settingsViewModel: SettingsViewModel by viewModels()
现在运行应用,并确认一切正常。
11. 恭喜!
恭喜!您已成功迁移应用以使用 Hilt!您不仅完成了迁移,而且在逐个迁移 Dagger 组件的过程中还保证了应用程序的正常运行。
在本 Codelab 中,您已学习如何从处理应用程序组件开始,建立让 Hilt 能够使用现有 Dagger 组件所必需的基础。通过对活动和片段使用 Hilt 注释并删除与 Dagger 相关的代码,将每个 Dagger 组件迁移到 Hilt。每次完成组件迁移后,应用都会按预期工作和运行。您还使用 Hilt 提供的 @ActivityContext 和 @ApplicationContext 注释迁移了 Context 和 ApplicationContext 依赖项。您还迁移了其他 Android 组件。最后,您还迁移了测试,完成了向 Hilt 的迁移。
延伸阅读
如要了解有关将应用迁移到 Hilt 的更多信息,请查看"迁移到 Hilt"文档。除了有关将 Dagger 迁移到 Hilt 的更多信息之外,您还可以了解有关迁移 dagger.android 应用的信息。