
Get started with the Streetscape Geometry and Rooftop anchors APIs in ARCore
About this codelab
1. Before you begin
ARCore is Google's framework for building augmented reality (AR) experiences on smartphones. The Geospatial Streetscape Geometry and Rooftop anchor APIs help your AR experiences understand buildings around your users.
In this codelab, you build an AR app that visualizes streetscape geometry in your area and lets you decorate its sides. Then, you use rooftop anchors to add a decoration to the top of rooftops around you.
Prerequisites
- Basic knowledge of AR
- Basic knowledge of the ARCore Geospatial API
What you'll learn
- How to set up a Google Cloud project that can use ARCore Geospatial APIs.
- How to obtain streetscape geometry from the Geospatial API.
- How to visualize buildings and terrains obtained from streetscape geometry.
- How to perform basic calculations on the obtained polygons.
- How to perform a hit-test on the geometry.
- How to use rooftop anchors to attach content to the top of buildings.
What you'll need
- A supported ARCore Android device that's connected with a USB cable to your development machine and configured with USB debugging.
- Google Play Services for AR 1.37 or higher installed on the Android development device.
- Android Studio installed and configured to build Android apps.
2. Set up your environment
To use the Geospatial APIs with Kotlin and Android Studio, you need a Google Cloud project and our starter project.
Set up a Google Cloud project
The ARCore Geospatial API connects with Google Cloud to provide localization information from Google's Visual Positioning System (VPS) in areas covered by Google Street View.
To use this server in your project, follow these steps:
- Create a project in Google Cloud.

- In the Project name field, enter an appropriate name, such as
ARCore Geospatial API project, and choose any location. - Click Create.
- In the Google Cloud console on the project-selector page, click Create Project.
- Click the following link to view the ARCore API for this project and click Enable:
- Create an API key for your project:
- Under APIs & services, select Credentials.
- Click Create credentials and select API key.
- Note the key because you need it later.
You created a Google Cloud project with API-key authorization, and you're ready to use the Geospatial API in the sample project.
Set up Android Studio
To get started with the Geospatial API, we provided a starter project that includes the basics of an ARCore project integrated with the Geospatial API.
To set up Android Studio, follow these steps:
- Open Android Studio and do one of the following:
- If you already have a project open, click File > New > Project from version control.
- If you see the Welcome to Android Studio window, click Get from VCS.
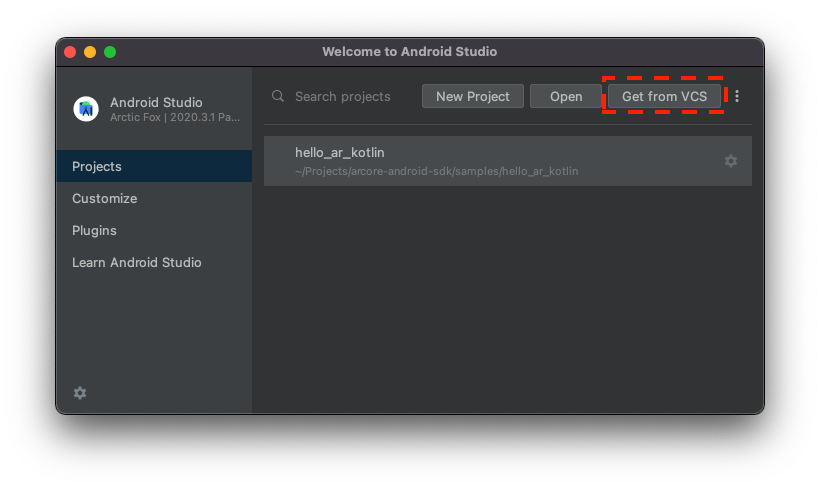
- Select Git and enter
https://github.com/google-ar/codelab-streetscape-geometry-rooftop-anchors.gitto import the project.
Integrate the API key with the Android Studio project
To associate the API key from Google Cloud with your project, follow these steps:
- In Android Studio, click app > src and double-click
AndroidManifest.xml. - Find the following
meta-dataentries:<meta-data
android:name="com.google.android.ar.API_KEY"
android:value="API_KEY" /> - Replace the
API_KEYplaceholder with the API key that you created in your Google Cloud project. The value stored incom.google.android.ar.API_KEYauthorizes this app to use the Geospatial API.
Verify your project
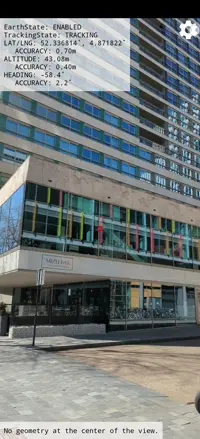
- To verify your project, run your app on your development device. You should see a camera view and geospatial debug information at the top of the screen. You should also see buttons and controls that seem to have no functionality; you program that functionality into your project throughout this codelab.
3. Visualize streetscape-geometry data
After you confirm that the Geospatial API works on your device, you obtain streetscape geometry from the Geospatial API.
Enable streetscape geometry
- In the
StreetscapeGeometryActivity.ktfile, find the following line:// TODO: Enable Streetscape Geometry. - After this line, enable the streetscape-geometry mode:
streetscapeGeometryMode = Config.StreetscapeGeometryMode.ENABLED
Obtain streetscape geometry
- In the
StreetscapeGeometryActivity.ktfile, find the following line:// TODO: Obtain Streetscape Geometry. - After this line, obtain streetscape geometry by getting all
Trackableobjects and filtering byStreetscapeGeometry:val streetscapeGeometry = session.getAllTrackables(StreetscapeGeometry::class.java) - On the next line, add the following code:
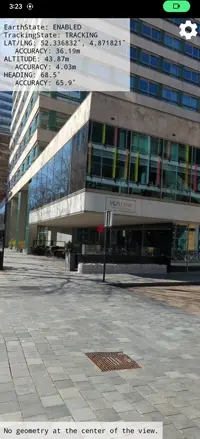
streetscapeGeometryRenderer.render(render, streetscapeGeometry) - Run your app and visit a building in your area.
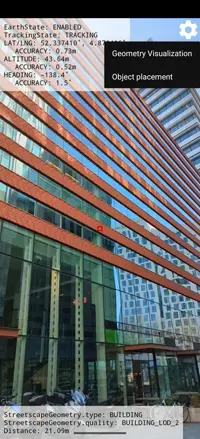
- After Geospatial localization is completed, tap
 Settings and enable streetscape-geometry visualization.
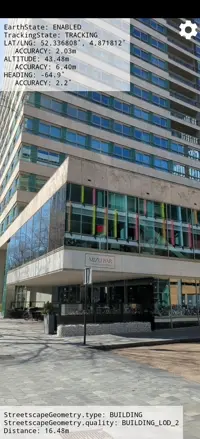
 - Look at a building in AR. Each segmented building has its own color, and the
QualityandTypeEnums of the centermost geometry are displayed.

4. Perform a hit-test with streetscape-geometry data
Now that you can see the streetscape geometry, you can use a hit-test to decorate the building. A hit-test finds an intersection between virtual geometry and a ray. You use a hit-test to find the geometry on which a user taps.
Perform a hit-test
In this section, you place a star on the facade of the building when the user taps on its geometry. You do so with a hit-test from the user's perspective in the world, and register which AR objects it encounters on the way out. You then use this information to check whether the user tapped a building polygon.
- In the
StreetscapeCodelabRenderer.ktfile, find the following line:// TODO: determine the Streetscape Geometry at the center of the viewport - After this line, add the following code:
val centerHits = frame.hitTest(centerCoords[0], centerCoords[1])
val hit = centerHits.firstOrNull {
  val trackable = it.trackable
  trackable is StreetscapeGeometry && trackable.type == StreetscapeGeometry.Type.BUILDING
} ?: return
Add a star decoration upon a tap
- In the
StreetscapeCodelabRenderer.ktfile, find the following line:// TODO: Create an anchor for a star, and add it to the starAnchors object. - After this line, add the following code:
val transformedPose = ObjectPlacementHelper.createStarPose(hit.hitPose)
val anchor = hit.trackable.createAnchor(transformedPose)
starAnchors.add(anchor)ObjectPlacementHelperclass determines an appropriate location to put your star by looking at the hit pose. ThestarAnchorsobject is used to render the stars in the AR view.
Try it
- Run your app and visit a building in your area.
- After geospatial localization is complete, aim your camera at the building and tap the screen. You see a star appear on the building at the center of the screen.
5. Use rooftop-anchor data
Finally, you use rooftop anchors to add decorations to the top of the building. Rooftop anchors help you attach AR anchors to the top of buildings with a latitude and longitude. You use these anchors to attach balloons to buildings around the user.
Add behaviors to the balloon mode
The project has two asset-placement modes: the sunflower mode that you already used and the balloon mode.
To program behavior for the balloon mode, follow these steps:
- In the
StreetscapeCodelabRenderer.ktfile, find the following line:// TODO: Create an anchor for a balloon and add it to the balloonAnchors object. - Use the hit pose to create a great spot for your balloon:
val transformedPose = ObjectPlacementHelper.createBalloonPose(frame.camera.pose, hit.hitPose) - Convert the
transformedPosevariable to a geospatial pose:val earth = session?.earth ?: return
val geospatialPose = earth.getGeospatialPose(transformedPose) - Create a rooftop anchor with the transformed latitude and longitude:
earth.resolveAnchorOnRooftopAsync(
  geospatialPose.latitude, geospatialPose.longitude,
  0.0,
  transformedPose.qx(), transformedPose.qy(), transformedPose.qz(), transformedPose.qw()
) { anchor, state ->
  if (!state.isError) {
    balloonAnchors.add(anchor)
  }
}
Try it out
- Run your app and visit a building in your area.
- After geospatial localization is complete, change to the balloon mode and tap a building. You see a balloon appear over the top of the building.
6. Conclusion
Congratulations! You built an AR app that visualizes streetscape geometry in your area and lets you decorate its sides with stars. You also used rooftop anchors to add a balloon to the top of rooftops around you.