
1. はじめに
Google Chat アプリを使えば、サービスやリソースを Google Chat に取り入れることができるため、ユーザーは会話から離れることなくすばやく情報を取得したり、対処したりできます。
この Codelab では、Node.js と Cloud Functions を使用してアンケート アプリを作成してデプロイする方法を学びます。

学習内容
- Cloud Shell を使用する
- Cloud Functions へのデプロイ
- スラッシュ コマンドとダイアログを使用してユーザー入力を取得する
- インタラクティブなカードを作成する
2. 設定と要件
Google Cloud プロジェクトを作成して、Chat アプリで使用する API とサービスを有効にします。
前提条件
Google Chat アプリを開発するには、Google Chat へのアクセス権を持つ Google Workspace アカウントが必要です。Google Workspace アカウントをまだお持ちでない場合は、この Codelab を先に進める前に、Google Workspace アカウントを作成してログインしてください。
セルフペース型の環境設定
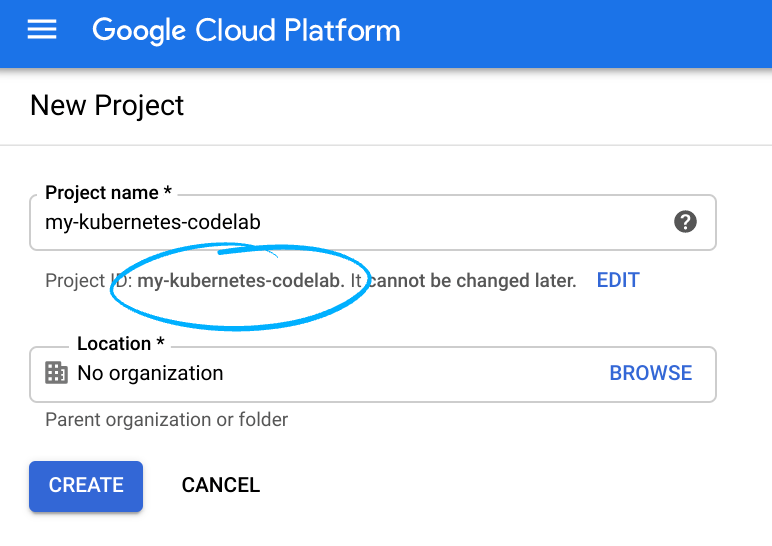
- Google Cloud コンソールを開き、プロジェクトを作成します。
プロジェクト ID、すべの Google Cloud プロジェクトにおいて一意の名前を覚えておいてください(上記の名前はすでに使用されており、ご使用いただけません)。以降、この Codelab ではPROJECT_IDと呼びます。
![[プロジェクトを選択] メニュー](https://lh5.googleusercontent.com/MW5TsN0_wuGhomk2FUp9590LyW8p1t8mvaMUkdNUqacEcEqXYLD5jTLzM-jIAGqFkWu-aaLmQmsHALV-gTR5Q1oyR4o2WAmcsBG1DRVIugd9I0V6ADQbTM2i3X0kmfpXjr8JrFRPZg)
![[新しいプロジェクト] ボタン](https://lh4.googleusercontent.com/lMRhd6IHUnUIoHLvfFhT3cFIZUeFBlydTk2qP4IkA9or1nqO1Xi7QLiL7Q3r0pLG4uOLr_P1CABHIOk07z6TRw-G0JRPz8JiFzsPcU_e73BY0BPmVNSWvM3DYvCcty-SvuEBTpr1Ig)
- 次に、Google Cloud リソースを使用するために、Cloud コンソールで課金を有効にします。
この Codelab の操作をすべて行って、費用が生じたとしても、少額です。Codelab の最後にある「クリーンアップ」セクションの指示に従ってください。ここでは、このチュートリアルを終了した後に課金が発生しないようにリソースをシャットダウンするように指示されています。Google Cloud の新規ユーザーは、300 米ドル分の無料トライアル プログラムをご利用いただけます。
Google Cloud Shell
Google Cloud はノートパソコンからリモートで操作できますが、この Codelab では Google Cloud Shell(Google Cloud 上で動作するコマンドライン環境)を使用します。
Cloud Shell をアクティブにする
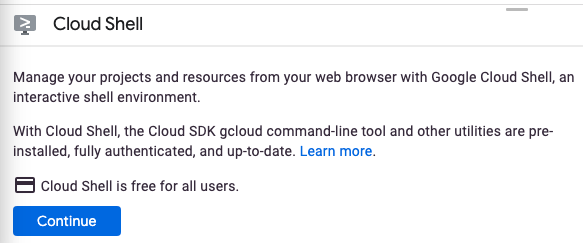
- Cloud コンソールで、[Cloud Shell をアクティブにする]
をクリックします。
Cloud Shell を初めて起動するときは、説明的なウェルカム メッセージが表示されます。ウェルカム メッセージが表示された場合は、[続行] をクリックします。ウェルカム メッセージは今後表示されません。次に、ウェルカム メッセージを示します。
Cloud Shell のプロビジョニングと接続に少し時間がかかる程度です。接続すると、Cloud Shell ターミナルが表示されます。
この仮想マシンは。必要なすべての開発ツールで読み込まれます。永続的なホーム ディレクトリが 5 GB 用意されており、Google Cloud で稼働します。そのため、ネットワークのパフォーマンスと認証機能が大幅に向上しています。この Codelab での作業のすべては、ブラウザまたは Chromebook から実行できます。Cloud Shell に接続すると、すでに認証は完了しており、プロジェクトに各自のプロジェクト ID が設定されていることがわかります。 - Cloud Shell で次のコマンドを実行して、認証されたことを確認します。
gcloud auth list
コマンド出力Credentialed Accounts ACTIVE ACCOUNT * <my_account>@<my_domain.com>
$ gcloud config set account <ACCOUNT>
![メニューバーの [Cloud Shell] アイコン](https://lh3.googleusercontent.com/lpGF5r-09ItHCVoQCTlzkAfxKQkIamVA3yioveUKbPTGP1aiji3aYU5Fwmz0j__0s1birhUiPDhSopw4wY9fd1vFc3WjwKRbBCshiQmyCpYOJa3bZgzMuZR3uovz_JlWNMsl7ZxAMw)

- 正しいプロジェクトが選択されていることを確認します。Cloud Shell で、次のコマンドを実行します。
gcloud config list project
[core]
project = <PROJECT_ID>
gcloud config set project <PROJECT_ID>
Updated property [core/project].
Codelab を終了したら、コマンドライン操作を使用してファイルを編集します。ファイル編集の場合、Cloud Shell の組み込みコードエディタである Cloud Shell エディタで操作するには、Cloud Shell ツールバーの右側にある [エディタを開く] をクリックします。Cloud Shell では、広く使用されているエディタ(Vim や Emacs など)も使用できます。
3. Cloud Functions、Cloud Build、Google Chat API を有効にする
Cloud Shell から、これらの API とサービスを有効にします。
gcloud services enable \
  cloudfunctions \
  cloudbuild.googleapis.com \
  chat.googleapis.com
このオペレーションには少し時間がかかることがあります。
完了すると、次のような成功メッセージが表示されます。
Operation "operations/acf.cc11852d-40af-47ad-9d59-477a12847c9e" finished successfully.
4. 最初の Chat アプリを作成する
プロジェクトを初期化する
開始するには、シンプルな「Hello World」アプリを作成してデプロイします。Chat アプリは、https リクエストに対応し、JSON ペイロードで応答するウェブサービスです。このアプリの場合は、Node.js と Cloud Functions を使用します。
Cloud Shell で、poll-app という名前の新しいディレクトリを作成してそのディレクトリに移動します。
mkdir ~/poll-app
cd ~/poll-app
Codelab の残りのすべての作業と、作成するファイルは、このディレクトリ内にあります。
Node.js プロジェクトを初期化します。
npm init
NPM がプロジェクト構成に関するいくつかの質問(名前やバージョンなど)を行います。各質問に対して、ENTER を押してデフォルト値を受け入れます。デフォルトのエントリ ポイントとは、次に作成する index.js という名前のファイルです。
Chat アプリのバックエンドを作成する
ここで、アプリの作成を開始します。次の内容が含まれる index.js という名前のファイルを作成します。
/**
 * App entry point.
 */
exports.app = async (req, res) => {
  if (!(req.method === 'POST' && req.body)) {
      res.status(400).send('')
  }
  const event = req.body;
  let reply = {};
  if (event.type === 'MESSAGE') {
    reply = {
        text: `Hello ${event.user.displayName}`
    };
  }
  res.json(reply)
}
このアプリはまだ多くのことを行いませんが、問題ありません。後で機能を追加します。
アプリをデプロイする
「Hello World」アプリをデプロイするには、Cloud Function をデプロイして、Google Cloud コンソールで Chat アプリを構成し、アプリにテスト メッセージを送信してデプロイを確認します。
Cloud Functions 関数のデプロイ
「Hello World」アプリの Cloud Function をデプロイするには、次のコマンドを入力します。
gcloud functions deploy app --trigger-http --security-level=secure-always --allow-unauthenticated --runtime nodejs14
完了すると、出力は次のようになります。
availableMemoryMb: 256
buildId: 993b2ca9-2719-40af-86e4-42c8e4563a4b
buildName: projects/595241540133/locations/us-central1/builds/993b2ca9-2719-40af-86e4-42c8e4563a4b
entryPoint: app
httpsTrigger:
  securityLevel: SECURE_ALWAYS
  url: https://us-central1-poll-app-codelab.cloudfunctions.net/app
ingressSettings: ALLOW_ALL
labels:
  deployment-tool: cli-gcloud
name: projects/poll-app-codelab/locations/us-central1/functions/app
runtime: nodejs14
serviceAccountEmail: poll-app-codelab@appspot.gserviceaccount.com
sourceUploadUrl: https://storage.googleapis.com/gcf-upload-us-central1-66a01777-67f0-46d7-a941-079c24414822/94057943-2b7c-4b4c-9a21-bb3acffc84c6.zip
status: ACTIVE
timeout: 60s
updateTime: '2021-09-17T19:30:33.694Z'
versionId: '1'
httpsTrigger.url プロパティでデプロイされた関数の URL をメモします。これを次のステップで使用します。
アプリを構成する
アプリを構成するには、Cloud コンソールの Chat 構成ページに移動します。
- [この Chat アプリを Workspace アドオンとして構築する] のチェックを外し、[無効にする] をクリックして確定します。
- [アプリ名] に「PollCodelab」と入力します。
- [アバターの URL] に「
https://raw.githubusercontent.com/google/material-design-icons/master/png/social/poll/materialicons/24dp/2x/baseline_poll_black_24dp.png」と入力します。 - [説明] に「Codelab 用のアンケート アプリ」と入力します。
- [機能] で、[1:1 のメッセージを受信する] と [スペースとグループの会話に参加する] を選択します。
- [接続設定] で、[HTTP エンドポイント URL] を選択し、Cloud Function の URL を貼り付けます(最後のセクションの
httpsTrigger.urlプロパティ)。 - [権限] で、[ドメイン内の特定のユーザーとグループ] を選択し、メールアドレスを入力します。
- [保存] をクリックします。
アプリでメッセージを送信する準備ができました。
アプリをテストする
先に進む前に、Google Chat でスペースに追加して、アプリが動作していることを確認します。
- Google Chat に移動します。
- Chat の横にある [+] > [アプリを検索] をクリックします。
- 検索で、「PollCodelab」と入力します。
- [チャット] をクリックします。
- アプリにメッセージを送信するには、「Hello」と入力して、Enter キーを押します。
アプリが短い hello メッセージで応答するはずです。
基本構造があるので、さらに役立つものにしましょう。
5. アンケート機能を作成する
アプリの仕組みの概要
アプリは主に 2 つの部分で構成されます。
- アンケートを構成するためのダイアログを表示するスラッシュ コマンド
- 投票と結果を表示するためのインタラクティブなカード。
アプリには、アンケートの構成と結果を保存するための状態も必要です。これを Firestore または任意のデータベースで行うことも、状態をアプリのメッセージ自体に保存することもできます。このアプリはチームの簡単な非公式のアンケートを対象としているため、アプリ メッセージの状態の保存はこのユースケースに最適です。
アプリのデータモデル(Typescript で表現)は次のとおりです。
interface Poll {
  /* Question/topic of poll */
  topic: string;
  /** User that submitted the poll */
  author: {
    /** Unique resource name of user */
    name: string;
    /** Display name */
    displayName: string;
  };
  /** Available choices to present to users */
  choices: string[];
  /** Map of user ids to the index of their selected choice */
  votes: { [key: string]: number };
}
トピックや質問や選択肢のリストのほかに、状態には作成者の ID と名前、記録された投票が含まれます。ユーザーが複数回投票することを防ぐために、投票はユーザー ID の選択した選択肢へのマップとして保存されます。
もちろん、多数のさまざまなアプローチがありますが、これによってスペース内で簡単なアンケートを行うための適切な開始点がもたらされます。
アンケート構成コマンドを実装する
ユーザーがアンケートを開始して構成できるようにするには、ダイアログを開くスラッシュ コマンドを設定します。これは、複数の段階で実施されます。
- アンケートを開始するスラッシュ コマンドを登録します。
- アンケートを設定するダイアログを作成します。
- アプリでスラッシュ コマンドを認識して処理できるようにします。
- アンケートで投票を実行するインタラクティブなカードを作成します。
- アプリでアンケートを行えるようにするコードを実装します。
- Cloud Functions の関数を再デプロイします。
スラッシュ コマンドを登録します。
スラッシュ コマンドを登録するには、コンソールのチャットの構成ページに戻ります([API とサービス] > [ダッシュボード] > [Hangouts Chat API] > [構成])。
- [スラッシュ コマンド] で、[新しいスラッシュ コマンドを追加] をクリックします。
- [名前] で、「/poll」と入力します。
- [コマンド ID] で、「1」と入力します。
- [説明] で、「アンケートを開始する」と入力します。
- [ダイアログを開く] を選択します。
- [完了] をクリックします。
- [保存] をクリックします。
アプリが /poll コマンドを認識し、ダイアログを開きます。次に、ダイアログを構成します。
ダイアログとして構成フォームを作成する
スラッシュ コマンドによって、アンケートのトピックと選択肢を構成するためのダイアログが開きます。次の内容の新しいファイルを config-form.js という名前で作成します。
/** Upper bounds on number of choices to present. */
const MAX_NUM_OF_OPTIONS = 5;

/**
 * Build widget with instructions on how to use form.
 *
 * @returns {object} card widget
 */
function helpText() {
  return {
    textParagraph: {
      text: 'Enter the poll topic and up to 5 choices in the poll. Blank options will be omitted.',
    },
  };
}

/**
 * Build the text input for a choice.
 *
 * @param {number} index - Index to identify the choice
 * @param {string|undefined} value - Initial value to render (optional)
 * @returns {object} card widget
 */
function optionInput(index, value) {
  return {
    textInput: {
      label: `Option ${index + 1}`,
      type: 'SINGLE_LINE',
      name: `option${index}`,
      value: value || '',
    },
  };
}

/**
 * Build the text input for the poll topic.
 *
 * @param {string|undefined} topic - Initial value to render (optional)
 * @returns {object} card widget
 */
function topicInput(topic) {
  return {
    textInput: {
      label: 'Topic',
      type: 'MULTIPLE_LINE',
      name: 'topic',
      value: topic || '',
    },
  };
}

/**
 * Build the buttons/actions for the form.
 *
 * @returns {object} card widget
 */
function buttons() {
  return {
    buttonList: {
      buttons: [
        {
          text: 'Submit',
          onClick: {
            action: {
              function: 'start_poll',
            },
          },
        },
      ],
    },
  };
}

/**
 * Build the configuration form.
 *
 * @param {object} options - Initial state to render with form
 * @param {string|undefined} options.topic - Topic of poll (optional)
 * @param {string[]|undefined} options.choices - Text of choices to display to users (optional)
 * @returns {object} card
 */
function buildConfigurationForm(options) {
  const widgets = [];
  widgets.push(helpText());
  widgets.push(topicInput(options.topic));
  for (let i = 0; i < MAX_NUM_OF_OPTIONS; ++i) {
    const choice = options?.choices?.[i];
    widgets.push(optionInput(i, choice));
  }
  widgets.push(buttons());

  // Assemble the card
  return {
    sections: [
      {
        widgets,
      },
    ],
  };
}

exports.MAX_NUM_OF_OPTIONS = MAX_NUM_OF_OPTIONS;
exports.buildConfigurationForm = buildConfigurationForm;
このコードによって、ユーザーがアンケートを設定できるダイアログ フォームが生成されます。これによって、質問に設定できる選択肢の最大数の定数もエクスポートされます。パラメータとして渡される状態を含むステートレス関数への UI マークアップの構築を分離することをおすすめします。これによって再利用が可能になり、後でこのカードに別のコンテキストがレンダリングされます。
また、この実装では、カードを小さなユニットやコンポーネントに分解します。必須ではありませんが、複雑なインターフェースの構築時に読みやすさと管理しやすさが向上する傾向があるため、この技術はベスト プラクティスです。
構築する完全な JSON のサンプルを表示するには、カードビルダー ツールで表示します。
スラッシュ コマンドを処理する
スラッシュ コマンドは、アプリに送信されるときに MESSAGE イベントとして表示されます。index.js を更新して、MESSAGE イベントを介してスラッシュ コマンドのプレゼンスを確認し、ダイアログで応答します。index.js を次のように置き換えます。
const { buildConfigurationForm, MAX_NUM_OF_OPTIONS } = require('./config-form');

/**
 * App entry point.
 */
exports.app = async (req, res) => {
  if (!(req.method === 'POST' && req.body)) {
      res.status(400).send('')
  }
  const event = req.body;
  let reply = {};
  // Dispatch slash and action events
  if (event.type === 'MESSAGE') {
    const message = event.message;
    if (message.slashCommand?.commandId === '1') {
      reply = showConfigurationForm(event);
    }
  } else if (event.type === 'CARD_CLICKED') {
    if (event.action?.actionMethodName === 'start_poll') {
      reply = await startPoll(event);
    }
  }
  res.json(reply);
}

/**
 * Handles the slash command to display the config form.
 *
 * @param {object} event - chat event
 * @returns {object} Response to send back to Chat
 */
function showConfigurationForm(event) {
  // Seed the topic with any text after the slash command
  const topic = event.message?.argumentText?.trim();
  const dialog = buildConfigurationForm({
    topic,
    choices: [],
  });
  return {
    actionResponse: {
      type: 'DIALOG',
      dialogAction: {
        dialog: {
          body: dialog,
        },
      },
    },
  };
}

/**
 * Handle the custom start_poll action.
 *
 * @param {object} event - chat event
 * @returns {object} Response to send back to Chat
 */
function startPoll(event) {
  // Not fully implemented yet -- just close the dialog
  return {
    actionResponse: {
      type: 'DIALOG',
      dialogAction: {
        actionStatus: {
          statusCode: 'OK',
          userFacingMessage: 'Poll started.',
        },
      },
    },
  }
}
/poll コマンドが呼び出されると、アプリでダイアログが表示されるようになりました。Cloud Shell から Cloud Function を再デプロイして、インタラクションをテストします。
gcloud functions deploy app --trigger-http --security-level=secure-always
Cloud Function のデプロイ後、/poll コマンドを使用してアプリにメッセージを送信し、スラッシュ コマンドとダイアログをテストします。ダイアログでカスタム操作 start_poll を使用して CARD_CLICKED イベントを送信します。イベントは、startPoll メソッドを呼び出す更新されたエントリ ポイントで処理されます。ここでは、ダイアログを閉じるために startPoll メソッドがスタブアウトされます。次のセクションでは、投票機能を実装し、すべての部分を結び付けます。
投票カードを実装する
アプリの投票部分を実装するには、ユーザーが投票するためのインターフェースを提供するインタラクティブなカードを定義することから始めます。
投票インターフェースを実装する
次の内容で vote-card.js という名前のファイルを作成します。
/**
 * Creates a small progress bar to show percent of votes for an option. Since
 * width is limited, the percentage is scaled to 20 steps (5% increments).
 *
 * @param {number} voteCount - Number of votes for this option
 * @param {number} totalVotes - Total votes cast in the poll
 * @returns {string} Text snippet with bar and vote totals
 */
function progressBarText(voteCount, totalVotes) {
  if (voteCount === 0 || totalVotes === 0) {
    return '';
  }

  // For progress bar, calculate share of votes and scale it
  const percentage = (voteCount * 100) / totalVotes;
  const progress = Math.round((percentage / 100) * 20);
  return '▀'.repeat(progress);
}

/**
 * Builds a line in the card for a single choice, including
 * the current totals and voting action.
 *
 * @param {number} index - Index to identify the choice
 * @param {string|undefined} value - Text of the choice
 * @param {number} voteCount - Current number of votes cast for this item
 * @param {number} totalVotes - Total votes cast in poll
 * @param {string} state - Serialized state to send in events
 * @returns {object} card widget
 */
function choice(index, text, voteCount, totalVotes, state) {
  const progressBar = progressBarText(voteCount, totalVotes);
  return {
    keyValue: {
      bottomLabel: `${progressBar} ${voteCount}`,
      content: text,
      button: {
        textButton: {
          text: 'vote',
          onClick: {
            action: {
              actionMethodName: 'vote',
              parameters: [
                {
                  key: 'state',
                  value: state,
                },
                {
                  key: 'index',
                  value: index.toString(10),
                },
              ],
            },
          },
        },
      },
    },
  };
}

/**
 * Builds the card header including the question and author details.
 *
 * @param {string} topic - Topic of the poll
 * @param {string} author - Display name of user that created the poll
 * @returns {object} card widget
 */
function header(topic, author) {
  return {
    title: topic,
    subtitle: `Posted by ${author}`,
    imageUrl:
      'https://raw.githubusercontent.com/google/material-design-icons/master/png/social/poll/materialicons/24dp/2x/baseline_poll_black_24dp.png',
    imageStyle: 'AVATAR',
  };
}

/**
 * Builds the configuration form.
 *
 * @param {object} poll - Current state of poll
 * @param {object} poll.author - User that submitted the poll
 * @param {string} poll.topic - Topic of poll
 * @param {string[]} poll.choices - Text of choices to display to users
 * @param {object} poll.votes - Map of cast votes keyed by user ids
 * @returns {object} card
 */
function buildVoteCard(poll) {
  const widgets = [];
  const state = JSON.stringify(poll);
  const totalVotes = Object.keys(poll.votes).length;

  for (let i = 0; i < poll.choices.length; ++i) {
    // Count votes for this choice
    const votes = Object.values(poll.votes).reduce((sum, vote) => {
      if (vote === i) {
        return sum + 1;
      }
      return sum;
    }, 0);
    widgets.push(choice(i, poll.choices[i], votes, totalVotes, state));
  }

  return {
    header: header(poll.topic, poll.author.displayName),
    sections: [
      {
        widgets,
      },
    ],
  };
}

exports.buildVoteCard = buildVoteCard;
この実装はダイアログで使用されたアプローチと似ていますが、インタラクティブなカードのマークアップはダイアログとわずかに異なります。前のタスクと同様に、生成した JSON のサンプルをカードビルダー ツールで表示できます。
投票アクションを実装する
投票カードには、各選択肢のボタンが含まれています。その選択肢のインデックスと、アンケートのシリアル化された状態がボタンにアタッチされます。アプリは、パラメータとしてボタンにアタッチされたデータとともに、アクション vote が含まれる CARD_CLICKED を受け取ります。
以下で index.js を更新します。
const { buildConfigurationForm, MAX_NUM_OF_OPTIONS } = require('./config-form');
const { buildVoteCard } = require('./vote-card');

/**
 * App entry point.
 */
exports.app = async (req, res) => {
  if (!(req.method === 'POST' && req.body)) {
      res.status(400).send('')
  }
  const event = req.body;
  let reply = {};
  // Dispatch slash and action events
  if (event.type === 'MESSAGE') {
    const message = event.message;
    if (message.slashCommand?.commandId === '1') {
      reply = showConfigurationForm(event);
    }
  } else if (event.type === 'CARD_CLICKED') {
    if (event.action?.actionMethodName === 'start_poll') {
      reply = await startPoll(event);
    } else if (event.action?.actionMethodName === 'vote') {
        reply = recordVote(event);
    }
  }
  res.json(reply);
}

/**
 * Handles the slash command to display the config form.
 *
 * @param {object} event - chat event
 * @returns {object} Response to send back to Chat
 */
function showConfigurationForm(event) {
  // Seed the topic with any text after the slash command
  const topic = event.message?.argumentText?.trim();
  const dialog = buildConfigurationForm({
    topic,
    choices: [],
  });
  return {
    actionResponse: {
      type: 'DIALOG',
      dialogAction: {
        dialog: {
          body: dialog,
        },
      },
    },
  };
}

/**
 * Handle the custom start_poll action.
 *
 * @param {object} event - chat event
 * @returns {object} Response to send back to Chat
 */
function startPoll(event) {
  // Not fully implemented yet -- just close the dialog
  return {
    actionResponse: {
      type: 'DIALOG',
      dialogAction: {
        actionStatus: {
          statusCode: 'OK',
          userFacingMessage: 'Poll started.',
        },
      },
    },
  }
}

/**
 * Handle the custom vote action. Updates the state to record
 * the user's vote then rerenders the card.
 *
 * @param {object} event - chat event
 * @returns {object} Response to send back to Chat
 */
function recordVote(event) {
  const parameters = event.common?.parameters;

  const choice = parseInt(parameters['index']);
  const userId = event.user.name;
  const state = JSON.parse(parameters['state']);

  // Add or update the user's selected option
  state.votes[userId] = choice;

  const card = buildVoteCard(state);
  return {
    thread: event.message.thread,
    actionResponse: {
      type: 'UPDATE_MESSAGE',
    },
    cards: [card],
  }
}
recordVote メソッドは保存された状態を解析し、ユーザーの投票で更新して、カードを再レンダリングします。アンケート結果は、更新されるたびにシリアル化されてカードとともに保存されます。
要素をつなぎ合わせる
アプリはほとんど完成しています。スラッシュ コマンドで投票とともに実装されたので、残っているのは startPoll メソッドの完了のみです。
ただし、落とし穴があります。
アンケートの構成が送信されると、アプリは 2 つのアクションを実行する必要があります。
- ダイアログを閉じる。
- 投票カードでスペースに新しいメッセージを送信する。
残念ながら、HTTP リクエストへの直接返信は 1 件のみ実行でき、初回である必要があります。投票カードを送信するには、アプリで Chat API を使用して、新しいメッセージを非同期的に作成する必要があります。
クライアント ライブラリを追加する
次のコマンドを実行して、Node.js 用の Google API クライアントを含めるようにアプリの依存関係を更新します。
npm install --save googleapis
アンケートを開始する
index.js を以下の最終バージョンに更新します。
const { buildConfigurationForm, MAX_NUM_OF_OPTIONS } = require('./config-form');
const { buildVoteCard } = require('./vote-card');
const {google} = require('googleapis');

/**
 * App entry point.
 */
exports.app = async (req, res) => {
  if (!(req.method === 'POST' && req.body)) {
      res.status(400).send('')
  }
  const event = req.body;
  let reply = {};
  // Dispatch slash and action events
  if (event.type === 'MESSAGE') {
    const message = event.message;
    if (message.slashCommand?.commandId === '1') {
      reply = showConfigurationForm(event);
    }
  } else if (event.type === 'CARD_CLICKED') {
    if (event.action?.actionMethodName === 'start_poll') {
      reply = await startPoll(event);
    } else if (event.action?.actionMethodName === 'vote') {
        reply = recordVote(event);
    }
  }
  res.json(reply);
}

/**
 * Handles the slash command to display the config form.
 *
 * @param {object} event - chat event
 * @returns {object} Response to send back to Chat
 */
function showConfigurationForm(event) {
  // Seed the topic with any text after the slash command
  const topic = event.message?.argumentText?.trim();
  const dialog = buildConfigurationForm({
    topic,
    choices: [],
  });
  return {
    actionResponse: {
      type: 'DIALOG',
      dialogAction: {
        dialog: {
          body: dialog,
        },
      },
    },
  };
}

/**
 * Handle the custom start_poll action.
 *
 * @param {object} event - chat event
 * @returns {object} Response to send back to Chat
 */
async function startPoll(event) {
  // Get the form values
  const formValues = event.common?.formInputs;
  const topic = formValues?.['topic']?.stringInputs.value[0]?.trim();
  const choices = [];
  for (let i = 0; i < MAX_NUM_OF_OPTIONS; ++i) {
    const choice = formValues?.[`option${i}`]?.stringInputs.value[0]?.trim();
    if (choice) {
      choices.push(choice);
    }
  }

  if (!topic || choices.length === 0) {
    // Incomplete form submitted, rerender
    const dialog = buildConfigurationForm({
      topic,
      choices,
    });
    return {
      actionResponse: {
        type: 'DIALOG',
        dialogAction: {
          dialog: {
            body: dialog,
          },
        },
      },
    };
  }

  // Valid configuration, build the voting card to display
  // in the space
  const pollCard = buildVoteCard({
    topic: topic,
    author: event.user,
    choices: choices,
    votes: {},
  });
  const message = {
    cards: [pollCard],
  };
  const request = {
    parent: event.space.name,
    requestBody: message,
  };
  // Use default credentials (service account)
  const credentials = new google.auth.GoogleAuth({
    scopes: ['https://www.googleapis.com/auth/chat.bot'],
  });
  const chatApi = google.chat({
    version: 'v1',
    auth: credentials,
  });
  await chatApi.spaces.messages.create(request);

  // Close dialog
  return {
    actionResponse: {
      type: 'DIALOG',
      dialogAction: {
        actionStatus: {
          statusCode: 'OK',
          userFacingMessage: 'Poll started.',
        },
      },
    },
  };
}

/**
 * Handle the custom vote action. Updates the state to record
 * the user's vote then rerenders the card.
 *
 * @param {object} event - chat event
 * @returns {object} Response to send back to Chat
 */
function recordVote(event) {
  const parameters = event.common?.parameters;

  const choice = parseInt(parameters['index']);
  const userId = event.user.name;
  const state = JSON.parse(parameters['state']);

  // Add or update the user's selected option
  state.votes[userId] = choice;

  const card = buildVoteCard(state);
  return {
    thread: event.message.thread,
    actionResponse: {
      type: 'UPDATE_MESSAGE',
    },
    cards: [card],
  }
}
関数を再デプロイします。
gcloud functions deploy app --trigger-http --security-level=secure-always
アプリについて完全に学習しました。/poll コマンドを呼び出して、質問といくつかの選択肢を指定してみましょう。送信後、アンケート カードが表示されます。
投票して、何が起きるかを確認します。
もちろん、アンケート自体はさほど有益ではありませんので、友達や同僚を招待して試してみましょう。
6. 完了
これで完了です。Cloud Functions を使用して Google Chat アプリの作成とデプロイに成功しました。Codelab ではアプリ作成の基本コンセプトの多くを説明しましたが、学ぶべきことはまだたくさんあります。以下のリソースを参照して、追加料金の発生を回避するためにプロジェクトをクリーンアップすることを忘れないでください。
その他のアクティビティ
チャット プラットフォームとこのアプリについてさらに詳しく学習するために、自習できることがいくつかあります。
- アプリで @ メンションを使用するとどうなるでしょうか?アプリを更新して動作を改善してみましょう。
- カード内のアンケートの状態をシリアル化することは小規模なスペースでは問題ありませんが、上限があります。より適したオプションに切り替えてみてください。
- 作成者がアンケートを編集したり、新しい投票を停止した場合、どうなりますか?こうした機能はどのように実装しますか?
- アプリのエンドポイントはまだ保護されていません。検証を追加して、リクエストが Google Chat から行われていることを確認しましょう。
これらはアプリを改善するためのいくつかの方法にすぎません。創造力を働かせて楽しんでください。
クリーンアップ
このチュートリアルで使用したリソースについて、Google Cloud Platform アカウントに課金されないようにする手順は次のとおりです。
- Cloud コンソールで [リソースの管理] ページに移動します。左上隅をクリックして、[メニュー]
 > [IAM と管理] > [リソースの管理] をクリックします。
- プロジェクト リストで、プロジェクトを選択し、[削除] をクリックします。
- ダイアログでプロジェクト ID を入力し、[シャットダウン] をクリックしてプロジェクトを削除します。
詳細
チャットアプリの開発について詳しくは、以下をご覧ください。
Google Cloud コンソールでの開発について詳しくは、以下をご覧ください。