1. לפני שמתחילים
אחד מהמאפיינים הנפוצים ביותר באתרים הוא הצגה של מפה של Google שמציגה מיקום אחד או יותר של עסק, מוסד או ישות אחרת עם נוכחות פיזית. אופן ההטמעה של המפות האלה יכול להשתנות מאוד בהתאם לדרישות, כמו מספר המיקומים והתדירות שבה הם משתנים.
ב-codelab הזה נבחן את תרחיש השימוש הפשוט ביותר – מספר קטן של מיקומים שמשתנים לעיתים רחוקות, כמו כלי לאיתור חנויות של עסק עם רשת חנויות. במקרה כזה, אפשר להשתמש בגישה פשוטה יחסית בלי תכנות בצד השרת. אבל זה לא אומר שאי אפשר להיות יצירתיים. אפשר לעשות זאת באמצעות פורמט הנתונים GeoJSON כדי לאחסן ולהציג מידע שרירותי על כל חנות במפה, וגם להתאים אישית את הסמנים ואת הסגנון הכללי של המפה עצמה.
בנוסף, תוכלו להשתמש ב-Cloud Shell כדי לפתח ולארח את הכלי לאיתור חנויות. השימוש בכלי הזה לא חובה, אבל הוא מאפשר לכם לפתח את הכלי לאיתור חנויות מכל מכשיר שמותקן בו דפדפן אינטרנט, ולהפוך אותו לזמין לציבור באינטרנט.
דרישות מוקדמות
- ידע בסיסי ב-HTML וב-JavaScript
מה עושים
- הצגת מפה עם קבוצה של מיקומי חנויות ומידע שמאוחסן בפורמט GeoJSON.
- התאמה אישית של הסמנים ושל המפה עצמה.
- הצגת מידע נוסף על החנות כשלוחצים על הסמן שלה.
- מוסיפים סרגל חיפוש עם השלמה אוטומטית של מקומות לדף האינטרנט.
- זיהוי מיקום החנות הקרוב ביותר לנקודת התחלה שהמשתמש סיפק.
2. להגדרה
בשלב 3 בקטע הבא, מפעילים את שלושת ממשקי ה-API הבאים בשביל ה-codelab הזה:
- Maps JavaScript API
- Places API
- Distance Matrix API
תחילת העבודה עם הפלטפורמה של מפות Google
אם לא השתמשתם בפלטפורמה של מפות Google בעבר, תוכלו לעיין במדריך לתחילת העבודה עם הפלטפורמה של מפות Google או לצפות בפלייליסט לתחילת העבודה עם הפלטפורמה של מפות Google כדי לבצע את השלבים הבאים:
- יוצרים חשבון לחיוב.
- יוצרים פרויקט.
- מפעילים את ממשקי ה-API וערכות ה-SDK של הפלטפורמה של מפות Google (שמופיעים בקטע הקודם).
- יוצרים מפתח API.
הפעלת Cloud Shell
ב-codelab הזה משתמשים ב-Cloud Shell, סביבת שורת פקודה שפועלת ב-Google Cloud ומספקת גישה למוצרים ולמשאבים שפועלים ב-Google Cloud, כך שתוכלו לארח ולהריץ את הפרויקט שלכם באופן מלא מדפדפן האינטרנט.
כדי להפעיל את Cloud Shell ממסוף Cloud, לוחצים על הפעלת Cloud Shell  (הקצאת המשאבים והחיבור לסביבה אמורים להימשך רק כמה רגעים).

ייפתח Shell חדש בחלק התחתון של הדפדפן, אחרי שיוצג מעברון מבוא.

אחרי שמתחברים ל-Cloud Shell, אפשר לראות שהאימות כבר בוצע והפרויקט כבר הוגדר לפי מזהה הפרויקט שבחרתם במהלך ההגדרה.
$ gcloud auth list
Credentialed Accounts:
ACTIVE  ACCOUNT
  *     <myaccount>@<mydomain>.com
$ gcloud config list project
[core]
project = <YOUR_PROJECT_ID>
אם מסיבה כלשהי הפרויקט לא מוגדר, מריצים את הפקודה הבאה:
$ gcloud config set project <YOUR_PROJECT_ID>
3. "Hello, World!" עם מפה
התחלת פיתוח עם מפה
ב-Cloud Shell, מתחילים ביצירת דף HTML שישמש כבסיס לשאר ה-codelab.
- בסרגל הכלים של Cloud Shell, לוחצים על הפעלת העורך
 כדי לפתוח עורך קוד בכרטיסייה חדשה.
עורך הקוד הזה מבוסס-אינטרנט ומאפשר לערוך קבצים ב-Cloud Shell בקלות.

- יוצרים ספרייה חדשה
store-locatorלאפליקציה בעורך הקוד בלחיצה על File (קובץ) > New Folder (תיקייה חדשה).
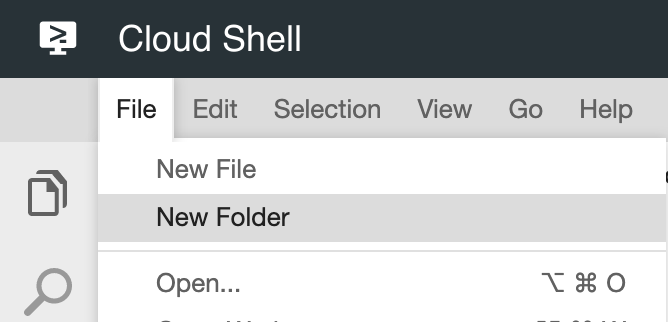
- נותנים לתיקייה החדשה את השם
store-locator.
בשלב הבא, יוצרים דף אינטרנט עם מפה.
- יוצרים קובץ בספרייה
store-locatorבשםindex.html.
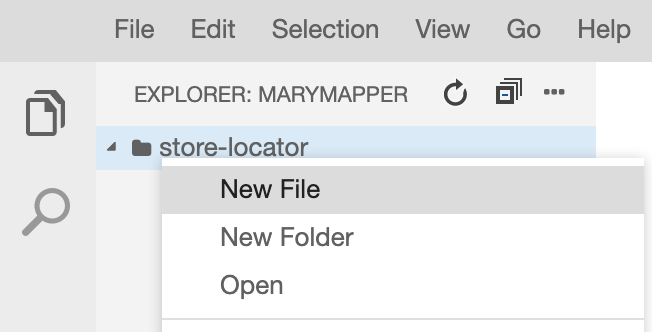
- מכניסים את התוכן הבא לקובץ
index.html:
index.html
<html>

<head>
    <title>Store Locator</title>
    <style>
        #map {
            height: 100%;
        }

        html,
        body {
            height: 100%;
            margin: 0;
            padding: 0;
        }
    </style>
</head>

<body>
    <!-- The div to hold the map -->
    <div id="map"></div>

    <script src="app.js"></script>
    <script async defer src="https://maps.googleapis.com/maps/api/js?key=YOUR_API_KEY&libraries=places&callback=initMap&solution_channel=GMP_codelabs_simplestorelocator_v1_a">
    </script>
</body>

</html>
זהו דף ה-HTML שבו מוצגת המפה. הוא מכיל קוד CSS כדי לוודא שהמפה תתפוס את כל הדף מבחינה ויזואלית, תג <div> להצגת המפה וזוג תגי <script>. תג הסקריפט הראשון טוען קובץ JavaScript בשם app.js, שמכיל את כל קוד ה-JavaScript. תג הסקריפט השני טוען את מפתח ה-API, כולל שימוש בספריית המקומות לפונקציונליות של השלמה אוטומטית שתוסיפו בהמשך, ומציין את השם של פונקציית ה-JavaScript שפועלת אחרי ש-Maps JavaScript API נטען, כלומר initMap.
- מחליפים את הטקסט
YOUR_API_KEYבקטע הקוד במפתח ה-API שיצרתם קודם ב-codelab הזה. - לבסוף, יוצרים קובץ נוסף בשם
app.jsעם הקוד הבא:
app.js
function initMap() {
   // Create the map.
    const map = new google.maps.Map(document.getElementById('map'), {
        zoom: 7,
        center: { lat: 52.632469, lng: -1.689423 },
    });

}
זהו הקוד המינימלי שנדרש ליצירת מפה. מעבירים הפניה לתג <div> כדי להציג את המפה, ומציינים את המרכז ואת רמת הזום.
כדי לבדוק את האפליקציה הזו, אפשר להריץ את שרת ה-HTTP הפשוט של Python ב-Cloud Shell.
- עוברים אל Cloud Shell ומקלידים את הפקודה הבאה:
$ cd store-locator
$ python3 -m http.server 8080
יוצגו כמה שורות של פלט יומן שיראו שאתם מריצים את שרת ה-HTTP הפשוט ב-Cloud Shell עם אפליקציית האינטרנט שמקשיבה ליציאה 8080 ב-localhost.
- פותחים כרטיסייה בדפדפן אינטרנט באפליקציה הזו על ידי לחיצה על תצוגה מקדימה באינטרנט
 בסרגל הכלים של Cloud Console ובחירה באפשרות תצוגה מקדימה ביציאה 8080.
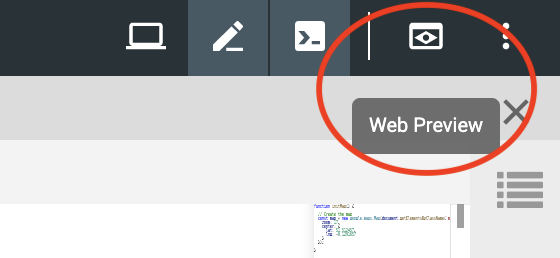
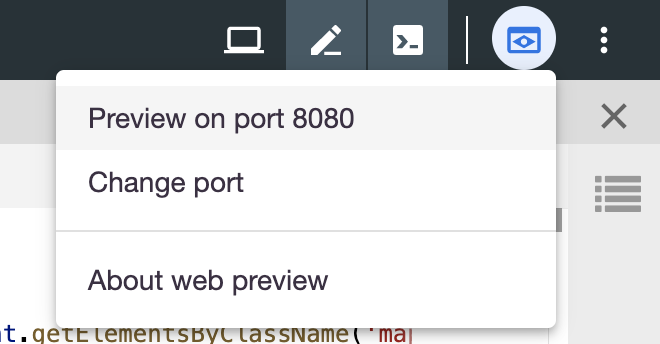
כשלוחצים על הפריט הזה בתפריט, נפתחת כרטיסייה חדשה בדפדפן האינטרנט עם התוכן של ה-HTML שמוצג משרת ה-HTTP הפשוט של Python. אם הכול עבר בצורה חלקה, אמורה להופיע מפה עם מרכז בלונדון, אנגליה.
כדי לעצור את שרת ה-HTTP הפשוט, מקישים על Control+C ב-Cloud Shell.
4. איכלוס המפה באמצעות GeoJSON
עכשיו, אפשר לעיין בנתונים של החנויות. GeoJSON הוא פורמט נתונים שמייצג ישויות גיאוגרפיות פשוטות, כמו נקודות, קווים או פוליגונים במפה. התכונות יכולות להכיל גם נתונים שרירותיים. לכן, GeoJSON הוא פורמט מצוין לייצוג החנויות, שהן בעצם נקודות במפה עם נתונים נוספים, כמו שם החנות, שעות הפתיחה ומספר הטלפון. הכי חשוב, ל-GeoJSON יש תמיכה ברמה גבוהה במפות Google, מה שאומר שאפשר לשלוח מסמך GeoJSON למפת Google והוא יוצג במפה בצורה מתאימה.
- יוצרים קובץ חדש בשם
stores.jsonומדביקים בו את הקוד הבא:
stores.json
{
    "type": "FeatureCollection",
    "features": [{
            "geometry": {
                "type": "Point",
                "coordinates": [-0.1428115,
                    51.5125168
                ]
            },
            "type": "Feature",
            "properties": {
                "category": "patisserie",
                "hours": "10am - 6pm",
                "description": "Modern twists on classic pastries. We're part of a larger chain of patisseries and cafes.",
                "name": "Josie's Patisserie Mayfair",
                "phone": "+44 20 1234 5678",
                "storeid": "01"
            }
        },
        {
            "geometry": {
                "type": "Point",
                "coordinates": [-2.579623,
                    51.452251
                ]
            },
            "type": "Feature",
            "properties": {
                "category": "patisserie",
                "hours": "10am - 6pm",
                "description": "Come and try our award-winning cakes and pastries. We're part of a larger chain of patisseries and cafes.",
                "name": "Josie's Patisserie Bristol",
                "phone": "+44 117 121 2121",
                "storeid": "02"
            }
        },
        {
            "geometry": {
                "type": "Point",
                "coordinates": [
                    1.273459,
                    52.638072
                ]
            },
            "type": "Feature",
            "properties": {
                "category": "patisserie",
                "hours": "10am - 6pm",
                "description": "Whatever the occasion, whether it's a birthday or a wedding, Josie's Patisserie has the perfect treat for you. We're part of a larger chain of patisseries and cafes.",
                "name": "Josie's Patisserie Norwich",
                "phone": "+44 1603 123456",
                "storeid": "03"
            }
        },
        {
            "geometry": {
                "type": "Point",
                "coordinates": [-1.9912838,
                    50.8000418
                ]
            },
            "type": "Feature",
            "properties": {
                "category": "patisserie",
                "hours": "10am - 6pm",
                "description": "A gourmet patisserie that will delight your senses. We're part of a larger chain of patisseries and cafes.",
                "name": "Josie's Patisserie Wimborne",
                "phone": "+44 1202 343434",
                "storeid": "04"
            }
        },
        {
            "geometry": {
                "type": "Point",
                "coordinates": [-2.985933,
                    53.408899
                ]
            },
            "type": "Feature",
            "properties": {
                "category": "patisserie",
                "hours": "10am - 6pm",
                "description": "Spoil yourself or someone special with our classic pastries. We're part of a larger chain of patisseries and cafes.",
                "name": "Josie's Patisserie Liverpool",
                "phone": "+44 151 444 4444",
                "storeid": "05"
            }
        },
        {
            "geometry": {
                "type": "Point",
                "coordinates": [-1.689423,
                    52.632469
                ]
            },
            "type": "Feature",
            "properties": {
                "category": "patisserie",
                "hours": "10am - 6pm",
                "description": "Come and feast your eyes and tastebuds on our delicious pastries and cakes. We're part of a larger chain of patisseries and cafes.",
                "name": "Josie's Patisserie Tamworth",
                "phone": "+44 5555 55555",
                "storeid": "06"
            }
        },
        {
            "geometry": {
                "type": "Point",
                "coordinates": [-3.155305,
                    51.479756
                ]
            },
            "type": "Feature",
            "properties": {
                "category": "patisserie",
                "hours": "10am - 6pm",
                "description": "Josie's Patisserie is family-owned, and our delectable pastries, cakes, and great coffee are renowed. We're part of a larger chain of patisseries and cafes.",
                "name": "Josie's Patisserie Cardiff",
                "phone": "+44 29 6666 6666",
                "storeid": "07"
            }
        },
        {
            "geometry": {
                "type": "Point",
                "coordinates": [-0.725019,
                    52.668891
                ]
            },
            "type": "Feature",
            "properties": {
                "category": "cafe",
                "hours": "8am - 9:30pm",
                "description": "Oakham's favorite spot for fresh coffee and delicious cakes. We're part of a larger chain of patisseries and cafes.",
                "name": "Josie's Cafe Oakham",
                "phone": "+44 7777 777777",
                "storeid": "08"
            }
        },
        {
            "geometry": {
                "type": "Point",
                "coordinates": [-2.477653,
                    53.735405
                ]
            },
            "type": "Feature",
            "properties": {
                "category": "cafe",
                "hours": "8am - 9:30pm",
                "description": "Enjoy freshly brewed coffe, and home baked cakes in our homely cafe. We're part of a larger chain of patisseries and cafes.",
                "name": "Josie's Cafe Blackburn",
                "phone": "+44 8888 88888",
                "storeid": "09"
            }
        },
        {
            "geometry": {
                "type": "Point",
                "coordinates": [-0.211363,
                    51.108966
                ]
            },
            "type": "Feature",
            "properties": {
                "category": "cafe",
                "hours": "8am - 9:30pm",
                "description": "A delicious array of pastries with many flavours, and fresh coffee in an snug cafe. We're part of a larger chain of patisseries and cafes.",
                "name": "Josie's Cafe Crawley",
                "phone": "+44 1010 101010",
                "storeid": "10"
            }
        },
        {
            "geometry": {
                "type": "Point",
                "coordinates": [-0.123559,
                    50.832679
                ]
            },
            "type": "Feature",
            "properties": {
                "category": "cafe",
                "hours": "8am - 9:30pm",
                "description": "Grab a freshly brewed coffee, a decadent cake and relax in our idyllic cafe. We're part of a larger chain of patisseries and cafes.",
                "name": "Josie's Cafe Brighton",
                "phone": "+44 1313 131313",
                "storeid": "11"
            }
        },
        {
            "geometry": {
                "type": "Point",
                "coordinates": [-3.319575,
                    52.517827
                ]
            },
            "type": "Feature",
            "properties": {
                "category": "cafe",
                "hours": "8am - 9:30pm",
                "description": "Come in and unwind at this idyllic cafe with fresh coffee and home made cakes. We're part of a larger chain of patisseries and cafes.",
                "name": "Josie's Cafe Newtown",
                "phone": "+44 1414 141414",
                "storeid": "12"
            }
        },
        {
            "geometry": {
                "type": "Point",
                "coordinates": [
                    1.158167,
                    52.071634
                ]
            },
            "type": "Feature",
            "properties": {
                "category": "cafe",
                "hours": "8am - 9:30pm",
                "description": "Fresh coffee and delicious cakes in an snug cafe. We're part of a larger chain of patisseries and cafes.",
                "name": "Josie's Cafe Ipswich",
                "phone": "+44 1717 17171",
                "storeid": "13"
            }
        }
    ]
}
זה הרבה נתונים, אבל כשמעיינים בהם רואים שזה פשוט אותו מבנה שחוזר על עצמו לכל חנות. כל חנות מיוצגת כ-GeoJSON Point עם הקואורדינטות שלה והנתונים הנוספים שמופיעים מתחת למפתח properties. מעניין לציין ש-GeoJSON מאפשר לכלול מפתחות עם שמות שרירותיים מתחת למפתח properties. ב-codelab הזה, המקשים האלה הם category, hours, description, name ו-phone.
- עכשיו עורכים את
app.jsכך שהוא יטען את GeoJSON ב-stores.jsאל המפה.
app.js
function initMap() {
  // Create the map.
  const map = new google.maps.Map(document.getElementById('map'), {
    zoom: 7,
    center: {lat: 52.632469, lng: -1.689423},
  });

  // Load the stores GeoJSON onto the map.
  map.data.loadGeoJson('stores.json', {idPropertyName: 'storeid'});

  const apiKey = 'YOUR_API_KEY';
  const infoWindow = new google.maps.InfoWindow();

  // Show the information for a store when its marker is clicked.
  map.data.addListener('click', (event) => {
    const category = event.feature.getProperty('category');
    const name = event.feature.getProperty('name');
    const description = event.feature.getProperty('description');
    const hours = event.feature.getProperty('hours');
    const phone = event.feature.getProperty('phone');
    const position = event.feature.getGeometry().get();
    const content = `
      <h2>${name}</h2><p>${description}</p>
      <p><b>Open:</b> ${hours}<br/><b>Phone:</b> ${phone}</p>
    `;

    infoWindow.setContent(content);
    infoWindow.setPosition(position);
    infoWindow.setOptions({pixelOffset: new google.maps.Size(0, -30)});
    infoWindow.open(map);
  });
}
בדוגמת הקוד, טוענים את קובץ ה-GeoJSON למפה על ידי קריאה ל-loadGeoJson והעברת השם של קובץ ה-JSON. הגדרתם גם פונקציה שתופעל בכל פעם שלוחצים על סמן. לאחר מכן, הפונקציה יכולה לגשת לנתונים הנוספים של החנות שהסמן שלה נלחץ ולהשתמש במידע בחלון מידע שמוצג. כדי לבדוק את האפליקציה הזו, אפשר להריץ את שרת ה-HTTP הפשוט של Python באמצעות אותה פקודה כמו קודם.
- חוזרים ל-Cloud Shell ומקלידים את הפקודה הבאה:
$ python3 -m http.server 8080
- לוחצים שוב על תצוגה מקדימה באינטרנט
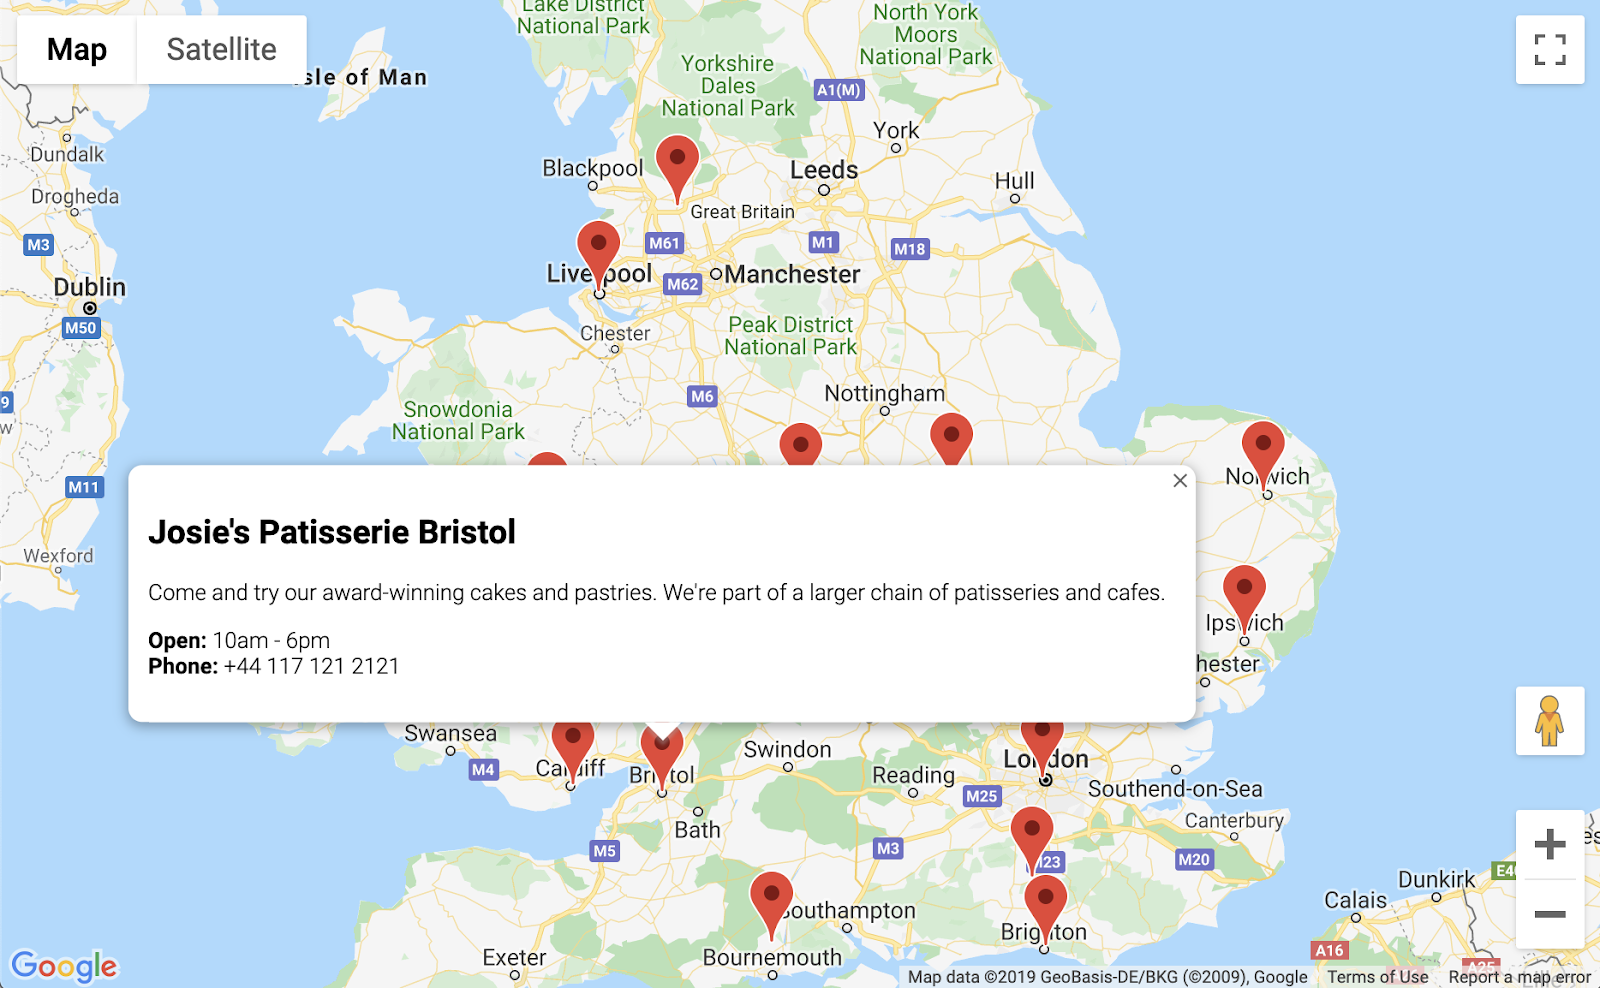
 > תצוגה מקדימה ביציאה 8080, ואז אמורה להופיע מפה מלאה בסמנים שאפשר ללחוץ עליהם כדי לראות פרטים על כל חנות, כמו בדוגמה הבאה. התקדמות!
5. התאמה אישית של המפה
כמעט סיימת. יש לכם מפה עם כל סמני החנויות ומידע נוסף שמוצג בלחיצה. אבל היא נראית כמו כל מפה אחרת של Google. איזה משעמם! אפשר להוסיף סגנון מפה מותאם אישית, סמנים, לוגואים ותמונות Street View.
הנה גרסה חדשה של app.js עם סגנון מותאם אישית:
app.js
const mapStyle = [{
  'featureType': 'administrative',
  'elementType': 'all',
  'stylers': [{
    'visibility': 'on',
  },
  {
    'lightness': 33,
  },
  ],
},
{
  'featureType': 'landscape',
  'elementType': 'all',
  'stylers': [{
    'color': '#f2e5d4',
  }],
},
{
  'featureType': 'poi.park',
  'elementType': 'geometry',
  'stylers': [{
    'color': '#c5dac6',
  }],
},
{
  'featureType': 'poi.park',
  'elementType': 'labels',
  'stylers': [{
    'visibility': 'on',
  },
  {
    'lightness': 20,
  },
  ],
},
{
  'featureType': 'road',
  'elementType': 'all',
  'stylers': [{
    'lightness': 20,
  }],
},
{
  'featureType': 'road.highway',
  'elementType': 'geometry',
  'stylers': [{
    'color': '#c5c6c6',
  }],
},
{
  'featureType': 'road.arterial',
  'elementType': 'geometry',
  'stylers': [{
    'color': '#e4d7c6',
  }],
},
{
  'featureType': 'road.local',
  'elementType': 'geometry',
  'stylers': [{
    'color': '#fbfaf7',
  }],
},
{
  'featureType': 'water',
  'elementType': 'all',
  'stylers': [{
    'visibility': 'on',
  },
  {
    'color': '#acbcc9',
  },
  ],
},
];

function initMap() {
  // Create the map.
  const map = new google.maps.Map(document.getElementById('map'), {
    zoom: 7,
    center: {lat: 52.632469, lng: -1.689423},
    styles: mapStyle,
  });

  // Load the stores GeoJSON onto the map.
  map.data.loadGeoJson('stores.json', {idPropertyName: 'storeid'});

  // Define the custom marker icons, using the store's "category".
  map.data.setStyle((feature) => {
    return {
      icon: {
        url: `img/icon_${feature.getProperty('category')}.png`,
        scaledSize: new google.maps.Size(64, 64),
      },
    };
  });

  const apiKey = 'YOUR_API_KEY';
  const infoWindow = new google.maps.InfoWindow();

  // Show the information for a store when its marker is clicked.
  map.data.addListener('click', (event) => {
    const category = event.feature.getProperty('category');
    const name = event.feature.getProperty('name');
    const description = event.feature.getProperty('description');
    const hours = event.feature.getProperty('hours');
    const phone = event.feature.getProperty('phone');
    const position = event.feature.getGeometry().get();
    const content = `
      <img style="float:left; width:200px; margin-top:30px" src="img/logo_${category}.png">
      <div style="margin-left:220px; margin-bottom:20px;">
        <h2>${name}</h2><p>${description}</p>
        <p><b>Open:</b> ${hours}<br/><b>Phone:</b> ${phone}</p>
        <p><img src="https://maps.googleapis.com/maps/api/streetview?size=350x120&location=${position.lat()},${position.lng()}&key=${apiKey}&solution_channel=GMP_codelabs_simplestorelocator_v1_a"></p>
      </div>
      `;

    infoWindow.setContent(content);
    infoWindow.setPosition(position);
    infoWindow.setOptions({pixelOffset: new google.maps.Size(0, -30)});
    infoWindow.open(map);
  });

}
אלה הפריטים שהוספתם:
- המשתנה
mapStyleמכיל את כל המידע לעיצוב המפה. (בונוס נוסף: אתם יכולים גם ליצור סגנון משלכם אם תרצו). - בשיטה
map.data.setStyle, הוספתם סמנים מותאמים אישית – סמן שונה לכלcategoryמ-GeoJSON. - שיניתם את המשתנה
contentכדי לכלול לוגו (שוב באמצעותcategoryמ-GeoJSON) ותמונה של מיקום החנות ב-Street View.
לפני שמפעילים את התכונה הזו, צריך לבצע כמה שלבים:
- מגדירים את הערך הנכון למשתנה
apiKeyעל ידי החלפת המחרוזת'YOUR_API_KEY'ב-app.jsבמפתח ה-API שלכם מהשלב הקודם (אותו מפתח שהדבקתם ב-index.html, בלי לשנות את המירכאות). - מריצים את הפקודות הבאות ב-Cloud Shell כדי להוריד את הגרפיקה של הסמן והלוגו. חשוב לוודא שאתם נמצאים בספרייה
store-locator. משתמשים בפקודהControl+Cכדי לעצור את שרת ה-HTTP הפשוט אם הוא פועל.
$ mkdir -p img; cd img
$ wget https://github.com/googlecodelabs/google-maps-simple-store-locator/raw/master/src/img/icon_cafe.png
$ wget https://github.com/googlecodelabs/google-maps-simple-store-locator/raw/master/src/img/icon_patisserie.png
$ wget https://github.com/googlecodelabs/google-maps-simple-store-locator/raw/master/src/img/logo_cafe.png
$ wget https://github.com/googlecodelabs/google-maps-simple-store-locator/raw/master/src/img/logo_patisserie.png
- כדי לראות תצוגה מקדימה של איתור החנויות, מריצים את הפקודה הבאה:
$ python3 -m http.server 8080
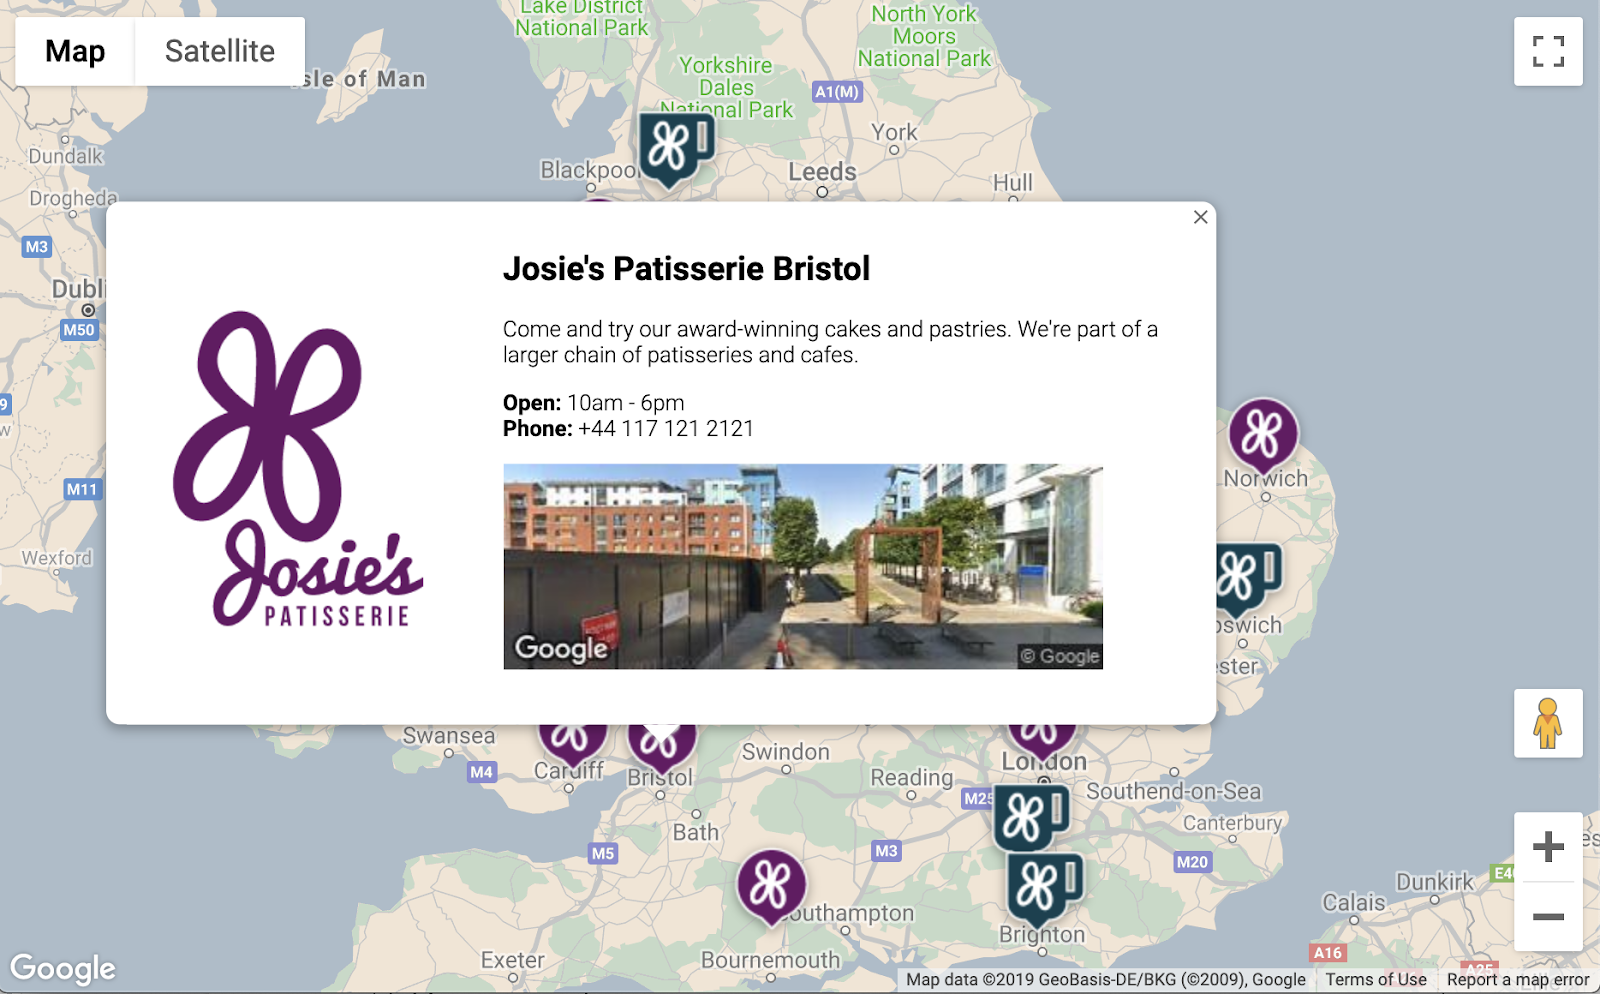
כשמטעינים מחדש את התצוגה המקדימה, אמורה להופיע מפה כמו זו שמוצגת כאן, עם סגנון מותאם אישית, תמונות סמנים מותאמות אישית, פורמט משופר של חלון המידע ותמונת Street View לכל מיקום:
6. קבלת קלט מהמשתמש
משתמשים במאתרי חנויות רוצים בדרך כלל לדעת איזו חנות הכי קרובה אליהם או לכתובת שבה הם מתכננים להתחיל את המסע שלהם. מוסיפים סרגל חיפוש של השלמה אוטומטית של מקומות כדי לאפשר למשתמש להזין בקלות כתובת התחלתית. ההשלמה האוטומטית של מקומות מספקת פונקציונליות של הקלדה מראש, בדומה לאופן שבו ההשלמה האוטומטית פועלת בסרגלי חיפוש אחרים של Google, אבל התחזיות הן של מקומות בפלטפורמת מפות Google.
- חוזרים לעריכה
index.htmlכדי להוסיף עיצוב לסרגל החיפוש של ההשלמה האוטומטית ולחלונית הצדדית של התוצאות שקשורות אליו. אם הדבקתן קוד חדש על הקוד הישן, אל תשכחי להחליף את מפתח ה-API.
index.html
<html>

<head>
  <title>Store Locator</title>
  <style>
    #map {
      height: 100%;
    }

    html,
    body {
      height: 100%;
      margin: 0;
      padding: 0;
    }

    /* Styling for Autocomplete search bar */
    #pac-card {
      background-color: #fff;
      border-radius: 2px 0 0 2px;
      box-shadow: 0 2px 6px rgba(0, 0, 0, 0.3);
      box-sizing: border-box;
      font-family: Roboto;
      margin: 10px 10px 0 0;
      -moz-box-sizing: border-box;
      outline: none;
    }

    #pac-container {
      padding-top: 12px;
      padding-bottom: 12px;
      margin-right: 12px;
    }

    #pac-input {
      background-color: #fff;
      font-family: Roboto;
      font-size: 15px;
      font-weight: 300;
      margin-left: 12px;
      padding: 0 11px 0 13px;
      text-overflow: ellipsis;
      width: 400px;
    }

    #pac-input:focus {
      border-color: #4d90fe;
    }

    #title {
      color: #fff;
      background-color: #acbcc9;
      font-size: 18px;
      font-weight: 400;
      padding: 6px 12px;
    }

    .hidden {
      display: none;
    }

    /* Styling for an info pane that slides out from the left.
     * Hidden by default. */
    #panel {
      height: 100%;
      width: null;
      background-color: white;
      position: fixed;
      z-index: 1;
      overflow-x: hidden;
      transition: all .2s ease-out;
    }

    .open {
      width: 250px;
    }

    .place {
      font-family: 'open sans', arial, sans-serif;
      font-size: 1.2em;
      font-weight: 500;
      margin-block-end: 0px;
      padding-left: 18px;
      padding-right: 18px;
    }

    .distanceText {
      color: silver;
      font-family: 'open sans', arial, sans-serif;
      font-size: 1em;
      font-weight: 400;
      margin-block-start: 0.25em;
      padding-left: 18px;
      padding-right: 18px;
    }
  </style>
</head>

<body>
  <!-- The div to hold the map -->
  <div id="map"></div>

  <script src="app.js"></script>
  <script async defer src="https://maps.googleapis.com/maps/api/js?key=YOUR_API_KEY&libraries=places&callback=initMap&solution_channel=GMP_codelabs_simplestorelocator_v1_a">
  </script>
</body>

</html>
גם סרגל החיפוש עם ההשלמה האוטומטית וגם החלונית הנפתחת מוסתרים בהתחלה עד שצריך אותם.
- עכשיו מוסיפים את הווידג'ט Autocomplete (השלמה אוטומטית) למפה בסוף הפונקציה
initMapב-app.js, ממש לפני הסוגר המסולסל הסוגר.
app.js
  // Build and add the search bar
  const card = document.createElement('div');
  const titleBar = document.createElement('div');
  const title = document.createElement('div');
  const container = document.createElement('div');
  const input = document.createElement('input');
  const options = {
    types: ['address'],
    componentRestrictions: {country: 'gb'},
  };

  card.setAttribute('id', 'pac-card');
  title.setAttribute('id', 'title');
  title.textContent = 'Find the nearest store';
  titleBar.appendChild(title);
  container.setAttribute('id', 'pac-container');
  input.setAttribute('id', 'pac-input');
  input.setAttribute('type', 'text');
  input.setAttribute('placeholder', 'Enter an address');
  container.appendChild(input);
  card.appendChild(titleBar);
  card.appendChild(container);
  map.controls[google.maps.ControlPosition.TOP_RIGHT].push(card);

  // Make the search bar into a Places Autocomplete search bar and select
  // which detail fields should be returned about the place that
  // the user selects from the suggestions.
  const autocomplete = new google.maps.places.Autocomplete(input, options);

  autocomplete.setFields(
      ['address_components', 'geometry', 'name']);
הקוד מגביל את ההצעות להשלמה אוטומטית כך שיחזירו רק כתובות (כי השלמה אוטומטית של מקומות יכולה להתאים לשמות של עסקים ולמיקומים אדמיניסטרטיביים), ומגביל את הכתובות שמוחזרות רק לכתובות בבריטניה. הוספה של המפרטים האופציונליים האלה תצמצם את מספר התווים שהמשתמש צריך להזין כדי לצמצם את התחזיות ולהציג את הכתובת שהוא מחפש. לאחר מכן, הוא מעביר את ההשלמה האוטומטית div שיצרתם לפינה השמאלית העליונה של המפה ומציין אילו שדות צריכים להיות מוחזרים לגבי כל מקום בתגובה.
- מפעילים מחדש את השרת ומרעננים את התצוגה המקדימה באמצעות הפקודה הבאה:
$ python3 -m http.server 8080
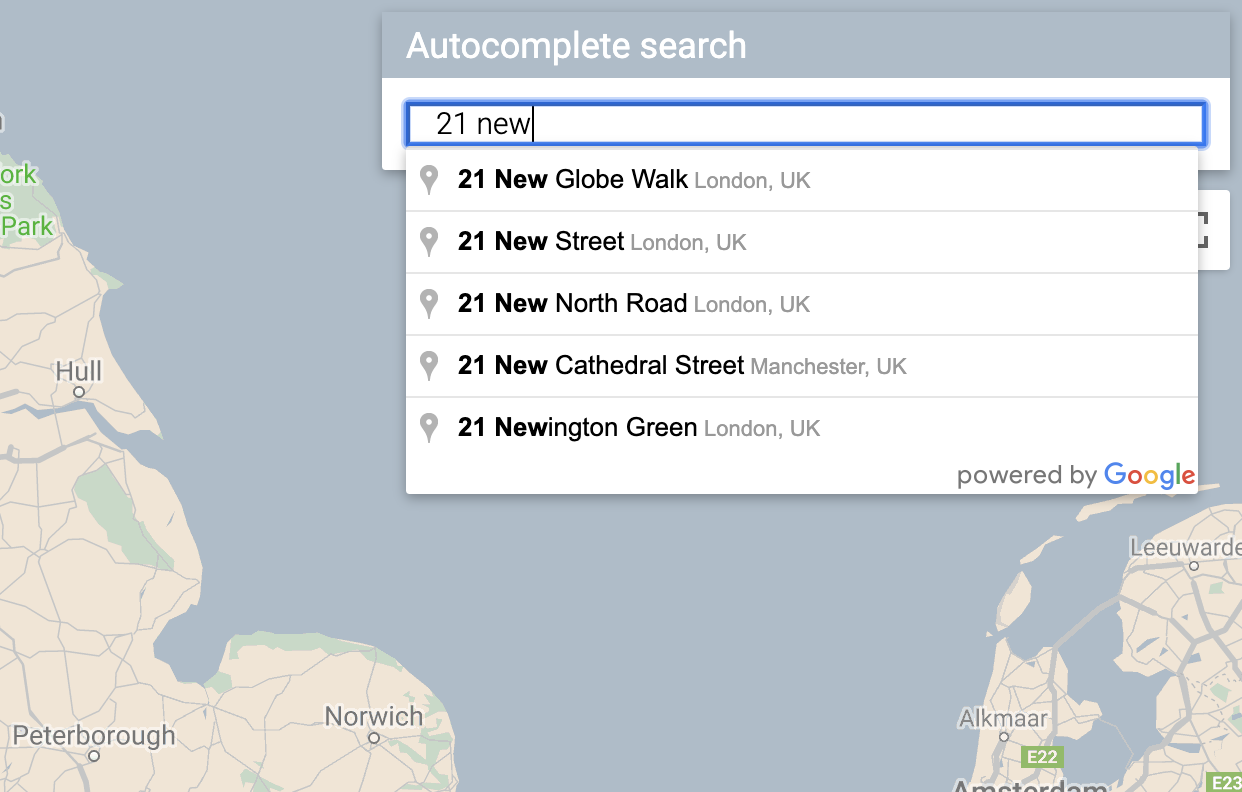
עכשיו אמור להופיע ווידג' של השלמה אוטומטית בפינה השמאלית העליונה של המפה, שבו מוצגות כתובות בבריטניה שתואמות למה שמקלידים.
עכשיו צריך לטפל במצב שבו המשתמש בוחר תחזית מווידג'ט ההשלמה האוטומטית, ולהשתמש במיקום הזה כבסיס לחישוב המרחקים לחנויות.
- מוסיפים את הקוד הבא לסוף
initMapב-app.jsאחרי הקוד שהדבקתם.
app.js
 // Set the origin point when the user selects an address
  const originMarker = new google.maps.Marker({map: map});
  originMarker.setVisible(false);
  let originLocation = map.getCenter();

  autocomplete.addListener('place_changed', async () => {
    originMarker.setVisible(false);
    originLocation = map.getCenter();
    const place = autocomplete.getPlace();

    if (!place.geometry) {
      // User entered the name of a Place that was not suggested and
      // pressed the Enter key, or the Place Details request failed.
      window.alert('No address available for input: \'' + place.name + '\'');
      return;
    }

    // Recenter the map to the selected address
    originLocation = place.geometry.location;
    map.setCenter(originLocation);
    map.setZoom(9);
    console.log(place);

    originMarker.setPosition(originLocation);
    originMarker.setVisible(true);

    // Use the selected address as the origin to calculate distances
    // to each of the store locations
    const rankedStores = await calculateDistances(map.data, originLocation);
    showStoresList(map.data, rankedStores);

    return;
  });
הקוד מוסיף מאזין, כך שכשהמשתמש לוחץ על אחת מההצעות, המפה מתמרכזת מחדש על הכתובת שנבחרה ומוגדרת כנקודת המוצא לחישוב המרחק. בשלב הבא מטמיעים את חישובי המרחק.
7. מה החנויות הכי קרובות?
ממשק Directions API פועל בדומה לחוויה של בקשת מסלול באפליקציית מפות Google – מזינים נקודת מוצא אחת ויעד אחד כדי לקבל מסלול בין שתי הנקודות. ה-API של מטריצת המרחקים לוקח את הרעיון הזה צעד אחד קדימה, ומאפשר לזהות את השילובים האופטימליים בין כמה נקודות מוצא אפשריות לכמה יעדים אפשריים על סמך זמני הנסיעה והמרחקים. במקרה כזה, כדי לעזור למשתמש למצוא את החנות הקרובה ביותר לכתובת שנבחרה, אתם מספקים נקודת מוצא אחת ומערך של מיקומי חנויות כיעדים.
- להוסיף פונקציה חדשה ל-
app.jsבשםcalculateDistances.
app.js
async function calculateDistances(data, origin) {
  const stores = [];
  const destinations = [];

  // Build parallel arrays for the store IDs and destinations
  data.forEach((store) => {
    const storeNum = store.getProperty('storeid');
    const storeLoc = store.getGeometry().get();

    stores.push(storeNum);
    destinations.push(storeLoc);
  });

  // Retrieve the distances of each store from the origin
  // The returned list will be in the same order as the destinations list
  const service = new google.maps.DistanceMatrixService();
  const getDistanceMatrix =
    (service, parameters) => new Promise((resolve, reject) => {
      service.getDistanceMatrix(parameters, (response, status) => {
        if (status != google.maps.DistanceMatrixStatus.OK) {
          reject(response);
        } else {
          const distances = [];
          const results = response.rows[0].elements;
          for (let j = 0; j < results.length; j++) {
            const element = results[j];
            const distanceText = element.distance.text;
            const distanceVal = element.distance.value;
            const distanceObject = {
              storeid: stores[j],
              distanceText: distanceText,
              distanceVal: distanceVal,
            };
            distances.push(distanceObject);
          }

          resolve(distances);
        }
      });
    });

  const distancesList = await getDistanceMatrix(service, {
    origins: [origin],
    destinations: destinations,
    travelMode: 'DRIVING',
    unitSystem: google.maps.UnitSystem.METRIC,
  });

  distancesList.sort((first, second) => {
    return first.distanceVal - second.distanceVal;
  });

  return distancesList;
}
הפונקציה קוראת ל-Distance Matrix API באמצעות המקור שמועבר אליה כמקור יחיד ומיקומי החנויות כמערך של יעדים. לאחר מכן, הפונקציה יוצרת מערך של אובייקטים שמאחסנים את מזהה החנות, המרחק שמוצג כמחרוזת שנוחה לקריאה, המרחק במטרים כערך מספרי וממיינת את המערך.
המשתמש מצפה לראות רשימה של חנויות, מסודרת מהקרובה ביותר לרחוקה ביותר. מאכלסים רשימה בחלונית הצדדית של כל חנות באמצעות הרשימה שמוחזרת מהפונקציה calculateDistances כדי לקבוע את סדר התצוגה של החנויות.
- להוסיף פונקציה חדשה ל-
app.jsבשםshowStoresList.
app.js
function showStoresList(data, stores) {
  if (stores.length == 0) {
    console.log('empty stores');
    return;
  }

  let panel = document.createElement('div');
  // If the panel already exists, use it. Else, create it and add to the page.
  if (document.getElementById('panel')) {
    panel = document.getElementById('panel');
    // If panel is already open, close it
    if (panel.classList.contains('open')) {
      panel.classList.remove('open');
    }
  } else {
    panel.setAttribute('id', 'panel');
    const body = document.body;
    body.insertBefore(panel, body.childNodes[0]);
  }


  // Clear the previous details
  while (panel.lastChild) {
    panel.removeChild(panel.lastChild);
  }

  stores.forEach((store) => {
    // Add store details with text formatting
    const name = document.createElement('p');
    name.classList.add('place');
    const currentStore = data.getFeatureById(store.storeid);
    name.textContent = currentStore.getProperty('name');
    panel.appendChild(name);
    const distanceText = document.createElement('p');
    distanceText.classList.add('distanceText');
    distanceText.textContent = store.distanceText;
    panel.appendChild(distanceText);
  });

  // Open the panel
  panel.classList.add('open');

  return;
}
- מפעילים מחדש את השרת ומרעננים את התצוגה המקדימה על ידי הרצת הפקודה הבאה.
$ python3 -m http.server 8080
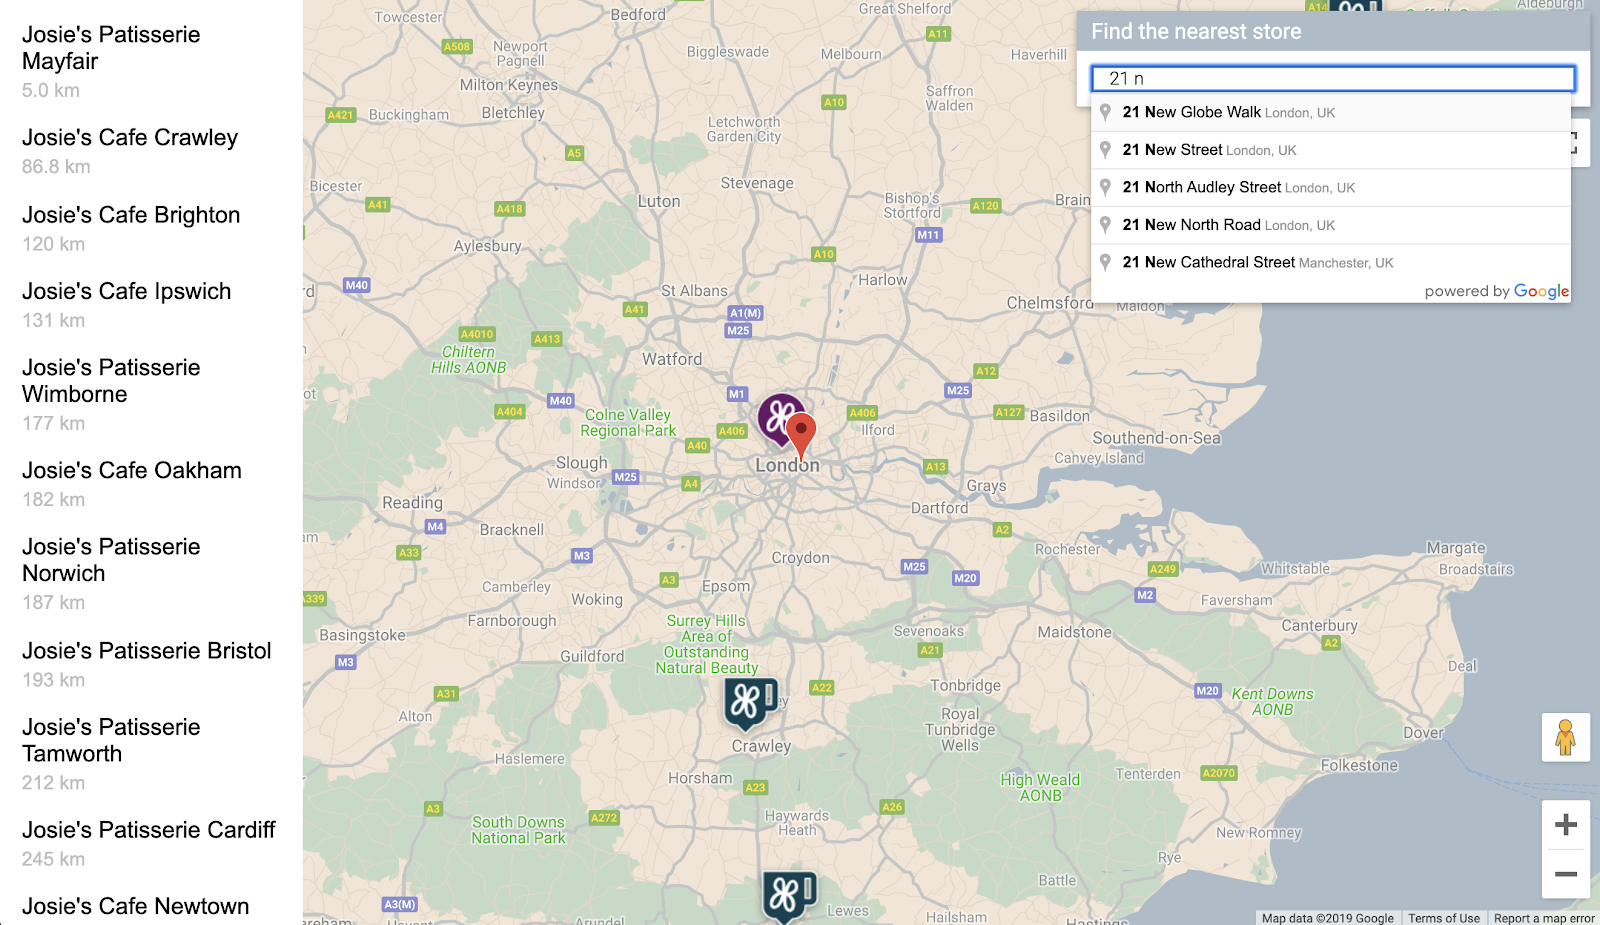
- לבסוף, מזינים כתובת בבריטניה בסרגל החיפוש של ההשלמה האוטומטית ולוחצים על אחת מההצעות.
הכתובת הזו תוצג במרכז המפה, ובסרגל הצד יופיעו מיקומי החנויות לפי המרחק שלהם מהכתובת שנבחרה. דוגמה אחת מוצגת כך:

8. אופציונלי: אירוח דף האינטרנט
עד עכשיו, המפה מוצגת רק כששרת ה-HTTP של Python פועל. כדי לראות את המפה מחוץ לסשן הפעיל של Cloud Shell או כדי לשתף את כתובת ה-URL של המפה עם אחרים, כדאי להשתמש ב-Cloud Storage לאירוח דף האינטרנט. Cloud Storage הוא שירות אינטרנט לאחסון קבצים אונליין, שמאפשר לאחסן נתונים בתשתית של Google ולגשת אליהם משם. השירות משלב בין הביצועים והיכולת להרחבה של Google Cloud לבין אבטחה מתקדמת ויכולות שיתוף. הוא מציע גם תוכנית ללא תשלום, ולכן הוא מצוין לאירוח של כלי פשוט לאיתור חנויות.
ב-Cloud Storage, הקבצים מאוחסנים בקטגוריות, שדומות לספריות במחשב. כדי לארח את דף האינטרנט, קודם צריך ליצור מאגר. צריך לבחור שם ייחודי לקטגוריה, למשל על ידי שימוש בשם שלכם כחלק משם הקטגוריה.
- אחרי שמחליטים על שם, מריצים את הפקודה הבאה ב-Cloud Shell:
$ gsutil mb gs://yourname-store-locator
gsutil הוא הכלי לאינטראקציה עם Cloud Storage. הפקודה mb היא קיצור יצירתי של 'make bucket' (יצירת מאגר). מידע נוסף על כל הפקודות הזמינות, כולל הפקודות שבהן אתם משתמשים, זמין במאמר בנושא כלי gsutil.
כברירת מחדל, הקטגוריות והקבצים שלכם שמתארחים ב-Cloud Storage הם פרטיים. לעומת זאת, במפת הסניפים אתם רוצים שכל הקבצים יהיו ציבוריים כדי שכולם יוכלו לגשת אליהם באינטרנט. אפשר להגדיר כל קובץ כציבורי אחרי ההעלאה, אבל זה תהליך מייגע. במקום זאת, אפשר פשוט להגדיר את רמת הגישה שמוגדרת כברירת מחדל לקטגוריית האחסון שיצרתם, וכל הקבצים שתעלו אליה יקבלו את רמת הגישה הזו.
- מריצים את הפקודה הבאה, ומחליפים את
yourname-store-locatorבשם שבחרתם לקטגוריה:
$ gsutil defacl ch -u AllUsers:R gs://yourname-store-locator
- עכשיו אפשר להעלות את כל הקבצים בספרייה הנוכחית (כרגע רק הקבצים
index.htmlו-app.js) באמצעות הפקודה הבאה:
$ gsutil -h "Cache-Control:no-cache" cp * gs://yourname-store-locator
עכשיו אמור להיות לכם דף אינטרנט עם מפה באינטרנט. כתובת ה-URL לצפייה תהיה http://storage.googleapis.com/yourname-store-locator/index.html, כאשר החלק yourname-store-locator מוחלף בשם הקטגוריה שבחרתם קודם.
ניקוי
הדרך הקלה ביותר למחוק את כל המשאבים שנוצרו בפרויקט הזה היא לסגור את הפרויקט ב-Google Cloud שיצרתם בתחילת המדריך הזה:
- פותחים את דף ההגדרות במסוף Cloud.
- לוחצים על Select a project (בחירת פרויקט).
- בוחרים את הפרויקט שיצרתם בתחילת המדריך הזה ולוחצים על Open.
- מזינים את מזהה הפרויקט ולוחצים על Shut down (סגירה).
9. מזל טוב
מעולה! סיימתם את ה-codelab הזה.
מה למדתם
- הוספת מפה עם סגנון מותאם אישית באמצעות Maps JavaScript API
- טעינה של שכבת נתונים במפה בפורמט GeoJSON
- שימוש ב-Street View Static API כדי להציג תמונה של Street View בדף אינטרנט.
- שימוש בספריית המקומות כדי להוסיף סרגל חיפוש עם השלמה אוטומטית של מקומות לדף
- שימוש בשירות Distance Matrix כדי לחשב כמה מרחקים באמצעות קריאה אחת ל-API
- ניהול ובדיקה של פרויקטים לפיתוח אתרים ב-Google Cloud Platform באמצעות ממשק שורת הפקודה (CLI) Cloud Shell מבוסס-דפדפן
- אירוח אתר באמצעות Cloud Storage
מידע נוסף
- ב-codelab Mapping the NYC Subway (מיפוי הרכבת התחתית של ניו יורק) מוסבר על דרך נוספת לאירוח מפת האינטרנט באמצעות Google App Engine.
- אפשר לעיין בסדנאות קוד נוספות בפלטפורמה של מפות Google, כמו יצירת שירות לחיפוש עסקים בקרבת מקום.
- כדי לעזור לנו ליצור תוכן שיהיה לך הכי שימושי, נשמח אם תענה על השאלה הבאה:
אילו codelabs נוספים היית רוצה לראות?
האם ה-codelab שרצית לא מופיע ברשימה שלמעלה? כאן אפשר לשלוח בקשה בנושא בעיה חדשה.
אם רוצים לעיין בקוד, אפשר לעבור למאגר קוד המקור בכתובת https://github.com/googlecodelabs/google-maps-simple-store-locator.

