1. Before you begin
Over the last decade web apps have become ever more social and interactive, with support for multimedia, comments, and more all happening in real time by potentially tens of thousands of people on even a moderately popular website.
This has also presented an opportunity for spammers to abuse such systems and associate less savory content with the articles, videos, and posts others have written, in an attempt to gain more visibility.
Older methods of spam detection, such as a list of blocked words, can easily be bypassed and are simply no match for advanced spam bots, which are continuously evolving in their complexity. Fast-forward to today, and you can now use machine learning models that have been trained to detect such spam.
Traditionally, running a machine learning model to pre-filter comments would have been performed on the server side, but with TensorFlow.js you can now execute machine learning models client side, in browser via JavaScript. You can stop spam before it even touches the back end, potentially saving costly server side resources.
As you may be aware, Machine Learning is quite the buzzword these days, touching almost every industry out there but how can you take your first steps to use these capabilities as a web developer?
This codelab will show you how to build a web app, from a blank canvas, that tackles the very real problem of comment spam, using natural language processing (the art of understanding human language with a computer). Many web developers will encounter this issue as they work on one of the ever growing number of popular web applications that exist today, and this codelab will enable you to tackle such problems efficiently.
Prerequisites
This codelab has been written for web developers who are new to machine learning who are looking to get started using pre-trained models with TensorFlow.js.
Familiarity with HTML5, CSS, and JavaScript is assumed for this lab.
What you'll learn
You will:
- Learn more about what TensorFlow.js is and what models exist for natural language processing.
- Build a simple HTML / CSS / JS webpage for a fictitious video blog with a real time comment section.
- Use TensorFlow.js to load a pre-trained machine learning model capable of predicting if a sentence entered is likely to be spam or not, and if so, warn the user that their comment has been held for moderation.
- Encode comment sentences in a way that is usable by the machine learning model to then classify.
- Interpret the output of the machine learning model to decide if you want to automatically flag the comment or not. This hypothetical UX can be reused on any website you may be working on, and adapted to fit any client use case — maybe it is a regular blog, forum, or some form of CMS such as Drupal.
Pretty neat. Is it hard to do? Nope. So let's get hacking...
What you'll need
- a Glitch.com account is preferred to follow along or you can use a web serving environment you are comfortable editing and running yourself.
2. What is TensorFlow.js?

TensorFlow.js is an open source machine learning library that can run anywhere JavaScript can. It's based upon the original TensorFlow library written in Python and aims to re-create this developer experience and set of APIs for the JavaScript ecosystem.
Where can it be used?
Given the portability of JavaScript, you can now write in 1 language and perform machine learning across all of the following platforms with ease:
- Client side in the web browser using vanilla JavaScript
- Server side and even IoT devices like Raspberry Pi using Node.js
- Desktop apps using Electron
- Native mobile apps using React Native
TensorFlow.js also supports multiple backends within each of these environments (the actual hardware based environments it can execute within such as the CPU or WebGL for example. A "backend" in this context does not mean a server side environment - the backend for execution could be client side in WebGL for example) to ensure compatibility and also keep things running fast. Currently TensorFlow.js supports:
- WebGL execution on the device's graphics card (GPU) - this is the fastest way to execute larger models (over 3MB in size) with GPU acceleration.
- Web Assembly (WASM) execution on CPU - to improve CPU performance across devices including older generation mobile phones for example. This is better suited to smaller models (less than 3MB in size) which can actually execute faster on CPU with WASM than with WebGL due to the overhead of uploading content to a graphics processor.
- CPU execution - the fallback should none of the other environments be available. This is the slowest of the three but is always there for you.
Note: You can choose to force one of these backends if you know what device you will be executing on, or you can simply let TensorFlow.js decide for you if you do not specify this.
Client side super powers
Running TensorFlow.js in the web browser on the client machine can lead to several benefits that are worth considering.
Privacy
You can both train and classify data on the client machine without ever sending data to a 3rd party web server. There may be times where this may be a requirement to comply with local laws, such as GDPR for example, or when processing any data that the user may want to keep on their machine and not sent to a 3rd party.
Speed
As you are not having to send data to a remote server, inference (the act of classifying the data) can be faster. Even better, you have direct access to the device's sensors such as the camera, microphone, GPS, accelerometer and more should the user grant you access.
Reach and scale
With one click anyone in the world can click a link you send them, open the web page in their browser, and utilise what you have made. No need for a complex server side Linux setup with CUDA drivers and much more just to use the machine learning system.
Cost
No servers means the only thing you need to pay for is a CDN to host your HTML, CSS, JS, and model files. The cost of a CDN is much cheaper than keeping a server (potentially with a graphics card attached) running 24/7.
Server side features
Leveraging the Node.js implementation of TensorFlow.js enables the following features.
Full CUDA support
On the server side, for graphics card acceleration, you must install the NVIDIA CUDA drivers to enable TensorFlow to work with the graphics card (unlike in the browser which uses WebGL - no install needed). However with full CUDA support you can fully leverage the graphics card's lower level abilities, leading to faster training and inference times. Performance is on parity with the Python TensorFlow implementation as they both share the same C++ backend.
Model Size
For cutting edge models from research, you may be working with very large models, maybe gigabytes in size. These models can not currently be run in the web browser due to the limitations of memory usage per browser tab. To run these larger models you can use Node.js on your own server with the hardware specifications you require to run such a model efficiently.
IOT
Node.js is supported on popular single board computers like the Raspberry Pi, which in turn means you can execute TensorFlow.js models on such devices too.
Speed
Node.js is written in JavaScript which means that it benefits from just in time compilation. This means that you may often see performance gains when using Node.js as it will be optimized at runtime, especially for any preprocessing you may be doing. A great example of this can be seen in this case study which shows how Hugging Face used Node.js to get a 2x performance boost for their natural language processing model.
Now you understand the basics of TensorFlow.js, where it can run, and some of the benefits, let's start doing useful things with it!
3. Pre-trained models
Why would I want to use a pre-trained model?
There are a number of benefits to starting with a popular pre-trained model if it fits your desired use case, such as:
- Not needing to gather training data yourself. Preparing data in the correct format, and labelling it so that a machine learning system can use it to learn from, can be very time consuming and costly.
- The ability to rapidly prototype an idea with reduced cost and time.
There is no point "reinventing the wheel" when a pre-trained model may be good enough to do what you need, allowing you to concentrate on using the knowledge provided by the model to implement your creative ideas. - Use of state of the art research. Pre-trained models are often based on popular research, giving you exposure to such models, whilst also understanding their performance in the real world.
- Ease of use and extensive documentation. Due to the popularity of such models.
- Transfer learning capabilities. Some pre-trained models offer transfer learning capabilities, which is essentially the practice of transferring information learnt from one machine learning task, to another similar example. For example, a model that was originally trained to recognize cats could be retrained to recognize dogs, if you gave it new training data. This will be faster since you won't be starting with a blank canvas. The model can use what it has already learned to recognize cats to then recognize the new thing - dogs have eyes and ears too after all, so if it already knows how to find those features, we are halfway there. Re-train the model on your own data in a much faster way.
A pre-trained comment spam detection model
You will be using the Average Word Embedding model architecture for your comment spam detection needs, however if you try to use an untrained model, it won't be any better than random chance at guessing if the sentences are spam or not.
To make the model useful it needs to be trained on custom data, in this case, to allow it to learn what spam vs non-spam comments look like. From that learning it will then have a better chance of classifying things correctly in the future.
Thankfully, someone has already trained this exact model architecture for this comment spam classification task, so you can use it as your starting point. You may find other pre-trained models using the same model architecture to do different things, such as detecting what language a comment was written in, or predicting if website contact form data should be routed to a certain company team automatically based on the text written eg sales (product enquiry) or engineering (technical bug or feedback). With enough training data, a model like this can learn to classify such text in each case to give your web app superpowers and improve the efficiency of your organization.
In a future code lab you'll learn how to use Model Maker to retrain this pre-trained comment spam model, and improve its performance further on your own comment data. For now, you'll use the existing comment spam detection model as a starting point to get the initial web app working as a first prototype.
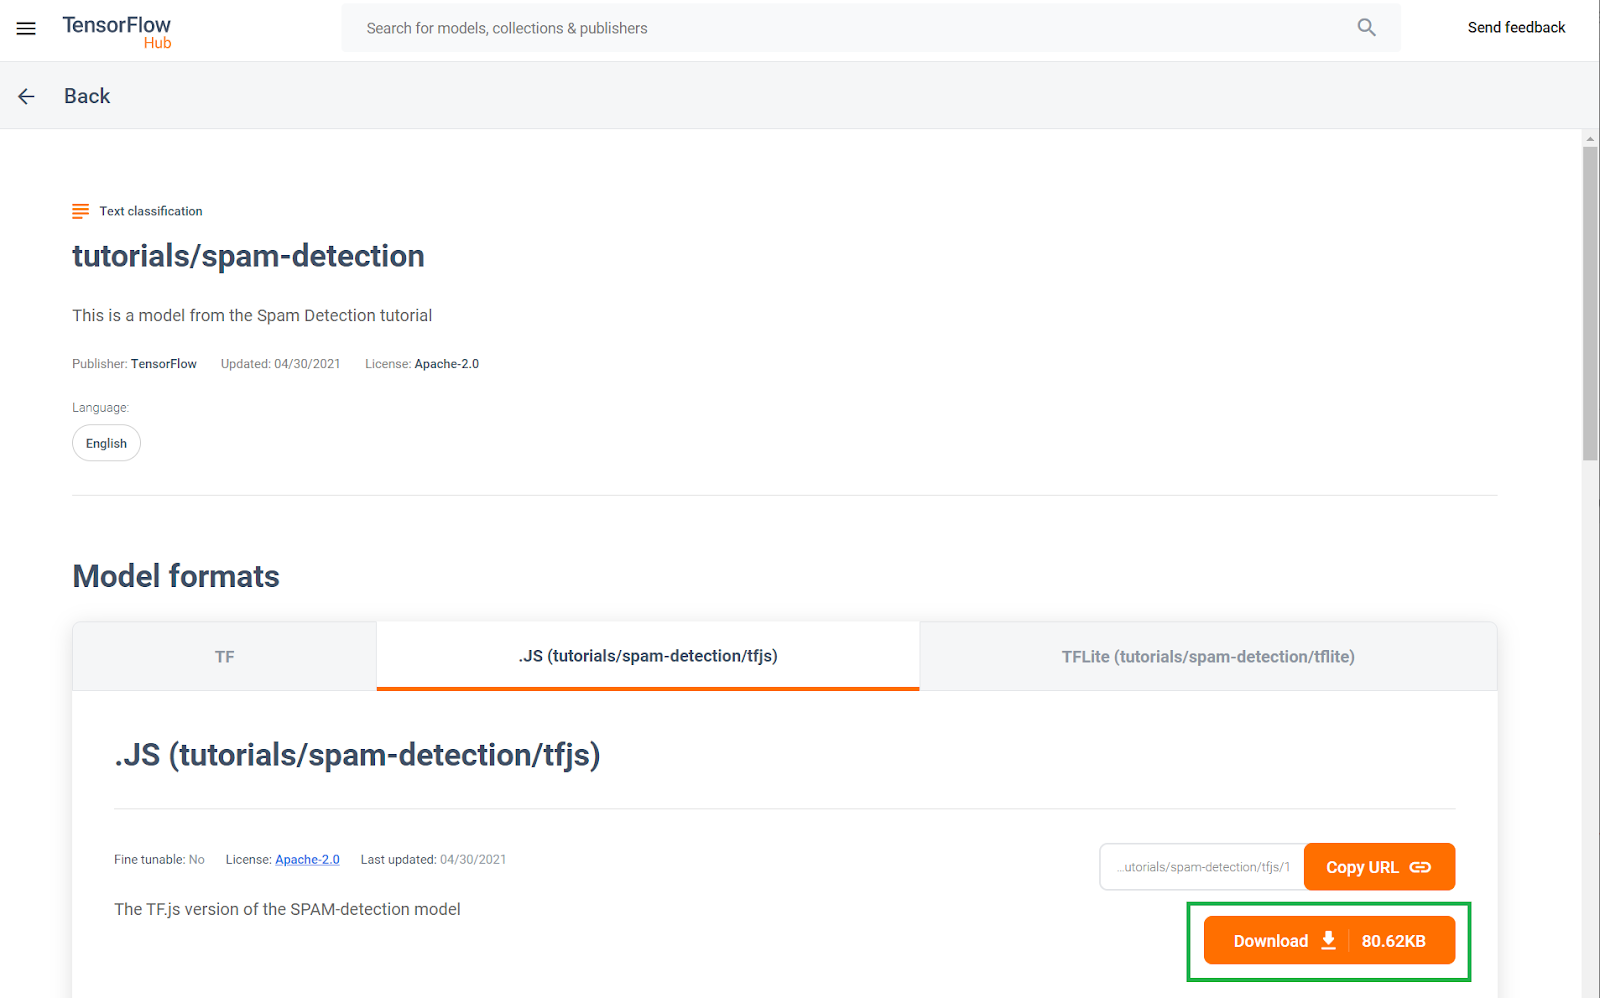
This pre-trained comment spam detection model has been published to a website known as TF Hub, a machine learning model repository maintained by Google, where ML engineers can publish their pre-made models for many common use cases (such as text, vision, sound and more for specific use cases within each of those categories). Go ahead and download the model files for now to use in the web app later in this codelab.
Click the download button for the JS model, as shown below:
4. Get set up to code
What you'll need
- A modern web browser.
- Basic knowledge of HTML, CSS, JavaScript, and Chrome DevTools (viewing the console output).
Let's get coding.
We have created a Glitch.com Node.js Express boilerplate template to start from which you can simply clone as your base state for this code lab in just one click.
On Glitch simply click the "remix this" button to fork it and make a new set of files you can edit.
This very simple skeleton provides us with the following files within the www folder:
- HTML page (index.html)
- Stylesheet (style.css)
- File to write our JavaScript code (script.js)
For your convenience we have also added in the HTML file an import for the TensorFlow.js library which looks like this:
index.html
<!-- Import TensorFlow.js library -->
<script src="https://cdn.jsdelivr.net/npm/@tensorflow/tfjs@2.0.0/dist/tf.min.js" type="text/javascript"></script>
We then serve this www folder via a simple Node Express server via package.json and server.js
5. App HTML Boilerplate
What's your starting point?
All prototypes require some basic HTML scaffolding upon which you can render your findings to. Set that up now. You are going to add:
- A title for the page
- Some descriptive text
- A placeholder video representing the video blog entry
- An area to view and type comments
Open index.html and paste over the existing code with the following to set up the above features:
index.html
<!DOCTYPE html>
<html lang="en">
  <head>
    <title>My Pretend Video Blog</title>
    <meta charset="utf-8">
    <meta http-equiv="X-UA-Compatible" content="IE=edge">
    <meta name="viewport" content="width=device-width, initial-scale=1">
    <!-- Import the webpage's stylesheet -->
    <link rel="stylesheet" href="/style.css">
  </head>
  <body>
    <header>
      <h1>MooTube</h1>
      <a id="login" href="#">Login</a>
    </header>

    <h2>Check out the TensorFlow.js rap for the show and tell!</h2>
    <p>Lorem ipsum dolor sit amet, consectetur adipiscing elit. Curabitur ipsum quam, tincidunt et tempor in, pulvinar vel urna. Nunc eget erat pulvinar, lacinia nisl in, rhoncus est. Morbi molestie vestibulum nunc. Integer non ipsum dolor. Curabitur condimentum sem eget odio dapibus, nec bibendum augue ultricies. Vestibulum ante ipsum primis in faucibus orci luctus et ultrices posuere cubilia curae; Sed iaculis ut ligula sed tempor. Phasellus ac dictum felis. Integer arcu dui, facilisis sit amet placerat sagittis, blandit sit amet risus.</p>

    <iframe width="100%" height="500" src="https://www.youtube.com/embed/RhVs7ijB17c" frameborder="0" allow="accelerometer; autoplay; clipboard-write; encrypted-media; gyroscope; picture-in-picture" allowfullscreen></iframe>

    <section id="comments" class="comments">
      <div id="comment" class="comment" contenteditable></div>
      <button id="post" type="button">Comment</button>

      <ul id="commentsList">
        <li>
          <span class="username">NotASpammer</span>
          <span class="timestamp">3/18/2021, 6:52:16 PM</span>
          <p>I am not a spammer, I am a good boy.</p>
        </li>
        <li>
          <span class="username">SomeUser</span>
          <span class="timestamp">2/11/2021, 3:10:00 PM</span>
          <p>Wow, I love this video, so many amazing demos!</p>
        </li>
      </ul>
    </section>


    <!-- Import TensorFlow.js library -->
    <script src="https://cdn.jsdelivr.net/npm/@tensorflow/tfjs@2.0.0/dist/tf.min.js" type="text/javascript"></script>

    <!-- Import the page's JavaScript to do some stuff -->
    <script type="module" src="/script.js"></script>
  </body>
</html>
Breaking it down
Let's break some of the above HTML code down to highlight some key things you added.
- You added a
<h1>tag for the page title along with an<a>tag for the login button all contained within the<header>. You then added a<h2>for the article title, and a<p>tag for the description of the video. Nothing special here. - You added an
iframetag that embeds an arbitrary YouTube video. For now you're using the mighty TensorFlow.js rap as a placeholder, but you can put any video here you want simply by changing the URL of the iframe. In fact, on a production website all of these values would be rendered by the backend dynamically, depending on the page being viewed. - Finally, you added a
sectionwith an id and class of "comments" which contains a contenteditabledivto write new comments along with abuttonto submit the new comment you want to add along with an unordered list of comments. You have the username and time of posting within aspantag inside each list item, and then finally the comment itself in aptag. 2 example comments are hard coded for now as a placeholder.
If you preview the output right now, it should look something like this:
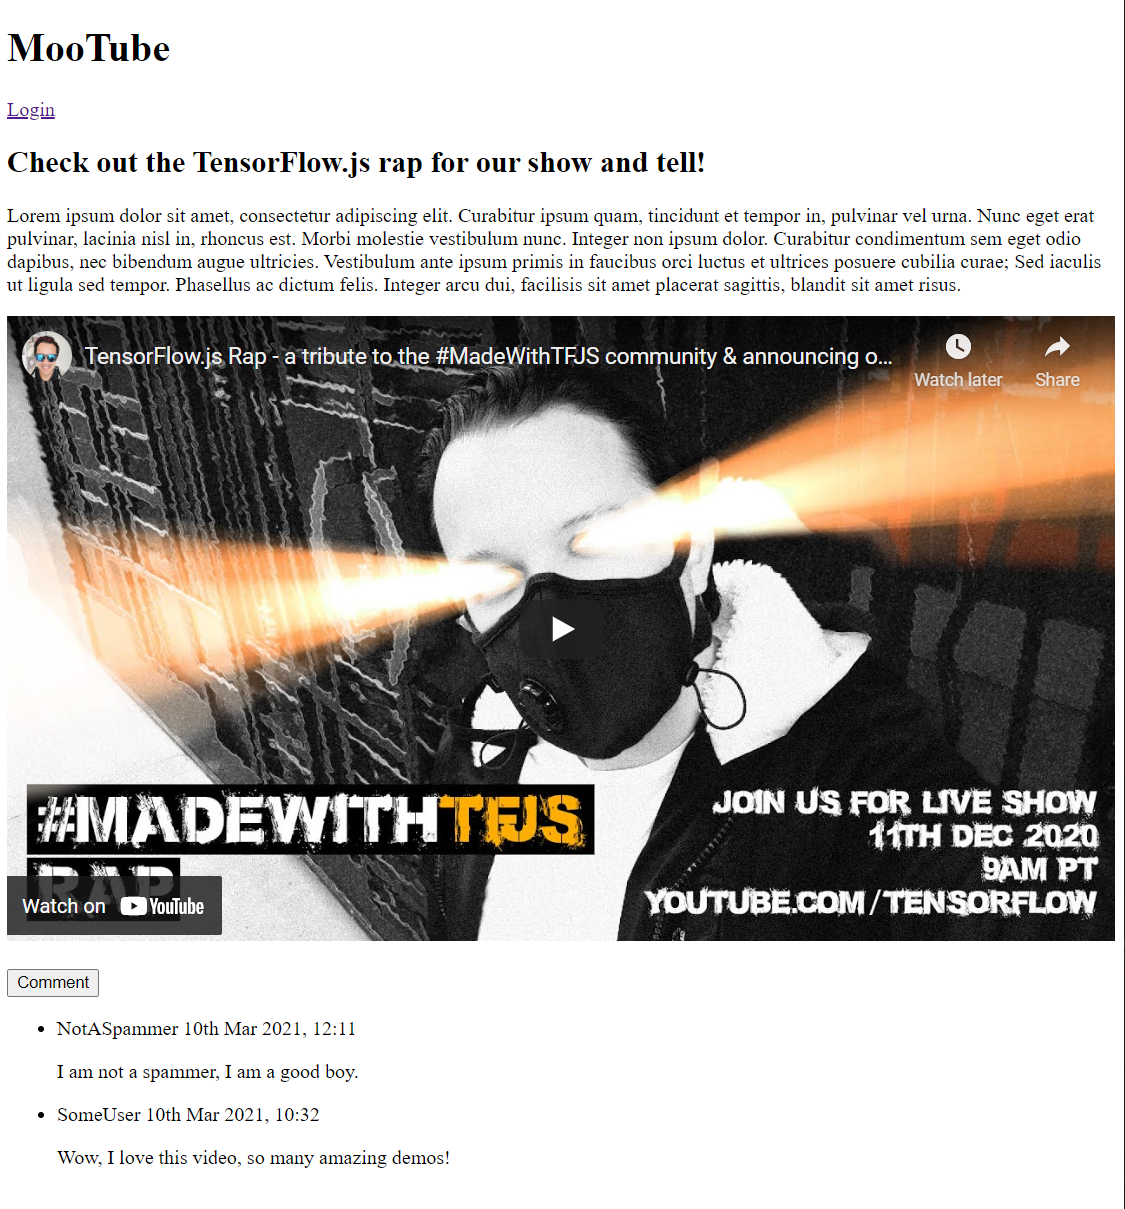
Well that looks pretty terrible, so it is time to add some style...
6. Add style
Element defaults
First, add styles for the HTML elements you just added to ensure they render correctly.
Start by applying a CSS reset to have a comment starting point across all browsers and OS. Overwrite style.css contents with the following:
style.css
/* http://meyerweb.com/eric/tools/css/reset/
   v2.0 | 20110126
   License: none (public domain)
*/
a,abbr,acronym,address,applet,article,aside,audio,b,big,blockquote,body,canvas,caption,center,cite,code,dd,del,details,dfn,div,dl,dt,em,embed,fieldset,figcaption,figure,footer,form,h1,h2,h3,h4,h5,h6,header,hgroup,html,i,iframe,img,ins,kbd,label,legend,li,mark,menu,nav,object,ol,output,p,pre,q,ruby,s,samp,section,small,span,strike,strong,sub,summary,sup,table,tbody,td,tfoot,th,thead,time,tr,tt,u,ul,var,video{margin:0;padding:0;border:0;font-size:100%;font:inherit;vertical-align:baseline}article,aside,details,figcaption,figure,footer,header,hgroup,menu,nav,section{display:block}body{line-height:1}ol,ul{list-style:none}blockquote,q{quotes:none}blockquote:after,blockquote:before,q:after,q:before{content:'';content:none}table{border-collapse:collapse;border-spacing:0}
Next, append to that some useful CSS to bring the user interface to life.
Add the following to the end of style.css below the reset CSS code you added above:
style.css
/* CSS files add styling rules to your content */
body {
  background: #212121;
  color: #fff;
  font-family: helvetica, arial, sans-serif;
}

header {
  background: linear-gradient(0deg, rgba(7,7,7,1) 0%, rgba(7,7,7,1) 85%, rgba(55,52,54,1) 100%);
  min-height: 30px;
  overflow: hidden;
}

h1 {
  color: #f0821b;
  font-size: 24pt;
  padding: 15px 25px;
  display: inline-block;
  float: left;
}

h2, p, section, iframe {
  background: #212121;
  padding: 10px 25px;
}

h2 {
  font-size: 16pt;
  padding-top: 25px;
}

p {
  color: #cdcdcd;
}

iframe {
  display: block;
  padding: 15px 0;
}

header a, button {
  color: #222;
  padding: 7px;
  min-width: 100px;
  background: rgb(240, 130, 30);
  border-radius: 3px;
  border: 1px solid #3d3d3d;
  text-transform: uppercase;
  font-weight: bold;
  cursor: pointer;
  transition: background 300ms ease-in-out;
}

header a {
  background: #efefef;
  float: right;
  margin: 15px 25px;
  text-decoration: none;
  text-align: center;
}

button:focus, button:hover, header a:hover {
  background: rgb(260, 150, 50);
}

.comment {
  background: #212121;
  border: none;
  border-bottom: 1px solid #888;
  color: #fff;
  min-height: 25px;
  display: block;
  padding: 5px;
}

.comments button {
  float: right;
  margin: 5px 0;
}

.comments button, .comment {
  transition: opacity 500ms ease-in-out;
}

.comments ul {
  clear: both;
  margin-top: 60px;
}

.comments ul li {
  margin-top: 5px;
  padding: 10px;
  transition: background 500ms ease-in-out;
}

.comments ul li * {
  background: transparent;
}

.comments ul li:nth-child(1) {
  background: #313131;
}

.comments ul li:hover {
  background: rgb(70, 60, 10);
}

.username, .timestamp {
  font-size: 80%;
  margin-right: 5px;
}

.username {
  font-weight: bold;
}

.processing {
  opacity: 0.3;
  filter: grayscale(1);
}

.comments ul li.spam {
  background-color: #d32f2f;
}

.comments ul li.spam::after {
  content: "⚠";
  margin: -17px 2px;
  zoom: 3;
  float: right;
}
Great! That's all you need. If you successfully overwrote your styles with the 2 pieces of code above, your live preview should now look like this:

Sweet, night mode by default, and charming CSS transitions for hover effects on key elements. Looking good. Now integrate some behavioural logic using JavaScript.
7. JavaScript: DOM manipulation & Event Handlers
Referencing key DOM elements
First, ensure you can access the key parts of the page you will need to manipulate or access later on in the code along with defining some CSS class constants for styling.
Start by replacing the contents of script.js with the following constants:
script.js
const POST_COMMENT_BTN = document.getElementById('post');
const COMMENT_TEXT = document.getElementById('comment');
const COMMENTS_LIST = document.getElementById('commentsList');
// CSS styling class to indicate comment is being processed when
// posting to provide visual feedback to users.
const PROCESSING_CLASS = 'processing';

// Store username of logged in user. Right now you have no auth
// so default to Anonymous until known.
var currentUserName = 'Anonymous';
Handle comment posting
Next, add an event listener and handling function to the POST_COMMENT_BTN so that it has the ability to grab the written comment text and set a CSS class to indicate processing has started. Note that you check that you have not already clicked the button in case processing is already in progress.
script.js
/**
 * Function to handle the processing of submitted comments.
 **/
function handleCommentPost() {
  // Only continue if you are not already processing the comment.
  if (! POST_COMMENT_BTN.classList.contains(PROCESSING_CLASS)) {
    POST_COMMENT_BTN.classList.add(PROCESSING_CLASS);
    COMMENT_TEXT.classList.add(PROCESSING_CLASS);
    let currentComment = COMMENT_TEXT.innerText;
    console.log(currentComment);

    // TODO: Fill out the rest of this function later.
  }
}

POST_COMMENT_BTN.addEventListener('click', handleCommentPost);
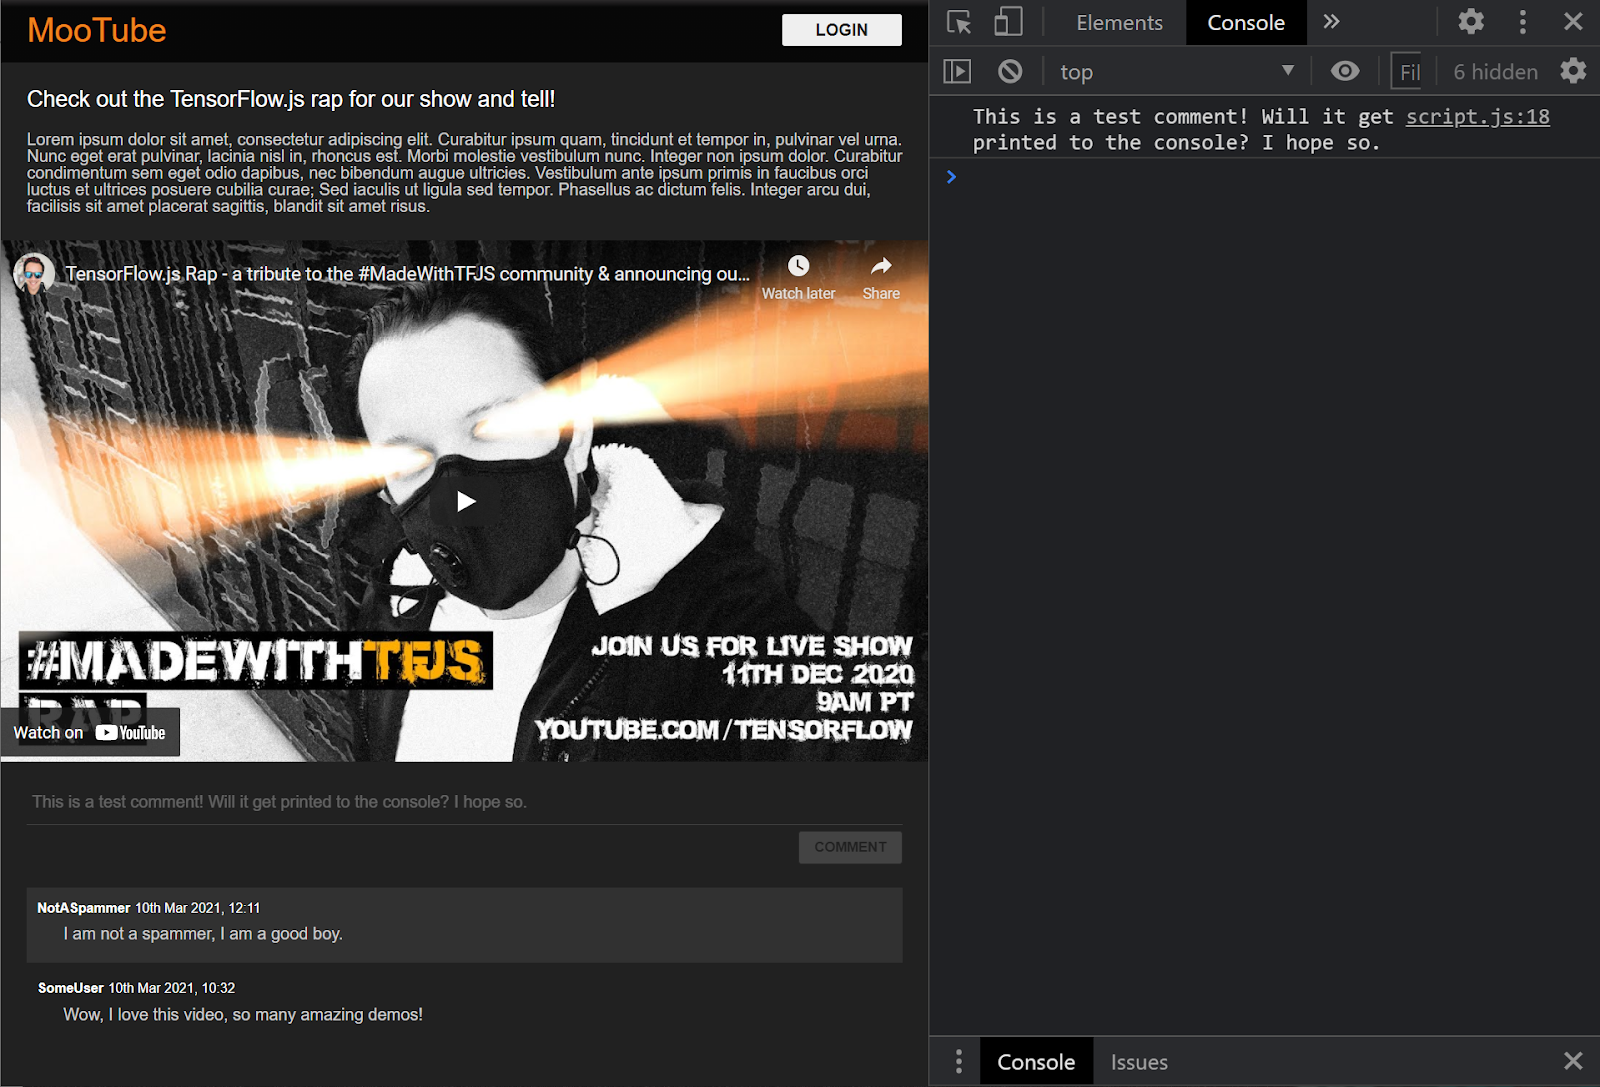
Great! If you refresh the webpage and try posting a comment you should now see the comment button and text turn greyscale, and in the console you should see the comment printed like this:
Now you have a basic HTML / CSS / JS skeleton, it is time to turn your attention back to the machine learning model so you can integrate that with the beautiful webpage.
8. Serve the machine learning model
You are almost ready to load the model. Before you can do that though, you must upload the model files downloaded earlier in the codelab to your website so it is hosted and usable within the code.
First, if you have not done so already, unzip the files you downloaded for the model at the start of this codelab. You should see a directory with the following files contained within:

What do you have here?
model.json- This is one of the files that make up the trained TensorFlow.js model. You will actually reference this specific file later on in your TensorFlow.js code.group1-shard1of1.bin- This is a binary file containing the trained weights (essentially a bunch of numbers it learned to do its classification task well) of the TensorFlow.js model and will need to be hosted somewhere on your server for download.vocab- This strange file with no extension is something from Model Maker that shows us how to encode words in the sentences so the model understands how to use them. You will dive more into this in the next section.labels.txt- This simply contains the resulting classnames that the model will predict. For this model if you open this file in your text editor it simply has "false" and "true" listed, indicating "not spam" or "spam" as its prediction output.
Host the TensorFlow.js model files
First place model.json and the *.bin files that were generated on to a web server so you can access them via the web page.
Upload files to Glitch
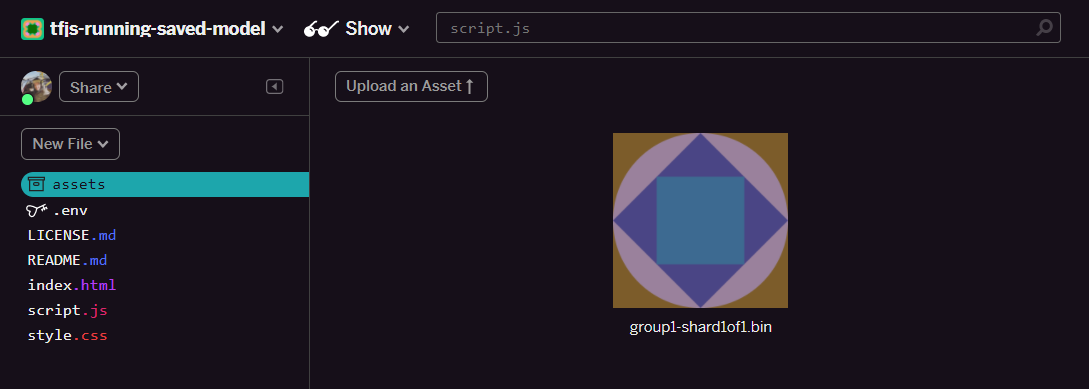
- Click the assets folder in the left-hand panel of your Glitch project.
- Click upload an asset and select
group1-shard1of1.binto be uploaded into this folder. It should now look like this once uploaded:
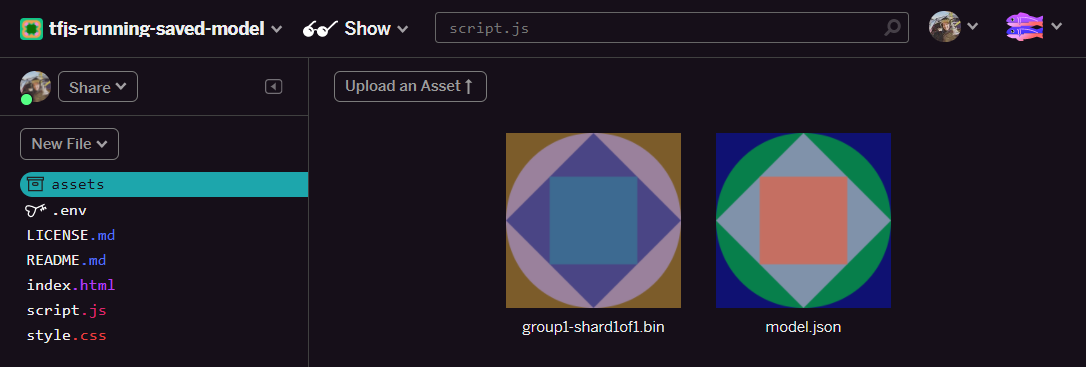
- Great! Now do the same for the
model.jsonfile. 2 files should be in your assets folder like this:
- Click the
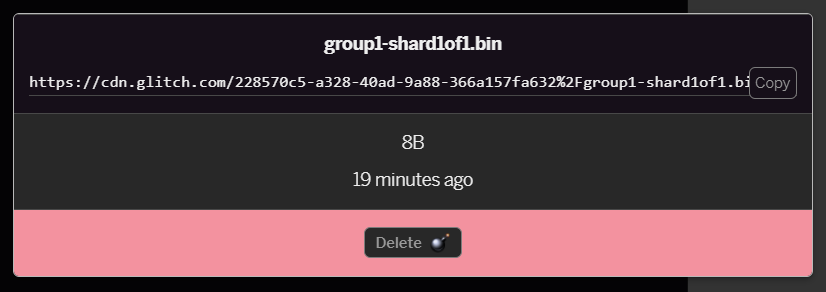
group1-shard1of1.binfile you just uploaded. You will be able to copy the URL to its location. Copy this path now as shown:
- Now at the bottom left of the screen, click Tools > Terminal. Wait for the terminal window to load. Once loaded, type the following and then press enter to change directory to the
wwwfolder:
terminal:
cd www
- Next, use
wgetto download the 2 files just uploaded by replacing the URLs below with the URLs you generated for the files in the assets folder on Glitch (check the assets folder for each file's custom URL). Note the space between the two URLs and that the URLs you will need to use will be different to the ones below, but will look similar:
terminal
wget https://cdn.glitch.com/1cb82939-a5dd-42a2-9db9-0c42cab7e407%2Fmodel.json?v=1616111344958 https://cdn.glitch.com/1cb82939-a5dd-42a2-9db9-0c42cab7e407%2Fgroup1-shard1of1.bin?v=1616017964562
Super, you now have made a copy of the files uploaded to the www folder however right now they will have downloaded with strange names.
- Type
lsin the terminal and press enter. You will see something like this:

- Using the
mvcommand you can rename the files. Type the following into the console and press <kbd>Enter</kbd>, or <kbd>return</kbd>, after each line:
terminal:
mv *group1-shard1of1.bin* group1-shard1of1.bin
mv *model.json* model.json
- Finally, refresh the Glitch project by typing
refreshin the terminal and pressing <kbd>Enter</kbd>:
terminal:
refresh
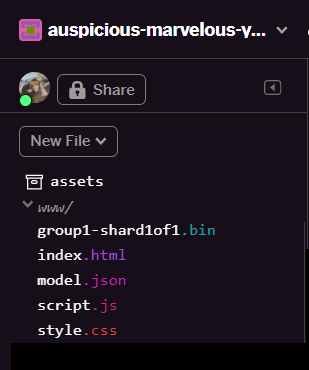
- After refreshing, you should now see
model.jsonandgroup1-shard1of1.binin thewwwfolder of the user interface:
Great! You are now ready to use the uploaded model files with some actual code in the browser.
9. Load & use the hosted TensorFlow.js model
You are now at a point where you can test loading the uploaded TensorFlow.js model with some data to check if it works.
Right now, the example input data you will see below will look rather mysterious (an array of numbers), and how they were generated will be explained in the next section. Just view it as an array of numbers for now. At this stage it is important to simply test that the model gives us an answer without error.
Add the following code to the end of your script.js file, and be sure to replace the MODEL_JSON_URL string value with the path of the model.json file you generated when you uploaded the file to your Glitch assets folder in the prior step. (Remember, you can simply click the file in the assets folder on Glitch to find its URL).
Read the comments of the new code below to understand what each line is doing:
script.js
// Set the URL below to the path of the model.json file you uploaded.
const MODEL_JSON_URL = 'model.json';
// Set the minimum confidence for spam comments to be flagged.
// Remember this is a number from 0 to 1, representing a percentage
// So here 0.75 == 75% sure it is spam.
const SPAM_THRESHOLD = 0.75;

// Create a variable to store the loaded model once it is ready so
// you can use it elsewhere in the program later.
var model = undefined;


/**
 * Asynchronous function to load the TFJS model and then use it to
 * predict if an input is spam or not spam.
 */
async function loadAndPredict(inputTensor) {
  // Load the model.json and binary files you hosted. Note this is
  // an asynchronous operation so you use the await keyword
  if (model === undefined) {
    model = await tf.loadLayersModel(MODEL_JSON_URL);
  }

  // Once model has loaded you can call model.predict and pass to it
  // an input in the form of a Tensor. You can then store the result.
  var results = await model.predict(inputTensor);

  // Print the result to the console for us to inspect.
  results.print();

  // TODO: Add extra logic here later to do something useful
}

loadAndPredict(tf.tensor([[1,3,12,18,2,0,0,0,0,0,0,0,0,0,0,0,0,0,0,0]]));
If the project is set up correctly, you should now see something like the following printed to your console window, when you use the model you loaded to predict a result from the input passed to it:
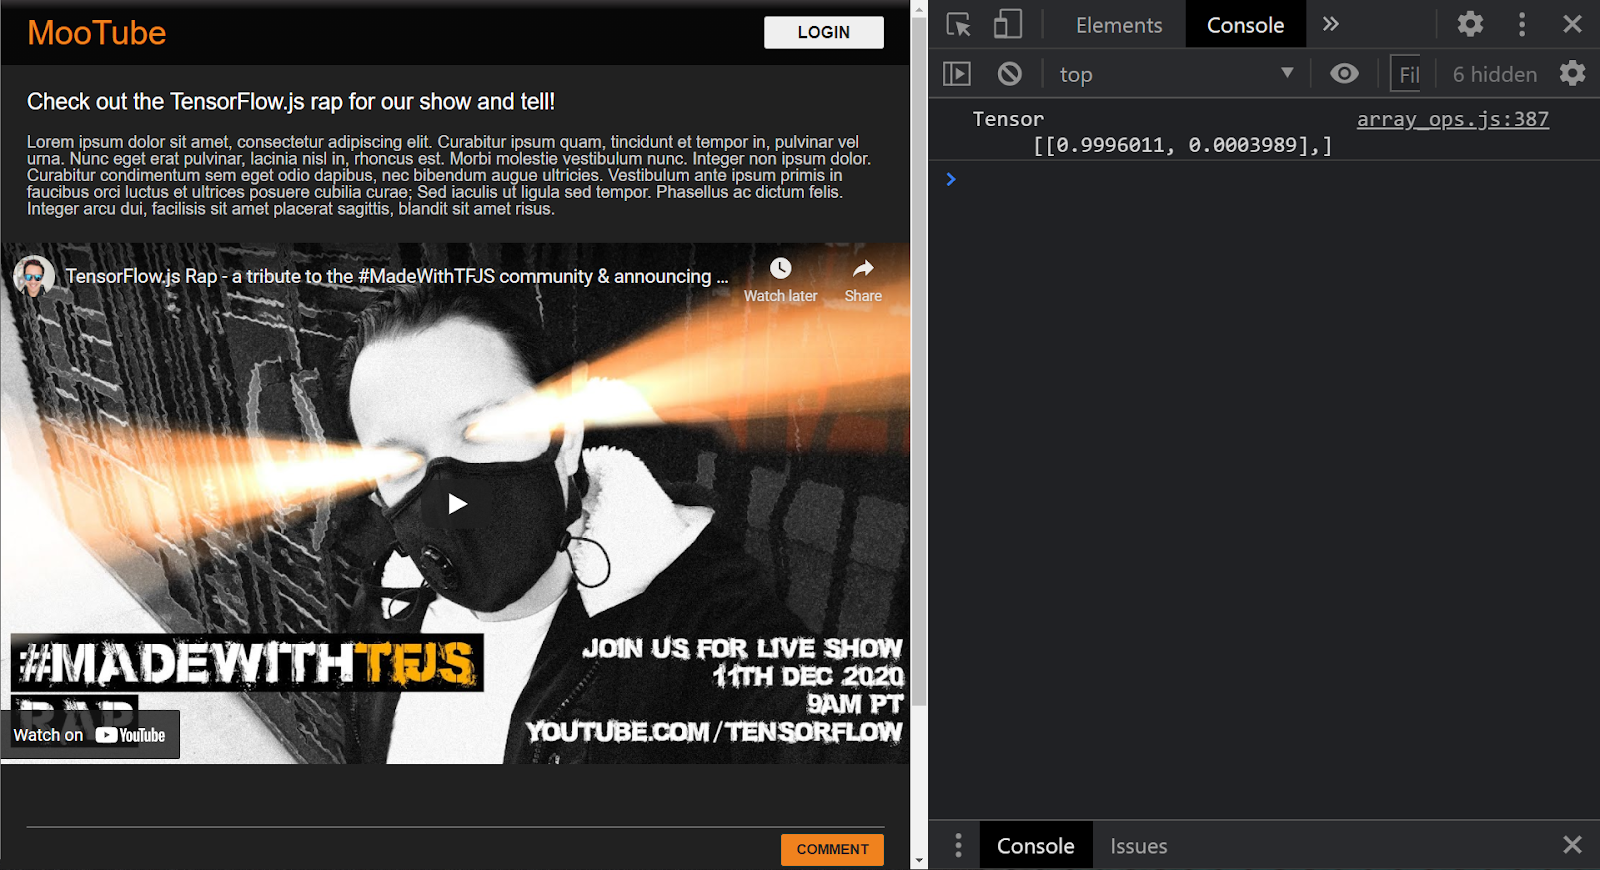
In the console, you see 2 numbers printed:
- 0.9996011
- 0.0003989
While this may seem cryptic, these numbers actually represent probabilities of what the model thinks the classification is for the input you gave it. But what do they represent?
If you open up your labels.txt file from the downloaded model files you have on your local machine, you'll see that it also has 2 fields:
- False
- True
Thus, the model in this case is saying it is 99.96011% sure (shown in the result object as 0.9996011) that the input you gave it (which was [1,3,12,18,2,0,0,0,0,0,0,0,0,0,0,0,0,0,0,0] was NOT spam (i.e False).
Note that false was the first label in labels.txt and is represented by the first output in the console print which is how you know what the output prediction relates to.
OK, so now you know how to interpret the output, but what exactly was that big bunch of numbers given as the input and how do you convert the sentences to this format for the model to use? For that, you need to learn about tokenizing and tensors. Read on!
10. Tokenization & Tensors
Tokenization
So it turns out that machine learning models can only accept a bunch of numbers as inputs. Why? Well essentially, it is because a machine learning model is basically a bunch of chained mathematical operations, so if you pass to it something that is not a number, it is going to have a hard time dealing with it. So now the question becomes how do you convert the sentences into numbers for use with the model you loaded?
Well the exact process differs from model to model, but for this one there is one more file in the model files you downloaded called vocab, and this is the key of how you encode data.
Go ahead and open vocab in a local text editor on your machine and you will see something like this:
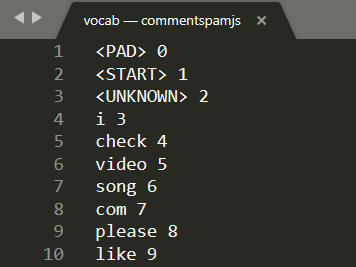
Essentially this is a lookup table on how to convert meaningful words the model learned to numbers it can understand. There are also some special cases at the top of the file <PAD>, <START>, and <UNKNOWN>:
<PAD>- This is short for "padding". It turns out that machine learning models like to have a fixed number of inputs no matter how long your sentence may be. The model used expects that there are always 20 numbers for the input (this was defined by the creator of the model and can be changed if you retrain the model). So if you have a phrase like "I like video" you would fill the remaining spaces in the array with 0's which represent the<PAD>token. If the sentence is greater than 20 words, you would need to split it up so it fits this requirement and instead do multiple classifications on many smaller sentences.<START>- This is simply always the first token to indicate the start of the sentence. You will notice in the example input in the previous steps the array of numbers started with a "1" - this was representing the<START>token.<UNKNOWN>- As you may have guessed, if the word does not exist in this lookup of words, you simply use the<UNKNOWN>token (represented by a "2") as the number.
For every other word, it either exists in the lookup and has a special number associated with it, so you would use that, or it does not exist, in which case you use the <UNKNOWN> token number instead.
Take another look at the input used in the prior code you ran:
[1,3,12,18,2,0,0,0,0,0,0,0,0,0,0,0,0,0,0,0]
From this you can now see that this was a sentence with 4 words as the rest are either <START> or <PAD> tokens and there are 20 numbers in the array. OK, starting to make a bit more sense.
The sentence I actually wrote for this was "I love my dog". You can see from the screenshot above that "I" is converted to the number "3" which is correct. If you looked up the other words you would find their corresponding numbers too.
Tensors
There is one final hurdle before the ML model will accept your numerical input. You must convert the array of numbers into something known as a Tensor, and yes, you guessed it, TensorFlow is named after these things - the Flow of Tensors through a model essentially.
What's a Tensor?
The official definition from TensorFlow.org says:
"Tensors are multi-dimensional arrays with a uniform type. All tensors are immutable: you can never update the contents of a tensor, only create a new one."
In plain English, it is just a fancy mathematical name for an array of any dimension that has some other functions built into the Tensor Object that are useful to us as machine learning developers. One should note however that Tensors store data of 1 type only, e.g. all integers, or all floating point numbers, and once created you can never change the contents of a Tensor— thus you can think of it as a permanent storage box for numbers!
Don't worry too much about this for now. At the very least, think of it as a multidimensional storage mechanism for machine learning models to work with, until you dive deeper with a good book like this one — highly recommended if you want to learn more about Tensors and how to use them.
Put it all together: Coding Tensors and Tokenization
So how do you use that vocab file in the code? Great question!
This file on it's own is pretty useless to you as a JS developer. It would be much better if this was a JavaScript object you could simply import and use. One can see how it would be pretty simple to convert the data in this file to a format more like this:
// Special cases. Export as constants.
export const PAD =  0;
export const START = 1;
export const UNKNOWN = 2;

// Export a lookup object.
export const LOOKUP = {
  "i": 3,
  "check": 4,
  "video": 5,
  "song": 6,
  "com": 7,
  "please": 8,
  "like": 9
  // and all the other words...
}
Using your favourite text editor, you could easily transform the vocab file to be in such a format with some find and replacing. However you can also use this pre-made tool to make this easier.
By doing this work in advance and saving the vocab file in the correct format, you're prevented from having to do this conversion and parsing on every page load, which is a waste of CPU resources. Even better, JavaScript objects have the following properties:
"An object property name can be any valid JavaScript string, or anything that can be converted to a string, including the empty string. However, any property name that is not a valid JavaScript identifier (for example, a property name that has a space or a hyphen, or that starts with a number) can only be accessed using the square bracket notation".
Thus as long as you use square bracket notation you can create a rather efficient lookup table through this simple transformation.
Converting to a more useful format
Convert your vocab file to the format above, either manually yourself via your text editor, or using this tool here. Save the resulting output as dictionary.js within your www folder.
On Glitch you can simply create a new file at this location and paste in the result of your conversion to save as shown:
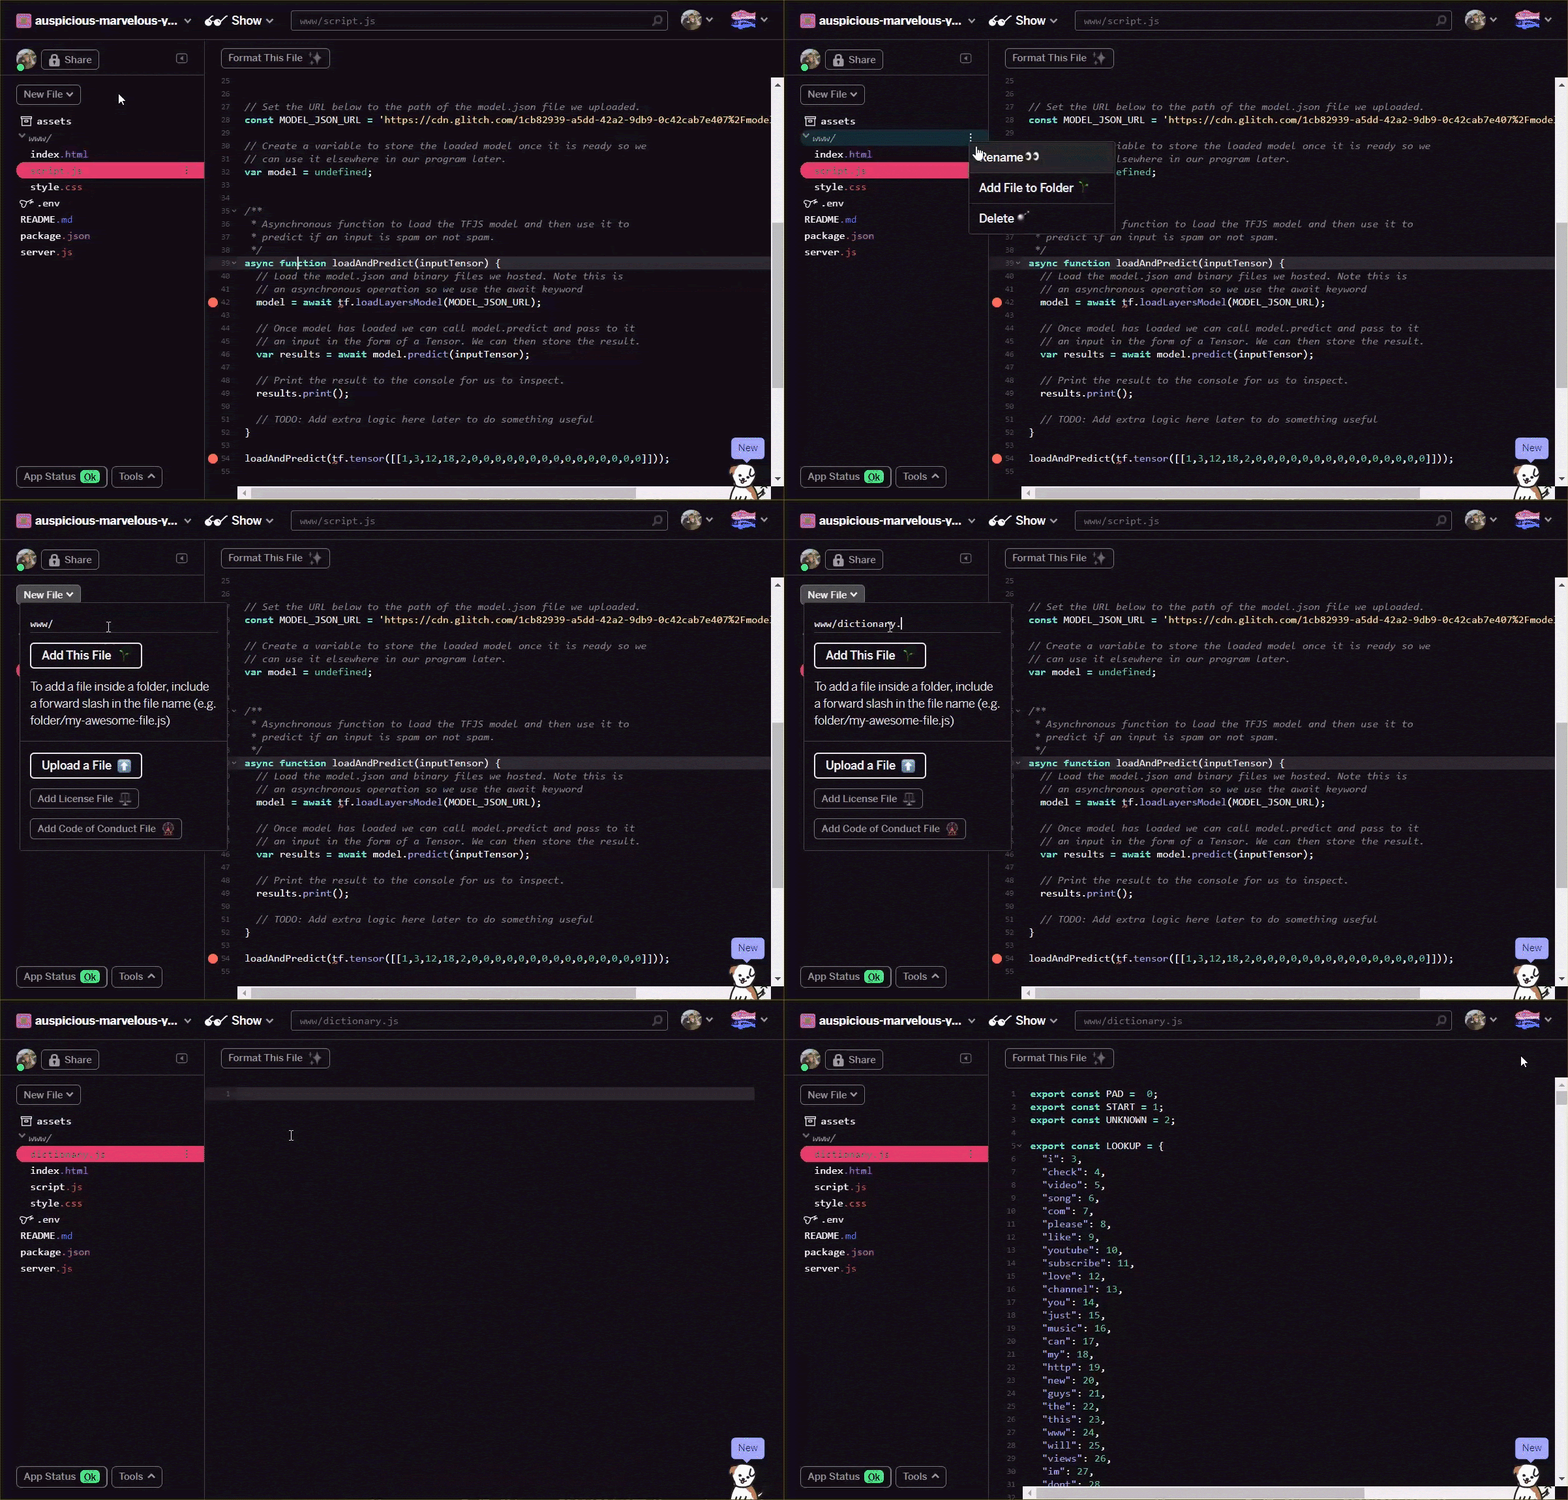
Once you have a saved dictionary.js file in the format described above, you can now prepend the following code to the very top of script.js to import the dictionary.js module you just wrote. Here you also define an extra constant ENCODING_LENGTH so you know how much to pad by later in the code, along with a tokenize function you will use to convert an array of words into a suitable tensor that can be used as an input to the model.
Check the comments in the code below for more details on what each line does:
script.js
import * as DICTIONARY from '/dictionary.js';

// The number of input elements the ML Model is expecting.
const ENCODING_LENGTH = 20;


/**
 * Function that takes an array of words, converts words to tokens,
 * and then returns a Tensor representation of the tokenization that
 * can be used as input to the machine learning model.
 */
function tokenize(wordArray) {
  // Always start with the START token.
  let returnArray = [DICTIONARY.START];

  // Loop through the words in the sentence you want to encode.
  // If word is found in dictionary, add that number else
  // you add the UNKNOWN token.
  for (var i = 0; i < wordArray.length; i++) {
    let encoding = DICTIONARY.LOOKUP[wordArray[i]];
    returnArray.push(encoding === undefined ? DICTIONARY.UNKNOWN : encoding);
  }

  // Finally if the number of words was < the minimum encoding length
  // minus 1 (due to the start token), fill the rest with PAD tokens.
  while (i < ENCODING_LENGTH - 1) {
    returnArray.push(DICTIONARY.PAD);
    i++;
  }

  // Log the result to see what you made.
  console.log([returnArray]);

  // Convert to a TensorFlow Tensor and return that.
  return tf.tensor([returnArray]);
}
Great, now go back to the handleCommentPost() function and replace it with this new version of the function.
See the code for comments on what you added:
script.js
/**
 * Function to handle the processing of submitted comments.
 **/
function handleCommentPost() {
  // Only continue if you are not already processing the comment.
  if (! POST_COMMENT_BTN.classList.contains(PROCESSING_CLASS)) {
    // Set styles to show processing in case it takes a long time.
    POST_COMMENT_BTN.classList.add(PROCESSING_CLASS);
    COMMENT_TEXT.classList.add(PROCESSING_CLASS);

    // Grab the comment text from DOM.
    let currentComment = COMMENT_TEXT.innerText;
    // Convert sentence to lower case which ML Model expects
    // Strip all characters that are not alphanumeric or spaces
    // Then split on spaces to create a word array.
    let lowercaseSentenceArray = currentComment.toLowerCase().replace(/[^\w\s]/g, ' ').split(' ');

    // Create a list item DOM element in memory.
    let li = document.createElement('li');

    // Remember loadAndPredict is asynchronous so you use the then
    // keyword to await a result before continuing.
    loadAndPredict(tokenize(lowercaseSentenceArray), li).then(function() {
      // Reset class styles ready for the next comment.
      POST_COMMENT_BTN.classList.remove(PROCESSING_CLASS);
      COMMENT_TEXT.classList.remove(PROCESSING_CLASS);

      let p = document.createElement('p');
      p.innerText = COMMENT_TEXT.innerText;

      let spanName = document.createElement('span');
      spanName.setAttribute('class', 'username');
      spanName.innerText = currentUserName;

      let spanDate = document.createElement('span');
      spanDate.setAttribute('class', 'timestamp');
      let curDate = new Date();
      spanDate.innerText = curDate.toLocaleString();

      li.appendChild(spanName);
      li.appendChild(spanDate);
      li.appendChild(p);
      COMMENTS_LIST.prepend(li);

      // Reset comment text.
      COMMENT_TEXT.innerText = '';
    });
  }
}
Finally, update the loadAndPredict() function to set a style if a comment is detected as spam.
For now you will simply change the style, but later you can choose to hold the comment in some sort of moderation queue or stop it from sending.
script.js
/**
 * Asynchronous function to load the TFJS model and then use it to
 * predict if an input is spam or not spam.
 */
async function loadAndPredict(inputTensor, domComment) {
  // Load the model.json and binary files you hosted. Note this is
  // an asynchronous operation so you use the await keyword
  if (model === undefined) {
    model = await tf.loadLayersModel(MODEL_JSON_URL);
  }

  // Once model has loaded you can call model.predict and pass to it
  // an input in the form of a Tensor. You can then store the result.
  var results = await model.predict(inputTensor);

  // Print the result to the console for us to inspect.
  results.print();

  results.data().then((dataArray)=>{
    if (dataArray[1] > SPAM_THRESHOLD) {
      domComment.classList.add('spam');
    }
  })
}
11. Real-time updates: Node.js + Websockets
Now you have a working frontend with spam detection, the final piece of the puzzle is to use Node.js with some websockets for real-time communication and update in real time any comments that are added that are not spam.
Socket.io
Socket.io is one of the most popular ways (at time of writing) to use websockets with Node.js. Go ahead and tell Glitch you want to include the Socket.io library in the build by editing package.json in the top level directory (in the parent folder of www folder) to include socket.io as one of the dependencies:
package. json
{
  "name": "tfjs-with-backend",
  "version": "0.0.1",
  "description": "A TFJS front end with thin Node.js backend",
  "main": "server.js",
  "scripts": {
    "start": "node server.js"
  },
  "dependencies": {
    "express": "^4.17.1",
    "socket.io": "^4.0.1"
  },
  "engines": {
    "node": "12.x"
  }
}
Great! Once updated, next update index.html within the www folder to include the socket.io library.
Simply place this line of code above the HTML script tag import for script.js near the end of the index.html file:
index.html
<script src="/socket.io/socket.io.js"></script>
You should now have 3 script tags in your index.html file:
- the first importing the TensorFlow.js library
- the 2nd importing socket.io that you just added
- and the last should be importing the script.js code.
Next, edit server.js to setup socket.io within node and create a simple backend to relay messages received to all connected clients.
See code comments below for an explanation of what the Node.js code is doing:
server.js
const http = require('http');
const express = require("express");
const app = express();
const server = http.createServer(app);

// Require socket.io and then make it use the http server above.
// This allows us to expose correct socket.io library JS for use
// in the client side JS.
var io = require('socket.io')(server);

// Serve all the files in 'www'.
app.use(express.static("www"));

// If no file specified in a request, default to index.html
app.get("/", (request, response) => {
  response.sendFile(__dirname + "/www/index.html");
});


// Handle socket.io client connect event.
io.on('connect', socket => {
  console.log('Client connected');

  // If you wanted you could emit existing comments from some DB
  // to client to render upon connect.
  // socket.emit('storedComments', commentObjectArray);

  // Listen for "comment" event from a connected client.
  socket.on('comment', (data) => {
    // Relay this comment data to all other connected clients
    // upon receiving.
    socket.broadcast.emit('remoteComment', data);
  });
});


// Start the web server.
const listener = server.listen(process.env.PORT, () => {
  console.log("Your app is listening on port " + listener.address().port);
});
Great! You now have a web server that is listening for socket.io events. Namely you have a comment event when a new comment comes in from a client, and the server emits remoteComment events which the client side code will listen for to know to render a remote comment. So the last thing to do is to add the socket.io logic to the client side code to emit and handle these events.
First, add the following code to the end of script.js to connect to the socket.io server and listen out / handle remoteComment events received:
script.js
// Connect to Socket.io on the Node.js backend.
var socket = io.connect();


function handleRemoteComments(data) {
  // Render a new comment to DOM from a remote client.
  let li = document.createElement('li');
  let p = document.createElement('p');
  p.innerText = data.comment;

  let spanName = document.createElement('span');
  spanName.setAttribute('class', 'username');
  spanName.innerText = data.username;

  let spanDate = document.createElement('span');
  spanDate.setAttribute('class', 'timestamp');
  spanDate.innerText = data.timestamp;

  li.appendChild(spanName);
  li.appendChild(spanDate);
  li.appendChild(p);

  COMMENTS_LIST.prepend(li);
}


// Add event listener to receive remote comments that passed
// spam check.
socket.on('remoteComment', handleRemoteComments);
Finally, add some code to the loadAndPredict function to emit a socket.io event if a comment is not spam. This allows you to update the other connected clients with this new comment as the content of this message will be relayed to them via the server.js code you wrote above.
Simply replace your existing loadAndPredict function with the following code that adds an else statement to the final spam check where if the comment is not spam, you call socket.emit() to send all the comment data:
script.js
/**
 * Asynchronous function to load the TFJS model and then use it to
 * predict if an input is spam or not spam. The 2nd parameter
 * allows us to specify the DOM element list item you are currently
 * classifying so you can change it+s style if it is spam!
 */
async function loadAndPredict(inputTensor, domComment) {
  // Load the model.json and binary files you hosted. Note this is
  // an asynchronous operation so you use the await keyword
  if (model === undefined) {
    model = await tf.loadLayersModel(MODEL_JSON_URL);
  }

  // Once model has loaded you can call model.predict and pass to it
  // an input in the form of a Tensor. You can then store the result.
  var results = await model.predict(inputTensor);

  // Print the result to the console for us to inspect.
  results.print();

  results.data().then((dataArray)=>{
    if (dataArray[1] > SPAM_THRESHOLD) {
      domComment.classList.add('spam');
    } else {
      // Emit socket.io comment event for server to handle containing
      // all the comment data you would need to render the comment on
      // a remote client's front end.
      socket.emit('comment', {
        username: currentUserName,
        timestamp: domComment.querySelectorAll('span')[1].innerText,
        comment: domComment.querySelectorAll('p')[0].innerText
      });
    }
  })
}
Great job! If you followed along correctly, you should now be able to open up 2 instances of your index.html page.
As you post comments that are not spam, you should see them rendered on the other client almost instantly. If the comment is spam, it simply will never be sent and instead be marked as spam on the frontend that generated it only like this:

12. Congratulations
Congratulations, you have taken your first steps in using machine learning with TensorFlow.js in the web browser for a real world application - to detect comment spam!
Try it out, test it on a variety of comments, you may notice some things still get through. You will also notice that if you enter a sentence that is longer than 20 words, it will currently fail as the model expects 20 words as input.
In that case you may need to break long sentences into groups of 20 words and then take the spam likelihood of each sub sentence into consideration to determine if to show or not. We will leave this as an optional extra task for you to experiment with as there are many approaches you could take for this.
In the next codelab we will show you how to retrain this model with your custom comment data for edge cases it does not currently detect, or even to change the input expectation of the model so it can handle sentences that are larger than 20 words, and then export and use that model with TensorFlow.js.
If for some reason you are having issues, compare your code to this completed version available here, and check if you missed anything.
Recap
In this codelab you:
- Learned what TensorFlow.js is and what models exist for natural language processing
- Created a fictitious website that allows real time comments for an example website.
- Loaded a pre-trained machine learning model suitable for comment spam detection via TensorFlow.js on the web page.
- Learned how to encode sentences for use with the loaded machine learning model and encapsulate that encoding inside a Tensor.
- Interpreted the output of the machine learning model to decide if you want to hold the comment for review, and if not, sent to the server to relay to other connected clients in real time.
What's next?
Now that you have a working base to start from, what creative ideas can you come up with to extend this machine learning model boilerplate for a real world use case you may be working on?
Share what you make with us
You can easily extend what you made today for other creative use cases too and we encourage you to think outside the box and keep hacking.
Remember to tag us on social media using the #MadeWithTFJS hashtag for a chance for your project to be featured on our TensorFlow blog or even future events. We would love to see what you make.
More TensorFlow.js codelabs to go deeper
- Check out part 2 of this series to learn how to retrain the comment spam model to account for edge cases that it does not currently detect as spam.
- Use Firebase hosting to deploy and host a TensorFlow.js model at scale.
- Make a smart webcam using a pre-made object detection model with TensorFlow.js
Websites to check out
- TensorFlow.js official website
- TensorFlow.js pre-made models
- TensorFlow.js API
- TensorFlow.js Show & Tell — get inspired and see what others have made.
