# User interface

This document goes over how to follow Glass style and implement common UI best practices that can
optimize your user's experience. It covers the following UI elements:

- [Theme](https://developers.google.com/glass-enterprise/guides/user-interface#theme)
- [XML layouts](https://developers.google.com/glass-enterprise/guides/user-interface#xml-layouts)
- [Menus](https://developers.google.com/glass-enterprise/guides/user-interface#menus)
- [Swipeable pages](https://developers.google.com/glass-enterprise/guides/user-interface#swipeable-pages)

## Theme

The Glass theme we suggest you use has the following characteristics:

- Displays activities full-screen with no action bar.
- Applies a solid-black background.
- Sets the color lighter for the color edge effect.
- Applies a white text color.

**Note:** See the Android developer documentation guide on [Styles and Themes](https://developer.android.com/guide/topics/ui/look-and-feel/themes) for more information about creating themes.

The following are the recommended theme settings for Glass:

```
 <style name="AppTheme" parent="Theme.AppCompat.NoActionBar">
   <item name="android:windowBackground">@android:color/black</item>
   <item name="android:colorEdgeEffect">@android:color/white</item>
   <item name="android:textColor">@android:color/white</item>
 </style>
```

## XML layouts

Here are the two basic card layouts that your fragments can inflate:

- [Main layout](https://developers.google.com/glass-enterprise/guides/user-interface#main-layout)
- [Left column layout](https://developers.google.com/glass-enterprise/guides/user-interface#left-column-layout)

### Main layout

This layout defines the suggested standard padding and footer for a card. Put your own views in
the empty [`FrameLayout`](https://developer.android.com/reference/android/widget/FrameLayout).
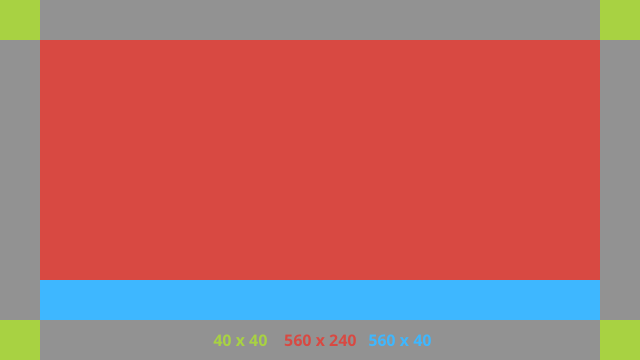
![The center box takes up most of the interior of the screen at 560 by 240 pixels, with
a small bar at the bottom that's 560 by 40 pixels.
There are also four small 40 by 40 pixel blocks, one on each corner](https://developers.google.com/static/glass-enterprise/images/main-template.png)

Here is an example XML layout:

```
<?xml version="1.0" encoding="utf-8"?>
<androidx.constraintlayout.widget.ConstraintLayout
    xmlns:android="http://schemas.android.com/apk/res/android"
    xmlns:app="http://schemas.android.com/apk/res-auto"
    android:id="@+id/layout"
    android:layout_width="match_parent"
    android:layout_height="match_parent">

  <FrameLayout
      android:id="@+id/body_layout"
      android:layout_width="0dp"
      android:layout_height="0dp"
      android:layout_margin="@dimen/glass_card_margin"
      app:layout_constraintBottom_toTopOf="@id/footer"
      app:layout_constraintEnd_toEndOf="parent"
      app:layout_constraintStart_toStartOf="parent"
      app:layout_constraintTop_toTopOf="parent">

    <!-- Put your widgets inside this FrameLayout. -->

  </FrameLayout>

  <!-- The footer view will grow to fit as much content as possible while the
         timestamp view keeps its width. If the footer text is too long, it
         will be ellipsized with a 40dp margin between it and the timestamp. -->

  <TextView
      android:id="@+id/footer"
      android:layout_width="0dp"
      android:layout_height="wrap_content"
      android:layout_marginStart="@dimen/glass_card_margin"
      android:layout_marginEnd="@dimen/glass_card_margin"
      android:layout_marginBottom="@dimen/glass_card_margin"
      android:ellipsize="end"
      android:singleLine="true"
      android:textAppearance="?android:attr/textAppearanceSmall"
      app:layout_constraintBottom_toBottomOf="parent"
      app:layout_constraintEnd_toStartOf="@id/timestamp"
      app:layout_constraintStart_toStartOf="parent" />

  <TextView
      android:id="@+id/timestamp"
      android:layout_width="0dp"
      android:layout_height="wrap_content"
      android:layout_marginEnd="@dimen/glass_card_margin"
      android:layout_marginBottom="@dimen/glass_card_margin"
      android:ellipsize="end"
      android:singleLine="true"
      android:textAlignment="viewEnd"
      android:textAppearance="?android:attr/textAppearanceSmall"
      app:layout_constraintBottom_toBottomOf="parent"
      app:layout_constraintEnd_toEndOf="parent" />

</androidx.constraintlayout.widget.ConstraintLayout>
```

### Left column layout

This layout defines a one-third width left column and two-thirds width right column in the form
of two [`FrameLayout`](https://developer.android.com/reference/android/widget/FrameLayout) classes that you can put your views into. Reference the following
picture to see an example.
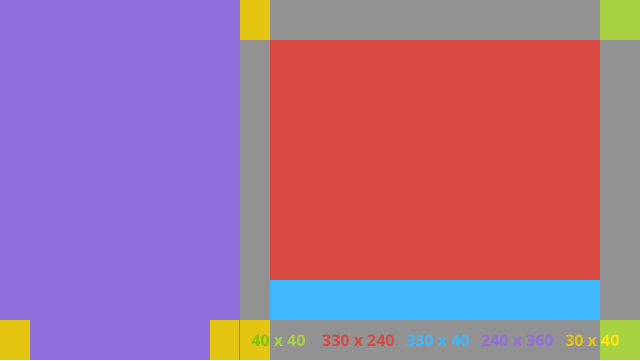
![Shows a left column at 240 by 360 pixels, which pushes the main layout over.
Its size squeezes to fit, the main area is 330 by 240 pixels, with a small lower bar
that's 330 by 40 pixels. The right two corners have two small 40 by 40 pixel boxes and
there are four other 30 by 40 pixel boxes, two on the lower corners of the left column
and two on the left side of the main layout, one on top and one on the bottom.](https://developers.google.com/static/glass-enterprise/images/left-column-template.png)

Here is an example XML layout:

```
<?xml version="1.0" encoding="utf-8"?>
<androidx.constraintlayout.widget.ConstraintLayout
    xmlns:android="http://schemas.android.com/apk/res/android"
    xmlns:app="http://schemas.android.com/apk/res-auto"
    android:layout_width="match_parent"
    android:layout_height="match_parent">

  <FrameLayout
      android:id="@+id/left_column"
      android:layout_width="0dp"
      android:layout_height="match_parent"
      android:background="#303030"
      app:layout_constraintBottom_toBottomOf="parent"
      app:layout_constraintStart_toStartOf="parent"
      app:layout_constraintTop_toTopOf="parent"
      app:layout_constraintWidth_percent=".333">

    <!-- Put widgets for the left column inside this FrameLayout. -->

  </FrameLayout>

  <FrameLayout
      android:id="@+id/right_column"
      android:layout_width="0dp"
      android:layout_height="0dp"
      android:layout_marginTop="@dimen/glass_card_two_column_margin"
      android:layout_marginStart="@dimen/glass_card_two_column_margin"
      android:layout_marginBottom="@dimen/glass_card_two_column_margin"
      android:layout_marginEnd="@dimen/glass_card_margin"
      app:layout_constraintBottom_toTopOf="@id/footer"
      app:layout_constraintEnd_toEndOf="parent"
      app:layout_constraintStart_toEndOf="@id/left_column"
      app:layout_constraintTop_toTopOf="parent">

    <!-- Put widgets for the right column inside this FrameLayout. -->

  </FrameLayout>

  <!-- The footer view will grow to fit as much content as possible while the
         timestamp view keeps its width. If the footer text is too long, it
         will be ellipsized with a 40dp margin between it and the timestamp. -->

  <TextView
      android:id="@+id/footer"
      android:layout_width="0dp"
      android:layout_height="wrap_content"
      android:layout_marginStart="@dimen/glass_card_margin"
      android:layout_marginEnd="@dimen/glass_card_margin"
      android:layout_marginBottom="@dimen/glass_card_margin"
      android:ellipsize="end"
      android:singleLine="true"
      android:textAppearance="?android:attr/textAppearanceSmall"
      app:layout_constraintBottom_toBottomOf="parent"
      app:layout_constraintEnd_toStartOf="@id/timestamp"
      app:layout_constraintStart_toEndOf="@id/left_column" />

  <TextView
      android:id="@+id/timestamp"
      android:layout_width="0dp"
      android:layout_height="wrap_content"
      android:layout_marginEnd="@dimen/glass_card_margin"
      android:layout_marginBottom="@dimen/glass_card_margin"
      android:ellipsize="end"
      android:singleLine="true"
      android:textAlignment="viewEnd"
      android:textAppearance="?android:attr/textAppearanceSmall"
      app:layout_constraintBottom_toBottomOf="parent"
      app:layout_constraintEnd_toEndOf="parent" />

</androidx.constraintlayout.widget.ConstraintLayout>
```

### Standard dimensions

Use the following in conjunction with the previous layouts or your own layouts to create a file
that adheres to Glass' standard style. Create this file as `res/values/dimens.xml`
in your Android project.

```
<?xml version="1.0" encoding="utf-8"?>
<resources>

  <!-- The recommended margin for the top, left, and right edges of a card. -->
  <dimen name="glass_card_margin">40dp</dimen>

  <!-- The recommended margin between the bottom of the card and the footer. -->
  <dimen name="glass_card_footer_margin">50dp</dimen>

  <!-- The recommended margin for the left column of the two-column card. -->
  <dimen name="glass_card_two_column_margin">30dp</dimen>

</resources>
```

## Menus

We suggest you use [`RecyclerView`](https://developer.android.com/reference/androidx/recyclerview/widget/RecyclerView.html) to build menus. They should be based on the standard
Android menu file from Android Studio project resources. Android allows you to override the standard
menu creation and replace it with your implementation. To do so, follow these steps:

1. Create the layout with [`RecyclerView`](https://developer.android.com/reference/androidx/recyclerview/widget/RecyclerView.html) and set it as the view for your [`Activity`](https://developer.android.com/reference/android/app/Activity).
2. Set [`RecyclerView`](https://developer.android.com/reference/androidx/recyclerview/widget/RecyclerView.html) and its adapter to use the newly created collection of menu items.
3. Override the [`onCreateOptionsMenu`](https://developer.android.com/reference/android/app/Activity#onCreateOptionsMenu(android.view.Menu)) method.
   1. Inflate your menu and add your new element to the collection for each menu item.
   2. Call the [`notifyDataSetChanged`](https://developer.android.com/reference/android/widget/BaseAdapter.html#notifyDataSetChanged()) method on the adapter.

   ### Kotlin

   ```kotlin
       override fun onCreateOptionsMenu(menu: Menu): Boolean {
           val menuResource = intent
               .getIntExtra(EXTRA_MENU_KEY, EXTRA_MENU_ITEM_DEFAULT_VALUE)
           if (menuResource != EXTRA_MENU_ITEM_DEFAULT_VALUE) {
               menuInflater.inflate(menuResource, menu)
               for (i in 0 until menu.size()) {
                   val menuItem = menu.getItem(i)
                   menuItems.add(
                       GlassMenuItem(
                           menuItem.itemId, menuItem.icon,
                           menuItem.title.toString()
                       )
                   )
                   adapter.notifyDataSetChanged()
               }
           }
           return super.onCreateOptionsMenu(menu)
       }
       
   ```

   ### Java

   ```java
       @Override
       public boolean onCreateOptionsMenu(Menu menu) {
         final int menuResource = getIntent()
             .getIntExtra(EXTRA_MENU_KEY, EXTRA_MENU_ITEM_DEFAULT_VALUE);
         if (menuResource != EXTRA_MENU_ITEM_DEFAULT_VALUE) {
           final MenuInflater inflater = getMenuInflater();
           inflater.inflate(menuResource, menu);

           for (int i = 0; i < menu.size(); i++) {
             final MenuItem menuItem = menu.getItem(i);
             menuItems.add(
                 new GlassMenuItem(menuItem.getItemId(), menuItem.getIcon(),
                     menuItem.getTitle().toString()));
             adapter.notifyDataSetChanged();
           }
         }
         return super.onCreateOptionsMenu(menu);
       }
       
   ```
4. Use [`OnScrollListener`](https://developer.android.com/reference/androidx/recyclerview/widget/RecyclerView.OnScrollListener) together with [`LayoutManager`](https://developer.android.com/reference/androidx/recyclerview/widget/RecyclerView.LayoutManager) and [`SnapHelper`](https://developer.android.com/reference/androidx/recyclerview/widget/SnapHelper) to determine which option has been selected.
5. Listen for a `TAP` gesture to handle the menu item selection event.
6. Create an [`Intent`](https://developer.android.com/reference/android/content/Intent) with information about the selected menu item.
7. Set a result for this activity and finish it.
8. Call [`startActivityForResult`](https://developer.android.com/reference/android/app/Activity#startActivityForResult(android.content.Intent,%20int)) from the fragment or activity where you want to have a menu. Use a `TAP` gesture for this purpose.
9. Override the [`onActivityResult`](https://developer.android.com/reference/android/app/Activity.html#onActivityResult(int,%20int,%20android.content.Intent)) in the calling fragment or activity to handle the selected menu item.

### Guidelines

The following is a list of suggestions for how to set up your menu layout:

- Text size: `64sp`
- Background color: `#96000000`
- Use [Material icons](https://developer.android.com/studio/write/vector-asset-studio#materialicon) with the size of `64dpx64dp`
- Set the [`windowIsTranslucent`](https://developer.android.com/reference/android/R.styleable.html#Theme_windowIsTranslucent) theme flag to `true`

The following image is an example of a customized menu layout:
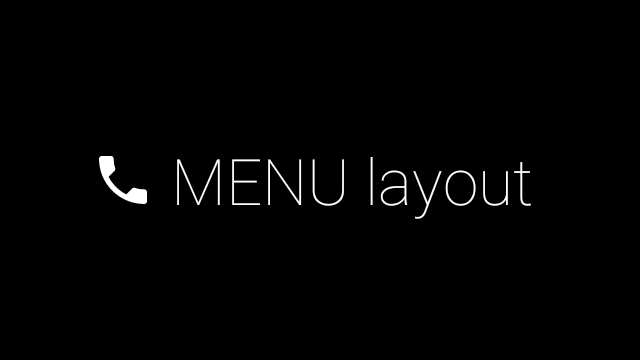
![This simple image shows a black background with the words 'MENU layout' centered on the
screen and a phone symbol adjacent.](https://developers.google.com/static/glass-enterprise/images/menu_layout.png)

Review the [Card sample app](https://developers.google.com/glass-enterprise/samples/code-samples#cardsample) for
implementation details.

## Swipeable pages

The Glass display and touchpad work together to display swipeable cards in a convenient way. You
can build swipeable pages in your activity with the standard Android
[`ViewPager`](https://developer.android.com/reference/kotlin/androidx/viewpager/widget/ViewPager) API.

Visit the [Screen slide](https://developer.android.com/training/animation/screen-slide)
training documentation for more information on how to use Android
[`ViewPager`](https://developer.android.com/reference/kotlin/androidx/viewpager/widget/ViewPager) to scroll through cards or screens.