帐号使用行业标准的 OAuth 2.0 隐式和授权代码流程来关联。您的服务必须支持符合 OAuth 2.0 规范的授权和令牌交换端点。
在隐式流程中,Google 会在用户的浏览器中打开您的授权端点。成功登录后,系统会将长期访问令牌返回到 Google。现在,从 Google 发送的每个请求中都包含此访问令牌。
在授权代码流程中,您需要两个端点:
授权端点 - 向尚未登录的用户显示登录界面。授权端点还会创建一个短期授权代码,用于记录用户针对所请求的访问权限的同意情况。
令牌交换端点,负责两种交换类型:
- 将授权代码交换为长期刷新令牌和短期访问令牌。这种交换会在用户完成帐号关联流程时进行。
- 将长期有效的刷新令牌交换为短期访问令牌。当 Google 需要新的访问令牌时,由于此令牌已过期,因此出现这种交换。
选择 OAuth 2.0 流程
虽然隐式数据流的实现过程更简单,但 Google 建议隐式数据流签发的访问令牌永远不会过期。这是因为在令牌随隐式流程过期后,用户被迫再次关联自己的帐号。出于安全考虑,如果您需要令牌过期,我们强烈建议您改为使用授权代码流程。
设计准则
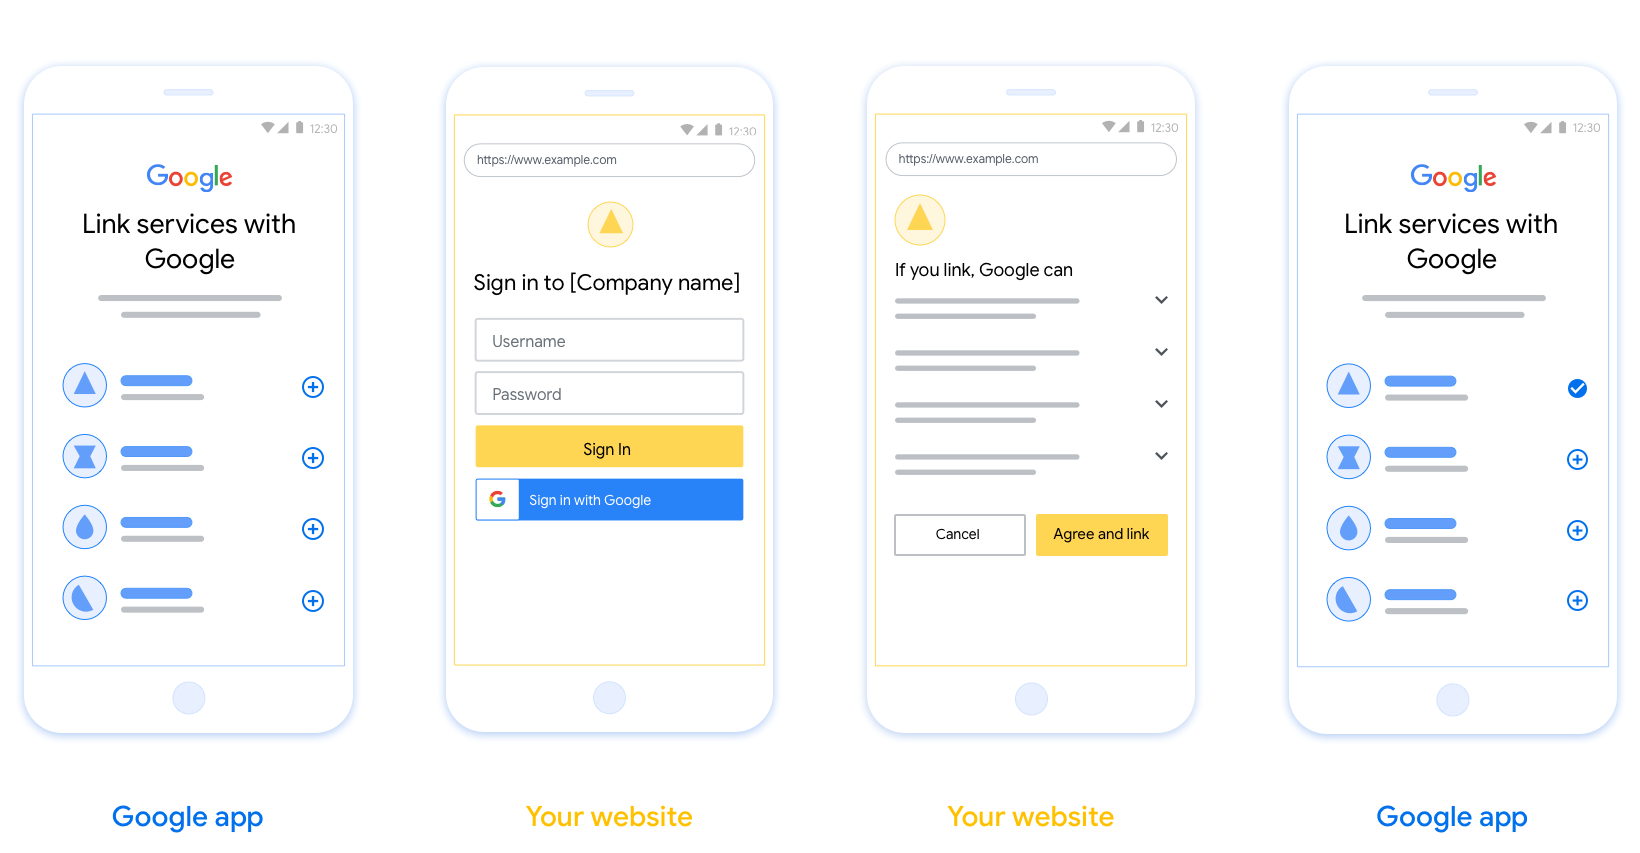
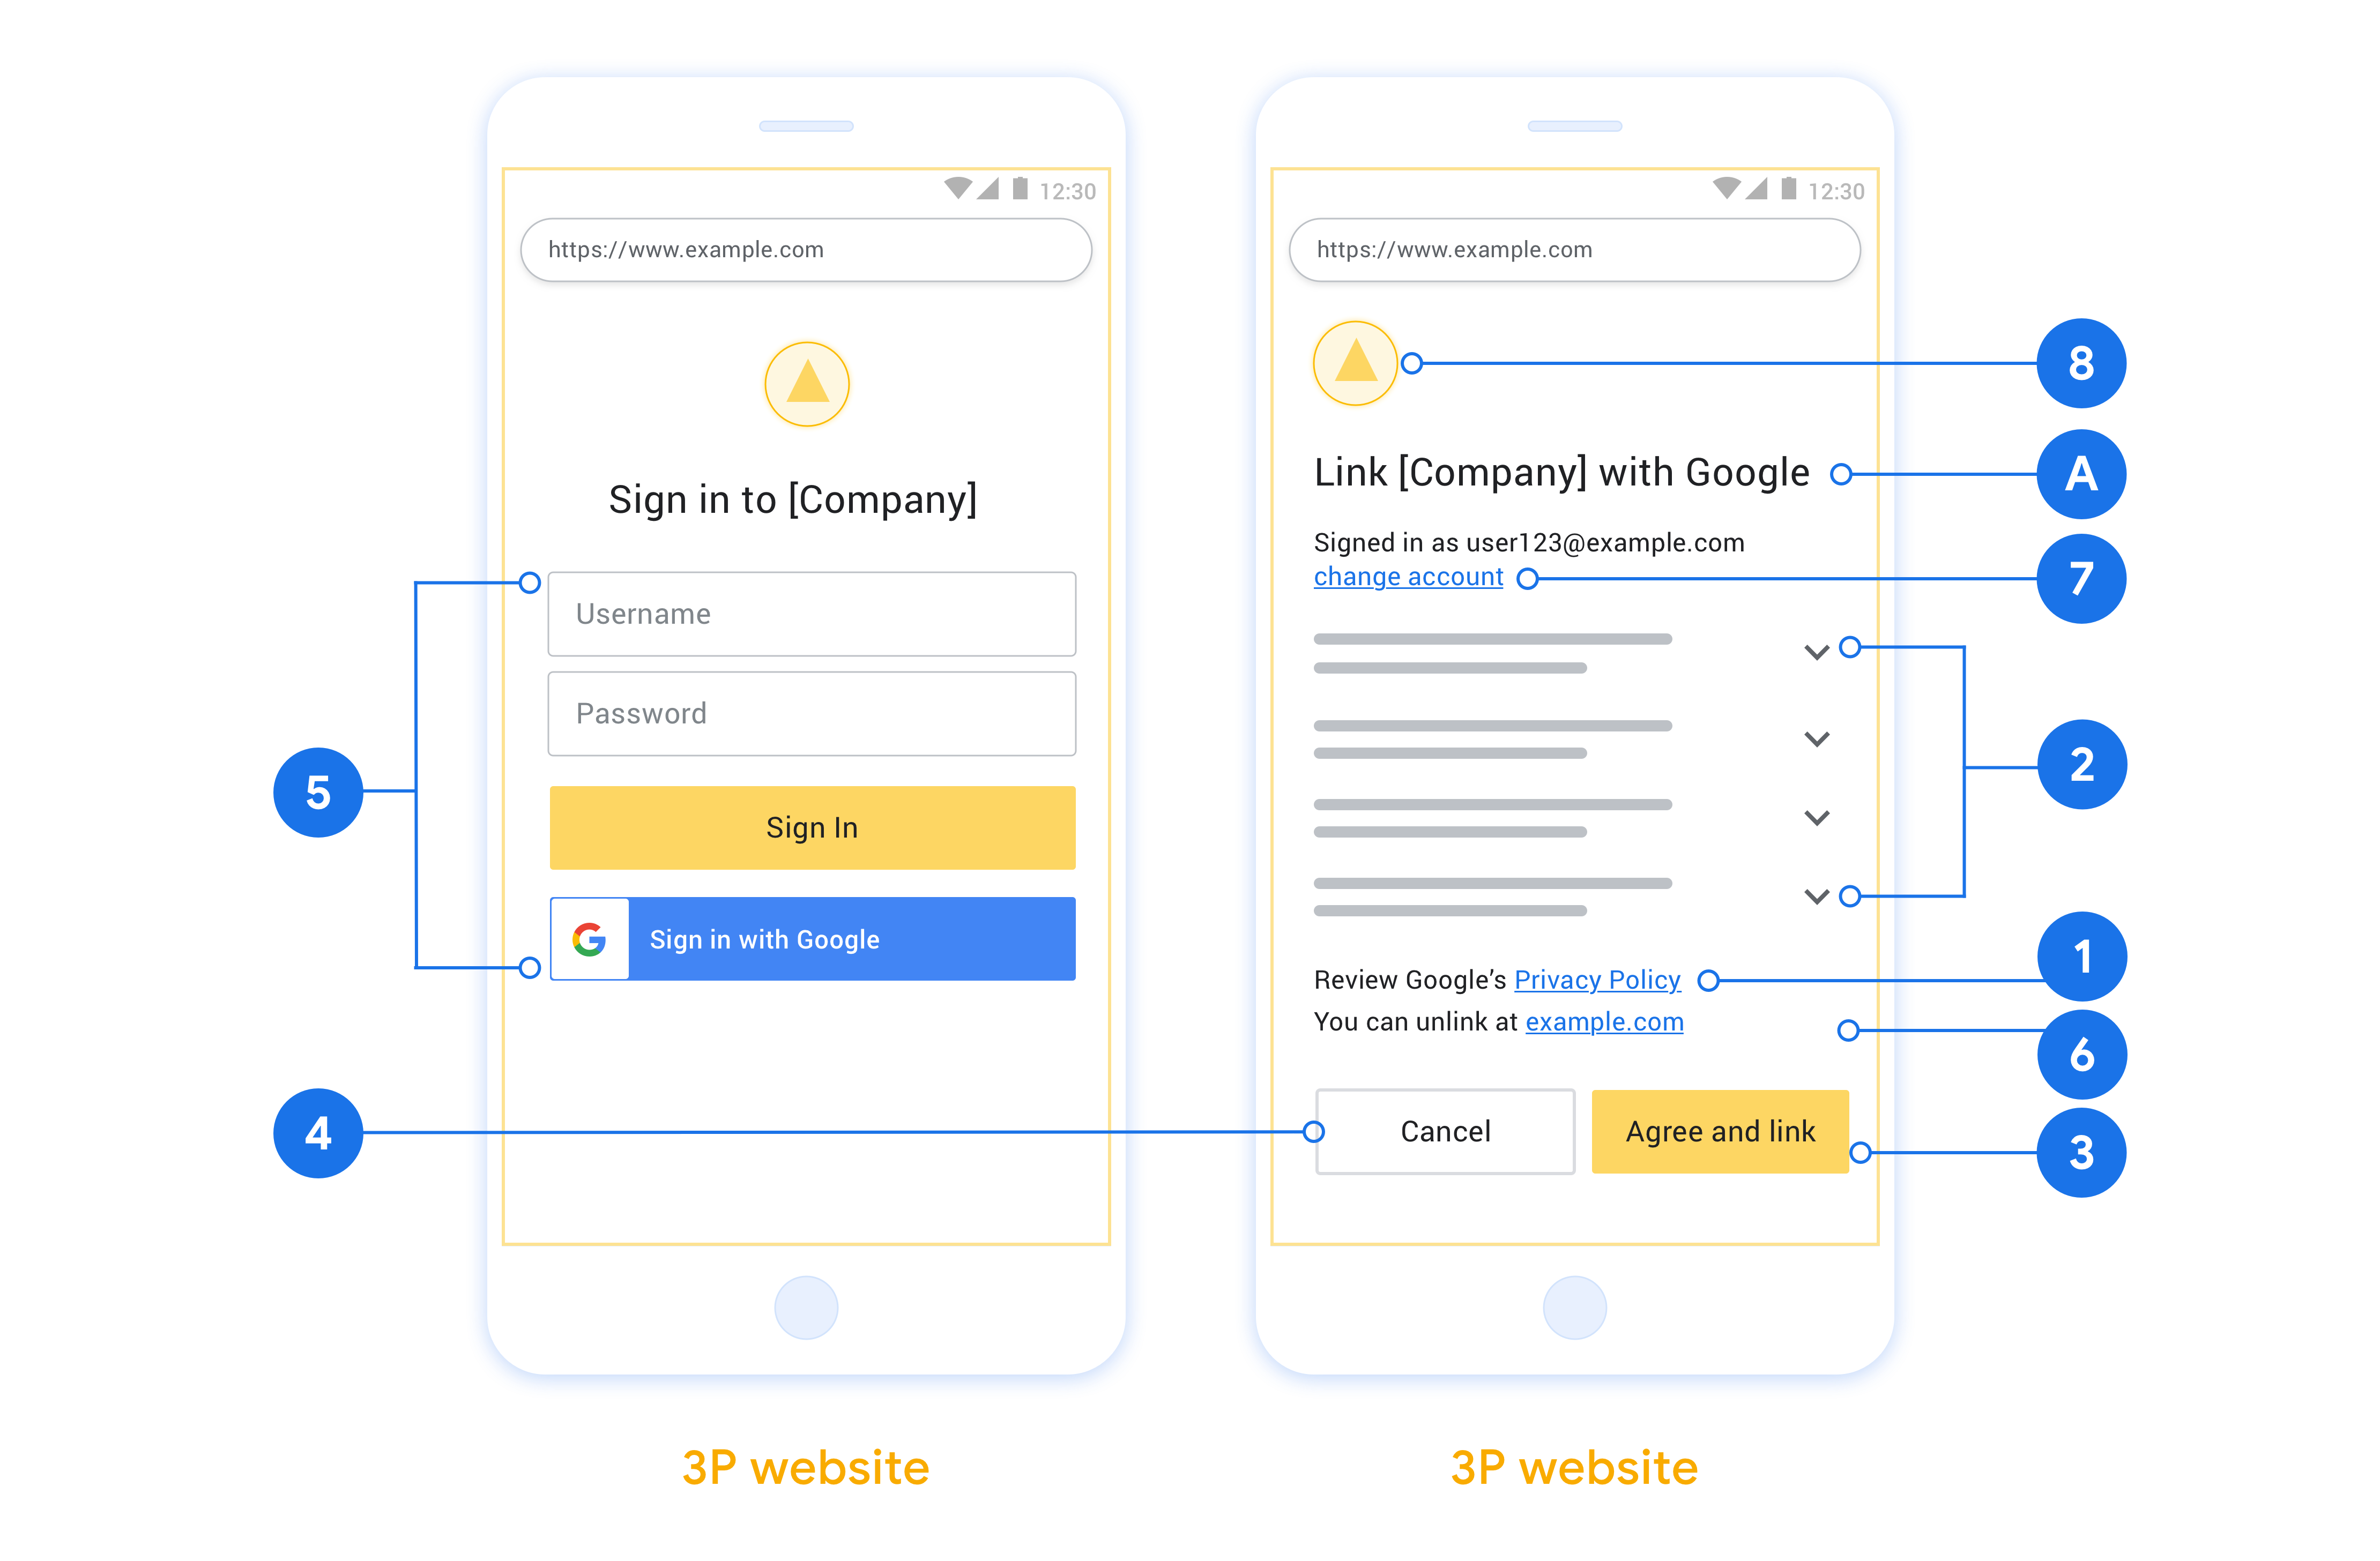
本部分将介绍针对 OAuth 关联流程托管的用户屏幕的设计要求和建议。在由 Google 的应用调用后,您的平台会向用户显示“登录 Google”页面和帐号关联屏幕。用户同意关联帐号后,会被重定向回 Google 的应用。
要求
- 您必须告知用户该用户帐号将与 Google 关联,而不是与特定 Google 产品(例如 Google Home 或 Google 助理)关联。
建议
建议您执行以下操作:
显示 Google 的隐私权政策。在同意屏幕上添加指向 Google 隐私权政策的链接。
要共享的数据。使用简洁明了的语言向用户说明他们的 Google 需要哪些数据以及为何收集这些数据。
明确的号召性用语。在同意屏幕上提供明确的号召性用语,例如“同意并关联”。这是因为用户需要了解他们需要与 Google 共享哪些数据,才能关联帐号。
能够取消。如果用户不关联,则可以提供返回或取消的方式。
清除登录流程。确保用户有明确的登录 Google 帐号的方法,例如用户名和密码字段或使用 Google 帐号登录字段。
能够解除关联。为用户提供解除关联的机制,例如他们在平台上的帐号设置网址。或者,您也可以添加指向 Google 帐号的链接,以便用户可以管理关联的帐号。
能够更改用户帐号。推荐一种供用户切换帐号的方法。如果用户往往拥有多个帐号,这一点尤其有用。
- 如果用户必须关闭同意屏幕才能切换帐号,请向 Google 发送一个可恢复错误,以便用户通过 OAuth 关联和隐式流程登录所需帐号。
添加徽标。在同意屏幕上显示公司徽标。 根据样式指南放置徽标。如果您还希望显示 Google 的徽标,请参阅徽标和商标。
Create the project
To create your project to use account linking:
- Go to the Google API Console.
- 单击创建项目 。
- 输入名称或接受生成的建议。
- 确认或编辑所有剩余字段。
- 点击创建 。
要查看您的项目ID:
- Go to the Google API Console.
- 在登录页面的表格中找到您的项目。项目ID出现在ID列中。
Configure your OAuth Consent Screen
The Google Account Linking process includes a consent screen which tells users the application requesting access to their data, what kind of data they are asking for and the terms that apply. You will need to configure your OAuth consent screen before generating a Google API client ID.
- Open the OAuth consent screen page of the Google APIs console.
- If prompted, select the project you just created.
On the "OAuth consent screen" page, fill out the form and click the “Save” button.
Application name: The name of the application asking for consent. The name should accurately reflect your application and be consistent with the application name users see elsewhere. The application name will be shown on the Account Linking consent screen.
Application logo: An image on the consent screen that will help users recognize your app. The logo is shown on Account linking consent screen and on account settings
Support email: For users to contact you with questions about their consent.
Scopes for Google APIs: Scopes allow your application to access your user's private Google data. For the Google Account Linking use case, default scope (email, profile, openid) is sufficient, you don’t need to add any sensitive scopes. It is generally a best practice to request scopes incrementally, at the time access is required, rather than up front. Learn more.
Authorized domains: To protect you and your users, Google only allows applications that authenticate using OAuth to use Authorized Domains. Your applications' links must be hosted on Authorized Domains. Learn more.
Application Homepage link: Home page for your application. Must be hosted on an Authorized Domain.
Application Privacy Policy link: Shown on Google Account Linking consent screen. Must be hosted on an Authorized Domain.
Application Terms of Service link (Optional): Must be hosted on an Authorized Domain.
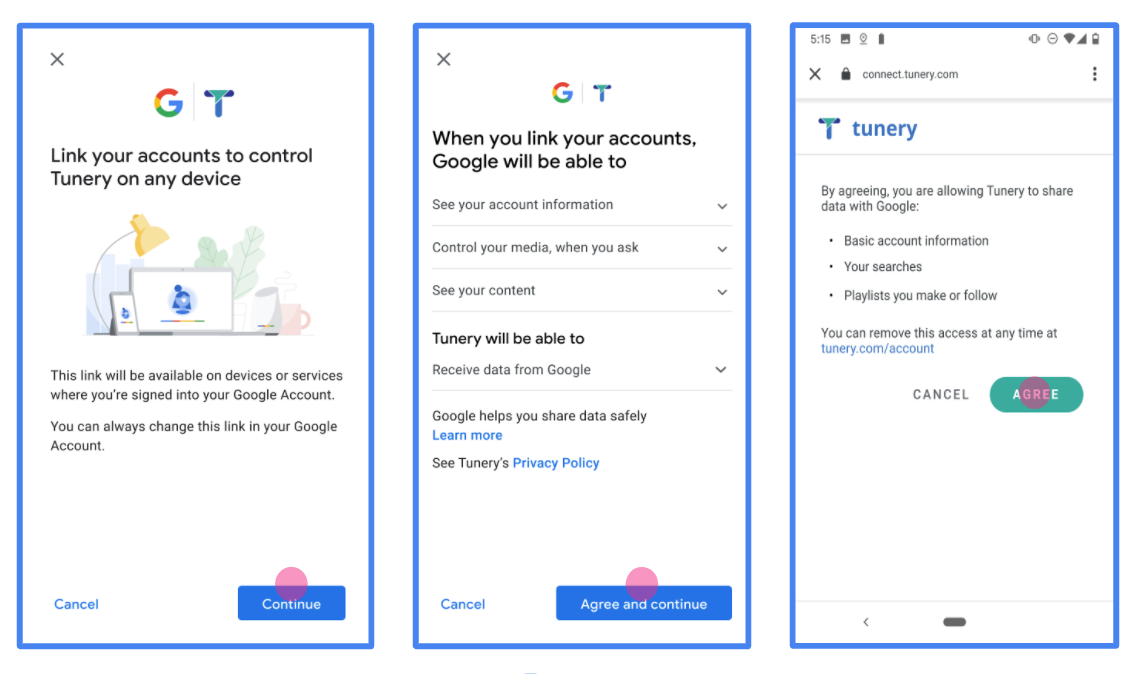
Figure 1. Google Account Linking Consent Screen for a fictitious Application, Tunery
Check "Verification Status", if your application needs verification then click the "Submit For Verification" button to submit your application for verification. Refer to OAuth verification requirements for details.
实现 OAuth 服务器
为了支持OAuth 2.0已隐含流,你的服务使可通过HTTPS授权端点。此端点负责身份验证并获得用户对数据访问的同意。授权端点向尚未登录的用户显示登录 UI,并记录对请求访问的同意。
当 Google 应用程序需要调用您的服务的授权 API 之一时,Google 会使用此端点来获得您的用户的许可,以代表他们调用这些 API。
一个典型的由 Google 发起的 OAuth 2.0 隐式流会话具有以下流程:
- Google 在用户的浏览器中打开您的授权端点。用户登录(如果尚未登录)并授予 Google 使用您的 API 访问其数据的权限(如果他们尚未授予权限)。
- 您的服务创建的访问令牌并将其返回给谷歌。为此,请使用附加到请求的访问令牌将用户的浏览器重定向回 Google。
- Google 会调用您服务的 API 并在每个请求中附加访问令牌。您的服务会验证访问令牌是否授予 Google 访问 API 的授权,然后完成 API 调用。
处理授权请求
当 Google 应用程序需要通过 OAuth 2.0 隐式流执行帐户链接时,Google 会将用户发送到您的授权端点,并包含以下参数的请求:
| 授权端点参数 | |
|---|---|
client_id | 您分配给 Google 的客户端 ID。 |
redirect_uri | 您向其发送对此请求的响应的 URL。 |
state | 传递回 Google 的簿记值在重定向 URI 中保持不变。 |
response_type | 要在响应中返回的值的类型。对于的OAuth 2.0隐式流程中,响应类型总是token 。 |
user_locale | 在谷歌帐户语言设置RFC5646格式用于本地化用户的首选语言内容。 |
例如,如果您的授权端点可在https://myservice.example.com/auth ,请求看起来像下面这样:
GET https://myservice.example.com/auth?client_id=GOOGLE_CLIENT_ID&redirect_uri=REDIRECT_URI&state=STATE_STRING&response_type=token&user_locale=LOCALE
对于处理登录请求的授权端点,请执行以下步骤:
验证
client_id和redirect_uri值,以防止授权访问意外或错误配置的客户端应用程序:- 确认该
client_id你分配给谷歌的客户ID相匹配。 - 确认URL指定由
redirect_uri参数有以下形式:https://oauth-redirect.googleusercontent.com/r/YOUR_PROJECT_ID https://oauth-redirect-sandbox.googleusercontent.com/r/YOUR_PROJECT_ID
- 确认该
检查用户是否已登录您的服务。如果用户未登录,请完成服务的登录或注册流程。
生成供 Google 用来访问您的 API 的访问令牌。访问令牌可以是任何字符串值,但它必须唯一地代表用户和令牌所针对的客户端,并且不能被猜测。
发送用户的浏览器重定向到被指定的URL的HTTP响应
redirect_uri参数。在 URL 片段中包含以下所有参数:-
access_token:刚才生成的令牌,你的访问 token_type:字符串bearer-
state:从原始请求的未修改的状态值
以下是所得的URL的一个示例:
https://oauth-redirect.googleusercontent.com/r/YOUR_PROJECT_ID#access_token=ACCESS_TOKEN&token_type=bearer&state=STATE_STRING
-
谷歌的OAuth 2.0重定向处理接收的令牌的访问并确认state的值并没有改变。在 Google 为您的服务获取访问令牌后,Google 会将令牌附加到对您的服务 API 的后续调用中。
处理用户信息请求
该用户信息终端是一个OAuth 2.0保护的资源,对链接的用户返回的权利要求。实现和托管 userinfo 端点是可选的,以下用例除外:
从您的令牌端点成功检索访问令牌后,Google 会向您的 userinfo 端点发送请求,以检索有关链接用户的基本个人资料信息。
| userinfo 端点请求标头 | |
|---|---|
Authorization header | Bearer 类型的访问令牌。 |
例如,如果你的用户信息终端可在https://myservice.example.com/userinfo ,请求看起来像下面这样:
GET /userinfo HTTP/1.1
Host: myservice.example.com
Authorization: Bearer ACCESS_TOKEN
要让您的 userinfo 端点处理请求,请执行以下步骤:
- 从 Authorization 标头中提取访问令牌并返回与访问令牌关联的用户的信息。
- 如果访问令牌无效,返回HTTP 401错误未经授权使用的
WWW-Authenticate响应头。下面是一个userinfo的错误响应的一个示例:HTTP/1.1 401 Unauthorized WWW-Authenticate: error="invalid_token", error_description="The Access Token expired"
如果一个401未经授权,或任何其它不成功错误响应在关联过程返回时,误差将是不可恢复的,所检索的令牌将被丢弃,并且用户将必须再次启动链接过程。 如果访问令牌是有效的,回国与以下JSON对象在HTTPS响应的身体HTTP 200回应:
{
"sub": "USER_UUID",
"email": "EMAIL_ADDRESS",
"given_name": "FIRST_NAME",
"family_name": "LAST_NAME",
"name": "FULL_NAME",
"picture": "PROFILE_PICTURE",
}
如果你的用户信息端点返回一个HTTP 200成功响应,检索到的令牌和索赔登记针对用户的谷歌帐户。用户信息端点响应 sub标识系统中用户的唯一 ID。 email用户的电子邮件地址。 given_name可选:用户的名字。 family_name可选:用户的姓氏。 name可选:用户的全名。 picture可选:用户的档案图片。
验证您的实现
You can validate your implementation by using the OAuth 2.0 Playground tool.
In the tool, do the following steps:
- Click Configuration to open the OAuth 2.0 Configuration window.
- In the OAuth flow field, select Client-side.
- In the OAuth Endpoints field, select Custom.
- Specify your OAuth 2.0 endpoint and the client ID you assigned to Google in the corresponding fields.
- In the Step 1 section, don't select any Google scopes. Instead, leave this field blank or type a scope valid for your server (or an arbitrary string if you don't use OAuth scopes). When you're done, click Authorize APIs.
- In the Step 2 and Step 3 sections, go through the OAuth 2.0 flow and verify that each step works as intended.
You can validate your implementation by using the Google Account Linking Demo tool.
In the tool, do the following steps:
- Click the Sign-in with Google button.
- Choose the account you'd like to link.
- Enter the service ID.
- Optionally enter one or more scopes that you will request access for.
- Click Start Demo.
- When prompted, confirm that you may consent and deny the linking request.
- Confirm that you are redirected to your platform.