Учетные записи связаны с использованием неявных потоков кода авторизации и неявных потоков OAuth 2.0, являющихся отраслевым стандартом. Ваша служба должна поддерживать конечные точки авторизации и обмена токенами, совместимые с OAuth 2.0.
In the implicit flow, Google opens your authorization endpoint in the user's browser. After successful sign in, you return a long-lived access token to Google. This access token is now included in every request sent from Google.
In the authorization code flow, you need two endpoints:
The authorization endpoint, which presents the sign-in UI to your users that aren't already signed in. The authorization endpoint also creates a short-lived authorization code to record users' consent to the requested access.
The token exchange endpoint, which is responsible for two types of exchanges:
- Exchanges an authorization code for a long-lived refresh token and a short-lived access token. This exchange happens when the user goes through the account linking flow.
- Exchanges a long-lived refresh token for a short-lived access token. This exchange happens when Google needs a new access token because the one it had expired.
Choose an OAuth 2.0 flow
Although the implicit flow is simpler to implement, Google recommends that access tokens issued by the implicit flow never expire. This is because the user is forced to link their account again after a token expires with the implicit flow. If you need token expiration for security reasons, we strongly recommend that you use the authorization code flow instead.
Design guidelines
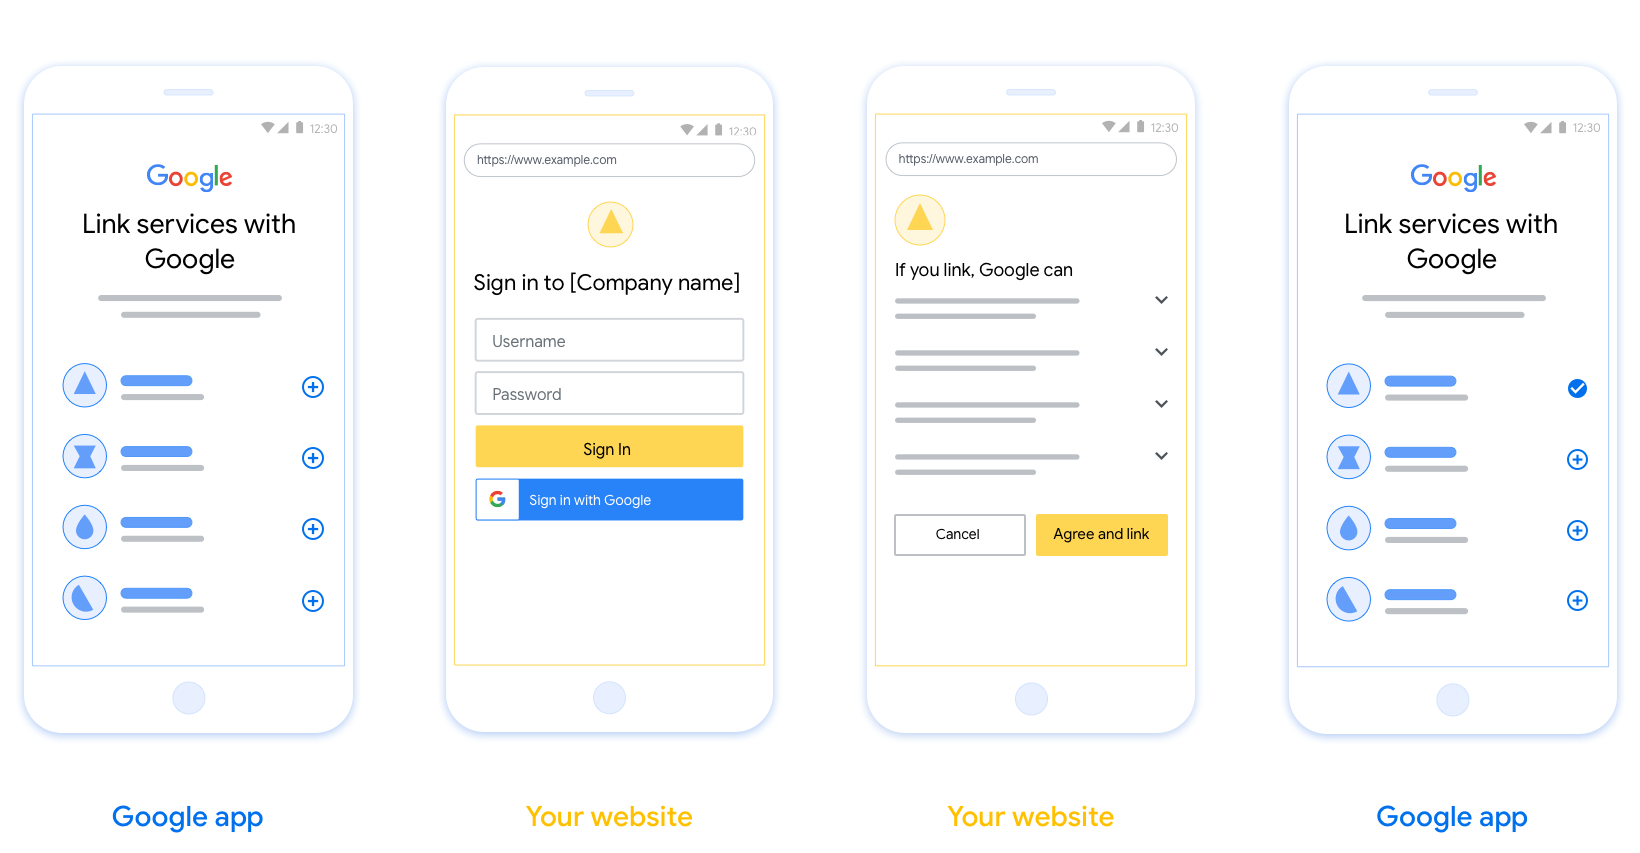
This section describes the design requirements and recommendations for the user screen that you host for OAuth linking flows. After it's called by Google's app, your platform displays a sign in to Google page and account linking consent screen to the user. The user is directed back to Google's app after giving their consent to link accounts.
Requirements
- You must communicate that the user’s account will be linked to Google, not a specific Google product like Google Home or Google Assistant.
Recommendations
We recommend that you do the following:
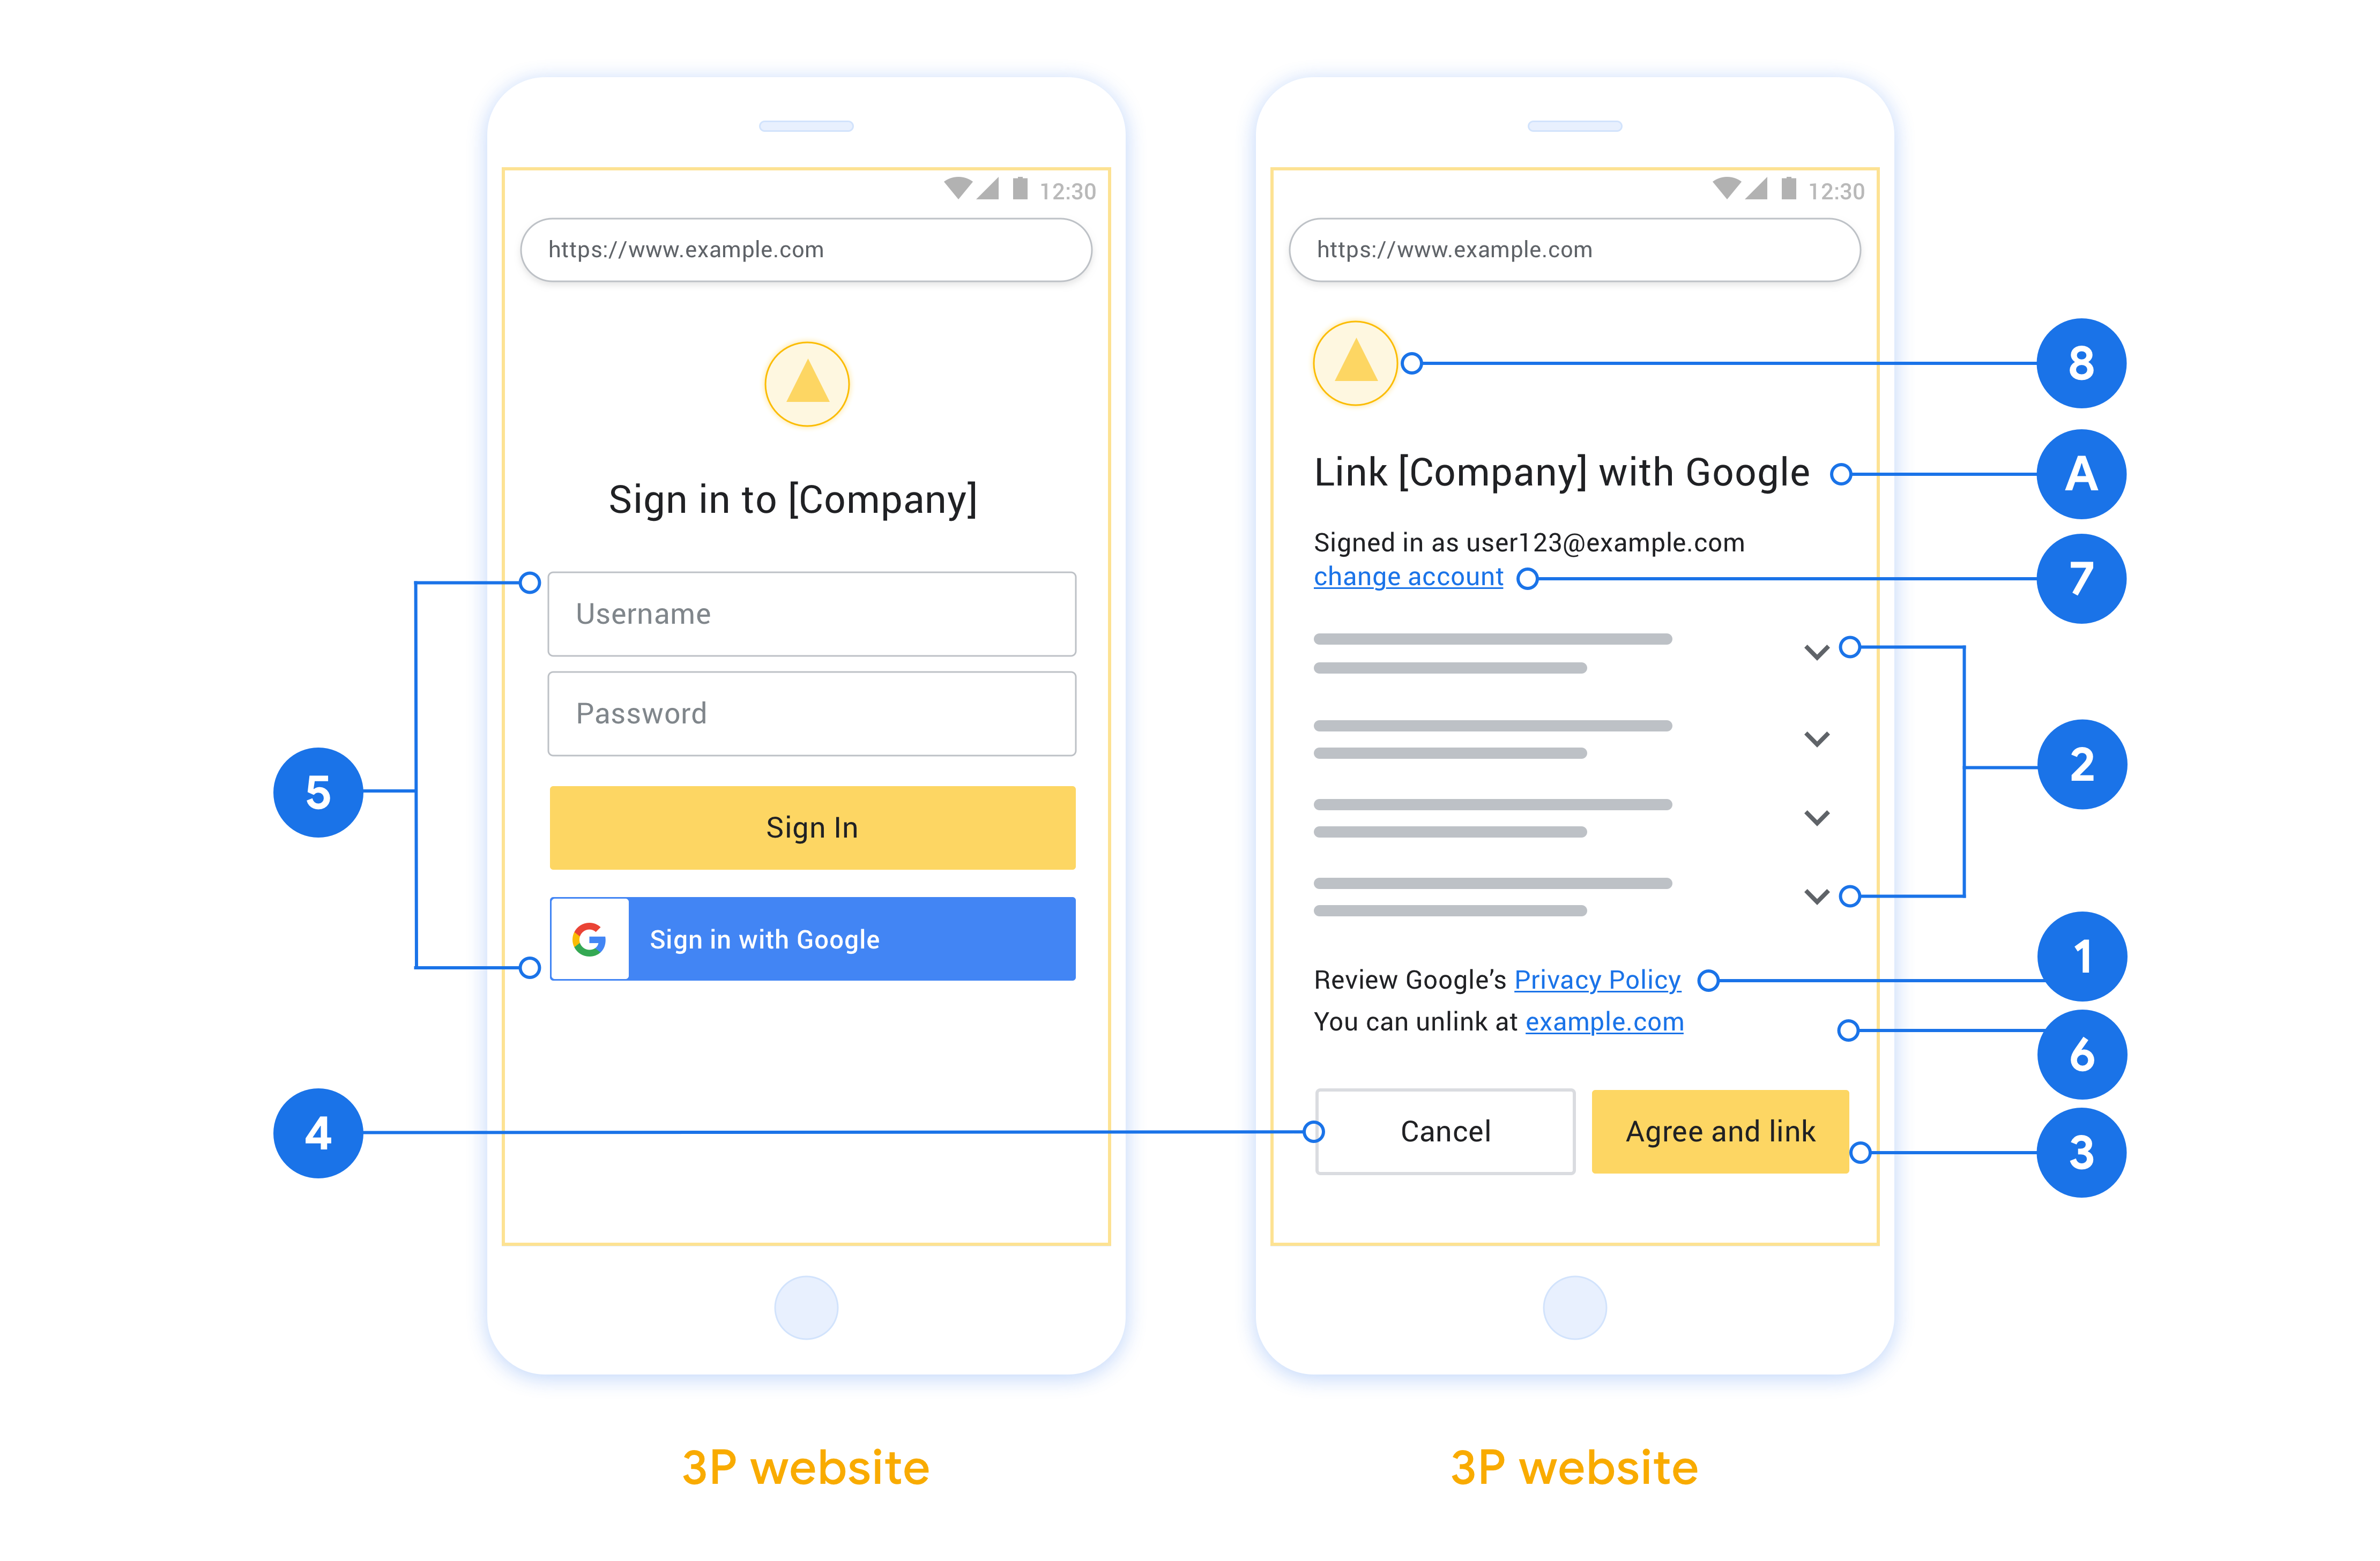
Display Google's Privacy Policy. Include a link to Google’s Privacy Policy on the consent screen.
Data to be shared. Use clear and concise language to tell the user what data of theirs Google requires and why.
Clear call-to-action. State a clear call-to-action on your consent screen, such as “Agree and link.” This is because users need to understand what data they're required to share with Google to link their accounts.
Ability to cancel. Provide a way for users to go back or cancel, if they choose not to link.
Clear sign-in process. Ensure that users have clear method for signing in to their Google account, such as fields for their username and password or Sign in with Google.
Ability to unlink. Offer a mechanism for users to unlink, such as a URL to their account settings on your platform. Alternatively, you can include a link to Google Account where users can manage their linked account.
Ability to change user account. Suggest a method for users to switch their account(s). This is especially beneficial if users tend to have multiple accounts.
- If a user must close the consent screen to switch accounts, send a recoverable error to Google so the user can sign in to the desired account with OAuth linking and the implicit flow.
Include your logo. Display your company logo on the consent screen. Use your style guidelines to place your logo. If you wish to also display Google's logo, see Logos and trademarks.
创建项目
如需创建项目以使用帐号关联,请按以下步骤操作:
- Go to the Google API Console.
- Нажмите Создать проект .
- Введите имя или примите сгенерированное предложение.
- Подтвердите или отредактируйте оставшиеся поля.
- Нажмите Создать .
Для просмотра идентификатора вашего проекта:
- Go to the Google API Console.
- Найдите свой проект в таблице на целевой странице. Идентификатор проекта отображается в столбце идентификаторов .
配置 OAuth 权限请求页面
Google 帐号关联流程包括一个同意屏幕,用于告知用户请求访问其数据的应用、用户要求的数据类型以及适用的条款。您需要先配置 OAuth 权限请求页面,然后才能生成 Google API 客户端 ID。
- 打开 Google API 控制台的 OAuth 同意屏幕页面。
- 如果出现提示,请选择您刚刚创建的项目。
在“OAuth 同意屏幕”页面上,填写表单,然后点击“保存”按钮。
应用名称:请求用户同意的应用的名称。该名称应准确反映您的应用,并与用户在别处看到的应用名称保持一致。应用名称将显示在帐号关联同意屏幕上。
应用徽标:同意屏幕上的图片,有助于用户识别您的应用。徽标会显示在帐号关联同意屏幕和帐号设置中
支持电子邮件地址:供用户就其同意情况与您联系。
Google API 的范围:范围允许您的应用访问用户的私有 Google 数据。对于 Google 帐号关联用例,默认范围(电子邮件、个人资料、OpenID)就足够了,您无需添加任何敏感范围。最佳做法一般是在需要访问时逐步请求作用域,而不是预先请求。了解详情。
已获授权的网域:为保护您和您的用户,Google 仅允许使用 OAuth 进行身份验证的应用使用已获授权的网域。您应用的链接必须托管在已获授权的网域上。了解详情。
应用首页链接:您的应用的首页。必须托管在已获授权的网域上。
应用隐私权政策链接:在 Google 帐号关联同意屏幕上显示。必须托管在已获授权的网域上。
应用服务条款链接(可选):必须托管在已获授权的网域上。
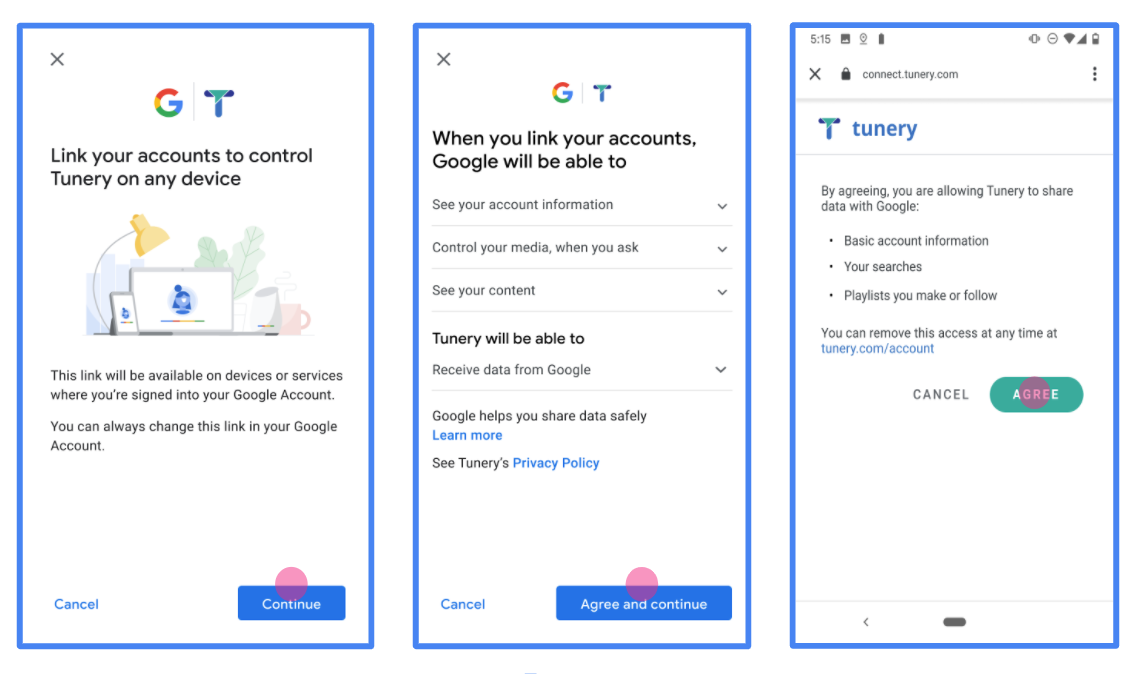
图 1. 一款虚构应用 Tunery 的 Google 帐号关联同意屏幕
查看“验证状态”。如果您的申请需要验证,请点击“提交验证”按钮,提交您的申请。如需了解详情,请参阅 OAuth 验证要求。
Внедрите свой сервер OAuth
Для того, чтобы поддержать неявный поток OAuth 2.0, ваша служба делает конечную точку авторизации доступную по протоколу HTTPS. Эта конечная точка отвечает за аутентификацию и получение согласия пользователей на доступ к данным. Конечная точка авторизации представляет пользовательский интерфейс для входа вашим пользователям, которые еще не вошли в систему, и записывает согласие на запрошенный доступ.
Когда приложению Google необходимо вызвать один из авторизованных API вашей службы, Google использует эту конечную точку, чтобы получить разрешение от ваших пользователей на вызов этих API от их имени.
Типичный сеанс неявного потока OAuth 2.0, инициированный Google, имеет следующий поток:
- Google открывает вашу конечную точку авторизации в браузере пользователя. Пользователь входит в систему, если еще не вошел в систему, и предоставляет Google разрешение на доступ к своим данным с помощью вашего API, если он еще не предоставил разрешение.
- Ваша служба создает маркер доступа и возвращает его в Google. Для этого перенаправьте браузер пользователя обратно в Google с токеном доступа, прикрепленным к запросу.
- Google вызывает API вашей службы и прикрепляет токен доступа к каждому запросу. Ваша служба проверяет, разрешает ли токен доступа Google доступ к API, а затем выполняет вызов API.
Обработка запросов на авторизацию
Когда приложению Google необходимо выполнить привязку учетной записи через неявный поток OAuth 2.0, Google отправляет пользователя в конечную точку авторизации с запросом, который включает следующие параметры:
| Параметры конечной точки авторизации | |
|---|---|
client_id | Идентификатор клиента, который вы присвоили Google. |
redirect_uri | URL-адрес, на который вы отправляете ответ на этот запрос. |
state | Бухгалтерская стоимость, которая возвращается в Google без изменений в URI перенаправления. |
response_type | Тип значения, возвращаемого в ответе. Для неявного потока OAuth 2.0, тип ответа всегда token . |
user_locale | Настройка учетной записи Google языка в RFC5646 формате используется для локализации вашего контента в предпочтительном языке пользователя. |
Например, если конечная точка авторизации доступна на https://myservice.example.com/auth , запрос может выглядеть следующим образом :
GET https://myservice.example.com/auth?client_id=GOOGLE_CLIENT_ID&redirect_uri=REDIRECT_URI&state=STATE_STRING&response_type=token&user_locale=LOCALE
Чтобы конечная точка авторизации могла обрабатывать запросы на вход, выполните следующие действия:
Проверьте
client_idиredirect_uriзначения для предотвращения предоставления доступа к непредвиденным или некорректной настройки приложений клиента:- Убедитесь , что
client_idсоответствует идентификатор клиента, назначенный для Google. - Убедитесь , что URL - адрес задается
redirect_uriпараметром имеет следующий вид:https://oauth-redirect.googleusercontent.com/r/YOUR_PROJECT_ID https://oauth-redirect-sandbox.googleusercontent.com/r/YOUR_PROJECT_ID
- Убедитесь , что
Проверьте, вошел ли пользователь в вашу службу. Если пользователь не вошел в систему, завершите процесс входа или регистрации в вашей службе.
Создайте токен доступа, который Google будет использовать для доступа к вашему API. Токеном доступа может быть любое строковое значение, но он должен однозначно представлять пользователя и клиента, для которого предназначен токен, и его нельзя угадывать.
Отправить ответ HTTP , который перенаправляет браузер пользователя на URL , указанный
redirect_uriпараметра. Включите во фрагмент URL все следующие параметры:-
access_token: Доступ лексемы вы только что генерируется -
token_type: Строкаbearer -
state: Неизмененное значение состояния из исходного запроса
Ниже приведен пример результирующего URL:
https://oauth-redirect.googleusercontent.com/r/YOUR_PROJECT_ID#access_token=ACCESS_TOKEN&token_type=bearer&state=STATE_STRING
-
OAuth 2.0 обработчик редирект Google получает доступ токенов и подтверждает , что state значение не изменилось. После того, как Google получит токен доступа для вашей службы, Google прикрепит этот токен к последующим вызовам API ваших служб.
Handle userinfo requests
The userinfo endpoint is an OAuth 2.0 protected resource that return claims about the linked user. Implementing and hosting the userinfo endpoint is optional, except for the following use cases:
- Linked Account Sign-In with Google One Tap.
- Frictionless subscription on AndroidTV.
After the access token has been successfully retrieved from your token endpoint, Google sends a request to your userinfo endpoint to retrieve basic profile information about the linked user.
| userinfo endpoint request headers | |
|---|---|
Authorization header |
The access token of type Bearer. |
For example, if your userinfo endpoint is available at
https://myservice.example.com/userinfo, a request might look like the following:
GET /userinfo HTTP/1.1
Host: myservice.example.com
Authorization: Bearer ACCESS_TOKEN
For your userinfo endpoint to handle requests, do the following steps:
- Extract access token from the Authorization header and return information for the user associated with the access token.
- If the access token is invalid, return an HTTP 401 Unauthorized error with using the
WWW-AuthenticateResponse Header. Below is an example of a userinfo error response:HTTP/1.1 401 Unauthorized WWW-Authenticate: error="invalid_token", error_description="The Access Token expired"
If a 401 Unauthorized, or any other unsuccessful error response is returned during the linking process, the error will be non-recoverable, the retrieved token will be discarded and the user will have to initiate the linking process again. If the access token is valid, return and HTTP 200 response with the following JSON object in the body of the HTTPS response:
{
"sub": "USER_UUID",
"email": "EMAIL_ADDRESS",
"given_name": "FIRST_NAME",
"family_name": "LAST_NAME",
"name": "FULL_NAME",
"picture": "PROFILE_PICTURE",
}
If your userinfo endpoint returns an HTTP 200 success response, the retrieved token and claims are registered against the user's Google account.userinfo endpoint response subA unique ID that identifies the user in your system. emailEmail address of the user. given_nameOptional: First name of the user. family_nameOptional: Last name of the user. nameOptional: Full name of the user. pictureOptional: Profile picture of the user.
Проверка вашей реализации
您可以通过使用验证实现的OAuth 2.0游乐场工具。
在工具中,执行以下步骤:
- 单击配置打开的OAuth 2.0配置窗口。
- 在OAuth流场中,选择客户端。
- 在OAuth端点字段中,选择自定义。
- 在相应字段中指定您的 OAuth 2.0 端点和您分配给 Google 的客户端 ID。
- 在步骤1部分,不要选择任何谷歌范围。相反,将此字段留空或键入对您的服务器有效的范围(如果不使用 OAuth 范围,则输入任意字符串)。当您完成后,单击授权的API。
- 在步骤2和步骤3段,完成OAuth 2.0流程和验证每个步骤按预期工作。
您可以通过验证您的实现谷歌帐户链接演示工具。
在工具中,执行以下步骤:
- 点击登录在与谷歌按钮。
- 选择您要关联的帐户。
- 输入服务标识。
- (可选)输入您将请求访问的一个或多个范围。
- 单击开始演示。
- 出现提示时,确认您可以同意并拒绝链接请求。
- 确认您被重定向到您的平台。