IDX 提供多種內建範本,其中包含您需要的所有檔案、系統套件 (例如編譯器) 和擴充功能,可快速開始使用語言或架構。
您也可以使用 GitHub 代管的社群範本啟動 IDX 工作區。如要進一步瞭解如何從範本啟動新工作區,請參閱「建立工作區」一文。
大多數使用者會使用內建範本或從 Git 匯入專案,但針對更進階的用途,您可以自行建立範本:
如果您自行建構架構、程式庫或服務,可以讓使用者在瀏覽器中快速開始使用您的技術,充分發揮雲端虛擬機器的強大功能。
如果您有專案偏好的技術堆疊,可以透過自訂範本簡化啟動新專案的程序。
如果您要教導他人,例如透過教學課程或程式碼研究室,可以預先將程式碼研究室的起始點設為自訂範本,藉此移除學生的部分初始步驟。
建立及測試自訂範本後,您可以建立連結,並將其放在網站、Git 存放區 README 檔案、套件詳細資料頁面 (例如 NPM 中),或是您希望使用者開始使用技術的任何其他位置。
必要條件
事前準備作業:
範本檔案結構
IDX 範本是至少包含兩個檔案的公開 Git 存放區 (或存放區中的資料夾或分支):

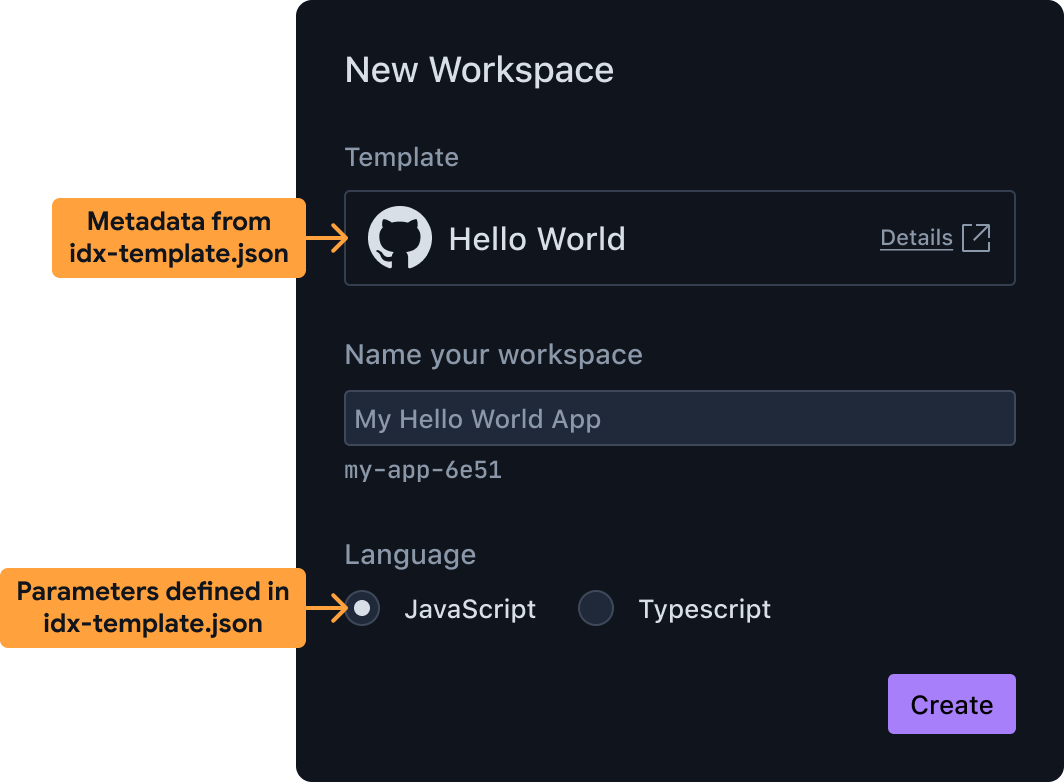
使用自訂範本建立新工作區 idx-template.json包含範本的中繼資料,包括使用者可見的名稱、說明,以及使用者可用於設定範本的參數。舉例來說,您可以讓使用者從多種程式設計語言或示例用途中選擇。IDX 會使用這項資訊,為使用者準備 UI,讓他們選擇從範本建立新工作區。idx-template.nix是使用 Nix 語言編寫的檔案,其中包含 Bash 殼層指令碼 (包裝在 Nix 函式中),負責執行下列操作:- 建立新工作區的工作目錄。
- 建立
.idx/dev.nix檔案來設定環境。請注意,您也可以在這個指令碼中執行專案架構工具,例如flutter create或npm init,或是執行以 Go、Python、Node.js 或其他語言編寫的自訂指令碼。
當 IDX 載入範本時,這個檔案會使用使用者指定的參數執行。
您可以將其他檔案與這兩個檔案一併納入,以便在 idx-template.nix 中使用,以便將範本例項化。舉例來說,您可以加入最終的 .idx/dev.nix 檔案,甚至直接在存放區中加入所有結構檔案。
建立入門範本
為加快範本建立作業,建議您先使用下列其中一種方法建立 IDX 範本,再進一步自訂:
基本範例:將任何公開 GitHub 存放區轉換為範本
在進一步瞭解如何定義 idx-template.json 和 idx-template.nix 之前,先來看看以下基本範例範本:
- 沒有使用者可設定的參數
- 只要將範本存放區中的所有檔案 (兩個
idx-template檔案除外) 複製到使用者的工作區即可。應該已經有一個.idx子資料夾,其中包含定義環境的dev.nix檔案。
將下列檔案新增至任何公開的 GitHub 存放區 (或子資料夾或分支),即可有效地將該存放區轉換為 IDX 範本。
idx-template.json
{
  "name": "Hello world",
  "description": "A template for a CLI program that prints 'hello world'",
  "icon": "https://www.gstatic.com/images/branding/productlogos/idx/v1/192px.svg",
  "params": []
}
idx-template.nix
# No user-configurable parameters
{ pkgs, ... }: {
  # Shell script that produces the final environment
  bootstrap = ''
    # Copy the folder containing the `idx-template` files to the final
    # project folder for the new workspace. ${./.} inserts the directory
    # of the checked-out Git folder containing this template.
    cp -rf ${./.} "$out"

    # Set some permissions
    chmod -R +w "$out"

    # Remove the template files themselves and any connection to the template's
    # Git repository
    rm -rf "$out/.git" "$out/idx-template".{nix,json}
  '';
}
請參閱「自訂範本」一文,瞭解您可以進行哪些額外變更來自訂範本。
使用官方或社群範本建立自訂範本
Project IDX 團隊維護兩個 IDX 範本存放區:
官方範本:這是指您在建立新應用程式時,直接從 IDX 資訊主頁選取的範本。
社群範本:這些範本允許開放原始碼社群提供貢獻。如要使用社群範本,請複製社群範本 Git 存放區。您可以使用要使用的範本完整連結。
如要以現有範本為基礎建立自訂範本,請按照下列步驟操作:
決定要使用哪個範本做為自訂範本的基礎,然後複製專案。
視需要自訂
idx-template.json、idx-template.nix和.idx/dev.nix,請參閱「自訂範本」一文。檢查存放區中的變更。
請按照這篇文章的說明,為範本建立新的工作區,並部署及測試範本。如果您使用的是巢狀存放區,請在網址中直接連結至該存放區。舉例來說,如果您使用社群「Vanilla Vite」範本,則會使用以下網址佈建及測試新工作區:
https://idx.google.com/new?template=https://github.com/project-idx/community-templates/tree/main/vite-vanilla
請繼續參閱「自訂範本」一文,瞭解您可以進行哪些額外變更來自訂範本。
自訂範本
您已建立可用於建構的基礎範本,現在可以編輯 idx-template.json、idx-template.nix 和 .idx/dev.nix 檔案,以符合您的需求。您可能需要自訂的設定包括:
在 bootstrap 指令碼中使用其他系統套件
基本範例只會使用基本 POSIX 指令,將檔案複製到正確的位置。範本的 bootstrap 指令碼可能需要安裝其他二進位檔,例如 git、node、python3 或其他。
您可以透過在 idx-template.nix 檔案中指定 packages,讓引導程式碼可使用其他系統套件,就像使用其他系統套件自訂工作區一樣,在 dev.nix 檔案中新增 packages。
以下範例說明如何新增 pkgs.nodejs,其中包含 node、npx 和 npm 等二進位檔:
# idx-template.nix
{pkgs}: {
  packages = [
    # Enable "node", "npm" and "npx" in the bootstrap script below.
    # Note, this is NOT the list of packages available to the workspace once
    # it's created. Those go in .idx/dev.nix
    pkgs.nodejs
  ];

  bootstrap = ''
    mkdir "$out"
    # We can now use "npm"
    npm init --yes my-boot-strap@latest "$out"
  ''
}
新增可由使用者設定的參數
如要讓使用者自訂新專案的起點,您可以建立多個範本,或建立含有參數的單一範本。如果不同的起點只是傳遞至 CLI 工具的不同值 (例如 --language=js 與 --language=ts),這會是個不錯的選項。
如要新增參數,請按照下列步驟操作:
- 在
idx-template.json中繼資料檔案的params物件中說明參數。IDX 會使用這個檔案中的資訊,為範本使用者準備 UI (例如核取方塊、下拉式選單和文字欄位)。 - 更新
idx-template.nix引導程序,以便使用使用者在例項化範本時選取的值。
在 idx-template.json 中說明您的參數
以下是新增 enum 參數的範例,視選項數量而定,IDX 會以下拉式選單或圓形按鈕群組的形式顯示:
{
  "name": "Hello world",
  "description": "A hello world app",
  "params": [
    {
      "id": "language",
      "name": "Programming Language",
      "type": "enum",
      "default": "ts",
      "options": {
        "js": "JavaScript",
        "ts": "TypeScript"
      },
      "required": true
    }
  ]
}
由於有兩個值 (JavaScript 和 TypeScript),UI 會為這兩個選項顯示單選按鈕群組,並將 ts 或 js 值傳遞至 idx-template.nix 指令碼。
每個參數物件都具有下列屬性:
| 屬性 | 類型 | 說明 |
|---|---|---|
| id | string |
參數的專屬 ID,類似於變數名稱。 |
| 名稱 | string |
這個參數的顯示名稱。 |
| 類型 | string |
指定要用於此參數的 UI 元件,以及要傳遞至引導程式碼的資料類型。有效值如下:
|
| 選項 | object |
對於 enum 參數,這代表要向使用者顯示的選項。舉例來說,如果選項為 {"js": "JavaScript", ...},系統會顯示「JavaScript」做為選項,選取後,這個參數的值會是 js。 |
| 預設 | string 或 boolean |
在 UI 中設定初始值。對於 enum 參數,此值必須是 options 中的其中一個鍵。對於 boolean 參數,這個項目應為 true 或 false。 |
| 必填 | boolean |
表示此參數為必要參數。 |
在 idx-template.nix 中使用參數值
在 idx-template.json 檔案中定義 params 物件後,您就可以開始根據使用者選擇的參數值自訂引導程式指令碼。
按照上一節的範例,如果您有一個 ID 為 language 的單一參數,該參數為列舉,可能的值為 ts 或 js,您可以這樣使用:
# idx-template.nix
# Accept additional arguments to this template corresponding to template
# parameter IDs, including default values (language=ts by default in this example).
{ pkgs, language ? "ts", ... }: {
  packages = [
    pkgs.nodejs
  ];

  bootstrap = ''
    # We use Nix string interpolation to pass the user's chosen programming
    # language to our script.
    npm init --yes my-boot-strap@latest "$out" -- --lang=${language}
  ''
}
另一個常見的模式是根據字串的值,有條件地加入內容。您也可以透過以下方式編寫上述範例:
npm init --yes my-boot-strap@latest "$out" -- \
    ${if language == "ts" then "--lang=ts" else "--lang=js" }
選擇預設要開啟的檔案
建議您在使用範本建立新工作區時,自訂要開啟哪些檔案進行編輯。舉例來說,如果您的範本是用於基本網站,建議您開啟主要 HTML、JavaScript 和 CSS 檔案。
如要自訂預設開啟的檔案,請更新 .idx/dev.nix 檔案 (不是 idx-template.nix 檔案!),加入具有 openFiles 屬性的 onCreate 工作區掛鉤,如下所示:
# .idx/dev.nix
{pkgs}: {
  ...
  idx = {
    # Workspace lifecycle hooks
    workspace = {
      # Runs when a workspace is first created with this `dev.nix` file
      onCreate = {
        # Open editors for the following files by default, if they exist.
        # The last file in the list will be focused.
        default.openFiles = [
          "src/index.css"
          "src/index.js"
          "src/index.html"
        ];
        # Include other scripts here, as needed, for example:
        # installDependencies = "npm install";
      };
      # To run something each time the workspace is (re)started, use the `onStart` hook
    };
    # Enable previews and customize configuration
    previews = { ... };
  };
}
選擇預設工作區圖示
您可以選擇使用範本建立的工作區預設圖示,方法是在 .idx 目錄中,將名為 icon.png 的 PNG 檔案放在 dev.nix 檔案旁邊。
在新的工作區中測試範本
如要測試範本的端對端功能,最簡單的方法就是使用範本建立新的工作區。請造訪下列連結,並將範例替換為範本的 GitHub 存放區網址:
https://idx.google.com/new?template=https://github.com/my-org/my-repo
您可以選擇加入分支和子資料夾。只要可公開存取,下列所有項目皆有效:
https://github.com/my-org/my-repo/https://github.com/my-org/my-repo/tree/main/path/to/myidxtemplatehttps://github.com/my-org/my-repo/tree/branchhttps://github.com/my-org/my-repo/tree/branch/path/to/myidxtemplate
這個網址也是您要與他人分享的網址,讓他們可以使用新的範本,或是您要從「在 IDX 中開啟」按鈕連結的網址。
分享範本
確認範本的運作情況符合預期後,請將範本發布至 GitHub 存放區,並分享您在建立用於測試的工作區時使用的連結。

