Project IDX lets you preview your work by rendering a live view of your application alongside your code editor. IDX web previews render an inline frame (iFrame) of the app's web server and a cloud-based Android emulator.
Enable and configure your preview environment
To preview your app in your workspace, you must configure your preview environment.
Enable previews in your
.idx/dev.nixconfiguration file. IDX automatically generates this file when you create a new workspace and includes any applicable preview environments based on the template you select. If the file isn't in your IDX code repository, create it. Set theidx.previewsattribute totrueand add configuration attributes, as the following example shows:{ pkgs, ... }: { # NOTE: This is an excerpt of a complete Nix configuration example. # For more information about the dev.nix file in IDX, see # https://developers.google.com/idx/guides/customize-idx-env # Enable previews and customize configuration idx.previews = { enable = true; previews = { # The following object sets web previews web = { command = [ "npm" "run" "start" "--" "--port" "$PORT" "--host" "0.0.0.0" "--disable-host-check" ]; manager = "web"; # Optionally, specify a directory that contains your web app # cwd = "app/client"; }; # The following object sets Android previews # Note that this is supported only on FLutter workspaces android = { manager = "flutter"; }; }; }; }For a full list of Nix attributes in IDX, see Nix + IDX.
Rebuild your environment:
- Run the Project IDX: Hard restart command from the command palette (Cmd+Shift+P/Ctrl+Shift+P).
- Click Rebuild environment from the Environment config updated notification.
When you rebuild the environment after modifying your
dev.nixfile, the preview panel appears in your workspace showing Android and Web tabs, depending on what you've enabled. However, you might need to wait a while for the environment to rebuild. Try closing the workspace and then reopening it from the IDX dashboard.
Use app previews
IDX offers web previews on Chrome and Android emulators (on Flutter workspaces) that install your app on the preview environment, so you can test it fully, from end to end, directly from your workspace.
Refresh previews for web and Android
IDX hooks into the hot reload functionalities of the underlying frameworks
(like npm run start and flutter hot-reload) to give you a tight inner
development loop. This section covers the different types of reloads to help you
troubleshoot if the default behavior on IDX does not work well for your use
case.
Automatic Hot Reload: Hot reloads are automatically performed when you save a file. Sometimes known as Hot Module Replacement (or HMR), a hot reload updates your app without reloading the page (for web apps) or without restarting or reinstalling the app (for emulators). This approach is excellent for preserving your app's live state but may sometimes not work as intended.
Manual Full Reload: This option is equivalent to a page refresh (for web apps) or an app restart (for emulators). We recommend using a full reload to capture significant changes to your source code, such as when refactoring large chunks of code.
Manual Hard Restart: This option performs a complete restart of IDX's preview system, which includes stopping and restarting your app's web server.
All reload options are available using either the preview toolbar or the command palette (Cmd+Shift+P on Mac or Ctrl+Shift+P on ChromeOS, Windows, or Linux), under the IDX category.
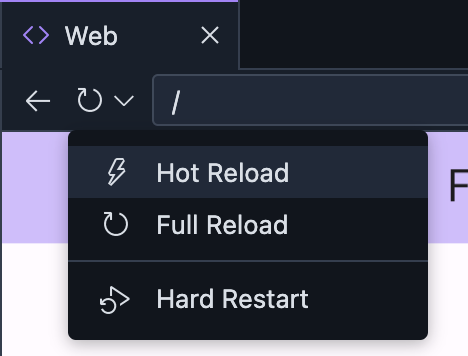
To use the preview toolbar, follow these steps:
Click the reload icon to refresh the page. This forces a full reload. For a different type of refresh, click the arrow next to the reload icon to expand the menu.
Select the refresh option you want from the menu: Hot Reload, Full Reload, or Hard Restart.
Share your web preview with others
You can share your app's web preview with others for feedback by enabling access and then sharing the direct link to the preview:
In the web preview toolbar, click the
 Share Preview
Link icon, to the right of the address bar to open the sharing menu.
Share Preview
Link icon, to the right of the address bar to open the sharing menu.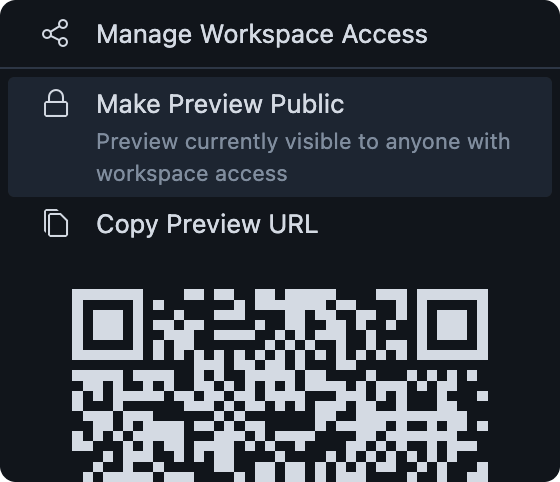
Allow others to access your workspace, using one of these options:
Option A: Make your workspace preview publicly accessible by selecting Make Preview Public. This enables anyone on the Internet to reach your workspace's running preview server while your workspace is active, and until you turn off public access.
Option B. Share your workspace with just the people you want to give access by selecting Manage Workspace Access.
Select Copy Preview URL to copy a direct link to the workspace preview, which you can then send to those you'd like to get feedback from.
Configure autosave and hot reload
By default, IDX autosaves your work one second after you stop typing, triggering automatic hot reloads. If you want IDX to save your work at a different interval, change the autosave setting. You can also turn off autosave.
Configure autosave
- Open Project IDX.
- Click the Settings icon. The Settings window appears.
- Search for Files: Auto Save and verify that the field is set to `afterDelay`.
- Search for Files: Auto Save Delay. The Auto Save Delay field appears.
- Enter a new autosave delay interval, expressed in milliseconds. Changes to your work are now automatically saved based on the new autosave delay setting.
Turn off autosave
- Open Project IDX.
- Click the Settings icon. The Settings window appears.
- Search for Files: Auto Save.
- Click the drop-down and select off. Autosave is now disabled.