Page Summary
-
Companion ads, displayed alongside video or overlay ads, are HTML ads shown within an HTML environment.
-
To implement companion ads, you must book them in Ad Manager, and they are enabled by default for each ad request.
-
Companion ads can be displayed automatically using the Google Publisher Tag (GPT) or manually using the Ad API.
-
GPT is recommended for most publishers and automates the display of HTML companion ads by recognizing declared slots on the page.
-
The Ad API allows for manual display of companion ads by retrieving
CompanionAdobjects from anAdobject and inserting their content into designated HTML div elements.
You might want to associate your in-page HTML ad slots with video or overlay ad slots. This relationship between associated ad slots is referred to as the master-companion relationship.
In addition to requesting video and overlay master ads, you can use the IMA SDK to display companion HTML ads. These ads are displayed within an HTML environment
Use companion ads
To use companion ads, perform the following steps:
1. Book your companion ads
You must first book the companion ads that you want to display with your master ads. Companion ads can be trafficked in Ad Manager. You can serve up to six companion ads per master ad. This technique, when a single buyer controls all ads on the page, is also known as roadblocking.
2. Request your companion ads
By default, companion ads are enabled for each ad request.
3. Display companion ads
There are two ways to render companion ads:
Automatically using the Google Publisher Tag (GPT).
If you're using GPT to implement your companion ads, they are displayed automatically as long as there are companion ad slots declared on the HTML page and these ads are registered with the API (that is, the div ID in the JavaScript and HTML must match). Some benefits of using GPT are:
- Companion slot awareness.
- Companion backfill from the publisher's network, if the VAST response contains fewer companion ads than there are defined slots on the HTML page.
- Companion autofill if a video ad is missing.
- Preloaded companion ad slots for click-to-play video players.
- Automated companion rendering, including
HTMLResourceandiFrameResource.
Manually using the Ad API.
Use companion ads with Google Publisher Tag
The Google Publisher Tag (GPT) automates the display of HTML companion ads on your site. We recommend that most publishers use the GPT. The HTML5 SDK recognizes GPT slots if GPT is loaded on the main web page (not in an IFrame). You can find more detailed information on using GPT with the IMA SDK in the GPT docs.
If you host the HTML5 SDK within an IFrame
If you meet both of the following criteria, you need to include an extra proxy script in order for your GPT companions to display correctly:
- Load the HTML5 SDK in an IFrame.
- Load GPT on the main web page (outside the IFrame).
To get your companions to display in this scenario, you must load the GPT proxy script before loading the SDK:
<script src="https://imasdk.googleapis.com/js/sdkloader/gpt_proxy.js"></script>
Important things to keep in mind:
- There should be no GPT loaded inside the IFrame loading the SDK.
- GPT must be loaded on the top page, not in another IFrame.
- The proxy script must be loaded in the same frame as GPT (that is, on the main page).
Declare companion ad slots in HTML
This section explains how to declare companion ads in HTML using GPT and provides sample code for different scenarios. For the HTML5 SDK, you need to add some JavaScript to your HTML page and declare the companion ad slots.
- Example 1: Basic ad slot implementation
- Example 2: Dynamic ad slot implementation
- Example 3: Pre-loaded ad slots
Example 1: Basic ad slot implementation
The following sample code shows how to include the gpt.js file in your HTML
page and declare an ad slot. The declared ad slot is 728x90px. GPT attempts to
fill the slot with any companion ads returned in the VAST response that match
this size. After the ad slots have been declared, the googletag.display()
function can render them wherever it is called on the page. Because the slots
are companion slots, ads are not displayed immediately. Instead they appear
alongside the master video ad.
Here's an example of the implementation:
<html>
  <head>
    <!-- Uncomment the line below for the HTML5 SDK caveat proxy -->
    <!--<script src="https://imasdk.googleapis.com/js/sdkloader/gpt_proxy.js"></script>-->
    <!-- HEAD part -->
    <!-- Initialize the tagging library -->
    <script async src="https://securepubads.g.doubleclick.net/tag/js/gpt.js"></script>

    <!-- Register your companion slots -->
    <script>
       window.googletag = window.googletag || { cmd: [] };

       googletag.cmd.push(function() {
         // Supply YOUR_NETWORK and YOUR_UNIT_PATH.
         googletag.defineSlot('/YOUR_NETWORK/YOUR_UNIT_PATH', [728, 90], 'companionDiv')
             .addService(googletag.companionAds())
             .addService(googletag.pubads());
         googletag.companionAds().setRefreshUnfilledSlots(true);
         googletag.pubads().enableVideoAds();
         googletag.enableServices();
       });
    </script>
  </head>

  <body>
    <!-- BODY part -->
    <!-- Declare a div where you want the companion to appear. Use
          googletag.display() to make sure the ad is displayed. -->
    <div id="companionDiv" style="width:728px; height:90px;">
      <script>
         // Using the command queue to enable asynchronous loading.
         // The unit does not actually display now - it displays when
         // the video player is displaying the ads.
         googletag.cmd.push(function() { googletag.display('companionDiv'); });
      </script>
    </div>
  <body>
</html>
Try it out
You can see the following codepen for a working implementation.
Example 2: Dynamic ad slot implementation
Sometimes you might not know how many ad slots you have on a page until the page content is rendered. The following sample code shows how to define ad slots while the page renders. This example is identical to Example 1 except that it registers the ad slots where they are actually displayed.
<html>
  <head>
    <!-- Uncomment the line below for the HTML5 SDK caveat proxy -->
    <!-- <script src="https://imasdk.googleapis.com/js/sdkloader/gpt_proxy.js"></script> -->
    <script async src="https://securepubads.g.doubleclick.net/tag/js/gpt.js"></script>
    <!-- HEAD part -->
    <!-- Initialize the tagging library -->
    <script>
      window.googletag = window.googletag || { cmd: [] };

      googletag.cmd.push(function() {
        googletag.companionAds().setRefreshUnfilledSlots(true);
        googletag.pubads().enableVideoAds();
        googletag.enableServices();
      });
    </script>
  </head>

  <body>
    <!-- BODY part -->
    <!-- Declare a div where you want the companion to appear. Use
        googletag.display() to make sure the ad is displayed. -->
    <div id="companionDiv" style="width:728px; height:90px;">
      <script>
        // Using the command queue to enable asynchronous loading.
        // The unit does not actually display now - it displays when
        // the video player is displaying the ads.
        googletag.cmd.push(function() {
          // Supply YOUR_NETWORK and YOUR_UNIT_PATH.
          googletag.defineSlot('/YOUR_NETWORK/YOUR_UNIT_PATH', [728, 90], 'companionDiv')
              .addService(googletag.companionAds())
              .addService(googletag.pubads());
          googletag.display('companionDiv');
        });
      </script>
    </div>
  <body>
</html>
Try it out
You can see the following code for a working implementation.
Example 3: Pre-loaded ad slots
In certain cases, you may need to display something in the ad slot before the companion ad is requested. Companion ads are usually requested along with a video ad. This request could occur after the page loads. For example, a companion ad may load only after the user clicks a click-to-play video. In such a case, you need the ability to request a regular ad to fill the ad slot before the companion ad is requested. To support this use case, you can display standard web ads in the companion slot. Ensure the web ads are targeted to the companion slots. You can target the companion slots in the same way as you would target standard web ad slots.
Here's an example of the implementation just described:
<html>
  <head>
    ...
    <!-- Register your companion slots -->
    <script>
      window.googletag = window.googletag || { cmd: [] };

      googletag.cmd.push(function() {
        // Supply YOUR_PRELOAD_NETWORK and YOUR_PRELOAD_UNIT_PATH.
        googletag.defineSlot('/YOUR_PRELOAD_NETWORK/YOUR_PRELOAD_UNIT_PATH', [728, 90], 'companionDiv')
            .addService(googletag.companionAds())
            .addService(googletag.pubads());
        googletag.companionAds().setRefreshUnfilledSlots(true);
        googletag.pubads().enableVideoAds();
        googletag.enableServices();
      });
    </script>
  </head>
  ...
</html>
Try it out
You can see the following code-pen for a working implementation.
Use companion ads with the Ad API
This section describes how to display companion ads using the Ad API.
Display companion ads
To display companion ads, first get a reference to an Ad object through any
of the AdEvent events dispatched from the AdsManager. We recommend using
the AdEvent.STARTED event, as displaying companion ads should coincide with
displaying the master ad.
Next, use this Ad object to call getCompanionAds() to get an array of
CompanionAd objects. Here you have the option of specifying
CompanionAdSelectionSettings, which lets you set filters on the companion
ads for creative type, near fit percentage, resource type, and size criteria.
For more information on these settings, see the
IMA CompanionAdSelectionSettings API documentation.
The CompanionAd objects returned by getCompanionAds can now be used to
display the companion ads on the page using these guidelines:
- Create a companion ad slot
<div>of the required size on the page. - In your event handler for the
STARTEDevent, retrieve theAdobject by callinggetAd(). - Use
getCompanionAds()to get a list of companion ads that match both the companion ad slot size andCompanionAdSelectionSettingsand have the same sequence number as the master creative. Creatives with a missing sequence attribute are treated as having sequence number 0. - Get the content from a
CompanionAdinstance and set it as the inner HTMl of that ad slot's<div>.
Sample code
<!--Set a companion ad div in html page. -->
<div id="companion-ad-300-250" width="300" height="250"></div>

<script>

  // Listen to the STARTED event.
  adsManager.addEventListener(
    google.ima.AdEvent.Type.STARTED,
    onAdEvent);

  function onAdEvent(adEvent) {
    switch (adEvent.type) {
      case google.ima.AdEvent.Type.STARTED:
        // Get the ad from the event.
        var ad = adEvent.getAd();
        var selectionCriteria = new google.ima.CompanionAdSelectionSettings();
        selectionCriteria.resourceType = google.ima.CompanionAdSelectionSettings.ResourceType.STATIC;
        selectionCriteria.creativeType = google.ima.CompanionAdSelectionSettings.CreativeType.IMAGE;
        selectionCriteria.sizeCriteria = google.ima.CompanionAdSelectionSettings.SizeCriteria.IGNORE;
        // Get a list of companion ads for an ad slot size and CompanionAdSelectionSettings
        var companionAds = ad.getCompanionAds(300, 250, selectionCriteria);
        var companionAd = companionAds[0];
        // Get HTML content from the companion ad.
        var content = companionAd.getContent();
        // Write the content to the companion ad slot.
        var div = document.getElementById('companion-ad-300-250');
        div.innerHTML = content;
        break;
    }
  }
</script>
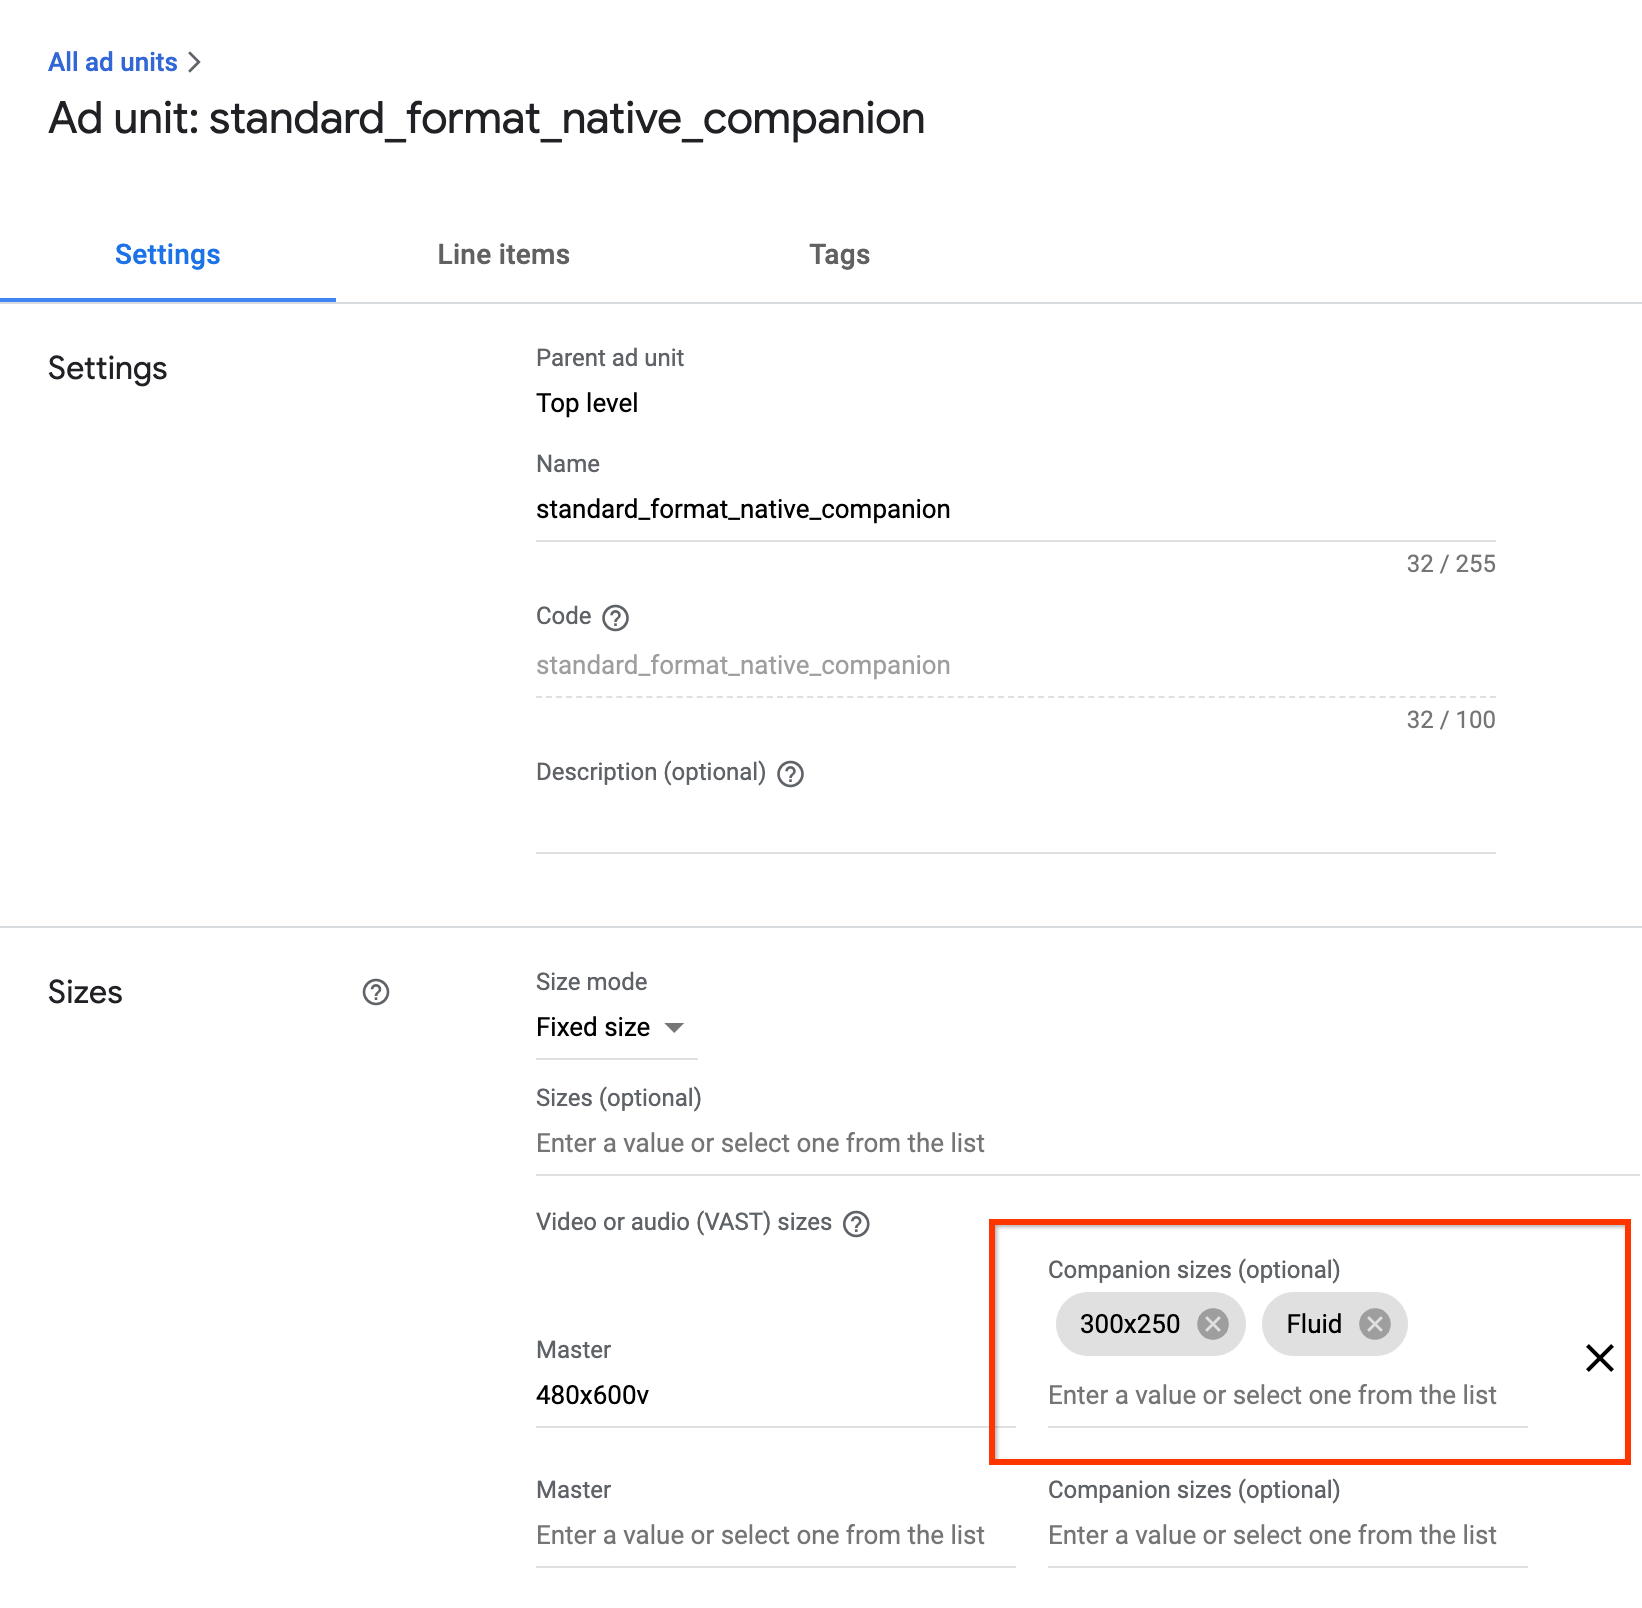
Display fluid companion ads
IMA now supports fluid companion ads. These companions ads can resize
to match the size of the ad slot. They fill 100% of the width of parent div,
then resize their height to fit the companion's content. They're set by using
the Fluid companion size in Ad Manager. See the following image for where to
set this value.
GPT fluid companions
When using GPT companions, you can declare a fluid companion slot by updating
the defineSlot() method's second parameter.
<!-- Register your companion slots -->
<script>
  googletag.cmd.push(function() {
    // Supply YOUR_NETWORK and YOUR_UNIT_PATH.
    googletag.defineSlot('/YOUR_NETWORK/YOUR_UNIT_PATH', ['fluid'], 'companionDiv')
        .addService(googletag.companionAds())
        .addService(googletag.pubads());
    googletag.companionAds().setRefreshUnfilledSlots(true);
    googletag.pubads().enableVideoAds();
    googletag.enableServices();
  });
</script>
Ad API fluid companions
When using the Ad API for companion ads, you can declare a fluid companion slot
by updating
google.ima.CompanionAdSelectionSettings.SizeCriteria
to the SELECT_FLUID value.
<script>

  ...
    // Get the ad from the event.
    var ad = adEvent.getAd();
    var selectionCriteria = new google.ima.CompanionAdSelectionSettings();
    selectionCriteria.resourceType = google.ima.CompanionAdSelectionSettings.ResourceType.STATIC;
    selectionCriteria.creativeType = google.ima.CompanionAdSelectionSettings.CreativeType.IMAGE;
    selectionCriteria.sizeCriteria = google.ima.CompanionAdSelectionSettings.SizeCriteria.SELECT_FLUID;
    // Get a list of companion ads for an ad slot size and CompanionAdSelectionSettings
    // Note: Companion width and height are irrelevant when fluid size is used.
    var companionAds = ad.getCompanionAds(0, 0, selectionCriteria);
    var companionAd = companionAds[0];
  ...
    }
  }
</script>