Page Summary
-
The Looker Studio API enables programmatic management of Looker Studio assets, primarily for automation and migration within Google Workspace or Cloud Identity organizations.
-
Before using the API, you must configure an app, authorize it via the Google Admin console (requiring domain-wide delegation), and then obtain OAuth 2.0 access tokens for API calls.
-
The API is exclusively available to users within organizations that have Google Workspace or Cloud Identity.
-
When a Workspace admin authorizes an app with the necessary scopes, users in that organization are automatically authorized to use the app with the Looker Studio API.
-
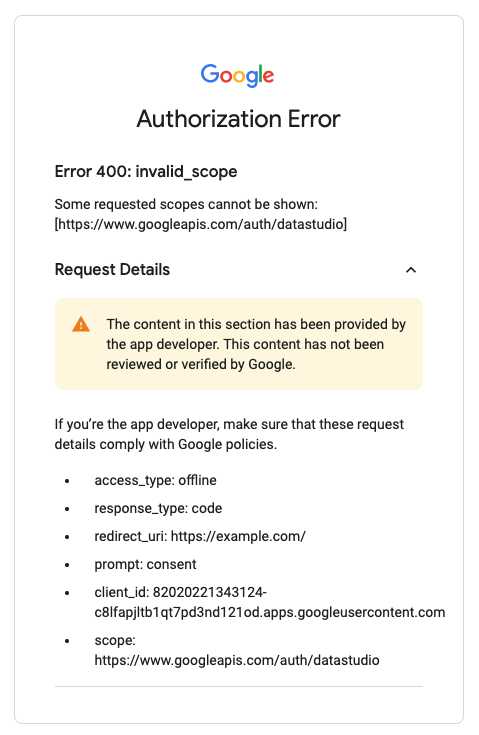
Common troubleshooting issues include a missing OAuth dialog (expected behavior if the app is authorized) and "Error 400: invalid_scope" indicating the app hasn't been authorized by the user's organization.
The Looker Studio API allows you to search for and manage Looker Studio assets.
The primary use case for the API is to allow Google Workspace or Cloud Identity organizations to automate management and migration of Looker Studio assets.
Requirements overview
The following steps are required to use the Looker Studio API:
- Configure an app to use the API.
- Use the Google Admin console to authorize the app.
- Obtain OAuth 2.0 access tokens and call the API.
The steps above may be performed by the same or different organizations based on the following common scenarios:
- Internal apps developed for an organization. The organization configures and authorizes the app for all users of their organization.
- 3rd-party apps developed for external users/customers (i.e. developer and users belong to different organizations). The developer configures the app but the user's organization authorizes the 3rd-party app.
1. Configure an app to use the API
Complete the following to configure your app:
Enable the API
To enable an API for your project:
- Open the Looker Studio API in the Google API Console.
- If prompted, select a project, or create a new one.
- Click Enable.
- If prompted, read and accept the API's Terms of Service.
Create an OAuth Client
The following steps to create an OAuth Client are general guidelines and should be adjusted to meet your app requirements.
- Navigate to Configure OAuth consent screen.
- Choose Internal, click Create.
- Fill out required fields, click Save.
- Navigate to Credentials.
- Click CREATE CREDENTIALS.
- Select OAuth client ID.
- Choose the appropriate
Application Type. (Web application is most common). - Fill required fields, click Create.
- Take note of the Client ID since it is used to authorize the app.
2. Authorize the app for an organization
Apps using the Looker Studio API can only authenticate and authorize Google Workspace users where the user's organization has authorized the app using Domain-wide delegation to control API access.
Configure domain-wide delegation with the OAuth Client ID of the app and the Scopes required by the app.
- Sign in to your Google Admin console and navigate to domain wide delegation.
- In
API clients, click Add new. - Enter the
Client IDof the app to authorize (i.e. the app that uses the Looker Studio API). - Enter all OAuth scopes required by the app. The following scopes are
commonly requested if using the Looker Studio API to manage assets:
https://www.googleapis.com/auth/datastudiohttps://www.googleapis.com/auth/userinfo.profile
- Click Authorize.
After authorizing the app, any Workspace user belonging to the organization will automatically be authorized to use the app with the Looker Studio API.
3. Obtaining OAuth 2.0 access tokens and calling the API
Once you have developed and authorized the app you will have the necessary access to call the API for Workspace users. See Using OAuth 2.0 to Access Google APIs for details on working with Google APIs using OAuth. Refer to the API reference for available operations.
Troubleshooting
Missing OAuth dialog
If a user's organization has authorized the app, users of that organization will not be shown the OAuth dialog when authorizing the app. The only exception would be if the app requests authorization for additional Google API scopes that the Workspace Admin hasn't configured, in which case the OAuth dialog will be shown to users.
Error 400: invalid_scope
If a user receives an Error 400: invalid_scope message when attempting to
authorize the app, then the user's organization has not or incorrectly
authorized the app. To resolve the issue, the user will have to request that
their organization authorize the app.
