Select platform: [Android](https://developers.google.com/maps/documentation/android-sdk/advanced-markers/add-marker.md.txt "View this page for the Android platform docs.") [iOS](https://developers.google.com/maps/documentation/ios-sdk/advanced-markers/add-marker.md.txt "View this page for the iOS platform docs.") [JavaScript](https://developers.google.com/maps/documentation/javascript/advanced-markers/add-marker.md.txt "View this page for the JavaScript platform docs.")
To add advanced markers to a map, create a new instance of
[`AdvancedMarkerOptions`](https://developers.google.com/android/reference/com/google/android/gms/maps/model/AdvancedMarkerOptions.md.txt)
and then use
[`GoogleMap.addMarker()`](https://developers.google.com/android/reference/com/google/android/gms/maps/GoogleMap.md.txt#addMarker(com.google.android.gms.maps.model.MarkerOptions))
to add the marker:
### Kotlin
```kotlin
private val SYDNEY = LatLng(-33.87365, 151.20689)
val marker: Marker? = map.addMarker(
AdvancedMarkerOptions()
.position(SYDNEY)
.iconView(textView)
.zIndex(zIndex)
)
```
### Java
```java
private final LatLng SYDNEY = new LatLng(-33.87365, 151.20689);
Marker marker = map.addMarker(
new AdvancedMarkerOptions()
.position(SYDNEY)
.iconView(textView)
.zIndex(zIndex));
```
`GoogleMap.addMarker()` returns an instance of
[`Marker`](https://developers.google.com/android/reference/com/google/android/gms/maps/model/Marker.md.txt).
If necessary, you can cast the returned value to
[`AdvancedMarker`](https://developers.google.com/android/reference/com/google/android/gms/maps/model/AdvancedMarker.md.txt).
Use `AdvancedMarkerOptions` to configure advanced markers.
`AdvancedMarkerOptions` is a subclass of
[`MarkerOptions`](https://developers.google.com/android/reference/com/google/android/gms/maps/model/MarkerOptions.md.txt)
so it supports all the same settings as `MarkerOptions`.
`AdvancedMarkerOptions` also lets you:
- Create an instance of the
[`PinConfig`](https://developers.google.com/android/reference/com/google/android/gms/maps/model/PinConfig.md.txt)
class, and then use the `PinConfig`
instance to configure the `AdvancedMarkerOptions` instance.
Use `PinConfig` to customize advanced marker properties, such as the
background color, border color, and glyph.
- Create an instance of the Android
[`View`](https://developer.android.com/reference/android/view/View) class
and use that instance to configure the `AdvancedMarkerOptions` instance.
The View instance lets you fully customize the marker.
## Use PinConfig
The `PinConfig` class contains options to customize
advanced markers. Use `PinConfig` to:
- Change the background color
- Change the border color
- Change the glyph color or add text
- Hide the glyph
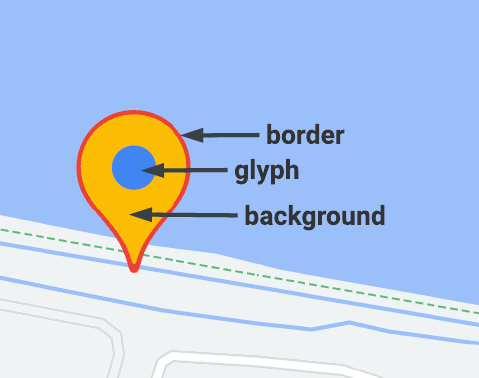 **Figure 1**: The parts of an Advanced Marker.
Use [`PinConfig.Builder`](https://developers.google.com/android/reference/com/google/android/gms/maps/model/PinConfig.Builder.md.txt)
to create an instance of `PinConfig`:
### Kotlin
```kotlin
// Use PinConfig.Builder to create an instance of PinConfig.
val pinConfigBuilder: PinConfig.Builder = PinConfig.builder()
pinConfigBuilder.setBackgroundColor(Color.MAGENTA)
val pinConfig: PinConfig = pinConfigBuilder.build()
// Use the PinConfig instance to set the icon for AdvancedMarkerOptions.
val advancedMarkerOptions: AdvancedMarkerOptions = AdvancedMarkerOptions()
.icon(BitmapDescriptorFactory.fromPinConfig(pinConfig))
.position(MARKER_POSITION)
// Pass the AdvancedMarkerOptions instance to addMarker().
val marker: Marker? = map.addMarker(advancedMarkerOptions)
```
### Java
```java
// Use PinConfig.Builder to create an instance of PinConfig.
PinConfig.Builder pinConfigBuilder = PinConfig.builder();
pinConfigBuilder.setBackgroundColor(Color.MAGENTA);
PinConfig pinConfig = pinConfigBuilder.build();
// Use the PinConfig instance to set the icon for AdvancedMarkerOptions.
AdvancedMarkerOptions advancedMarkerOptions =
new AdvancedMarkerOptions()
.icon(BitmapDescriptorFactory.fromPinConfig(pinConfig))
.position(MARKER_POSITION);
// Pass the AdvancedMarkerOptions instance to addMarker().
Marker marker = map.addMarker(advancedMarkerOptions);
```
### Change the background color
Use the `PinConfig.background()` method to change the background color of a
marker:
### Kotlin
```kotlin
// Use PinConfig.Builder to create an instance of PinConfig.
val pinConfigBuilder: PinConfig.Builder = PinConfig.builder()
pinConfigBuilder.setBackgroundColor(Color.MAGENTA)
val pinConfig: PinConfig = pinConfigBuilder.build()
```
### Java
```java
// Use PinConfig.Builder to create an instance of PinConfig.
PinConfig.Builder pinConfigBuilder = PinConfig.builder();
pinConfigBuilder.setBackgroundColor(Color.MAGENTA);
PinConfig pinConfig = pinConfigBuilder.build();
```
### Change the border color
Use the `PinConfig.borderColor()` method to change the border color of a
marker:
### Kotlin
```kotlin
// Set the border color.
val pinConfigBuilder: PinConfig.Builder = PinConfig.builder()
pinConfigBuilder.setBorderColor(Color.BLUE)
val pinConfig: PinConfig = pinConfigBuilder.build()
```
### Java
```java
// Set the border color.
PinConfig.Builder pinConfigBuilder = PinConfig.builder();
pinConfigBuilder.setBorderColor(Color.BLUE);
PinConfig pinConfig = pinConfigBuilder.build();
```
### Change the glyph
Create a [`Glyph`](https://developers.google.com/android/reference/com/google/android/gms/maps/model/PinConfig.Glyph.md.txt)
instance and then use that instance to configure `PinConfig`.
Use the glyph to set the glyph text and text color, the glyph color, or to
specify a custom image to use as the glyph.
The following example sets the glyph text:
### Kotlin
```kotlin
// Set the glyph text.
val pinConfigBuilder: PinConfig.Builder = PinConfig.builder()
val glyphText = Glyph("A")
// Alternatively, you can set the text color:
// Glyph glyphText = new Glyph("A", Color.GREEN);
pinConfigBuilder.setGlyph(glyphText)
val pinConfig: PinConfig = pinConfigBuilder.build()
```
### Java
```java
// Set the glyph text.
PinConfig.Builder pinConfigBuilder = PinConfig.builder();
PinConfig.Glyph glyphText = new PinConfig.Glyph("A");
// Alternatively, you can set the text color:
// PinConfig.Glyph glyphText = new PinConfig.Glyph("A", Color.GREEN);
pinConfigBuilder.setGlyph(glyphText);
PinConfig pinConfig = pinConfigBuilder.build();
```
Set the glyph color:
### Kotlin
```kotlin
val glyphColor = PinConfig.Glyph(Color.BLUE)
pinConfigBuilder.setGlyph(glyphColor)
val pinConfig: PinConfig = pinConfigBuilder.build()
```
### Java
```java
PinConfig.Glyph glyphColor = new PinConfig.Glyph(Color.BLUE);
pinConfigBuilder.setGlyph(glyphColor);
PinConfig pinConfig = pinConfigBuilder.build();
```
Set a custom image for the glyph. This technique is useful if you want to use a
custom logo or other visual indicator in the marker.
### Kotlin
```kotlin
// Set the glyph image.
val glyphImage: Int = R.drawable.example_image
val descriptor = PinConfig.BitmapDescriptorFactory.fromResource(glyphImage)
pinConfigBuilder.setGlyph(Glyph(descriptor))
val pinConfig: PinConfig = pinConfigBuilder.build()
```
### Java
```java
// Set the glyph image.
int glyphImage = R.drawable.example_image;
BitmapDescriptor descriptor = BitmapDescriptorFactory.fromResource(glyphImage);
pinConfigBuilder.setGlyph(new PinConfig.Glyph(descriptor));
PinConfig pinConfig = pinConfigBuilder.build();
```
### Hide the glyph
You can hide the glyph so that the background color fills the entire marker:
### Kotlin
```kotlin
// Create a transparent glyph.
val pinConfigBuilder: PinConfig.Builder = PinConfig.builder()
pinConfigBuilder.setBackgroundColor(Color.MAGENTA)
pinConfigBuilder.setGlyph(PinConfig.Glyph(Color.TRANSPARENT))
val pinConfig: PinConfig = pinConfigBuilder.build()
```
### Java
```java
// Create a transparent glyph.
PinConfig.Builder pinConfigBuilder = PinConfig.builder();
pinConfigBuilder.setBackgroundColor(Color.MAGENTA);
pinConfigBuilder.setGlyph(new PinConfig.Glyph(Color.TRANSPARENT));
PinConfig pinConfig = pinConfigBuilder.build();
```
## Use iconView
The `AdvancedMarkerOptions.iconView()` method lets you use any Android
[`View`](https://developer.android.com/reference/android/view/View)
as the marker. By using a view as the marker, you have complete control over the
marker.
> [!NOTE]
> **Note:** When using a `View` as the marker, don't perform operation on the `View` to move it. Instead, modify the `Marker` itself. For example, to rotate the `View`, use the [`Marker.setRotation()`](https://developers.google.com/android/reference/com/google/android/gms/maps/model/Marker.md.txt#setRotation(float)) method. Don't rotate `View`.
In your app, you first create the view, then use the
`AdvancedMarkerOptions.iconView()` method to add the view to the
advanced markers.
### Kotlin
```kotlin
// Create a TextView to use as the marker.
val textView = TextView(this)
textView.text = "Hello!!"
textView.setBackgroundColor(Color.BLACK)
textView.setTextColor(Color.YELLOW)
val marker: Marker? = map.addMarker(
AdvancedMarkerOptions()
.position(SYDNEY)
.iconView(textView)
)
```
### Java
```java
// Create a TextView to use as the marker.
TextView textView = new TextView(this);
textView.setText("Hello!!");
textView.setBackgroundColor(Color.BLACK);
textView.setTextColor(Color.YELLOW);
Marker marker = map.addMarker(
new AdvancedMarkerOptions()
.position(SYDNEY)
.iconView(textView));
```
> [!CAUTION]
> **Caution:** Performance of a map view with `iconView` markers might not match the performance of bitmap or default markers.
## Next steps:
- [Collision behavior](https://developers.google.com/maps/documentation/android-sdk/advanced-markers/collision-behavior.md.txt)