This page describes how to configure an Android Studio project to use the [Maps SDK for Android](https://developers.google.com/maps/documentation/android-sdk/overview.md.txt)
without using the Google Maps template that is detailed in the
[Quickstart](https://developers.google.com/maps/documentation/android-sdk/start.md.txt).
The Google Maps template automatically configures and adds a basic map to a new
Android Studio project. However, you can also add a map to an Android project
that uses a different Android Studio template. To do so, you need to manually
configure your project and then [add the
map](https://developers.google.com/maps/documentation/android-sdk/map).
## Step 1: Set up Android Studio
This document describes a development environment using
[Android Studio Hedgehog](https://developer.android.com/studio/install.html) and the
[Android Gradle plugin](https://developer.android.com/build/releases/gradle-plugin)
version 8.2.
> [!NOTE]
> **Note:** If your development environment uses a different version of Android Studio or Gradle you might have to modify the steps based on those versions. For more information about Android Studio and Gradle versions, see [Android Gradle plugin and Android Studio compatibility](https://developer.android.com/build/releases/gradle-plugin#android_gradle_plugin_and_android_studio_compatibility).
## Step 2. Set up the SDK
The Maps SDK for Android library is available through
[Google's Maven repository](https://maven.google.com/). To
add the SDK to your app, do the following:
1. In your top-level `settings.gradle.kts` file, include the [Gradle plugin portal](https://plugins.gradle.org/), [Google Maven repository](https://maven.google.com/web/index.html), and [Maven central repository](https://search.maven.org/artifact) under the `pluginManagement` block. The `pluginManagement` block must appear before any other statements in the script.
```yaml
pluginManagement {
repositories {
google()
mavenCentral()
gradlePluginPortal()
}
}
```
2. In your top-level `settings.gradle.kts` file, include the [Google's Maven repository](https://maven.google.com/web/index.html) and [Maven central repository](https://search.maven.org/artifact) under the `dependencyResolutionManagement` block:
```yaml
dependencyResolutionManagement {
repositoriesMode.set(RepositoriesMode.PREFER_SETTINGS)
repositories {
google()
mavenCentral()
}
}
```
3. In your module-level `build.gradle.kts` or `build.gradle` file, add the [Google Play services](http://developer.google.com/android) dependency for the Maps SDK for Android.
### Kotlin
```kotlin
dependencies {
// Maps SDK for Android
implementation(libs.play.services.maps)
}
```
### Groovy
```groovy
dependencies {
// Maps SDK for Android
implementation "com.google.android.gms:play-services-maps:20.1.0"
}
```
4. In your module-level `build.gradle.kts` or `build.gradle` file, set `compileSdk` and `minSdk` to the following values:
> [!NOTE]
> **Note:** Ensure that `compileSdk` is set to 34 or higher and `minSdk` is set to 23 or higher.
### Kotlin
```kotlin
android {
compileSdk = 34
defaultConfig {
minSdk = 23
// ...
}
}
```
### Groovy
```groovy
android {
compileSdk 34
defaultConfig {
minSdk 23
// ...
}
}
```
5. In the `buildFeatures` section of your module-level `build.gradle.kts` or `build.gradle` file, add the `BuildConfig` class, which you can use to access metadata values defined later in this procedure:
### Kotlin
```kotlin
android {
// ...
buildFeatures {
buildConfig = true
// ...
}
}
```
### Groovy
```groovy
android {
// ...
buildFeatures {
buildConfig true
// ...
}
}
```
6. In your `libs.versions.toml` file, add the following:
```toml
[versions]
play-services-maps = "20.1.0"
[libraries]
play-services-maps = { module = "com.google.android.gms:play-services-maps", version.ref = "play-services-maps" }
```
## Step 3: Add your API key to the project
This section describes how to store your API key so that it can be securely
referenced by your app. You shouldn't check your API key into your version
control system, so we recommend storing it in a
`secrets.properties` file in the root directory of your project and
excluding that file from version control. For more information about Gradle
properties files, see
[Gradle properties files](https://developer.android.com/studio/build#properties-files).
To simplify this task, we recommend that you use the
[Secrets Gradle Plugin for Android](https://github.com/google/secrets-gradle-plugin).
To install the Secrets Gradle Plugin for Android and store your API key:
1. In Android Studio, open your top-level `build.gradle.kts` or `build.gradle` file and add the following code to the `plugins` block.
### Kotlin
```kotlin
plugins {
// ...
id("com.google.android.libraries.mapsplatform.secrets-gradle-plugin") version "2.0.1" apply false
}
```
### Groovy
```groovy
plugins {
// ...
id 'com.google.android.libraries.mapsplatform.secrets-gradle-plugin' version '2.0.1' apply false
}
```
2. Open your module-level `build.gradle.kts` or `build.gradle` file and add the following code to the `plugins` element.
### Kotlin
```kotlin
plugins {
id("com.android.application")
// ...
id("com.google.android.libraries.mapsplatform.secrets-gradle-plugin")
}
```
### Groovy
```groovy
plugins {
id 'com.android.application'
// ...
id 'com.google.android.libraries.mapsplatform.secrets-gradle-plugin'
}
```
3. If you use Android Studio, [sync your
project with Gradle](https://developer.android.com/studio/build#sync-files).
4. Open the `secrets.properties` file in your top-level directory, and then add the following code. Replace `YOUR_API_KEY` with your API key. Make sure to add `secrets.properties` to your `.gitignore` file (or otherwise exclude it from your version control system) so that you don't check your API key into version control.
> [!NOTE]
> **Note:** If the `secrets.properties` file doesn't exist, create it in the same folder as the `local.properties` file.
```
MAPS_API_KEY=YOUR_API_KEY
```
5. Create the `local.defaults.properties` file in your top-level
directory, the same folder as the `secrets.properties` file, and
then add the following code.
> [!NOTE]
> **Note:** Enter the code as shown. Don't replace `DEFAULT_API_KEY` with your API key.
```
MAPS_API_KEY=DEFAULT_API_KEY
```
The purpose of this file is to provide a backup location for the API key
if the `secrets.properties` file isn't found so that builds
don't fail. This can happen if you clone the app from a version control
system that omits `secrets.properties` and you haven't yet
created a `secrets.properties` file locally to provide your API
key.
6. In your `AndroidManifest.xml` file, go to `com.google.android.geo.API_KEY` and update the `android:value` attribute as follows:
```html
```
**Note:**
`com.google.android.geo.API_KEY` is the recommended metadata name
for the API key. A key with this name can be used to authenticate to multiple
Google Maps-based APIs on the Android platform, including the
Maps SDK for Android. For backwards compatibility, the API also
supports the name `com.google.android.maps.v2.API_KEY`. This legacy
name allows authentication to the Android Maps API v2 only. An application can
specify only one of the API key metadata names. If both are specified, the API
throws an exception.
7. In Android Studio, open your module-level `build.gradle.kts`
or `build.gradle` file and edit the `secrets`
property. If the `secrets` property doesn't exist, add it.
Edit the properties of the plugin to set `propertiesFileName`
to `"secrets.properties"`, set
`defaultPropertiesFileName` to
`"local.defaults.properties"`, and set any other properties.
### Kotlin
```kotlin
secrets {
// To add your Maps API key to this project:
// 1. If the secrets.properties file does not exist, create it in the root directory (the same folder as the root local.properties file).
// 2. Add this line, where YOUR_API_KEY is your API key:
// MAPS_API_KEY=YOUR_API_KEY
propertiesFileName = "secrets.properties"
// A properties file containing default secret values. This file can be
// checked in version control.
defaultPropertiesFileName = "local.defaults.properties"
}
```
### Groovy
```groovy
secrets {
// To add your Maps API key to this project:
// 1. If the secrets.properties file does not exist, create it in the root directory (the same folder as the root local.properties file).
// 2. Add this line, where YOUR_API_KEY is your API key:
// MAPS_API_KEY=YOUR_API_KEY
propertiesFileName = "secrets.properties"
// A properties file containing default secret values. This file can be
// checked in version control.
defaultPropertiesFileName = "local.defaults.properties"
}
```
## Step 4: Update the app manifest
This section describes the settings to add to your
[`AndroidManifest.xml`](https://developer.android.com/guide/topics/manifest/manifest-intro.html)
file.
### Google Play services version number
Add the following declaration within the `application` element. This embeds
the version of Google Play services that the app was compiled with.
```xml
```
### Location permission
If your app needs to access the user's location, you need to request the
location permission in your `AndroidManifest.xml` file. The options are
`ACCESS_FINE_LOCATION`, which provides the precise device location, and
`ACCESS_COARSE_LOCATION`, which is less precise. For details, see the
[location data](https://developers.google.com/maps/documentation/android-sdk/location.md.txt) guide.
> [!NOTE]
> **Note:** The [quickstart](https://developers.google.com/maps/documentation/android-sdk/start.md.txt) has `ACCESS_FINE_LOCATION` enabled.
To request the `ACCESS_FINE_LOCATION` permission, add this code to the
`manifest` element:
```xml
```
### External storage permission
If you're targeting **version 8.3 or later** of the Google Play services SDK,
you don't need the `WRITE_EXTERNAL_STORAGE` permission. If you're targeting
earlier versions of the Google Play services SDK, you must request the
[WRITE_EXTERNAL_STORAGE](https://developer.android.com/reference/android/Manifest.permission.html#WRITE_EXTERNAL_STORAGE)
permission, in the `manifest` element.
```xml
```
### Apache HTTP Legacy library
If you are using `com.google.android.gms:play-services-maps:16.0.0` or below and
your app is targeting API level 28 (Android 9.0) or above, you must include
the following declaration within the `` element of
`AndroidManifest.xml`. Otherwise, skip this declaration.
```xml
```
## Step 5: Set up an Android device
To run an app that uses the Maps SDK for Android, you must deploy it to an Android
device or Android emulator that is based on
Android 6.0 or higher and includes the Google
APIs.
- To use an Android device, follow the instructions at [Run apps on a hardware device](https://developer.android.com/studio/run/device.html).
- To use an Android emulator, you can create a virtual device and install the emulator by using the [Device Manager](https://developer.android.com/studio/run/managing-avds.html) that comes with Android Studio.
> [!NOTE]
> **Note:** If you choose to use an Android emulator, ensure that you choose a device profile with the Google Play icon, , displayed in the **Play** column. This icon indicates that these profiles are fully [CTS](https://source.android.com/compatibility/cts) compliant and can use system images that include the Play Store app: 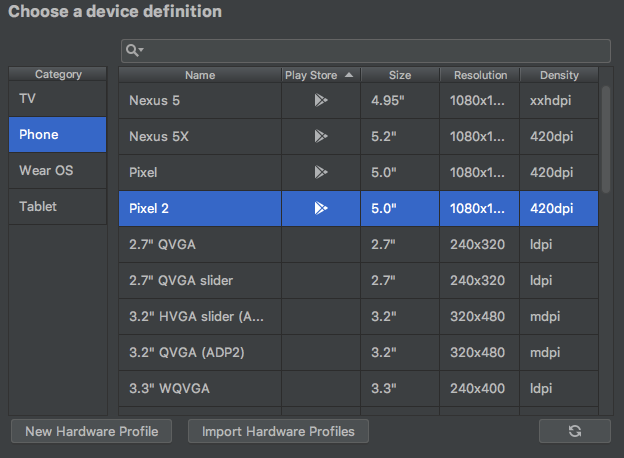 The **Add Device** dialog in Android Studio Device Manager showing virtual device profiles with the Google Play icon in the **Play** column.
## Step 6: Optionally check for Play Service support
Maps SDK for Android requires that the device on which you deploy your
app has the Google Play services installed. Google provides a method that you
can call from your app to check. For more information, see [Check whether Google
Play services is installed](https://developers.google.com/android/guides/setup#check-whether-installed).
## Next steps
Once your project is configured, you can [add a map](https://developers.google.com/maps/documentation/android-sdk/map.md.txt).