Using the Navigation SDK for Android, you can modify the user experience with
your map by determining which of the built-in UI controls and elements appear on
the map. You can also adjust the visual appearance of the navigation UI. Refer
to the [Policies page](https://developers.google.com/maps/documentation/navigation/android-sdk/policies) for
guidelines on acceptable modifications to the navigation UI.
This document describes how to modify your map's user interface in two ways:
- [Map UI controls](https://developers.google.com/maps/documentation/navigation/android-sdk/controls#map_ui_controls)
- [Map UI accessories](https://developers.google.com/maps/documentation/navigation/android-sdk/controls#map_ui_accessories)
> [!NOTE]
> **Note:** In most cases, we recommend using [`NavigationFragment`](https://developers.google.com/maps/documentation/navigation/android-sdk/reference/com/google/android/libraries/navigation/NavigationFragment), which is a wrapper for [`NavigationView`](https://developers.google.com/maps/documentation/navigation/android-sdk/reference/com/google/android/libraries/navigation/NavigationView), instead of interacting directly with `NavigationView`. For more information, see [Navigation map interaction best practices](https://developers.google.com/maps/documentation/navigation/android-sdk/nav-map-interactions-best-practices).
## Map UI controls
> [!NOTE]
> **Note:** The slot-based layout controls described in this section, such as `setCustomControl`, will be deprecated. It's recommended to use the experimental [layout customization](https://developers.google.com/maps/documentation/navigation/android-sdk/customize-layout) feature instead.
To place custom UI elements on the navigation view, use Map UI controls for
proper positioning. When the built-in layout changes,
Navigation SDK for Android automatically repositions your custom controls.
You can set one custom control view at a time for each position. If your design
requires multiple UI elements, you can place them in a `ViewGroup` and pass it
to the `setCustomControl` method.
The [`setCustomControl`
method](https://developers.google.com/maps/documentation/navigation/android-sdk/reference/com/google/android/libraries/navigation/NavigationFragment#setCustomControl)
provides positions as defined in the [`CustomControlPosition`
enum](https://developers.google.com/maps/documentation/navigation/android-sdk/reference/com/google/android/libraries/navigation/CustomControlPosition):
- `SECONDARY_HEADER` (appears in portrait mode only)
- `BOTTOM_START_BELOW`
- `BOTTOM_END_BELOW`
- `FOOTER`
 Custom control positions for portrait orientation  Custom control positions for landscape orientation
### Add a custom control
1. Create an [Android View](https://developer.android.com/reference/android/view/View.html) with the custom UI element or ViewGroup.
2. Inflate the XML or instantiate the custom view to get an instance of the view.
3. Use `NavigationView.setCustomControl` or
`NavigationFragment.setCustomControl` with the chosen custom control
position from the [`CustomControlPosition`
enum](https://developers.google.com/maps/documentation/navigation/android-sdk/reference/com/google/android/libraries/navigation/CustomControlPosition).
> [!NOTE]
> **Note:** Your app should call this method on the UI thread.
The following example creates a fragment and adds a custom control in the
secondary header position.
> [!NOTE]
> **Note:** The code in the example has line breaks for visibility in the documentation. Be sure to remove them as appropriate.
mNavFragment.setCustomControl(getLayoutInflater().
inflate(R.layout.your_custom_control, null),
CustomControlPosition.SECONDARY_HEADER);
```
### Remove a custom control
To remove a custom control, call the `setCustomControl` method with a `null`
view parameter and the chosen custom control position.
For example, the following snippet removes any custom secondary header and
returns to the default content:
mNavFragment.setCustomControl(null, CustomControlPosition.SECONDARY_HEADER);
### Custom control positions
#### Secondary header
 Secondary header custom control position for portrait orientation
To use this custom control position, pass the position
`CustomControlPosition.SECONDARY_HEADER` to `setCustomControl`.
By default, screen layouts in navigation mode provide a position for a secondary
header located beneath the primary header. This secondary header appears when
necessary, such as with lane guidance. Your app can use this secondary header
position of the layout for custom content. When you use this feature, your
control covers any default secondary header content. If your navigation view has
a background, that background remains in place, covered by the secondary header.
When your app removes the custom control, any default secondary header can
appear in its place.
The custom secondary header position aligns its top edge with the bottom edge of
the primary header. This position is only supported in `portrait mode`. In
`landscape mode`, the secondary header is unavailable, and the layout does not
change.
#### Bottom start
 Bottom start custom control position for portrait orientation  Bottom start custom control position for landscape orientation
To use this custom control position, pass the position
`CustomControlPosition.BOTTOM_START_BELOW` to `setCustomControl`.
This custom control position sits in the bottom start corner of the map. In both
`portrait mode` and `landscape mode`, it sits above the ETA card and/or custom
footer (or along the bottom of the map if neither are present), and Nav SDK
elements including the re-center button and Google logo move up to account for
the height of the custom control view. This control is positioned inside the
visible map bounds, so any padding added to the bottom or start edges of the map
will also change the position of this control.
#### Bottom end
 Bottom end custom control position for portrait orientation  Bottom end custom control position for landscape orientation
To use this custom control position, pass the position
`CustomControlPosition.BOTTOM_END_BELOW` to `setCustomControl`.
This custom control position sits in the bottom end corner of the map. In
`portrait mode`, it sits above the ETA card and/or custom footer (or along the
bottom of the map if neither are present), but in `landscape mode` it is aligned
with the bottom of the map. Any Nav SDK elements visible along the end side
(right side in LTR) move up to account for the height of the custom control
view. This control is positioned inside the visible map bounds, so any padding
added to the bottom or end edges of the map will also change the position of
this control.
#### Footer
> [!WARNING]
> [Preview](https://developers.google.com/maps/launch-stages) feature
 Footer custom control position for portrait orientation  Footer custom control position for landscape orientation
To use this custom control position, pass the position
`CustomControlPosition.FOOTER` to `setCustomControl`.
This custom control position is designed for a custom footer view. If the Nav
SDK ETA card is visible, this control sits above it. If not, the control is
aligned with the bottom of the map. Unlike the `BOTTOM_START_BELOW` and
`BOTTOM_END_BELOW` custom controls, this control is positioned outside the
visible map bounds, which means that any padding added to the map won't change
the position of this control.
In `portrait mode`, the custom footer is full width. Custom controls in both
`CustomControlPosition.BOTTOM_START_BELOW` and
`CustomControlPosition.BOTTOM_END_BELOW` positions, as well as Nav SDK UI
elements like the re-center button and the Google logo, are positioned above the
custom control footer. The default position of the chevron takes the custom
footer height into account.
In `landscape mode`, the custom footer is half width and aligned to the start
side (left side in LTR), just like the Nav SDK ETA card. The custom controls in
the `CustomControlPosition.BOTTOM_START_BELOW` position and Nav SDK UI elements
like the re-center button and the Google logo are positioned above the custom
control footer. The custom controls in `CustomControlPosition.BOTTOM_END_BELOW`
position and any Nav SDK UI elements along the end side (right side in LTR) stay
aligned with the bottom of the map. The default position of the chevron does not
change when a custom footer is present since the footer does not extend to the
end side of the map.
Custom controls in `CustomControlPosition.BOTTOM_START_BELOW` and
`CustomControlPosition.BOTTOM_END_BELOW` positions, as well as Nav SDK UI
elements like the re-center button and the Google logo are positioned above the
custom control footer.
## Map UI accessories
The Navigation SDK for Android provides UI accessories that appear during
navigation similar to those found in the Google Maps for Android application.
You can adjust the visibility or visual appearance of these controls as
described in this section. Changes you make here reflect during the next
navigation session.
Refer to the [Policies
page](https://developers.google.com/maps/documentation/navigation/android-sdk/policies) for guidelines on
acceptable modifications to the navigation UI.
### View the code
Show/Hide the Java code
for the navigation activity.
```
package com.example.navsdkcustomization;
import android.content.pm.PackageManager;
import android.graphics.Bitmap;
import android.graphics.BitmapFactory;
import android.os.Bundle;
import android.util.Log;
import android.widget.Toast;
import androidx.annotation.NonNull;
import androidx.appcompat.app.AppCompatActivity;
import androidx.core.app.ActivityCompat;
import androidx.core.content.ContextCompat;
import com.google.android.gms.maps.GoogleMap;
import com.google.android.gms.maps.GoogleMap.CameraPerspective;
import com.google.android.gms.maps.OnMapReadyCallback;
import com.google.android.gms.maps.model.BitmapDescriptorFactory;
import com.google.android.gms.maps.model.LatLng;
import com.google.android.gms.maps.model.Marker;
import com.google.android.gms.maps.model.MarkerOptions;
import com.google.android.libraries.navigation.AudioGuidanceSettings;
import com.google.android.libraries.navigation.ListenableResultFuture;
import com.google.android.libraries.navigation.NavigationApi;
import com.google.android.libraries.navigation.NavigationFragment;
import com.google.android.libraries.navigation.Navigator;
import com.google.android.libraries.navigation.SimulationOptions;
import com.google.android.libraries.navigation.StylingOptions;
import com.google.android.libraries.navigation.Waypoint;
/** An activity that displays a map and a customized navigation UI. */
public class NavigationActivityCustomization extends AppCompatActivity {
private static final String TAG = NavigationActivityCustomization.class.getSimpleName();
private Navigator mNavigator;
private NavigationFragment mNavFragment;
private GoogleMap mMap;
// Define the Sydney Opera House by specifying its place ID.
private static final String SYDNEY_OPERA_HOUSE = "ChIJ3S-JXmauEmsRUcIaWtf4MzE";
// Set fields for requesting location permission.
private static final int PERMISSIONS_REQUEST_ACCESS_FINE_LOCATION = 1;
private boolean mLocationPermissionGranted;
@Override
protected void onCreate(Bundle savedInstanceState) {
super.onCreate(savedInstanceState);
setContentView(R.layout.activity_main);
// Initialize the Navigation SDK.
initializeNavigationSdk();
}
/**
* Starts the Navigation SDK and sets the camera to follow the device's location. Calls the
* navigateToPlace() method when the navigator is ready.
*/
private void initializeNavigationSdk() {
/*
* Request location permission, so that we can get the location of the
* device. The result of the permission request is handled by a callback,
* onRequestPermissionsResult.
*/
if (ContextCompat.checkSelfPermission(
this.getApplicationContext(), android.Manifest.permission.ACCESS_FINE_LOCATION)
== PackageManager.PERMISSION_GRANTED) {
mLocationPermissionGranted = true;
} else {
ActivityCompat.requestPermissions(
this,
new String[] {android.Manifest.permission.ACCESS_FINE_LOCATION},
PERMISSIONS_REQUEST_ACCESS_FINE_LOCATION);
}
if (!mLocationPermissionGranted) {
displayMessage(
"Error loading Navigation SDK: " + "The user has not granted location permission.");
return;
}
// Get a navigator.
NavigationApi.getNavigator(
this,
new NavigationApi.NavigatorListener() {
/** Sets up the navigation UI when the navigator is ready for use. */
@Override
public void onNavigatorReady(Navigator navigator) {
displayMessage("Navigator ready.");
mNavigator = navigator;
mNavFragment =
(NavigationFragment)
getSupportFragmentManager().findFragmentById(R.id.navigation_fragment);
// Get the map.
mNavFragment.getMapAsync(
new OnMapReadyCallback() {
@Override
public void onMapReady(GoogleMap map) {
mMap = map;
// Navigate to a place, specified by Place ID.
navigateToPlace(SYDNEY_OPERA_HOUSE);
}
});
}
/**
* Handles errors from the Navigation SDK.
*
* @param errorCode The error code returned by the navigator.
*/
@Override
public void onError(@NavigationApi.ErrorCode int errorCode) {
switch (errorCode) {
case NavigationApi.ErrorCode.NOT_AUTHORIZED:
displayMessage(
"Error loading Navigation SDK: Your API key is "
+ "invalid or not authorized to use the Navigation SDK.");
break;
case NavigationApi.ErrorCode.TERMS_NOT_ACCEPTED:
displayMessage(
"Error loading Navigation SDK: User did not accept "
+ "the Navigation Terms of Use.");
break;
case NavigationApi.ErrorCode.NETWORK_ERROR:
displayMessage("Error loading Navigation SDK: Network error.");
break;
case NavigationApi.ErrorCode.LOCATION_PERMISSION_MISSING:
displayMessage(
"Error loading Navigation SDK: Location permission " + "is missing.");
break;
default:
displayMessage("Error loading Navigation SDK: " + errorCode);
}
}
});
}
/** Customizes the navigation UI and the map. */
private void customizeNavigationUI() {
// Set custom colors for the navigator.
mNavFragment.setStylingOptions(
new StylingOptions()
.primaryDayModeThemeColor(0xff1A237E)
.secondaryDayModeThemeColor(0xff3F51B5)
.primaryNightModeThemeColor(0xff212121)
.secondaryNightModeThemeColor(0xff424242)
.headerLargeManeuverIconColor(0xffffff00)
.headerSmallManeuverIconColor(0xffffa500)
.headerNextStepTypefacePath("/system/fonts/NotoSerif-BoldItalic.ttf")
.headerNextStepTextColor(0xff00ff00)
.headerNextStepTextSize(20f)
.headerDistanceTypefacePath("/system/fonts/NotoSerif-Italic.ttf")
.headerDistanceValueTextColor(0xff00ff00)
.headerDistanceUnitsTextColor(0xff0000ff)
.headerDistanceValueTextSize(20f)
.headerDistanceUnitsTextSize(18f)
.headerInstructionsTypefacePath("/system/fonts/NotoSerif-BoldItalic.ttf")
.headerInstructionsTextColor(0xffffff00)
.headerInstructionsFirstRowTextSize(24f)
.headerInstructionsSecondRowTextSize(20f)
.headerGuidanceRecommendedLaneColor(0xffffa500));
mMap.setTrafficEnabled(false);
// Place a marker at the final destination.
if (mNavigator.getCurrentRouteSegment() != null) {
LatLng destinationLatLng = mNavigator.getCurrentRouteSegment().getDestinationLatLng();
Bitmap destinationMarkerIcon =
BitmapFactory.decodeResource(getResources(), R.drawable.ic_person_pin_48dp);
mMap.addMarker(
new MarkerOptions()
.position(destinationLatLng)
.icon(BitmapDescriptorFactory.fromBitmap(destinationMarkerIcon))
.title("Destination marker"));
// Listen for a tap on the marker.
mMap.setOnMarkerClickListener(
new GoogleMap.OnMarkerClickListener() {
@Override
public boolean onMarkerClick(Marker marker) {
displayMessage(
"Marker tapped: "
+ marker.getTitle()
+ ", at location "
+ marker.getPosition().latitude
+ ", "
+ marker.getPosition().longitude);
// The event has been handled.
return true;
}
});
}
// Set the camera to follow the device location with 'TILTED' driving view.
mMap.followMyLocation(CameraPerspective.TILTED);
}
/**
* Requests directions from the user's current location to a specific place (provided by the
* Google Places API).
*/
private void navigateToPlace(String placeId) {
Waypoint destination;
try {
destination =
Waypoint.builder().setPlaceIdString(placeId).build();
} catch (Waypoint.UnsupportedPlaceIdException e) {
displayMessage("Error starting navigation: Place ID is not supported.");
return;
}
// Create a future to await the result of the asynchronous navigator task.
ListenableResultFuture pendingRoute =
mNavigator.setDestination(destination);
// Define the action to perform when the SDK has determined the route.
pendingRoute.setOnResultListener(
new ListenableResultFuture.OnResultListener() {
@Override
public void onResult(Navigator.RouteStatus code) {
switch (code) {
case OK:
// Hide the toolbar to maximize the navigation UI.
if (getActionBar() != null) {
getActionBar().hide();
}
// Customize the navigation UI.
customizeNavigationUI();
// Enable voice audio guidance (through the device speaker).
AudioGuidanceSettings audioSettings =
AudioGuidanceSettings.builder()
.setGuidanceMode(
AudioGuidanceSettings.GuidanceMode.VOICE_ALERTS_AND_GUIDANCE)
.build();
mNavigator.setAudioGuidanceSettings(audioSettings);
// Simulate vehicle progress along the route for demo/debug builds.
if (BuildConfig.DEBUG) {
mNavigator
.getSimulator()
.simulateLocationsAlongExistingRoute(
new SimulationOptions().speedMultiplier(5));
}
// Start turn-by-turn guidance along the current route.
mNavigator.startGuidance();
break;
// Handle error conditions returned by the navigator.
case NO_ROUTE_FOUND:
displayMessage("Error starting navigation: No route found.");
break;
case NETWORK_ERROR:
displayMessage("Error starting navigation: Network error.");
break;
case ROUTE_CANCELED:
displayMessage("Error starting navigation: Route canceled.");
break;
case ROUTING_TIMEOUT:
displayMessage("Error starting navigation: Routing timed out.");
break;
default:
displayMessage("Error starting navigation: " + String.valueOf(code));
}
}
});
}
/** Handles the result of the request for location permissions. */
@Override
public void onRequestPermissionsResult(
int requestCode, @NonNull String[] permissions, @NonNull int[] grantResults) {
mLocationPermissionGranted = false;
switch (requestCode) {
case PERMISSIONS_REQUEST_ACCESS_FINE_LOCATION:
{
// If request is canceled, the result arrays are empty.
if (grantResults.length > 0 && grantResults[0] == PackageManager.PERMISSION_GRANTED) {
mLocationPermissionGranted = true;
}
}
}
}
/**
* Shows a message on screen and in the log. Used when something goes wrong.
*
* @param errorMessage The message to display.
*/
private void displayMessage(String errorMessage) {
Toast.makeText(this, errorMessage, Toast.LENGTH_LONG).show();
Log.d(TAG, errorMessage);
}
}
```
### Destination highlighting and entrances
When a destination is created with a
[`placeID`](https://developers.google.com/maps/documentation/places/android-sdk/place-id), the destination
building will be highlighted and an entrance icon will be shown, whenever
possible. These visual cues help users distinguish and navigate to their
destination.
To create a destination with a `placeID`, use the
[`Waypoint.Builder.setPlaceIdString()`](https://developers.google.com/maps/documentation/navigation/android-sdk/reference/com/google/android/libraries/navigation/Waypoint.Builder#setPlaceIdString(java.lang.String))
method.

> [!NOTE]
> **Note:** The Navigation SDK does not support indoor navigation. For indoor maps without navigation, use the [`indoorBuilding`](https://developers.google.com/maps/documentation/android-sdk/reference/com/google/android/libraries/maps/model/IndoorBuilding) and [`indoorLevel`](https://developers.google.com/maps/documentation/android-sdk/reference/com/google/android/libraries/maps/model/IndoorLevel) classes of the [Maps SDK for Android](https://developers.google.com/maps/documentation/android-sdk).
### Modify the navigation header
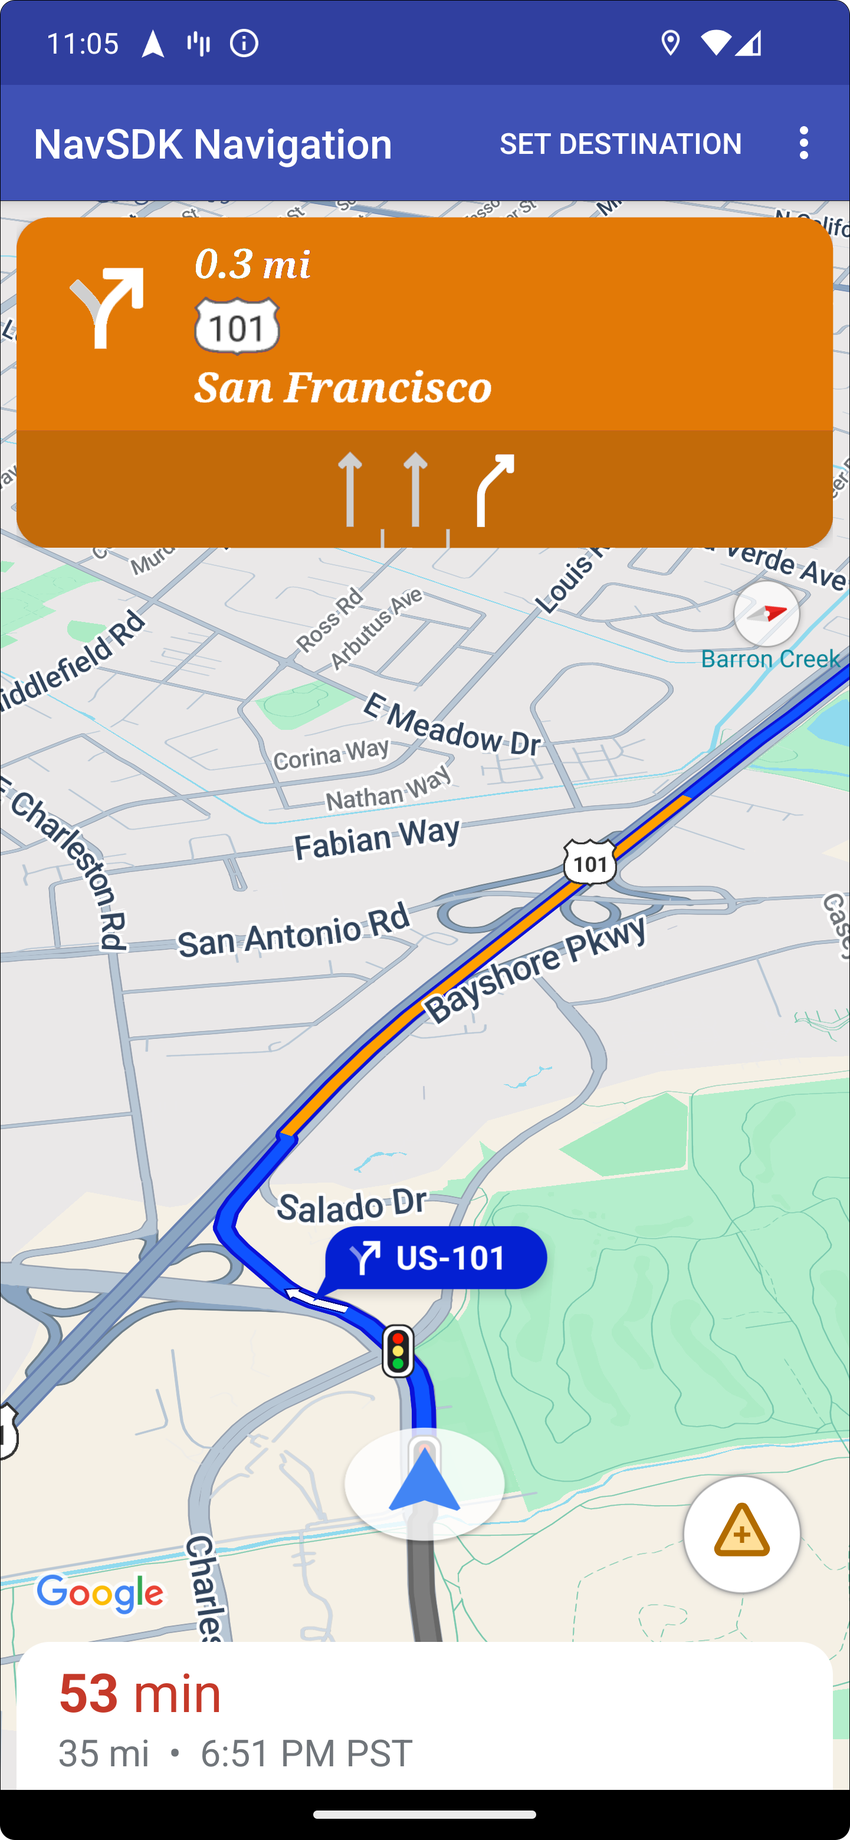
Use
[`NavigationFragment.setStylingOptions()`](https://developers.google.com/maps/documentation/navigation/android-sdk/reference/com/google/android/libraries/navigation/NavigationFragment#setStylingOptions(com.google.android.libraries.navigation.StylingOptions))
or
[`NavigationView.setStylingOptions()`](https://developers.google.com/maps/documentation/navigation/android-sdk/reference/com/google/android/libraries/navigation/NavigationView#setStylingOptions(com.google.android.libraries.navigation.StylingOptions))
to change the theme of the navigation header and the next-turn indicator that
appears below the header when available.
> [!NOTE]
> **Note:** The default header height is dynamic and is sized based on the maneuver guidance being displayed.
You can set the following attributes:
| Attribute Type | Attributes |
|---|---|
| Background color | - Primary day mode - the daytime color of the navigation header - Secondary day mode - the daytime color of the next-turn indicator - Primary night mode - the nighttime color of the navigation header - Secondary night mode - the nighttime color of the next-turn indicator |
| Text elements for instructions | - Text color - Font - Text size of the first row - Text size of the second row |
| Text elements for next steps | - Font - Text color of the distance value - Text size of the distance value - Text color of the distance units - Text size of the distance units |
| Maneuver icons | - Color of the large maneuver icon - Color of the small maneuver icon |
| Lane guidance | - Color of the recommended lane or lanes |
The following example shows how to set styling options:
private NavigationFragment mNavFragment;
mNavFragment = (NavigationFragment) getSupportFragmentManager()
.findFragmentById(R.id.navigation_fragment);
// Set the styling options on the fragment.
mNavFragment.setStylingOptions(new StylingOptions()
.primaryDayModeThemeColor(0xff1A237E)
.secondaryDayModeThemeColor(0xff3F51B5)
.primaryNightModeThemeColor(0xff212121)
.secondaryNightModeThemeColor(0xff424242)
.headerLargeManeuverIconColor(0xffffff00)
.headerSmallManeuverIconColor(0xffffa500)
.headerNextStepTypefacePath("/system/fonts/NotoSerif-BoldItalic.ttf")
.headerNextStepTextColor(0xff00ff00)
.headerNextStepTextSize(20f)
.headerDistanceTypefacePath("/system/fonts/NotoSerif-Italic.ttf")
.headerDistanceValueTextColor(0xff00ff00)
.headerDistanceUnitsTextColor(0xff0000ff)
.headerDistanceValueTextSize(20f)
.headerDistanceUnitsTextSize(18f)
.headerInstructionsTypefacePath("/system/fonts/NotoSerif-BoldItalic.ttf")
.headerInstructionsTextColor(0xffffff00)
.headerInstructionsFirstRowTextSize(24f)
.headerInstructionsSecondRowTextSize(20f)
.headerGuidanceRecommendedLaneColor(0xffffa500));
### Turn off the traffic layer
Use
[`GoogleMap.setTrafficEnabled()`](https://developers.google.com/maps/documentation/android-sdk/reference/com/google/android/libraries/maps/GoogleMap#setTrafficEnabled(boolean))
to enable or disable the traffic layer on the map. This setting affects the
indications of traffic density shown on the map as a whole. However, it does not
affect the traffic indications on the route plotted by the navigator.
private GoogleMap mMap;
// Get the map, and when the async call returns, setTrafficEnabled
// (callback will be on the UI thread)
mMap = mNavFragment.getMapAsync(navMap -> navMap.setTrafficEnabled(false));
### Traffic lights and stop signs
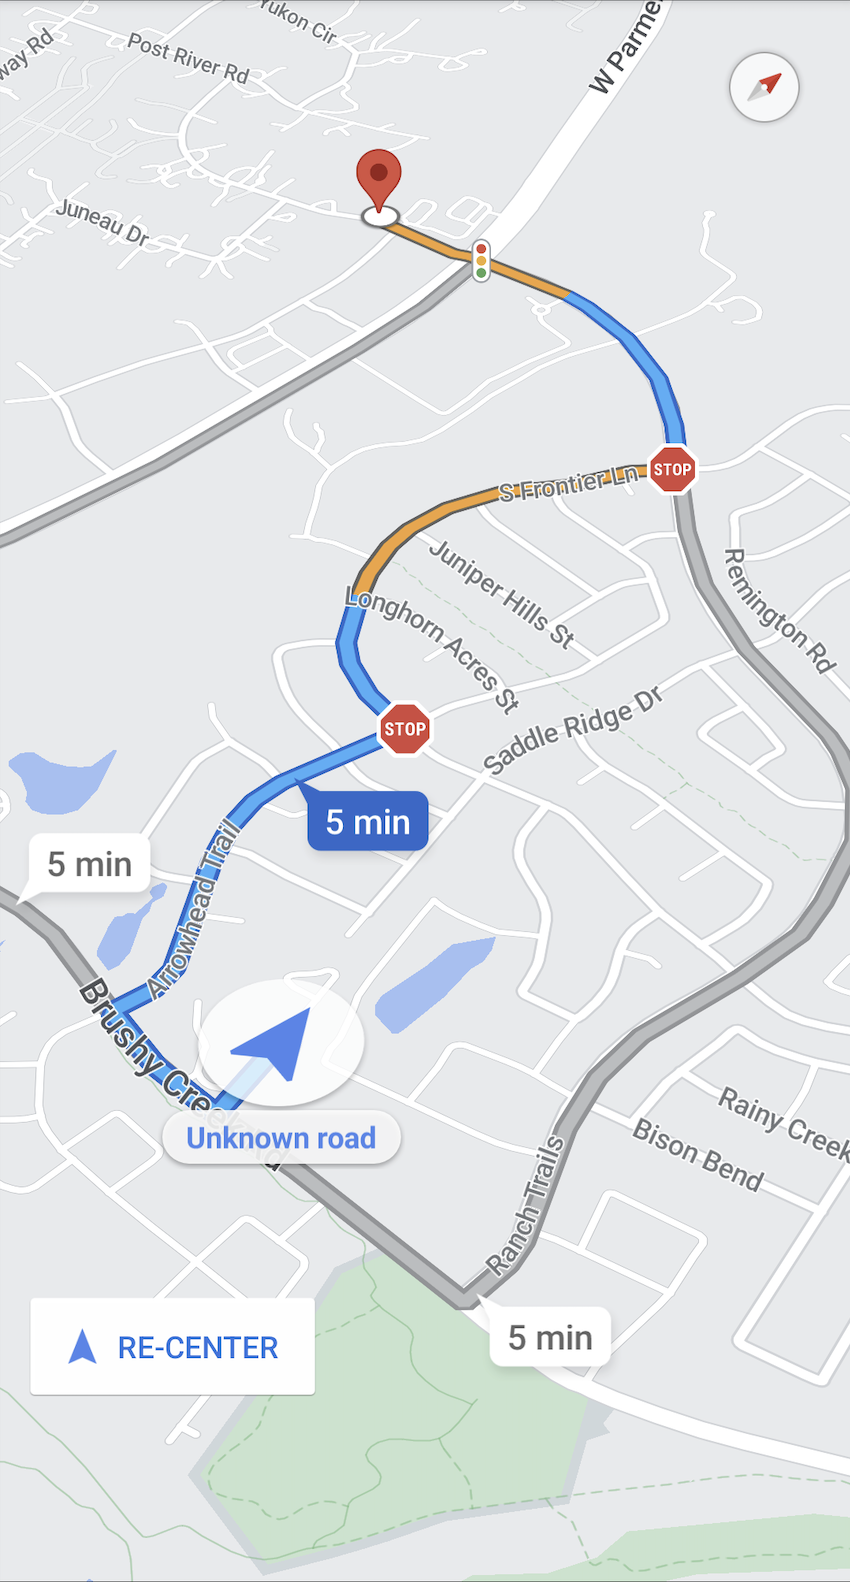
During active navigation, the map shows traffic lights and stop signs to give
users more context about the route and upcoming maneuvers. Starting with
version 8.0.0, you can't turn off this feature.
> [!NOTE]
> **Note:** Traffic lights may also appear on the map during non-navigation modes.
### Add custom markers
Navigation SDK for Android now uses Google Maps APIs for markers. Go to the
[Maps API documentation](https://developers.google.com/maps/documentation/android-sdk/marker)
for more information.
### Floating text
You can add floating text anywhere in your app, provided it does not cover the
Google attribution. The Navigation SDK doesn't support anchoring the text
to a latitude/longitude on the map, or to a label. Go to [Info
windows](https://developers.google.com/maps/documentation/android-sdk/infowindows) for more
information.
### Display the speed limit
You can programmatically show or hide the speed limit icon. Use
[`NavigationView.setSpeedLimitIconEnabled()`](https://developers.google.com/maps/documentation/navigation/android-sdk/reference/com/google/android/libraries/navigation/NavigationView#setSpeedLimitIconEnabled(boolean))
or
[`NavigationFragment.setSpeedLimitIconEnabled()`](https://developers.google.com/maps/documentation/navigation/android-sdk/reference/com/google/android/libraries/navigation/NavigationFragment#setSpeedLimitIconEnabled(boolean))
to display or hide the speed limit icon. When enabled, the speed limit icon
displays in a bottom corner during guidance. The icon displays the speed limit
of the road that the vehicle is traveling on. The icon only appears in locations
where reliable speed limit data is available.
// Display the Speed Limit icon
mNavFragment.setSpeedLimitIconEnabled(true);
The speed limit icon is temporarily hidden when the recenter button is
displayed.
> [!NOTE]
> **Note:** Users must follow all posted signs on the road. Data posted in the speed limit icon serves only as a reference. The accuracy of speed limit data cannot be guaranteed. You may report inaccuracies in our speed limit data by filing a case in the [Google Cloud Support page](https://console.cloud.google.com/google/maps-apis/support).
### Set night mode
You can programmatically control the behavior of night mode. Use
[`NavigationView.setForceNightMode()`](https://developers.google.com/maps/documentation/navigation/android-sdk/reference/com/google/android/libraries/navigation/NavigationView#setForceNightMode(int))
or
[`NavigationFragment.setForceNightMode()`](https://developers.google.com/maps/documentation/navigation/android-sdk/reference/com/google/android/libraries/navigation/NavigationFragment#setForceNightMode(int))
to turn night mode on or off, or let the Navigation SDK for Android
control it.
- `AUTO` Lets the Navigation SDK determine the appropriate mode according to the device location and local time.
- `FORCE_NIGHT` forces night mode on.
- `FORCE_DAY` forces day mode on.
The following example shows forcing night mode to turn on within a navigation
fragment:
// Force night mode on.
mNavFragment.setForceNightMode(FORCE_NIGHT);
### Display directions list
First, create the view and add it to your hierarchy.
void setupDirectionsListView() {
// Create the view.
DirectionsListView directionsListView = new DirectionsListView(getApplicationContext());
// Add the view to your view hierarchy.
ViewGroup group = findViewById(R.id.directions_view);
group.addView(directionsListView);
// Add a button to your layout to close the directions list view.
ImageButton button = findViewById(R.id.close_directions_button); // this button is part of the container we hide in the next line.
button.setOnClickListener(
v -> findViewById(R.id.directions_view_container).setVisibility(View.GONE));
}
Be sure to forward lifecycle events to the `DirectionsListView` just like they
are with `NavigationView`. For example:
protected void onResume() {
super.onResume();
directionsListView.onResume();
}
### Hide alternate routes
> [!WARNING]
> **Warning:** This feature is incompatible with the shortest/fastest route feature. Using both features at the same time can produce unexpected behavior.
When the user interface becomes cluttered with too much information, you can
reduce clutter by displaying fewer alternate routes than the default (two), or
by displaying no alternate routes at all. You can configure this option before
you fetch the routes by calling the `RoutingOptions.alternateRoutesStrategy()`
method with one of the following enumeration values:
| Enumeration Value | Description |
|---|---|
| AlternateRoutesStrategy.SHOW_ALL | Default. Displays up to two alternate routes. |
| AlternateRoutesStrategy.SHOW_ONE | Displays one alternate route (if one is available). |
| AlternateRoutesStrategy.SHOW_NONE | Hides alternate routes. |
The following code example demonstrates how to hide alternate routes altogether.
RoutingOptions routingOptions = new RoutingOptions();
routingOptions.alternateRoutesStrategy(AlternateRoutesStrategy.SHOW_NONE);
navigator.setDestinations(destinations, routingOptions, displayOptions);
### Trip progress bar
> [!WARNING]
> [Experimental](https://developers.google.com/maps/launch-stages) feature
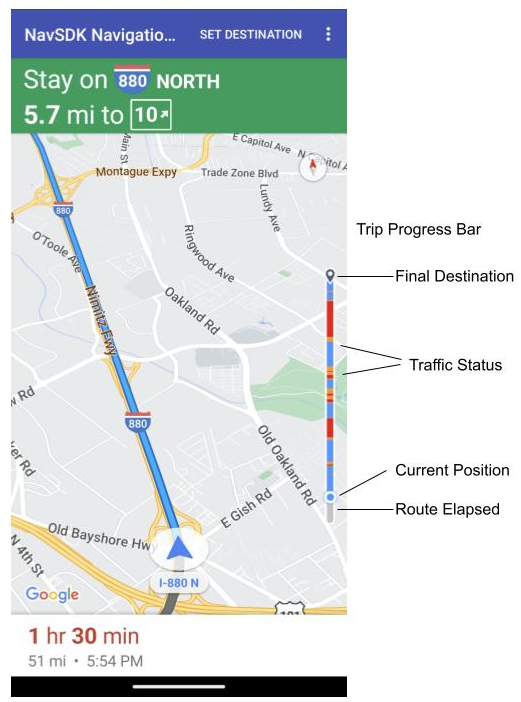
The trip progress bar is a vertical bar that appears on the start/leading side
of the map when navigation starts. When enabled, it displays an overview for an
entire trip, along with the user's destination and current position.
This lets users anticipate any upcoming issues, such as traffic, without
needing to zoom in. They can then reroute the trip if necessary. If the user
reroutes the trip, the progress bar resets as if a new trip has started from that
point.
The trip progress bar displays the following status indicators:
- **Route elapsed**---the elapsed portion of the trip.
- **Current position**---the user's current location in the trip.
- **Traffic status**---the status of upcoming traffic.
- **Final destination**---the final trip destination.
Enable the trip progress bar by calling the `setTripProgressBarEnabled()` method
on
[NavigationView](https://developers.google.com/maps/documentation/navigation/android-sdk/reference/com/google/android/libraries/navigation/NavigationView#setTripProgressBarEnabled(boolean))
or
[NavigationFragment](https://developers.google.com/maps/documentation/navigation/android-sdk/reference/com/google/android/libraries/navigation/NavigationFragment#setTripProgressBarEnabled(boolean)).
For example:
// Enable the trip progress bar.
mNavFragment.setTripProgressBarEnabled(true);
### Trip progress bar positioning
- The left side of the bar roughly aligns with the left of the speedometer, Google logo, and Re-center button (when visible). The width is 12 dp.
- The trip progress bar maintains a static height. In order to adapt to vertical space limitations in smaller devices, the visibility and height of the trip progress bar adapts based on specified breakpoints in screen height. These breakpoints are independent of device orientation and how much space the map actually takes up on the screen:
| Screen height | Trip progress bar visibility | Trip progress bar height | Trip progress bar y-axis position |
|---|---|---|---|
| Small: 0 dp - 551 dp | Not visible | N/A | N/A |
| Medium: 552 dp - 739 dp | Visible | 130 dp | Above start side controls (speedometer / Google logo / Re-center button) |
| Large: 740 dp and above | Visible | 290 dp | Above start side controls (speedometer / Google logo / Re-center button) |
> [!NOTE]
> **Note:** The screen height values shown in the table above apply to Navigation SDK versions 6.2.1 and higher. For version 6.2.0, small screens are defined as 0 dp - 519 dp, medium screens as 520 dp - 599 dp, and large screens as 600 dp and above. Trip progress bar visibility, height, and y-axis position are the same.
- If the trip progress bar overlaps with the turn card or other Navigation UI elements, it appears under those other elements.
### Compass
The Navigation SDK provides a compass graphic which appears in the top right
corner of the map under certain circumstances and only when enabled. When the
user clicks on the compass, the camera animates back to a position with a
bearing of zero (the default orientation) and the compass fades away shortly
after.
If navigation is enabled and the camera mode is set to "following," the compass
remains visible and tapping the compass toggles between tilted and overview
camera perspectives.
To avoid driver distraction, the compass remains in the same position if the
header (in portrait mode) expands and conflicts with the default position of the
compass. If you add a secondary header custom control or header accessory view,
the compass is hidden to avoid UI conflicts.
The compass supports day and night modes, as well as dark mode.
The compass is enabled by default. You can set whether the compass is enabled
using the
[`compassEnabled`](https://developers.google.com/maps/documentation/navigation/android-sdk/reference/com/google/android/gms/maps/GoogleMapOptions#public-googlemapoptions-compassenabled-boolean-enabled)
method on the `GoogleMapOptions` class.
### Turn off 3D buildings
For performance-constrained devices, you can turn off the display of 3D
buildings by calling
[`GoogleMap.setBuildingsEnabled(false)`](https://developers.google.com/maps/documentation/android-sdk/reference/com/google/android/libraries/maps/GoogleMap#setBuildingsEnabled(boolean)).
### Prompt Visibility API (Experimental)
> [!WARNING]
> [Experimental](https://developers.google.com/maps/launch-stages) feature
The Prompt Visibility API lets you avoid conflicts between UI elements generated
by the Navigation SDK and your own custom UI elements by adding a listener to
receive a callback before a Navigation SDK UI element is about to appear and as
soon as the element is removed. For more information, including code samples,
see the [Prompt Visibility
API](https://developers.google.com/maps/documentation/navigation/android-sdk/real-time-disruptions#prompt-visibility-api)
section of the *Configure real-time-disruptions* page.