Registering as a developer is a mandatory, one-time setup process that links
your Google Cloud project to your Merchant Center account, and
registers your developer contact information with Google. This lets Google send
critical service announcements and mandatory updates to the relevant technical
contacts that you provide.
This document is part of a multi-part series about getting started with
Merchant API. If you already have registered with Merchant API, you
can skip to the next section:
[Insert your first product](https://developers.google.com/merchant/api/guides/quickstart/insert-first-product)
## Prerequisites
Before you register to use the Merchant API, ensure you meet the following
requirements:
- **Merchant Center Account** : You need an existing Merchant Center account. **Registration is only supported for production accounts.** [Test accounts](https://developers.google.com/merchant/api/guides/accounts/test-accounts) are not eligible for developer registration.
- **Verified homepage** : Your Merchant Center account must have a [verified website](https://support.google.com/merchants/answer/11586344). This proves ownership of the domain associated with your business.
- **Admin Access on the Merchant Center account** : The email or service account you use to authorize the registration call must have `ADMIN` access type in the Merchant Center account you are registering to. For more information, see [Authorizing requests to Merchant API](https://developers.google.com/merchant/api/guides/quickstart/authentication).
- **Google Cloud project ID** : Your application must be associated with a dedicated Google Cloud project to provide credentials for authentication. For details about where to find the project ID, see [Find the project name, number, and ID](https://docs.cloud.google.com/resource-manager/docs/creating-managing-projects#identifying_projects).
- A **valid email address associated with a Google account** that you provide as the developer point of contact for updates from Google. Must not be a service account email. You can use an email address that is already part of the Merchant Center account or a new one.
## Register as a developer with Merchant API
To use the Merchant API, you **must** register your developer contact
information and Google Cloud project with your Merchant Center
account through the [registerGcp](https://developers.google.com/merchant/api/reference/rest/accounts_v1/accounts.developerRegistration/registerGcp) method.
Whether you are working with multiple merchant accounts or not, you **perform
the registration operation once for each Google Cloud project you
intend to use** . If you are working with **multiple Google Cloud
projects** , you can register **any or all** of them to the same
Merchant Center Account.
### Registration benefits
Registration provides the following benefits:
- **Technical contact creation**: It creates a technical contact in Merchant Center. Google sends important API-specific updates to the technical contact, such as service announcements and new features information.
- **Multiple merchant account management**: It lets you represent the developer point of contact for all the merchant accounts you manage.
Except registration, any calls to Merchant API from an unregistered
Google Cloud project are blocked, returning a `401` error code with
status `UNAUTHENTICATED` and the following error message:
GCP project with id {GCP_ID} and number {GCP_NUMBER} is not registered with the merchant account.
Follow these steps https://developers.google.com/merchant/api/guides/quickstart#register_as_a_developer
to register the GCP project with the merchant account then try calling the API again in 5 minutes.
### Important considerations
- **One-time setup for each Google Cloud project**: Registration is a one-time setup for each Google Cloud project, and it applies to all users and service accounts within the Google Cloud project. Make sure that Merchant API is enabled in your Google Cloud project.
- **Each Google Cloud project can only be registered with a single
Merchant Center account at any given time** : If you try to register one Google Cloud project with multiple Merchant Center accounts simultaneously, you receive an `ALREADY_REGISTERED` error. Use the same developer email address for registration. Note that multiple Google Cloud projects can be registered to the same Merchant Center Account. For instructions on changing or rotating your registered Google Cloud project, see [Manage and transition Google Cloud projects](https://developers.google.com/merchant/api/guides/accounts/manage-transition-gcp-projects).
- **Designate the correct account for Third Parties (3Ps) Managing Multiple
Merchants:** To ensure long-term stability and avoid service disruptions,
third parties that represent or manage multiple merchants need
to use the appropriate account structure within the Google ecosystem. We
recommend that you register the account that represents your business
identity, depending on your business type:
- **Marketplaces with an existing advanced account:** If your business operates as a marketplace and already has an [advanced account](https://support.google.com/merchants/answer/14089347?sjid=6263895272024855622-EU) representing the entire platform, you should use this existing account ID.
- **Comparison Shopping Services (CSS):** If you are a CSS, you should use your unique CSS account ID or CSS group account ID.
- **Agencies, Developers, and other 3Ps:** If you are a 3P business such as agency or third-party developer manages multiple merchant accounts and lack a single Merchant Center ID representing your business, you should create a new, primary Merchant Center Account and request converting it to an [advanced account](https://support.google.com/merchants/answer/14089347?sjid=6263895272024855622-EU). Advanced accounts can manage subaccounts and provide the necessary structure for 3P operations.
The following table provides recommendations for different partner types:
| Partner Type | Recommended Account to Register |
|---|---|
| **Marketplaces** | Your main (or biggest) advanced account. |
| **Advertising Agencies** | A standalone account or an advanced account representing your company. If you are just starting with Merchant API, we recommend to create a standalone account. |
| **Comparison Shopping Services (CSS)** | Your CSS group account ID or specific CSS account ID, depending if the account represents the entire CSS group or just a specific CSS within a group. **Don't use** a CSS advanced account. |
| **Merchants or Brands** | Your main account that represents your brand. Can be standalone or advanced account. |
| **Point of Sale (POS)/Inventory data providers** | Your main (or biggest) advanced account. |
| **Other 3Ps** | If you have a Merchant Center account, you can use it for registration. Otherwise, create a company standalone account. Then [verify](https://support.google.com/merchants/answer/11586344) your website. |
- **Perform registration only for your primary Merchant Center**: You
perform developer registration using only your primary Merchant Center
account, and you become the developer contact for all the linked
Merchant Center subaccounts. Don't perform registration for each of your
Merchant Center subaccounts.
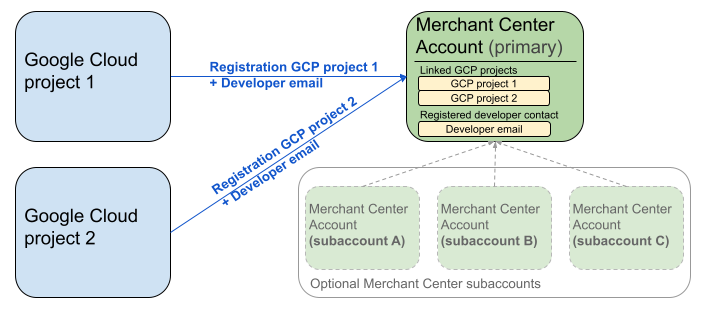
The preceding diagram shows the registration setup when using multiple Google
Cloud projects and one primary Merchant Center with optionally multiple
Merchant Center subaccounts.
- **Authentication requirement**: When performing registration, the
authenticated Merchant Center account (which is the account where your
credentials reside), must match the impersonated Merchant Center account
(which is the account you are registering). You can't register for a
subaccount if you are authenticated with a separate parent or manager account.
- **Verified website accounts only** : Registration is only permitted for
Merchant Center accounts with a [verified website](https://support.google.com/merchants/answer/11586344).
- **No registration for
[test accounts](https://developers.google.com/merchant/api/guides/accounts/test-accounts)**: You can't
perform registration for test accounts.
- **Once you register a developer email address**:
- You can perform Merchant API calls within 5 minutes of registration.
- If the email belongs to an existing Merchant Center user, they are granted the `API developer` role. Otherwise, a new user is created in the Merchant Center and they must accept an invitation within 14 days to prevent it from expiring and from having to restart the registration process. You complete the registration process only after the user clicked the invitation link.
## Make the registration call
You register by calling the [registerGcp](https://developers.google.com/merchant/api/reference/rest/accounts_v1/accounts.developerRegistration/registerGcp) method. You have two
options of making the registration call:
- **Option 1: Direct API calls** You make raw requests to the API endpoints directly, typically over HTTP(S). You manually handle aspects like forming the request body, setting headers (including authentication), and parsing the response.
- **Option 2: Client libraries** You use the prebuilt libraries that offer a more convenient, language-idiomatic way to interact with the Merchant API. They handle authentication and authorization, and offer a convenient way of abstracting away the underlying HTTP communication. Official [code
samples](https://developers.google.com/merchant/api/samples) are available to get you started quickly.
### Authorization for the registration call
As described in the [Authorizing requests to Merchant API](https://developers.google.com/merchant/api/guides/quickstart/authentication) step, you have two
distinct authentication scenarios:
- **OAuth 2.0**: for third-party providers or agencies managing multiple merchant accounts
- **Service Accounts**: for access to your own Merchant Center account
For more information about the authorization of the registration call, see [How
do I perform authentication and authorization for the registration call?](https://developers.google.com/merchant/api/guides/quickstart/faq#how_do_i_perform_authentication_and_authorization_for_the_registration_call)
### Registration call
In the following examples, you perform the registration call using direct api
calls or client libraries.
You perform the registration call using the
[registerGcp](https://developers.google.com/merchant/api/reference/rest/accounts_v1/accounts.developerRegistration/registerGcp) method.
POST https://merchantapi.googleapis.com/accounts/v1/accounts/{ACCOUNT_ID}/developerRegistration:registerGcp
Content-Type: application/json
Authorization: Bearer {ACCESS_TOKEN}"
{
"developerEmail": "{DEVELOPER_EMAIL}"
}
Replace the following:
- `ACCOUNT_ID`: your Merchant Center ID
- `ACCESS_TOKEN`: the authorization token to make the API Call
- `DEVELOPER_EMAIL`: the email address of the primary technical contact
> [!NOTE]
> **Note:** The `developerEmail` field is optional. If you don't provide a value for this field, the [registerGcp](https://developers.google.com/merchant/api/reference/rest/accounts_v1/accounts.developerRegistration/registerGcp) call just links your Google Cloud project with your Merchant Center Account.
A successful call returns a [DeveloperRegistration](https://developers.google.com/merchant/api/reference/rest/accounts_v1/DeveloperRegistration) resource,
confirming the successful linking status:
"name": "accounts/{ACCOUNT_ID}/developerRegistration",
"gcpIds": ["{GOOGLE_CLOUD_PROJECT_ID}"]
### Python
Download the samples and follow the guidance from the
[Google Merchant API Python Samples](https://github.com/google/merchant-api-samples/tree/main/python#prerequisites)
to set up the python client libraries.
from examples.authentication import configuration
from examples.authentication import generate_user_credentials
from google.shopping.merchant_accounts_v1 import DeveloperRegistration
from google.shopping.merchant_accounts_v1 import DeveloperRegistrationServiceClient
from google.shopping.merchant_accounts_v1 import RegisterGcpRequest
def register_gcp(
account_id: str, developer_email: str
) -> DeveloperRegistration:
"""Registers the GCP project used to call the Merchant API with a developer email.
Args:
account_id: The ID of your Merchant Center account.
developer_email: The email address of the developer to register.
Returns:
The created or updated DeveloperRegistration object.
"""
# Get OAuth credentials.
credentials = generate_user_credentials.main()
# Create a client to the Developer Registration Service.
client = DeveloperRegistrationServiceClient(credentials=credentials)
# The name has the format: accounts/{account}/developerRegistration
name = f"accounts/{account_id}/developerRegistration"
# Create the request to register the GCP project.
request = RegisterGcpRequest(
name=name,
developer_email=developer_email,
)
# Make the API call and handle potential errors.
try:
print("Sending RegisterGcp request:")
response = client.register_gcp(request=request)
print("Registered GCP project successfully:")
print(response)
return response
except RuntimeError as e:
print(f"An error occurred: {e}")
raise
if __name__ == "__main__":
# Your Merchant Center account ID.
# This can be found in the Merchant Center UI.
_account_id = configuration.Configuration().read_merchant_info()
# The developer email to associate with the GCP project.
_developer_email = "YOUR_EMAIL_HERE"
register_gcp(_account_id, _developer_email)
### Java
Download the samples and follow the guidance from
[Google Merchant API Java Samples](https://github.com/google/merchant-api-samples/java/README.md)
to set up the java client libraries.
import com.google.api.gax.core.FixedCredentialsProvider;
import com.google.auth.oauth2.GoogleCredentials;
import com.google.shopping.merchant.accounts.v1.DeveloperRegistration;
import com.google.shopping.merchant.accounts.v1.DeveloperRegistrationName;
import com.google.shopping.merchant.accounts.v1.DeveloperRegistrationServiceClient;
import com.google.shopping.merchant.accounts.v1.DeveloperRegistrationServiceSettings;
import com.google.shopping.merchant.accounts.v1.RegisterGcpRequest;
import shopping.merchant.samples.utils.Authenticator;
import shopping.merchant.samples.utils.Config;
/**
* This class demonstrates how to register the GCP project used to call the Merchant API with a
* developer email.
*/
public class RegisterGcpSample {
public static DeveloperRegistration registerGcp(Config config, String developerEmail) throws Exception {
// Obtains OAuth token based on the user's configuration.
GoogleCredentials credential = new Authenticator().authenticate();
// Creates service settings using the credentials retrieved above.
DeveloperRegistrationServiceSettings developerRegistrationServiceSettings =
DeveloperRegistrationServiceSettings.newBuilder()
.setCredentialsProvider(FixedCredentialsProvider.create(credential))
.build();
// Creates DeveloperRegistration name to identify the DeveloperRegistration.
// The name has the format: accounts/{account}/developerRegistration
String name =
DeveloperRegistrationName.newBuilder()
.setAccount(config.getAccountId().toString())
.build()
.toString();
// Calls the API and propagates any network failures/errors.
try (DeveloperRegistrationServiceClient developerRegistrationServiceClient =
DeveloperRegistrationServiceClient.create(developerRegistrationServiceSettings)) {
// Creates a request to register the GCP project with the developer email.
RegisterGcpRequest request =
RegisterGcpRequest.newBuilder().setName(name).setDeveloperEmail(developerEmail).build();
System.out.println("Sending RegisterGcp request:");
DeveloperRegistration response = developerRegistrationServiceClient.registerGcp(request);
System.out.println(response);
return response;
}
}
public static void main(String[] args) throws Exception {
Config config = Config.load();
String developerEmail = "YOUR_EMAIL_HERE"; // Replace with your email
registerGcp(config, developerEmail);
}
}
### PHP
Download the samples and follow the guidance from the
[Google Merchant API PHP Samples](https://github.com/google/merchant-api-samples/php/README.md)
to set up the php client libraries.
require_once __DIR__ . '/../../../../vendor/autoload.php';
require_once __DIR__ . '/../../../Authentication/Authentication.php';
require_once __DIR__ . '/../../../Authentication/Config.php';
use Google\ApiCore\ApiException;
use Google\Shopping\Merchant\Accounts\V1\Client\DeveloperRegistrationServiceClient;
use Google\Shopping\Merchant\Accounts\V1\RegisterGcpRequest;
/**
* This class demonstrates how to register the GCP project used to call the
* Merchant API with a developer email.
*/
class RegisterGcpSample
{
/**
* A helper function to create the name string for the
* DeveloperRegistration.
*
* @param string $accountId The merchant account ID.
* @return string The name, which has the format:
* `accounts/{account}/developerRegistration`
*/
private static function getName(string $accountId): string
{
return sprintf("accounts/%s/developerRegistration", $accountId);
}
/**
* Registers the GCP project with a developer email.
*
* @param array $config The configuration data for authentication and account ID.
* @param string $developerEmail The email of the developer to register.
*/
public static function registerGcpSample(array $config, string $developerEmail): void
{
// Obtains OAuth credentials from the configuration file.
$credentials = Authentication::useServiceAccountOrTokenFile();
// Creates a configuration object for the client.
$options = ['credentials' => $credentials];
// Creates the DeveloperRegistrationServiceClient.
$developerRegistrationServiceClient = new DeveloperRegistrationServiceClient($options);
// Creates the name of the developer registration to identify it.
$name = self::getName($config['accountId']);
// Calls the API and handles any network failures.
try {
// Creates a request to register the GCP project with the developer email.
$request = new RegisterGcpRequest([
'name' => $name,
'developer_email' => $developerEmail
]);
printf("Sending RegisterGcp request:%s", PHP_EOL);
// The `registerGcp` method returns a `DeveloperRegistration` object
// upon success.
$response = $developerRegistrationServiceClient->registerGcp($request);
print "Successfully registered developer email '$developerEmail' for account {$config['accountId']}.\n";
print_r($response);
} catch (ApiException $e) {
printf("An error occurred: %s%s", $e->getMessage(), PHP_EOL);
}
}
/**
* Helper to execute the sample.
*/
public function callSample(): void
{
$config = Config::generateConfig();
// An email address for a developer to register for the API.
$developerEmail = 'YOUR_EMAIL_HERE'; // Replace with your email
self::registerGcpSample($config, $developerEmail);
}
}
// Executes the sample.
$sample = new RegisterGcpSample();
$sample->callSample();
### cURL
curl -X POST "https://merchantapi.googleapis.com/accounts/v1/accounts/{ACCOUNT_ID}/developerRegistration:registerGcp" \
-H "Content-Type: application/json" \
-H "Authorization: Bearer {ACCESS_TOKEN}" \
-d '{
"developerEmail": "{DEVELOPER_EMAIL}"
}'
To complete the registration, you must make sure that at least one user in
Merchant Center has the `API developer` role. To achieve this, you can
perform one of the following operations:
- Provide the `developerEmail` to the `registerGcp` method.
- Add a new user that has the `API developer` role in the Merchant Center UI.
- Assign the `API developer` role to an existing user in the Merchant Center UI.
- Call the [`accounts.users.create`](https://developers.google.com/merchant/api/reference/rest/accounts_v1/accounts.users/create) method to create a new user and assign it the `API developer` role.
- Assign the `API developer` role to an existing user using the [`accounts.users.patch`](https://developers.google.com/merchant/api/reference/rest/accounts_v1/accounts.users/patch) method.
## Best Practices after registration
To benefit from robust access management and prevent future service disruptions,
we recommend you follow a set of best practices after you\`ve completed the
initial registration:
### Grant additional permissions to the `API developer`
When you register a developer contact, they are automatically assigned the
`API developer` role. This role does not include other permissions necessary
for managing the Merchant Center account or making all API calls. We
recommend adding the `ADMIN` or `STANDARD` roles to your developers to provide
comprehensive access.
> [!NOTE]
> **Note:** Review and adjust the access rights for your developer users as needed to align with your internal policies.
To modify a user's access rights, use the [accounts.users.patch](https://developers.google.com/merchant/api/reference/rest/accounts_v1/accounts.users/patch)
method. You specify access rights in the updateMask field of the request body to
add or remove roles:
PATCH https://merchantapi.googleapis.com/accounts/v1/{ACCOUNT_ID}/users/{DEVELOPER_EMAIL}?update_mask=access_rights
Content-Type: application/json
Authorization: Bearer {ACCESS_TOKEN}"
{
"name": "accounts/{ACCOUNT_ID}/users/{DEVELOPER_EMAIL}",
"access_rights": [ "ADMIN", "API_DEVELOPER" ]
}
### Python
from examples.authentication import configuration
from examples.authentication import generate_user_credentials
from google.protobuf import field_mask_pb2
from google.shopping.merchant_accounts_v1 import AccessRight
from google.shopping.merchant_accounts_v1 import UpdateUserRequest
from google.shopping.merchant_accounts_v1 import User
from google.shopping.merchant_accounts_v1 import UserServiceClient
FieldMask = field_mask_pb2.FieldMask
_ACCOUNT = configuration.Configuration().read_merchant_info()
def update_user(user_email, user_access_right):
"""Updates a user to make it an admin of the MC account."""
credentials = generate_user_credentials.main()
client = UserServiceClient(credentials=credentials)
# Create user name string
name = "accounts/" + _ACCOUNT + "/users/" + user_email
user = User(name=name, access_rights=[user_access_right])
field_mask = FieldMask(paths=["access_rights"])
try:
request = UpdateUserRequest(user=user, update_mask=field_mask)
print("Sending Update User request")
response = client.update_user(request=request)
print("Updated User Name below")
print(response.name)
except RuntimeError as e:
print(e)
if __name__ == "__main__":
# Modify this email to update the right user
email = "USER_MAIL_ACCOUNT"
access_right = AccessRight.ADMIN
update_user(email, access_right)
### Java
import com.google.api.gax.core.FixedCredentialsProvider;
import com.google.auth.oauth2.GoogleCredentials;
import com.google.protobuf.FieldMask;
import com.google.shopping.merchant.accounts.v1.AccessRight;
import com.google.shopping.merchant.accounts.v1.UpdateUserRequest;
import com.google.shopping.merchant.accounts.v1.User;
import com.google.shopping.merchant.accounts.v1.UserName;
import com.google.shopping.merchant.accounts.v1.UserServiceClient;
import com.google.shopping.merchant.accounts.v1.UserServiceSettings;
import shopping.merchant.samples.utils.Authenticator;
import shopping.merchant.samples.utils.Config;
/** This class demonstrates how to update a user to make it an admin of the MC account. */
public class UpdateUserSample {
public static void updateUser(Config config, String email, AccessRight accessRight)
throws Exception {
GoogleCredentials credential = new Authenticator().authenticate();
UserServiceSettings userServiceSettings =
UserServiceSettings.newBuilder()
.setCredentialsProvider(FixedCredentialsProvider.create(credential))
.build();
// Creates user name to identify user.
String name =
UserName.newBuilder()
.setAccount(config.getAccountId().toString())
.setEmail(email)
.build()
.toString();
// Create a user with the updated fields.
User user = User.newBuilder().setName(name).addAccessRights(accessRight).build();
FieldMask fieldMask = FieldMask.newBuilder().addPaths("access_rights").build();
try (UserServiceClient userServiceClient = UserServiceClient.create(userServiceSettings)) {
UpdateUserRequest request =
UpdateUserRequest.newBuilder().setUser(user).setUpdateMask(fieldMask).build();
System.out.println("Sending Update User request");
User response = userServiceClient.updateUser(request);
System.out.println("Updated User Name below");
System.out.println(response.getName());
} catch (Exception e) {
System.out.println(e);
}
}
public static void main(String[] args) throws Exception {
Config config = Config.load();
String email = "testUser@gmail.com";
// Give the user admin rights. Note that all other rights, like
// PERFORMANCE_REPORTING, would be overwritten in this example
// if the user had those access rights before the update.
AccessRight accessRight = AccessRight.ADMIN;
updateUser(config, email, accessRight);
}
}
### PHP
use Google\ApiCore\ApiException;
use Google\Protobuf\FieldMask;
use Google\Shopping\Merchant\Accounts\V1\AccessRight;
use Google\Shopping\Merchant\Accounts\V1\UpdateUserRequest;
use Google\Shopping\Merchant\Accounts\V1\User;
use Google\Shopping\Merchant\Accounts\V1\Client\UserServiceClient;
/**
* Updates a user.
*
* @param array $config The configuration data.
* @param string $email The email address of the user.
* @param int $accessRight The access right to grant the user.
* @return void
*/
function updateUser($config, $email, $accessRights): void
{
// Gets the OAuth credentials to make the request.
$credentials = Authentication::useServiceAccountOrTokenFile();
// Creates options config containing credentials for the client to use.
$options = ['credentials' => $credentials];
// Creates a client.
$userServiceClient = new UserServiceClient($options);
// Creates user name to identify user.
$name = 'accounts/' . $config['accountId'] . "/users/" . $email;
$user = (new User())
->setName($name)
->setAccessRights($accessRights);
$fieldMask = (new FieldMask())->setPaths(['access_rights']);
// Calls the API and catches and prints any network failures/errors.
try {
$request = new UpdateUserRequest([
'user' => $user,
'update_mask' => $fieldMask,
]);
print "Sending Update User request\n";
$response = $userServiceClient->updateUser($request);
print "Updated User Name below\n";
print $response->getName() . "\n";
} catch (ApiException $e) {
print $e->getMessage();
}
}
$config = Config::generateConfig();
$email = "testUser@gmail.com";
$accessRights = [AccessRight::ADMIN];
updateUser($config, $email, $accessRights);
### cURL
curl -X PATCH \
"https://merchantapi.googleapis.com/accounts/v1/{ACCOUNT_ID}/users/{USER_EMAIL}?update_mask=access_rights" \
-H "Content-Type: application/json" \
-H "Authorization: Bearer {ACCESS_TOKEN}" \
-d '{
"access_rights": [
"ADMIN",
"API_DEVELOPER"
]
}'
> [!NOTE]
> **Note:** The `API developer` role is only visible in the Merchant Center UI after the developer registration is performed for the given Merchant Center account. Merchant Center accounts without registrations don't see the `API developer` role.
### Add more developer contacts
To avoid business disruption if the primary developer contact leaves or loses
access, it is critical to have redundant contacts. We recommend having at least
one additional user with the `API developer` role in Merchant Center to
serve as backup.
> [!CAUTION]
> **Caution:** If you remove all users with the `API developer` role from your Merchant Center account, your API calls will be blocked after a 30-day grace period. During this period, account admins receive email warnings.
You can add a user or update an existing one with the
[**accounts.users**](https://developers.google.com/merchant/api/reference/rest/accounts_v1/accounts.users) service in the Merchant API or the **Access and
services** page in the Merchant Center UI. By proactively adding backup
developers, you create a more resilient integration that is not dependent on a
single individual.
PATCH https://merchantapi.googleapis.com/products/v1/accounts/{ACCOUNT_ID}/users
Content-Type: application/json
Authorization: Bearer {ACCESS_TOKEN}"
{
"user_id": {USER_EMAIL},
"user": { "access_rights": [ "API_DEVELOPER", "ADMIN" ] }
}
### Python
from examples.authentication import configuration
from examples.authentication import generate_user_credentials
from google.shopping.merchant_accounts_v1 import AccessRight
from google.shopping.merchant_accounts_v1 import CreateUserRequest
from google.shopping.merchant_accounts_v1 import User
from google.shopping.merchant_accounts_v1 import UserServiceClient
_ACCOUNT = configuration.Configuration().read_merchant_info()
def get_parent(account_id):
return f"accounts/{account_id}"
def create_user(user_email):
"""Creates a user for a Merchant Center account."""
# Get OAuth credentials
credentials = generate_user_credentials.main()
# Create a UserServiceClient
client = UserServiceClient(credentials=credentials)
# Create parent string
parent = get_parent(_ACCOUNT)
# Create the request
request = CreateUserRequest(
parent=parent,
user_id=user_email,
user=User(
access_rights=[AccessRight.ADMIN, AccessRight.PERFORMANCE_REPORTING]
),
)
try:
print("Sending Create User request")
response = client.create_user(request=request)
print("Inserted User Name below")
print(response.name)
except RuntimeError as e:
print(e)
if __name__ == "__main__":
# Modify this email to create a new user
email = "USER_MAIL_ACCOUNT"
create_user(email)
### Java
import com.google.api.gax.core.FixedCredentialsProvider;
import com.google.auth.oauth2.GoogleCredentials;
import com.google.shopping.merchant.accounts.v1.AccessRight;
import com.google.shopping.merchant.accounts.v1.CreateUserRequest;
import com.google.shopping.merchant.accounts.v1.User;
import com.google.shopping.merchant.accounts.v1.UserServiceClient;
import com.google.shopping.merchant.accounts.v1.UserServiceSettings;
import shopping.merchant.samples.utils.Authenticator;
import shopping.merchant.samples.utils.Config;
/** This class demonstrates how to create a user for a Merchant Center account. */
public class CreateUserSample {
private static String getParent(String accountId) {
return String.format("accounts/%s", accountId);
}
public static void createUser(Config config, String email) throws Exception {
// Obtains OAuth token based on the user's configuration.
GoogleCredentials credential = new Authenticator().authenticate();
// Creates service settings using the credentials retrieved above.
UserServiceSettings userServiceSettings =
UserServiceSettings.newBuilder()
.setCredentialsProvider(FixedCredentialsProvider.create(credential))
.build();
// Creates parent to identify where to insert the user.
String parent = getParent(config.getAccountId().toString());
// Calls the API and catches and prints any network failures/errors.
try (UserServiceClient userServiceClient = UserServiceClient.create(userServiceSettings)) {
CreateUserRequest request =
CreateUserRequest.newBuilder()
.setParent(parent)
// This field is the email address of the user.
.setUserId(email)
.setUser(
User.newBuilder()
.addAccessRights(AccessRight.ADMIN)
.addAccessRights(AccessRight.PERFORMANCE_REPORTING)
.build())
.build();
System.out.println("Sending Create User request");
User response = userServiceClient.createUser(request);
System.out.println("Inserted User Name below");
// The last part of the user name will be the email address of the user.
// Format: `accounts/{account}/user/{user}`
System.out.println(response.getName());
} catch (Exception e) {
System.out.println(e);
}
}
public static void main(String[] args) throws Exception {
Config config = Config.load();
// The email address of this user.
String email = "testUser@gmail.com";
createUser(config, email);
}
}
### PHP
use Google\ApiCore\ApiException;
use Google\Shopping\Merchant\Accounts\V1\AccessRight;
use Google\Shopping\Merchant\Accounts\V1\CreateUserRequest;
use Google\Shopping\Merchant\Accounts\V1\User;
use Google\Shopping\Merchant\Accounts\V1\Client\UserServiceClient;
/**
* Creates a user.
*
* @param array $config The configuration data.
* @param string $email The email address of the user.
* @return void
*/
function createUser($config, $email): void
{
// Gets the OAuth credentials to make the request.
$credentials = Authentication::useServiceAccountOrTokenFile();
// Creates options config containing credentials for the client to use.
$options = ['credentials' => $credentials];
// Creates a client.
$userServiceClient = new UserServiceClient($options);
// Creates parent to identify where to insert the user.
$parent = sprintf("accounts/%s", $config['accountId']);
// Calls the API and catches and prints any network failures/errors.
try {
$request = new CreateUserRequest([
'parent' => $parent,
'user_id' => $email,
'user' => (new User())
->setAccessRights([AccessRight::ADMIN,AccessRight::PERFORMANCE_REPORTING])
]);
print "Sending Create User request\n";
$response = $userServiceClient->createUser($request);
print "Inserted User Name below\n";
print $response->getName() . "\n";
} catch (ApiException $e) {
print $e->getMessage();
}
}
$config = Config::generateConfig();
$email = "testUser@gmail.com";
createUser($config, $email);
### cURL
curl -X PATCH \
"https://merchantapi.googleapis.com/products/v1/accounts/{ACCOUNT_ID}/users/{USER_EMAIL}?update_mask=access_rights" \
-H "Content-Type: application/json" \
-H "Authorization: Bearer {ACCESS_TOKEN}" \
-d '{
"access_rights": [
"ADMIN",
"API_DEVELOPER"
]
}'