
Step 3: Google Business Profile Account & Linking
Introduction and Business Impact
If a merchant is integrating through the LFP program, they need to have a GBP. Learn more about creating one.
To run Local Inventory Ads, our system requires store information from Google Business Profile. The business profile can be linked to the merchant account and store information can then be pulled into the Merchant Center.
Utilizing the Google Business Profile API, Google Business Location & Business can be created as part of your onboarding process using existing information that is collected by the sub-account.
A merchant sub account (or the Local Feeds Partnership provider upon getting access) can use the Google Business profile UI to create the Location Group and its business at Google Locations.
If a Google Business Profile already exists for the merchant, you can link it
using Content APIs' liasettings.requestgmbaccess. Accounts can be looked
up through the following API: AccountManagement.accounts.list.
Finally, after the account has been created and linked to the merchant account, you need to login to the Merchant Center account and specify business profiles, which are GBP Business Location's. To activate through the API, you can use accounts.update with AccountGoogleMyBusinessLink filled. GBP Locations and Merchant Center Business Profiles enables the Merchant Center to know which store information it should import.
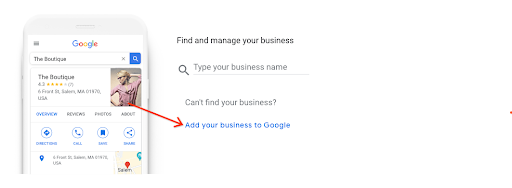
Create a Google Business Profile
Log into Google Business, if there are no businesses associated with this account, the only available option is the "Add Business" drop down. Select, "Add Business", to begin adding a merchant's business.
The business may appear in the pre-existing pick list. However, if it's not found, you can select the, "Add a merchant's business to Google" link below.
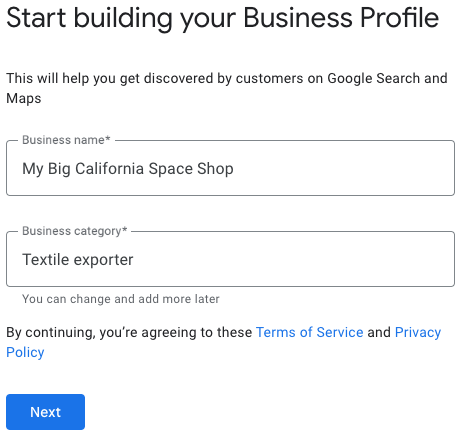
The following screen assists you with creating a new profile for your business. Enter the Business Name and the Business Category. The Business Category comes from Google's extensive list of merchant categories, select one that is best suited for your merchant's business. Select, "Next" when finished.
The following screen is important for your local inventory ads. It asks you to add a location customers can visit. This is required for business verification. Select "Yes", and Select, "Next".
The next screen requires you to enter an address for a merchant's business location. If you have multiple locations, you are able to enter each location separately after you've created a merchant's business. This is also the address that shows up in the Google Search Card.

Companies that are identified around a merchant's business may appear as possible matches. If there are no matches, then select "None of these".
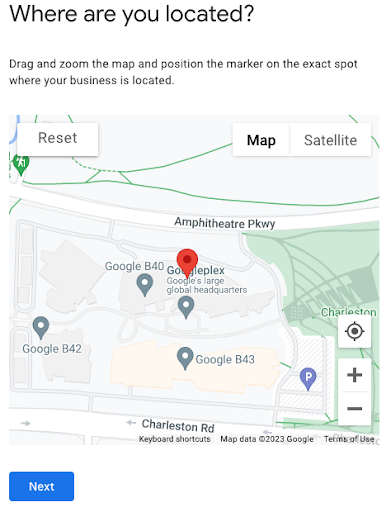
If your address is too broad, Google Business Profile may ask you to select your location on the map. When you've selected your location, Select "Next".
The next screen asks if you provide deliveries or home office visits. This can be populated later and is out of the scope for this document. For now, Select "No", then, Select "Next".
The next screen asks for adding business contact information. This is different from the verification phone number, which is collected in Step 10. For now, you can Select "Skip".
Select Yes or No, if you want updates and recommendations for the business that is registering with Google. Then, Select "Next".
If you want, enter a phone number, and select "Next". Otherwise, you can choose to Verify Later. It is important that if you select "Verify Later", this may cause issues with your local feed setup. The created business profile needs to be verified in order to be usable by the LFP integration.
In the following screen, you are asked to "Add business hours", similar to previous steps, this is out of scope, and it can be performed later. Select "Skip".
For "Add Messaging", similar to previous steps, this is out of scope, and it can be performed later. Select "Skip".
You may enter a business description, but it is out-of-scope for the Local Feed Provider & Local Inventory Ads Setup. It can be populated later. Select "Skip".
You may add photos of a merchant's business, but it is out-of-scope for the Local Feed Provider & Local Inventory Ads Setup. It can be populated later. Select "Skip".
If you have yet to claim your $500 free advertising credit, you can choose to do that here. Otherwise, Select "Skip".
For Exploring and Selecting Domains, it is out-of-scope for the Local Feed Provider & Local Inventory Ads Setup. Select "Skip".
The final screen lets you know that edits to a merchant's business profile is visible when you're verified. Select "Continue".
Go back to Google Locations. If a message appears about managing your business, Select "Stay here".
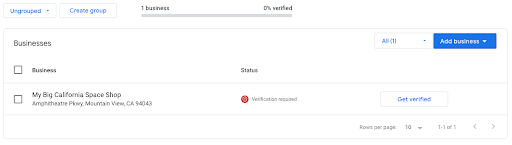
Your newly created business is going to appear on the screen. Follow these steps when convenient to fully verify a merchant's business. If you want to create a group for this or future locations, you can Select "Create Group". Otherwise, your Google Business Profile has been successfully created.
UX Guidance
Upon setting up the initial merchant account, add additional fields that could help populate some fields that are requested for Google Business Profile. For example, Store Codes, Categories, Physical StoreFront Information, such as phone numbers.
Tech Guidance
Most of these steps can be omitted using the usage of Content API and Google Business Profile API. When setting up a merchant center account, there are many elements that cross between both systems. See Table: GBP / GMC Mapping & CrossOver where values can be mapped for the creation of a GBP Business Account.
To verify the existence of eligible GBP accounts using Content API, the endpoint of
liasettings.getaccessiblegmbaccountscan be used to retrieve the list of accessible Business Profile Accounts for a specific account. This is a useful API call that can help determine if the sub account already has a business associated with it.From the Google Business Profile API perspective, you can use
accounts.listto see existing location groups and its associated businesses.If the merchant sub account doesn't contain any businesses, a business can be generated using
accounts.locations.createAPI endpoint. This object takes a location object, which at first glance may seem large, but in reality, most of the information that is required has been already collected as part of your merchant sub-account creation. You can view Table: GBP / GMC Mapping & CrossOver to see how some data points map with each other.If you want to streamline Google Business Profile API creation, it's recommended to implement
categories.listas part of your sub account creation process. This API method lists & filters Google required "Categories" that are related to the merchant's business.If a merchant has an existing GBP account, and you want to add an additional location, then call
accounts.list, then create a newaccounts.locations.
Link Google Business Profile to Merchant Center
When the GBP account is created, you can link the two accounts together using two different methods: UI or API. Furthermore, if the Google Merchant Center and Google Business Profile owners are different, there's also caveats involved. For example, if the email address is configured as administrator on both Google Merchant Center and the Business Profile Account, the linkage is automatically approved. The following section describes how to link a Google Business Profile Account and Merchant Center Account using the UI. For details on how to accomplish this using the API, review the following Tech API Guidance section.
Request Link through UI
Login to the Merchant Center for the newly created sub account for the merchant and select the gear at the top right. Then, select "Linked Accounts".
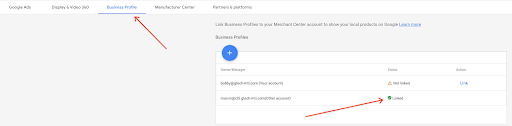
Along the banner, there's several tabs across the top. Select the "Business Profile" tab, then select the add sign (+).
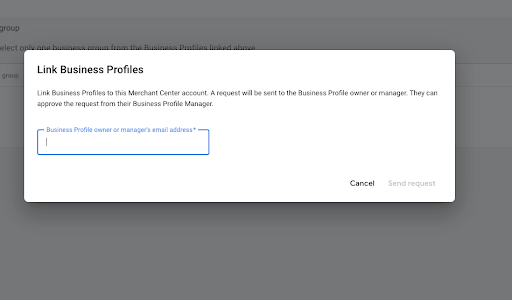
A modal window appears requesting an email belonging to the Google Business Profiler account. Enter the email address that the Google Business Profile Account is under.

After the request has been sent to Google Business Profile, the owner or the business profile manager, whose email was submitted, needs to confirm the linking by logging into Business Profile, navigating to the Linked Accounts Tab and approve the request.

Add Google Business Profile Locations (Business Groups) to Merchant Center
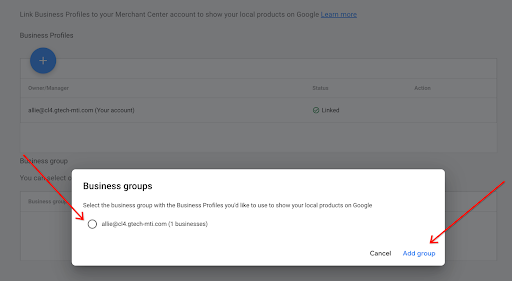
When the Google Business Profile is linked with the Merchant Center Account, you must select the specific business feeding into the merchant center. If there is only one Business Profile Location Group available across all linked Business profile accounts, then that business location is automatically selected (when linked through the UI, it doesn't automatically select on the API). Otherwise, you need to manually select the business location and add it to the Merchant Center's Business Groups.
Login to the Merchant Center for the newly created sub account for the merchant and select the gear at the top right. Then, select "Linked Accounts".
Directly below the link of the Google Business Profile Account is showing Business Group as listed. To add a Business Group, Select "Add business group".
Next, a modal window appears with available business groups to select from. If the business is nested within a Location Group, it shows the location group, and its businesses, otherwise, if it's unnested, it shows them under the email address. Select the location, then select "Add group".
When added, it shows that the business profile is now active.

UX Guidance (GBP/MC Link using API)
In the majority of cases, the merchant or merchant administrator are not redirected away from the on-boarding flow; however, in these circumstances, where the GBP Profile needs to be accepted if there's different owners, then it's best to just link to the Linked Accounts Tab directly so that merchants can go directly there.
Tech Guidance (GBP/MC Link using the API)
Using a OAuth client token from the new sub merchant account, a request can be made to Content APIs'
liasettings.getaccessiblegmbaccountsto identify if the account already has a google business profile that can be utilized.A similar request above can be made utilizing Google Business Profile APIs'
AccountManagement.Accounts.List, that provides a list of accounts for a particular authorized account.If there are eligible accounts for linking, a POST request can then be made to
liasettings.requestgmbaccessusing the Merchant ID (MCA Account), Account ID (sub-account) as path parameters and Google Business Profile email address returned fromliasettings.getaccessiblegmbaccounts.As mentioned above, if the client is using a token whose owner is the same as the Google Business Profile account, it is automatically approved in Google Business Profile. Otherwise, it has to be manually accepted as
AccountManagement.Accounts.Invitations.ListDOES NOT recognizeliasettings.requestgmbaccessas a valid invitation, and thus,AccountManagement.Accounts.Invitations.Acceptdoesn't see the invite for you to accept from the Google Business Profile API.Even though using the API for linking avoids having to select the option to accept the invitation, the Google Business Profile doesn't automatically be added if there's only one location. This only occurs if you link through the UI.