# Pose classification options
With the ML Kit Pose Detection API, you can derive meaningful interpretations
of a pose by checking the relative positions of various body parts. This page
demonstrates a few examples.
## Pose classification and repetition counting with the k-NN algorithm
One of the most common applications of pose detection is fitness tracking.
Building a pose classifier that recognizes specific fitness poses and counts
repetitions can be a challenging feat for developers.
In this section we describe how we built a custom pose
classifier using the [MediaPipe Colab](https://colab.research.google.com/drive/19txHpN8exWhstO6WVkfmYYVC6uug_oVR), and
demonstrate a working classifier in our ML Kit sample app.
If you are unfamiliar with Google Colaboratory, please check out the
[introduction guide](https://colab.research.google.com/notebooks/intro.ipynb#).
To recognize poses we use the k-nearest neighbors algorithm (k-NN) because it's simple
and easy to start with. The algorithm determines the object's class based on the
closest samples in the training set.
Follow these steps to build and train the recognizer:
### 1. Collect image samples
We collected image samples of the target exercises from various sources. We
chose a few hundred images for each exercise, such as "up" and "down" positions
for push-ups. It's important to collect samples that cover different camera
angles, environment conditions, body shapes, and exercise variations.
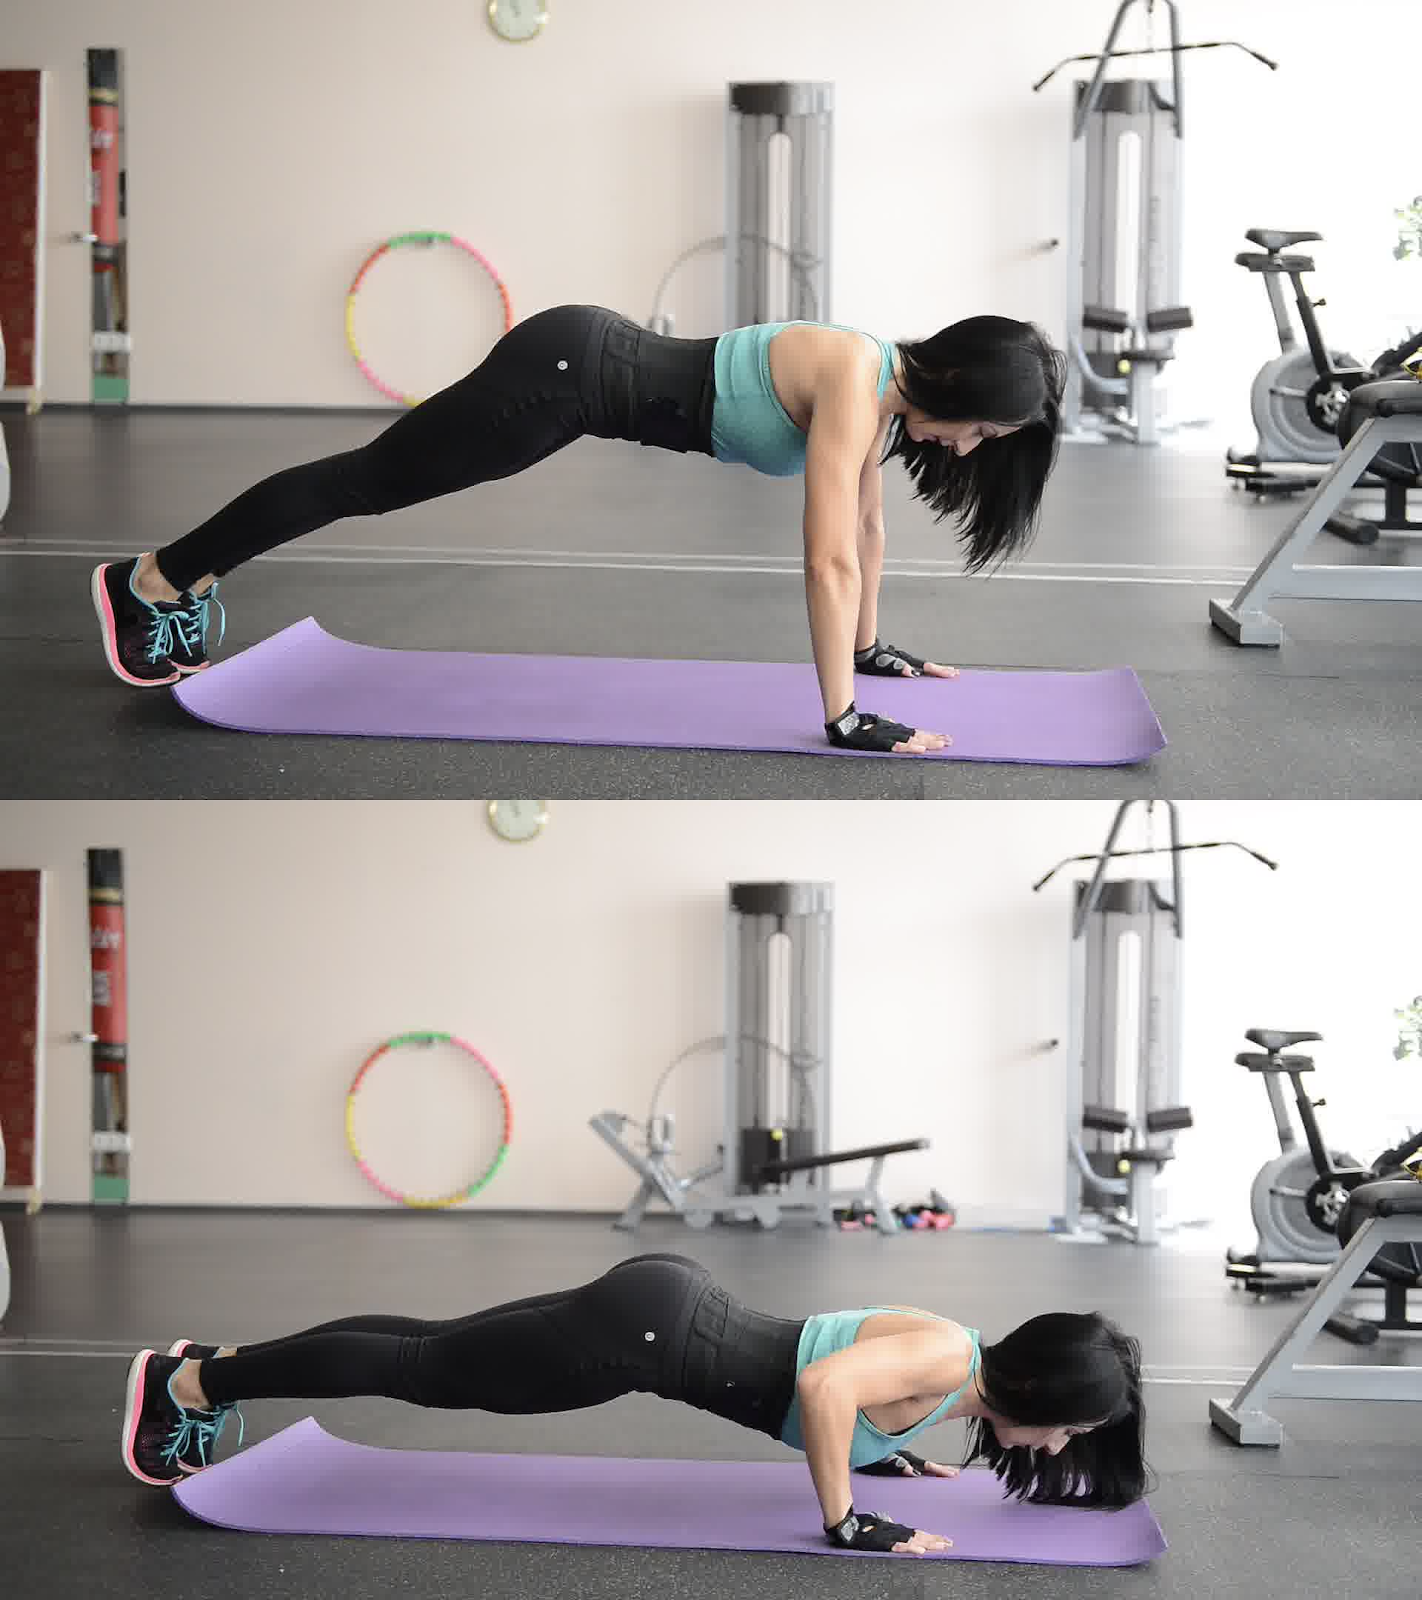 **Figure 1.** Up and down pushup pose positions
### 2. Run pose detection on the sample images
This produces a set of pose landmarks to be used for training. We are not
interested in the pose detection itself, since we will be training our
own model in the next step.
The k-NN algorithm we've chosen for custom pose classification requires a
feature vector representation for each sample and a metric to compute
the distance between two vectors to find the target nearest to the pose sample.
This means we must convert the pose landmarks we just obtained.
To convert pose landmarks to a feature vector, we use the pairwise distances
between predefined lists of pose joints, such as the distance between wrist and
shoulder, ankle and hip, and left and right wrists. Since the scale of images
can vary, we normalized the poses to have the same torso size and vertical torso
orientation before converting the landmarks.
### 3. Train the model and count repetitions
We used the [MediaPipe Colab](https://colab.research.google.com/drive/19txHpN8exWhstO6WVkfmYYVC6uug_oVR) to access the code for the classifier and
train the model.
To count repetitions, we used another Colab algorithm to monitor the probability
threshold of a target pose position. For example:
- When the probability of the "down" pose class passes a given threshold for the first time, the algorithm marks that the "down" pose class is entered.
- When the probability drops below the threshold, the algorithm marks that the "down" pose class has been exited and increases the counter.
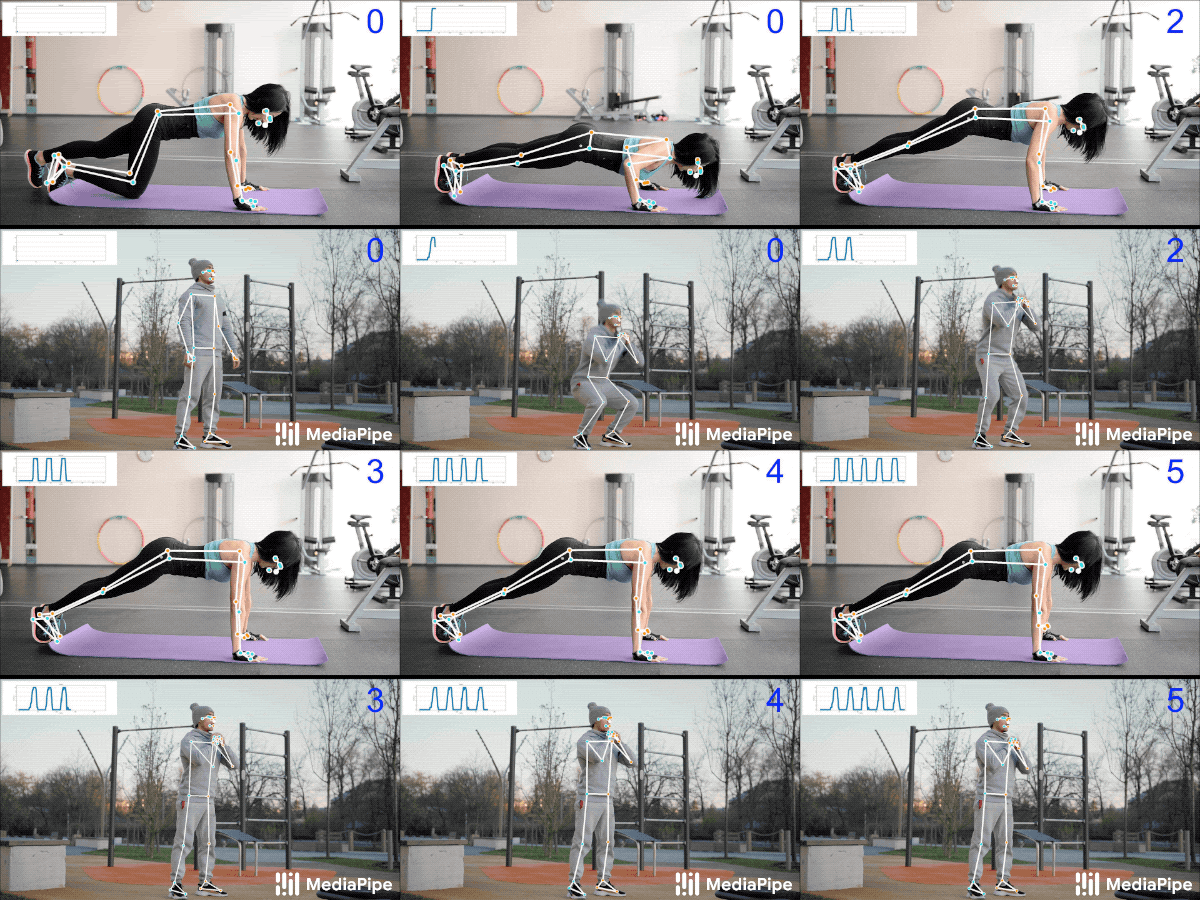 **Figure 2.** Example of repetition counting
### 4. Integrate with the ML Kit quickstart app
The Colab above produces a CSV file that you can populate with all of your pose
samples. In this section, you will learn how to integrate your CSV file with the
ML Kit Android quickstart app to see custom pose classification in real time.
#### Try pose classification with samples bundled in the quickstart app
- Get the [ML Kit Android quickstart app project](https://github.com/googlesamples/mlkit/tree/master/android/vision-quickstart) from Github and make sure it builds and runs well.
- Go to `LivePreviewActivity` and enable Pose Detection `Run classification` from the Settings' page. Now you should be able to classify pushups and squats.
#### Add your own CSV
- Add your CSV file to the app's asset folder.
- In [PoseClassifierProcessor](https://github.com/googlesamples/mlkit/blob/master/android/vision-quickstart/app/src/main/java/com/google/mlkit/vision/demo/java/posedetector/classification/PoseClassifierProcessor.java), update the `POSE_SAMPLES_FILE` and `POSE_CLASSES` variables to match your CSV file and pose samples.
- Build and run the app.
Note that the classification may not work well if there aren't enough samples.
Generally, you need about 100 samples per pose class.
To learn more and try this out yourself, check out the [MediaPipe Colab](https://colab.research.google.com/drive/19txHpN8exWhstO6WVkfmYYVC6uug_oVR)
and [MediaPipe classification guide](https://google.github.io/mediapipe/solutions/pose_classification).
## Recognizing simple gestures by calculating landmark distance
When two or more landmarks are close to each other, they can be used to
recognize gestures. For example, when the landmark for one or more fingers on a
hand is close to the landmark for the nose, you can infer the user is most
likely touching their face.
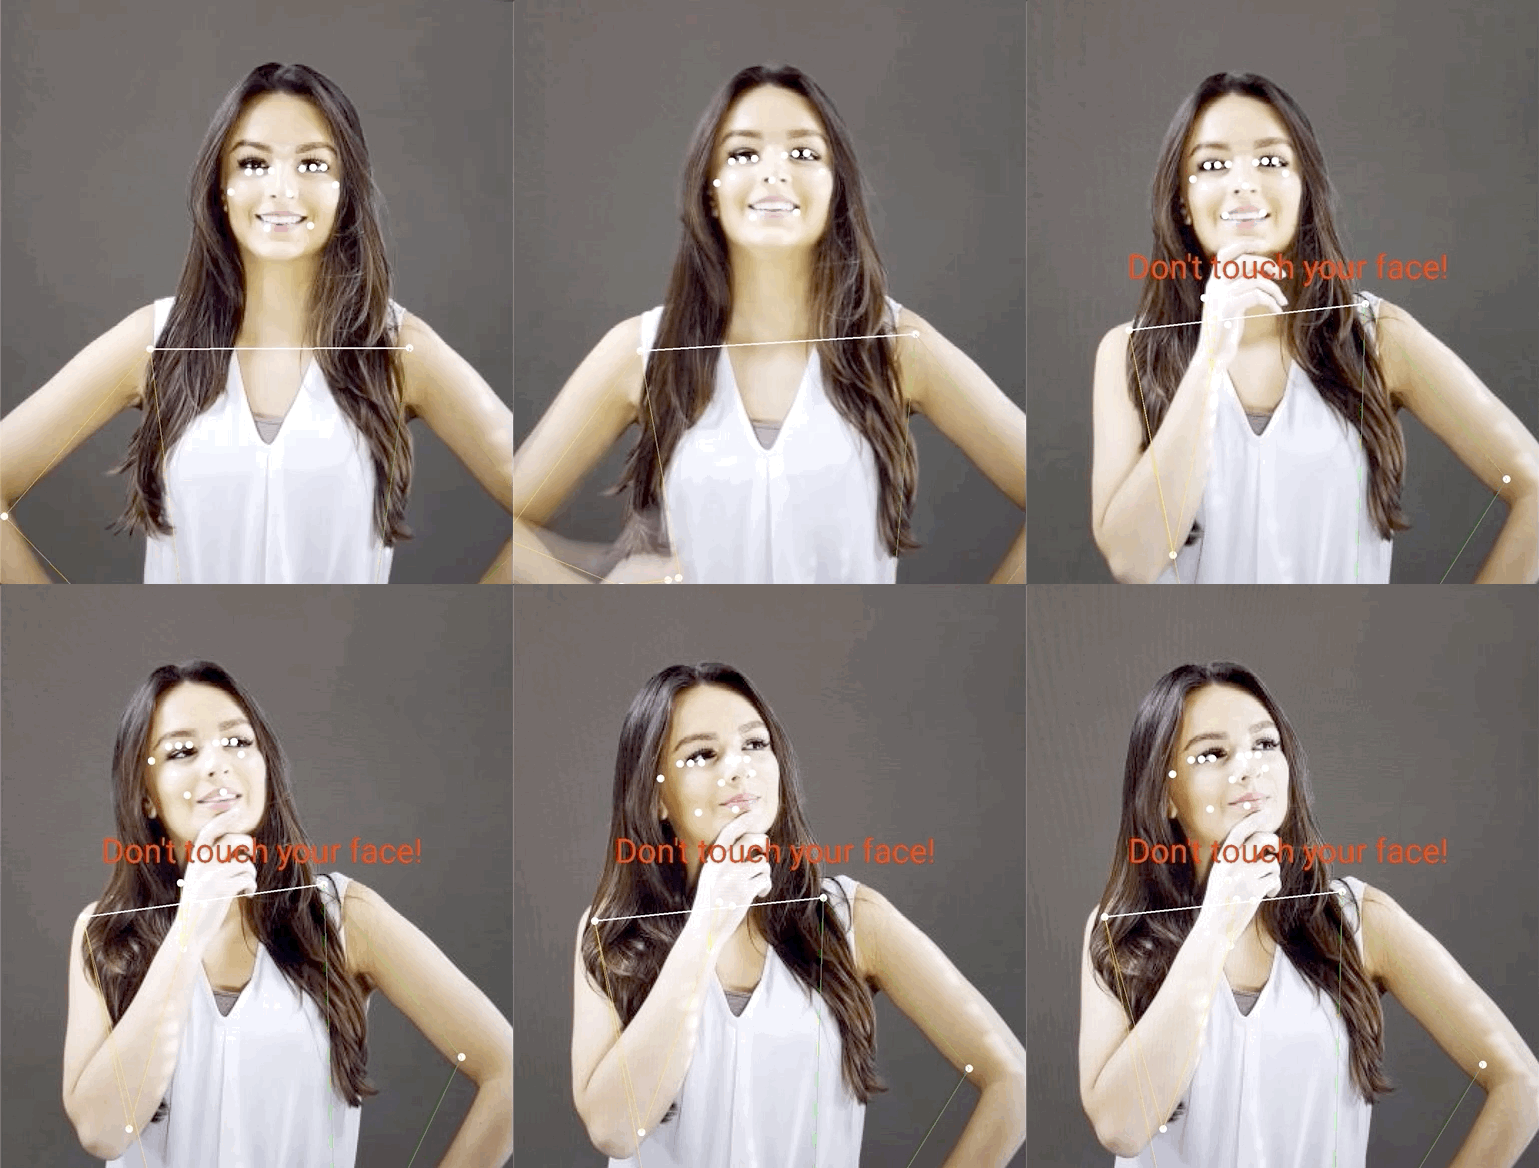 **Figure 3.** Interpreting a pose
## Recognizing a yoga pose with angle heuristics
You can identify a yoga pose by computing the angles of various joints. For
example, Figure 2 below shows the Warrior II yoga pose. The approximate angles
that identify this pose are written in:
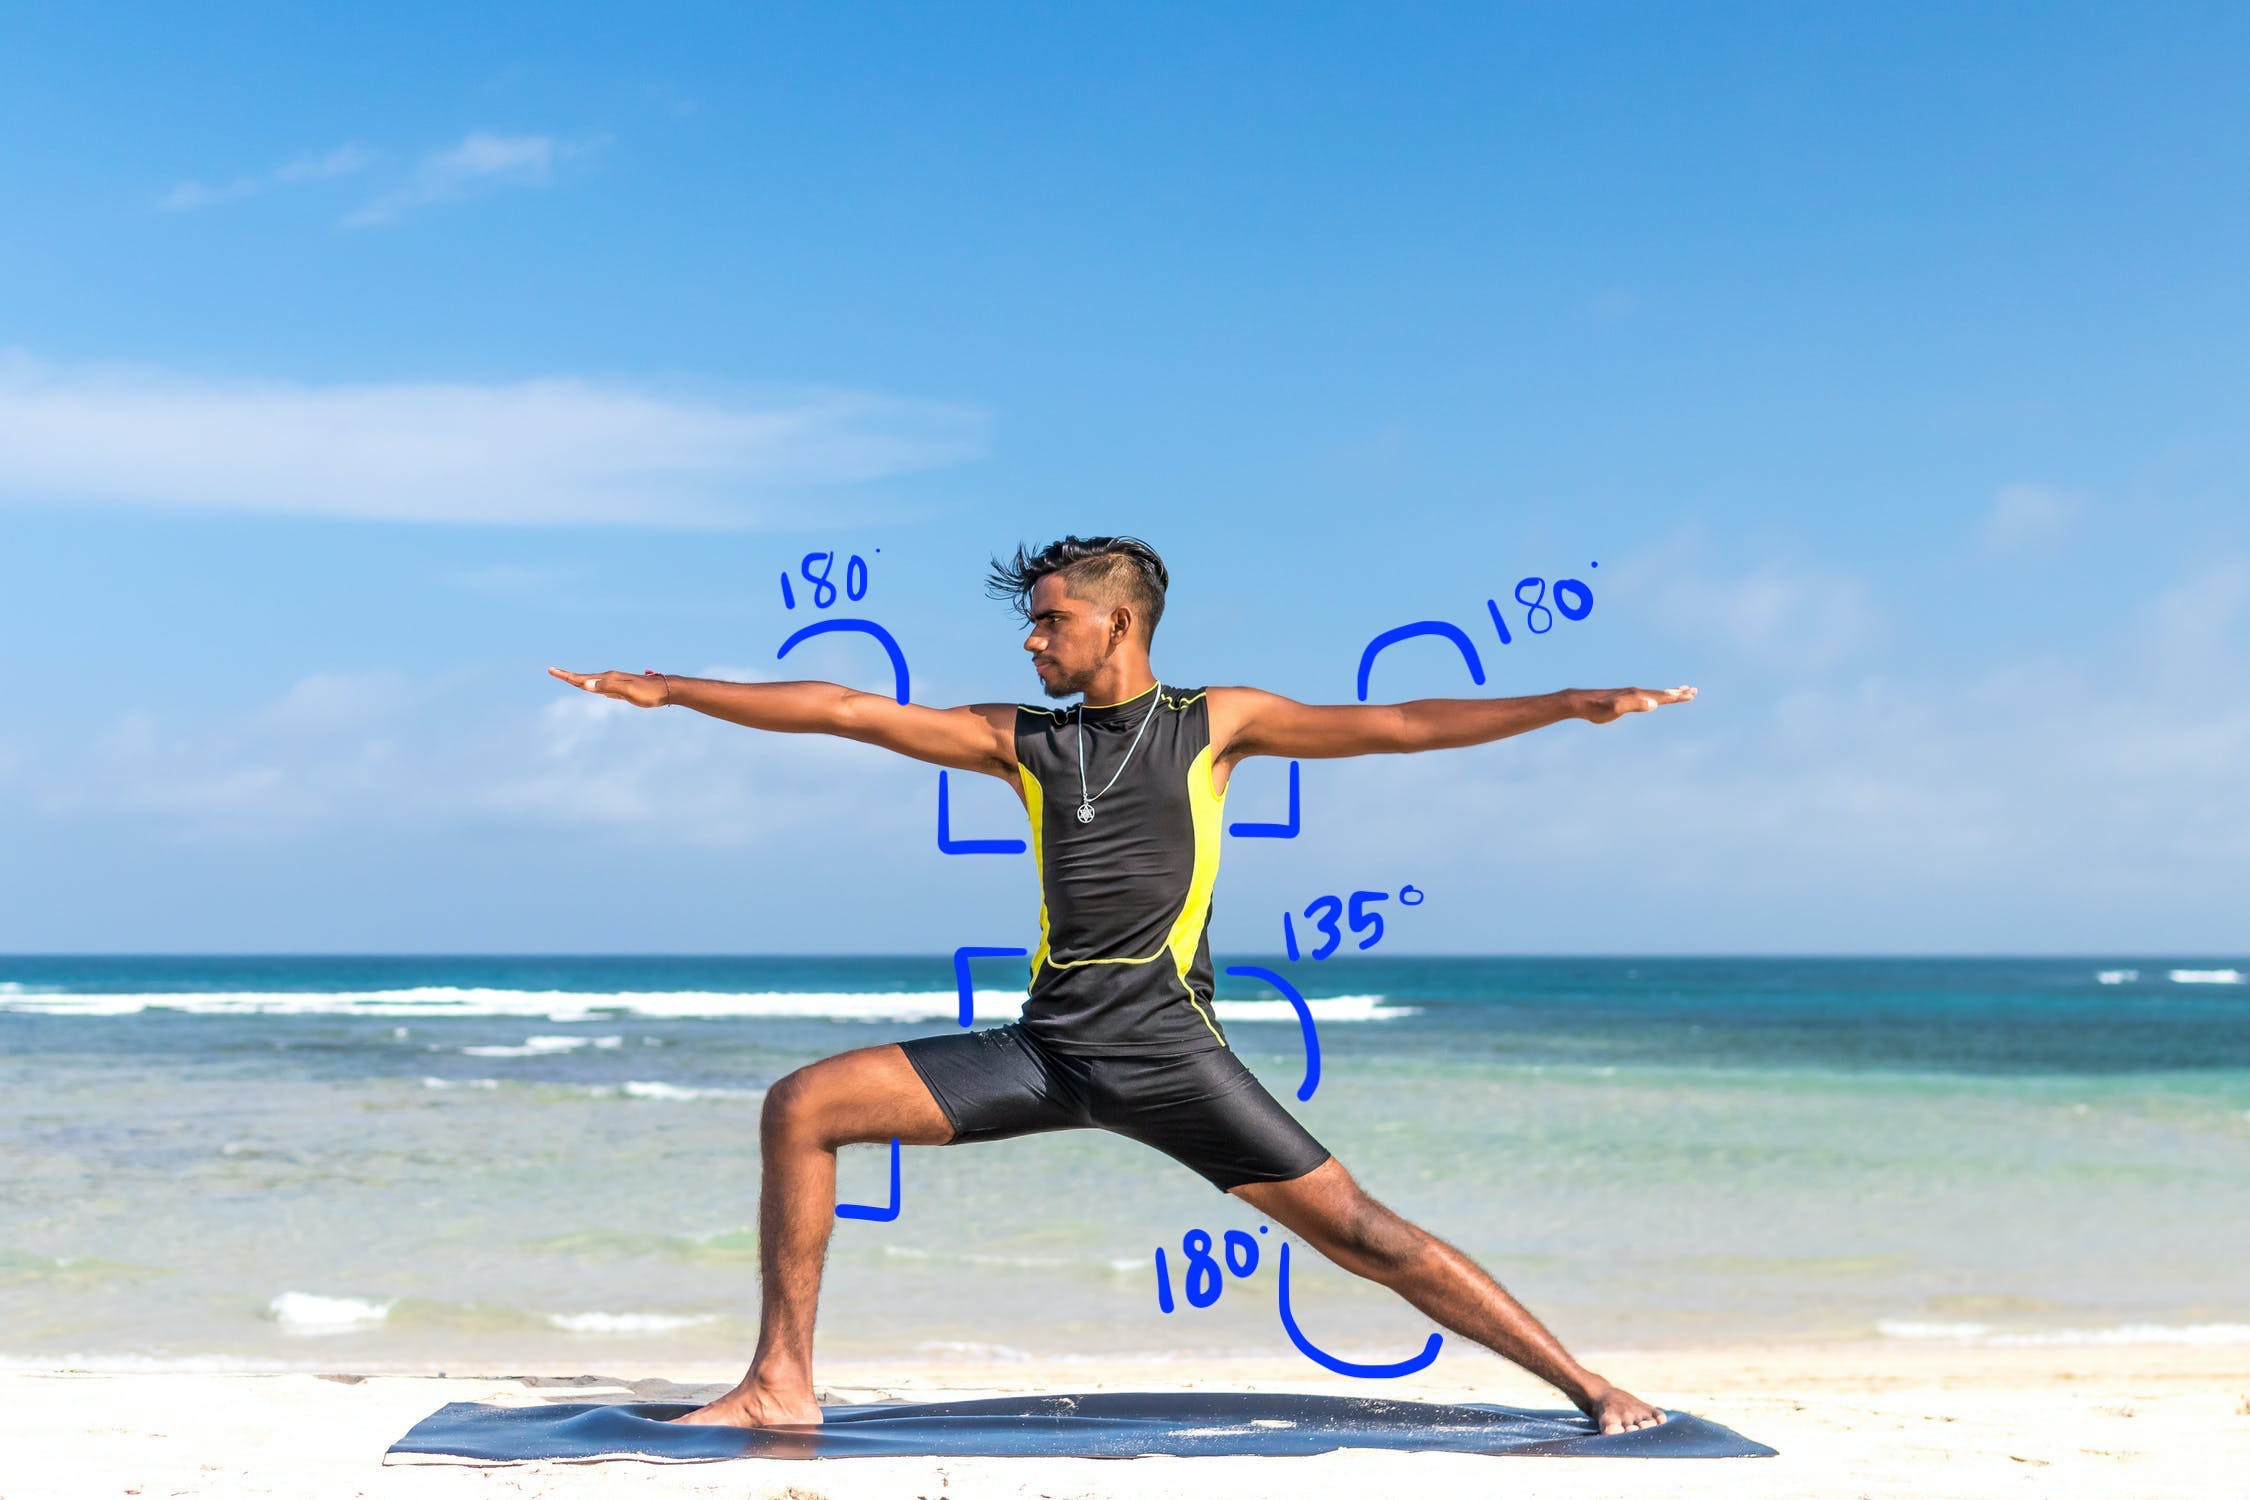 **Figure 4.** Breaking a pose into angles
This pose can be described as the following combination of approximate body
part angles:
- 90 degree angle at both shoulders
- 180 degrees at both elbows
- 90 degree angle at the front leg and waist
- 180 degree angle at the back knee
- 135 degree angle at the waist
You can use the pose landmarks to compute these angles. For example, the angle
at the right front leg and waist is the angle between the line from the right
shoulder to the right hip, and the line from the right hip to the right knee.
Once you've computed all the angles needed to identify the pose, you can check
to see if there's a match, in which case you've recognized the pose.
The code snippet below demonstrates how to use the X and Y coordinates to
calculate the angle between two body parts. This approach to classification
has some limitations. By only checking X and Y, the calculated angles vary
according to the angle between the subject and the camera. You'll get the
best results with a level, straight forward, head-on image. You could also
try extending this algorithm by making use of the
[Z coordinate](https://developers.google.com/ml-kit/vision/pose-detection#z_coordinate)
and see if it performs better for your use case.
#### Computing landmark angles on Android
The following method computes the angle between any three
landmarks. It ensures the angle returned is between
0 and 180 degrees.
### Kotlin
```kotlin
fun getAngle(firstPoint: PoseLandmark, midPoint: PoseLandmark, lastPoint: PoseLandmark): Double {
var result = Math.toDegrees(atan2(lastPoint.getPosition().y - midPoint.getPosition().y,
lastPoint.getPosition().x - midPoint.getPosition().x)
- atan2(firstPoint.getPosition().y - midPoint.getPosition().y,
firstPoint.getPosition().x - midPoint.getPosition().x))
result = Math.abs(result) // Angle should never be negative
if (result > 180) {
result = 360.0 - result // Always get the acute representation of the angle
}
return result
}
```
### Java
```java
static double getAngle(PoseLandmark firstPoint, PoseLandmark midPoint, PoseLandmark lastPoint) {
double result =
Math.toDegrees(
atan2(lastPoint.getPosition().y - midPoint.getPosition().y,
lastPoint.getPosition().x - midPoint.getPosition().x)
- atan2(firstPoint.getPosition().y - midPoint.getPosition().y,
firstPoint.getPosition().x - midPoint.getPosition().x));
result = Math.abs(result); // Angle should never be negative
if (result > 180) {
result = (360.0 - result); // Always get the acute representation of the angle
}
return result;
}
```
Here's how to compute the angle at the right hip:
### Kotlin
```kotlin
val rightHipAngle = getAngle(
pose.getPoseLandmark(PoseLandmark.Type.RIGHT_SHOULDER),
pose.getPoseLandmark(PoseLandmark.Type.RIGHT_HIP),
pose.getPoseLandmark(PoseLandmark.Type.RIGHT_KNEE))
```
### Java
```java
double rightHipAngle = getAngle(
pose.getPoseLandmark(PoseLandmark.Type.RIGHT_SHOULDER),
pose.getPoseLandmark(PoseLandmark.Type.RIGHT_HIP),
pose.getPoseLandmark(PoseLandmark.Type.RIGHT_KNEE));
```
#### Computing landmark angles on iOS
The following method computes the angle between any three
landmarks. It ensures the angle returned is between
0 and 180 degrees.
### Swift
```swift
func angle(
firstLandmark: PoseLandmark,
midLandmark: PoseLandmark,
lastLandmark: PoseLandmark
) -> CGFloat {
let radians: CGFloat =
atan2(lastLandmark.position.y - midLandmark.position.y,
lastLandmark.position.x - midLandmark.position.x) -
atan2(firstLandmark.position.y - midLandmark.position.y,
firstLandmark.position.x - midLandmark.position.x)
var degrees = radians * 180.0 / .pi
degrees = abs(degrees) // Angle should never be negative
if degrees > 180.0 {
degrees = 360.0 - degrees // Always get the acute representation of the angle
}
return degrees
}
```
### Objective-C
```objective-c
(CGFloat)angleFromFirstLandmark:(MLKPoseLandmark *)firstLandmark
midLandmark:(MLKPoseLandmark *)midLandmark
lastLandmark:(MLKPoseLandmark *)lastLandmark {
CGFloat radians = atan2(lastLandmark.position.y - midLandmark.position.y,
lastLandmark.position.x - midLandmark.position.x) -
atan2(firstLandmark.position.y - midLandmark.position.y,
firstLandmark.position.x - midLandmark.position.x);
CGFloat degrees = radians * 180.0 / M_PI;
degrees = fabs(degrees); // Angle should never be negative
if (degrees > 180.0) {
degrees = 360.0 - degrees; // Always get the acute representation of the angle
}
return degrees;
}
```
Here's how to compute the angle at the right hip:
### Swift
```swift
let rightHipAngle = angle(
firstLandmark: pose.landmark(ofType: .rightShoulder),
midLandmark: pose.landmark(ofType: .rightHip),
lastLandmark: pose.landmark(ofType: .rightKnee))
```
### Objective-C
```objective-c
CGFloat rightHipAngle =
[self angleFromFirstLandmark:[pose landmarkOfType:MLKPoseLandmarkTypeRightShoulder]
midLandmark:[pose landmarkOfType:MLKPoseLandmarkTypeRightHip]
lastLandmark:[pose landmarkOfType:MLKPoseLandmarkTypeRightKnee]];
```