In the past, third-party cookies have been used to store and convey information about a user's state, such as their sign-in status, information about the device they are using, or whether they are known and trusted. For example, whether the user has logged in with SSO, whether the user has a certain type of compatible device, or whether the user is known and trusted. With third-party cookie support being deprecated, many of these use cases will need to be supported by other means.
Private State Tokens offer a way to share information across the web, but in a privacy-preserving way through controls on the amount of data that can actually be shared.
Private State Tokens (formerly known as Trust Tokens) allow trust in a user's authenticity to be conveyed from one context to another while helping sites combat fraud and distinguish bots from real humans—without passive tracking.
This document outlines the technical details for implementing Private State Tokens (PST). For a more high-level outline, see the PST overview.
How do Private State Tokens work?
The key relationship to understand in PST is between issuers and redeemers. Issuers and redeemers can be within the same company.
- Issuers - These entities have some signal about a user (for example, whether that user is a bot or not) and embeds that signal into a token that is stored on the user device (more details in next sections).
- Redeemers - These entities may not have a signal about a user but need to know something about them (for example, whether that user is a bot or not) and ask to redeem a token from the issuer to understand the trustworthiness of that user.
Every PST interaction requires issuers and redeemers to work together to share signals across the web. Those signals are coarse values that are not detailed enough to identify individuals.
Are Private State Tokens right for me?
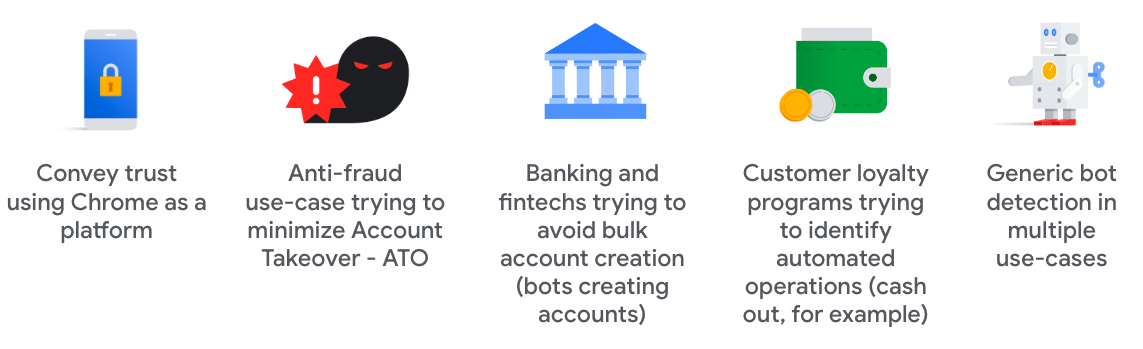
Companies that are making trust decisions and want that information to be available across contexts may benefit from PSTs. For more on potential use-cases of PSTs, see our documentation on PST use cases.
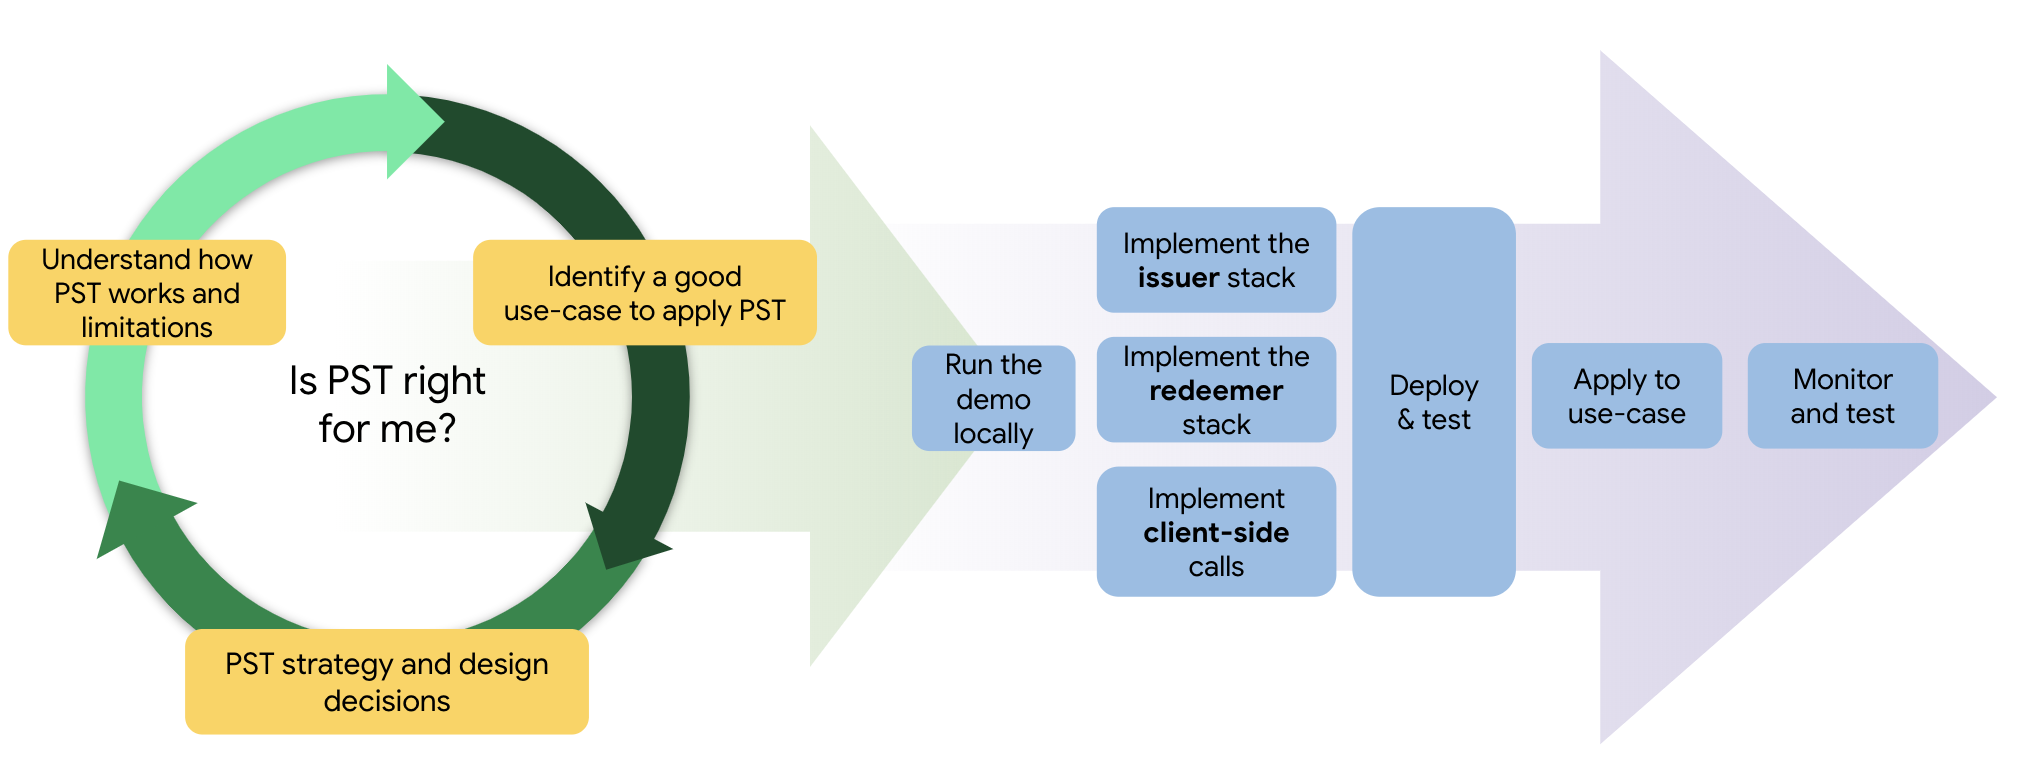
Issue and redeem tokens
The PST implementation occurs in three phases:
- Issuing tokens
- Redeeming tokens
- Redemption record forwarding
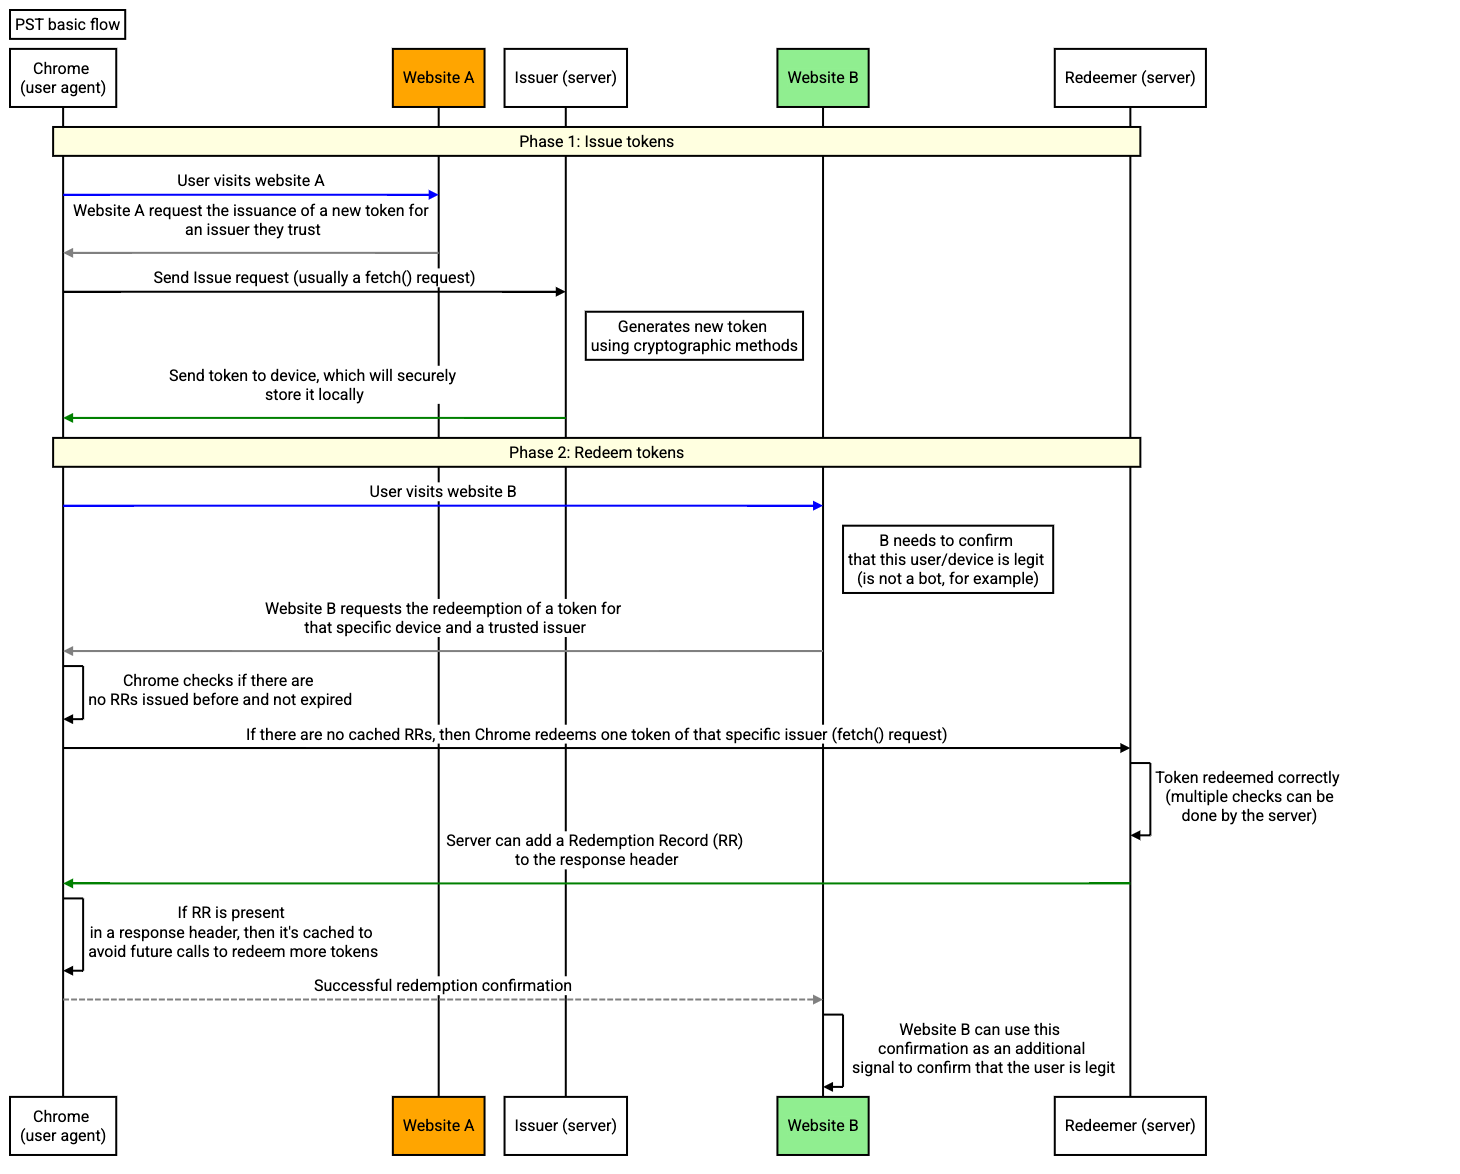
In the first phase, tokens are issued to a browser (usually after some kind of validation). In the second phase, another entity will make a request to redeem the token that had been issued to read the value in that token. In the final phase, the redeeming party receives a redemption record (RR) with the value that was contained in the token. That redeeming party can then use that record as an attestation of that user for various purposes.
Define your token strategy
To define your token strategy, you need to understand PST key concepts (tokens and redemption records), variables, behaviors and limitations to be able to think about their potential usage to your use case.
Tokens and redemption records: what's the relationship between them?
Each device can store up to 500 tokens per top-level website and issuer. Also, each token has metadata informing which key the issuer used to issue it. That information can be used to decide to redeem or not a token during the redeeming process. PST data is stored internally by the browser on the user's device and can only be accessed by the PST API.
When a token is redeemed, the Redemption Record (RR) is stored on the device. This storage acts as a cache for future redemptions. There is a limit of two tokens redemption every 48 hours, per device, page and issuer. New redemption calls will use cached RRs where possible, rather than causing a request to the issuer.
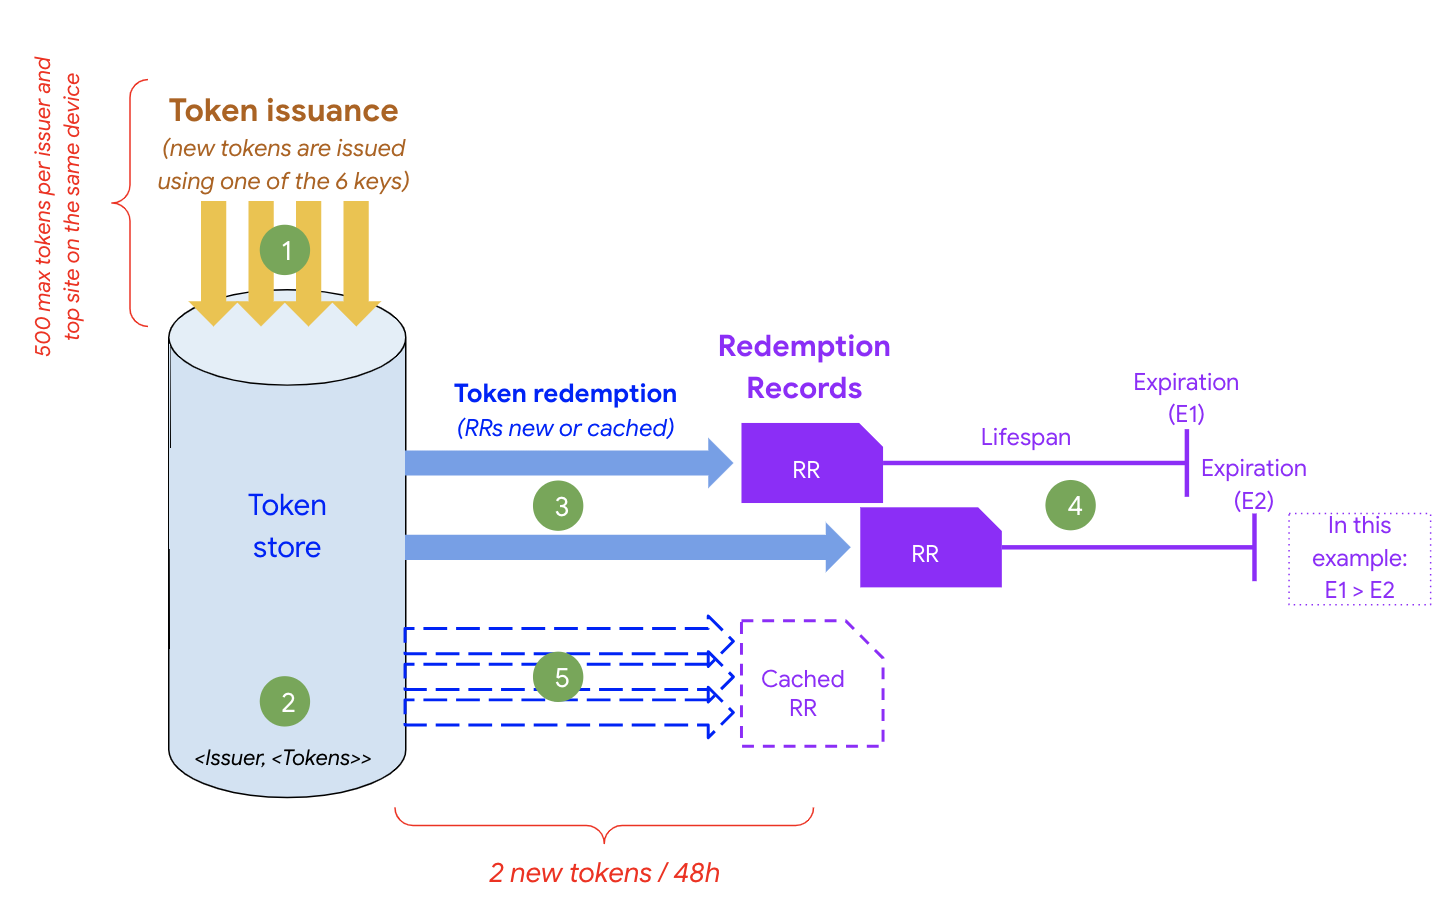
- New tokens are issued (max 500 per issuer, site and device).
- All tokens are stored on-device token store (similar as cookie store).
- If no active RR is found, then new RRs can be generated after issuance (maximum of 2 every 48 hours).
- RRs are considered active until expiration and they will be used as a local cache.
- New redemption calls will hit local cache (no new RRs are generated).
After defining your use case, you must define your RR's lifespan carefully as this is going to define how many times you will be able to use them in your case.
Make sure you understand the following critical behaviors and variables before defining your strategy:
| Variable / behavior | Description | Potential usage |
|---|---|---|
| Token key metadata | Each token can be issued using one and only one cryptographic key and in PST there is a limitation of six keys per issuer. | One potential way to use this variable is defining a range of trust to your tokens based on your cryptographic keys (for example, key 1 = high trust while key 6 = no trust). |
| Token expiration date | Token expiration date is the same as key expiration date. | Keys can be rotated at least every 60 days and all tokens issued with invalid keys are also considered invalid. |
| Token redemption rate limit | There is a limit of two token redemptions per device and issuer every 48 hours. | Depends on the estimated number of redemptions required by your use case every 48 hours. |
| Maximum number of issuers per top level origin | Maximum number of issuers per top level origin is currently two. | Carefully define the issuers of each page. |
| Tokens per issuer on a device | Maximum number of tokens per issuer on a specific device is currently 500. | Make sure to keep the number of tokens less than 500 per issuer. Make sure to handle errors in your web page when trying to issue tokens. |
| Key commitments rotation | Every PST issuer is required to expose an endpoint with key commitments that can be changed every 60 days and any rotation faster than that will be ignored. | If your keys are going to expire in less than 60 days, it's mandatory to update your key commitments before that date to avoid disruption (see details). |
| Redemption record lifespan | RR's lifespan can be defined in order to determine an expiration date. Since RRs are cached to avoid unnecessary new redemption calls to the issuer, this is important to make sure to have fresh enough redemption signals. | Since there is a redemption rate-limit of two tokens every 48 hours, it's important to define your RR's lifespan to be able to execute redemption calls with success over at least this period of time (RR lifespan should be set accordingly). It is recommended to set this lifespan on the order of weeks. |
Example scenarios
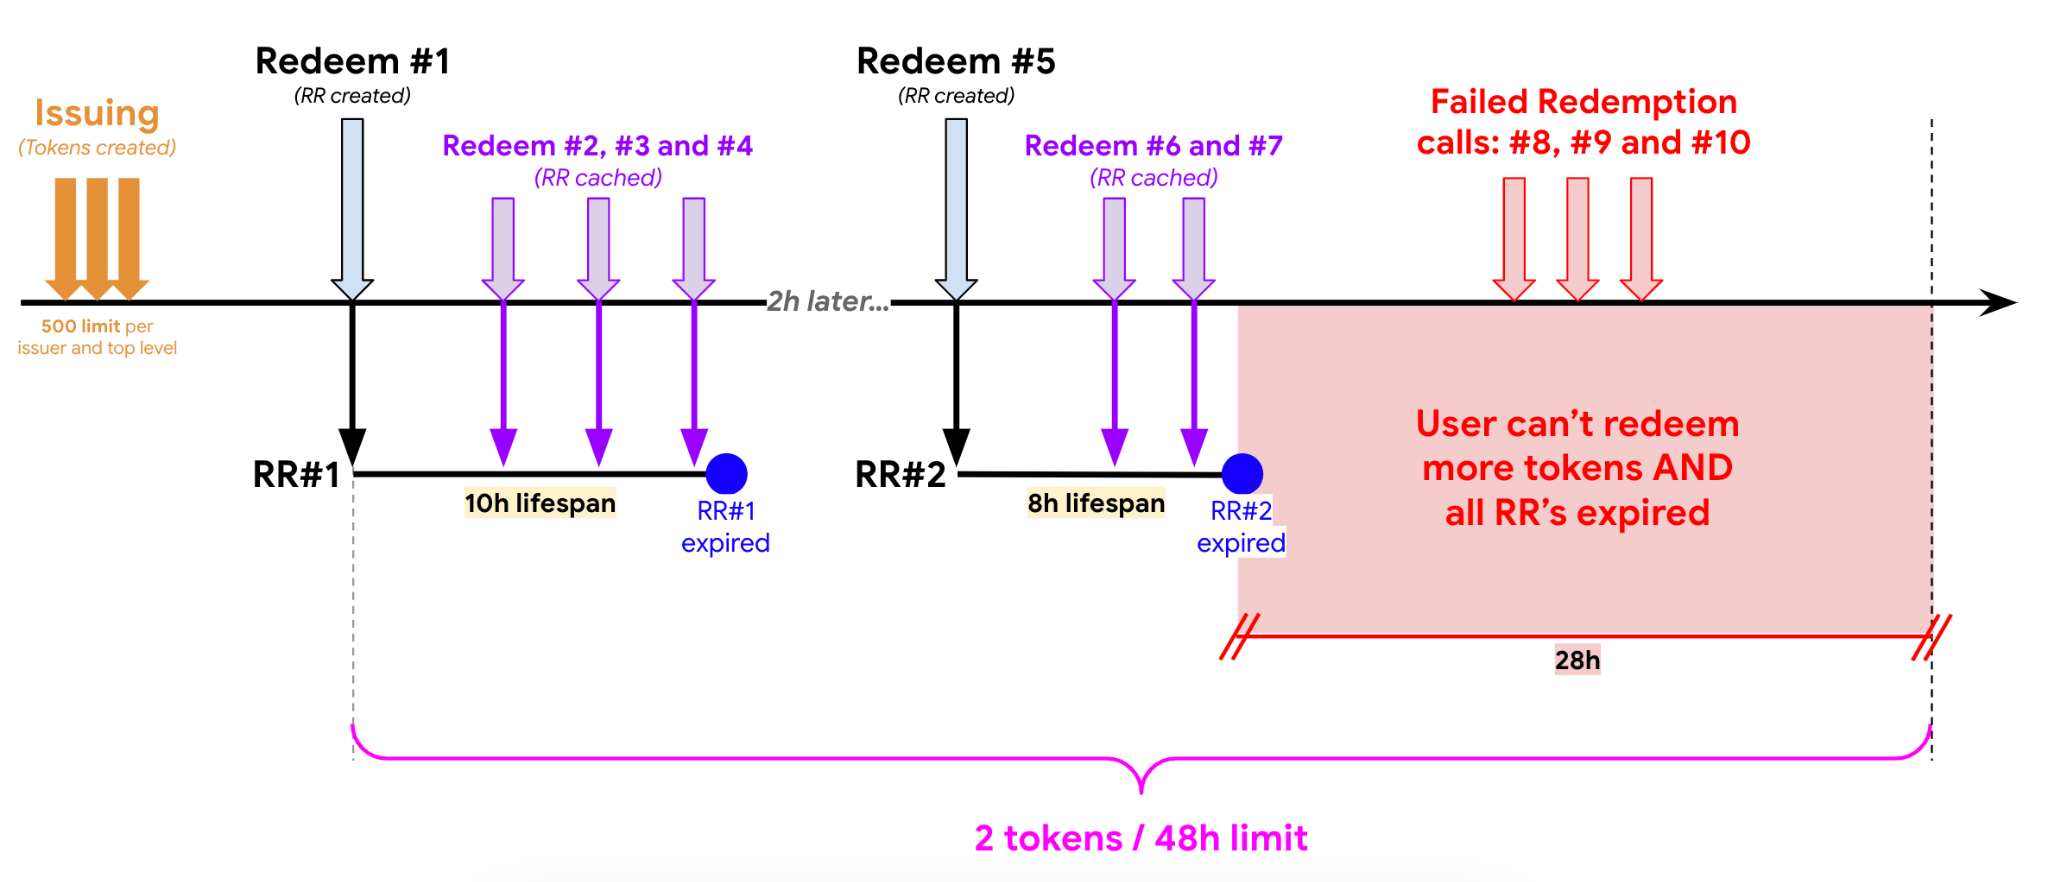
Scenario #1: RR lifespan is less than 24 hours (t=t) and redemption is performed multiple times during the 48-hour window.
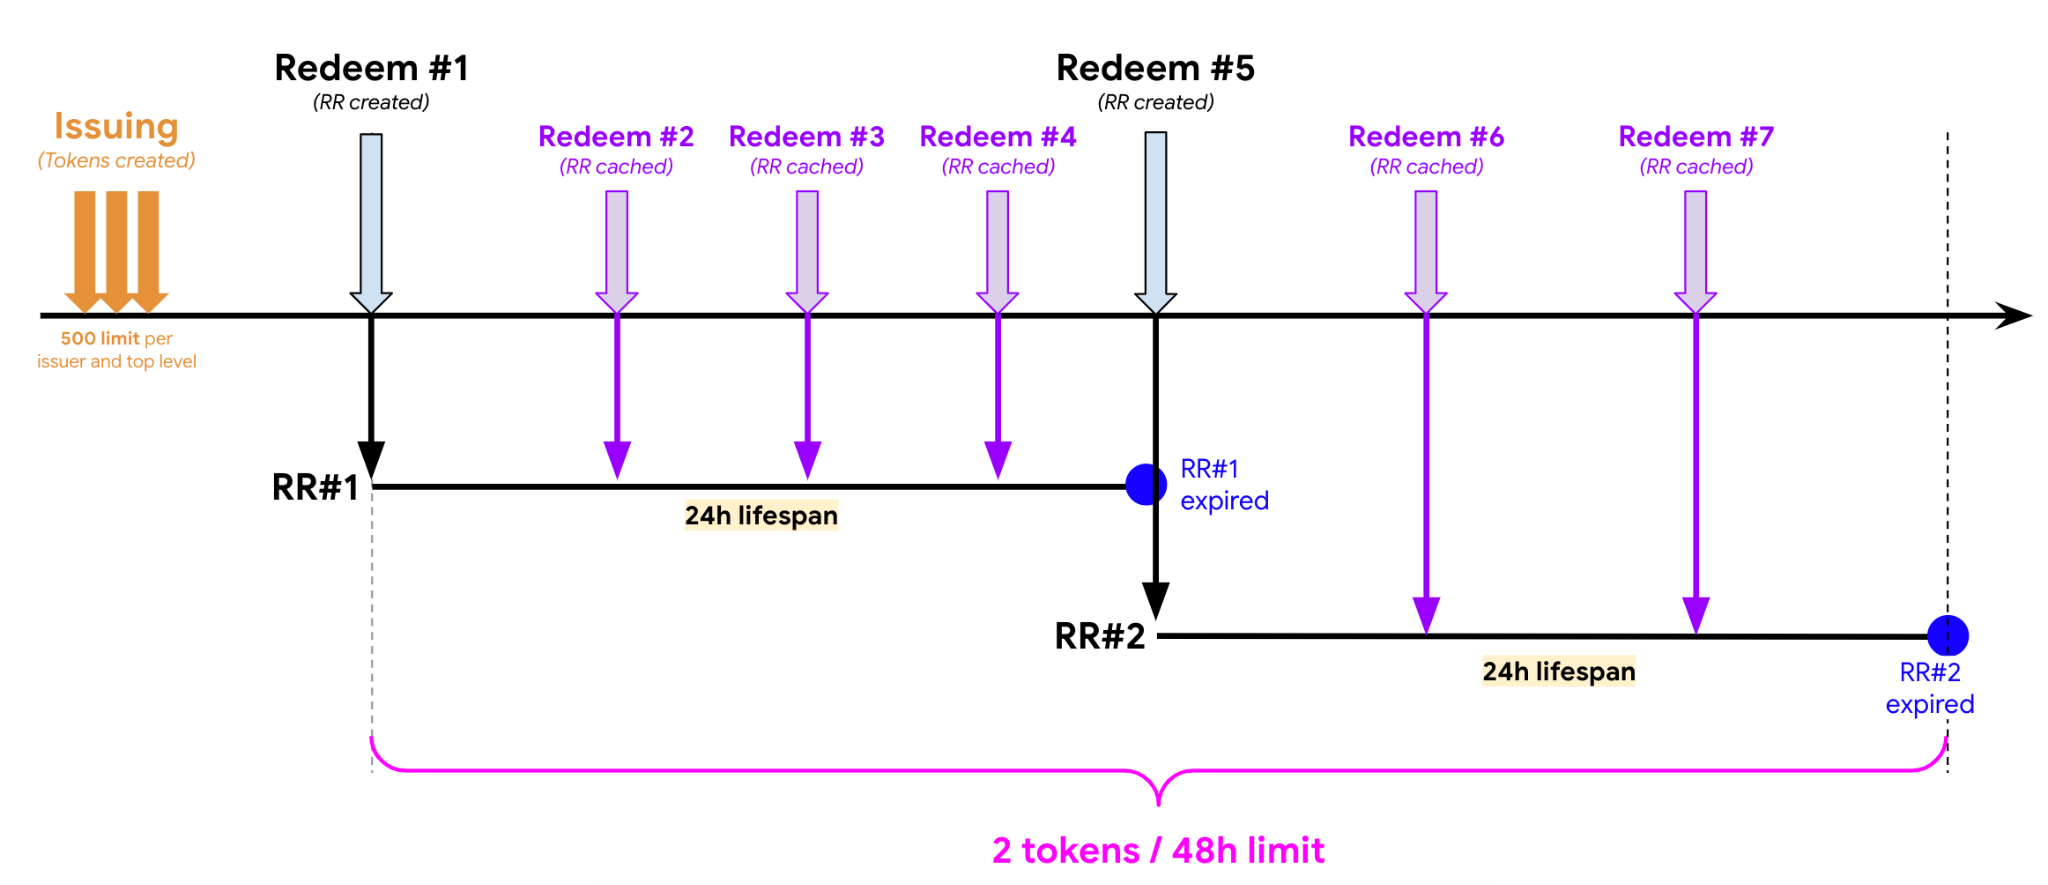
Scenario #2: RR lifespan is 24 hours and redemption is performed multiple times during the 48-hour window.
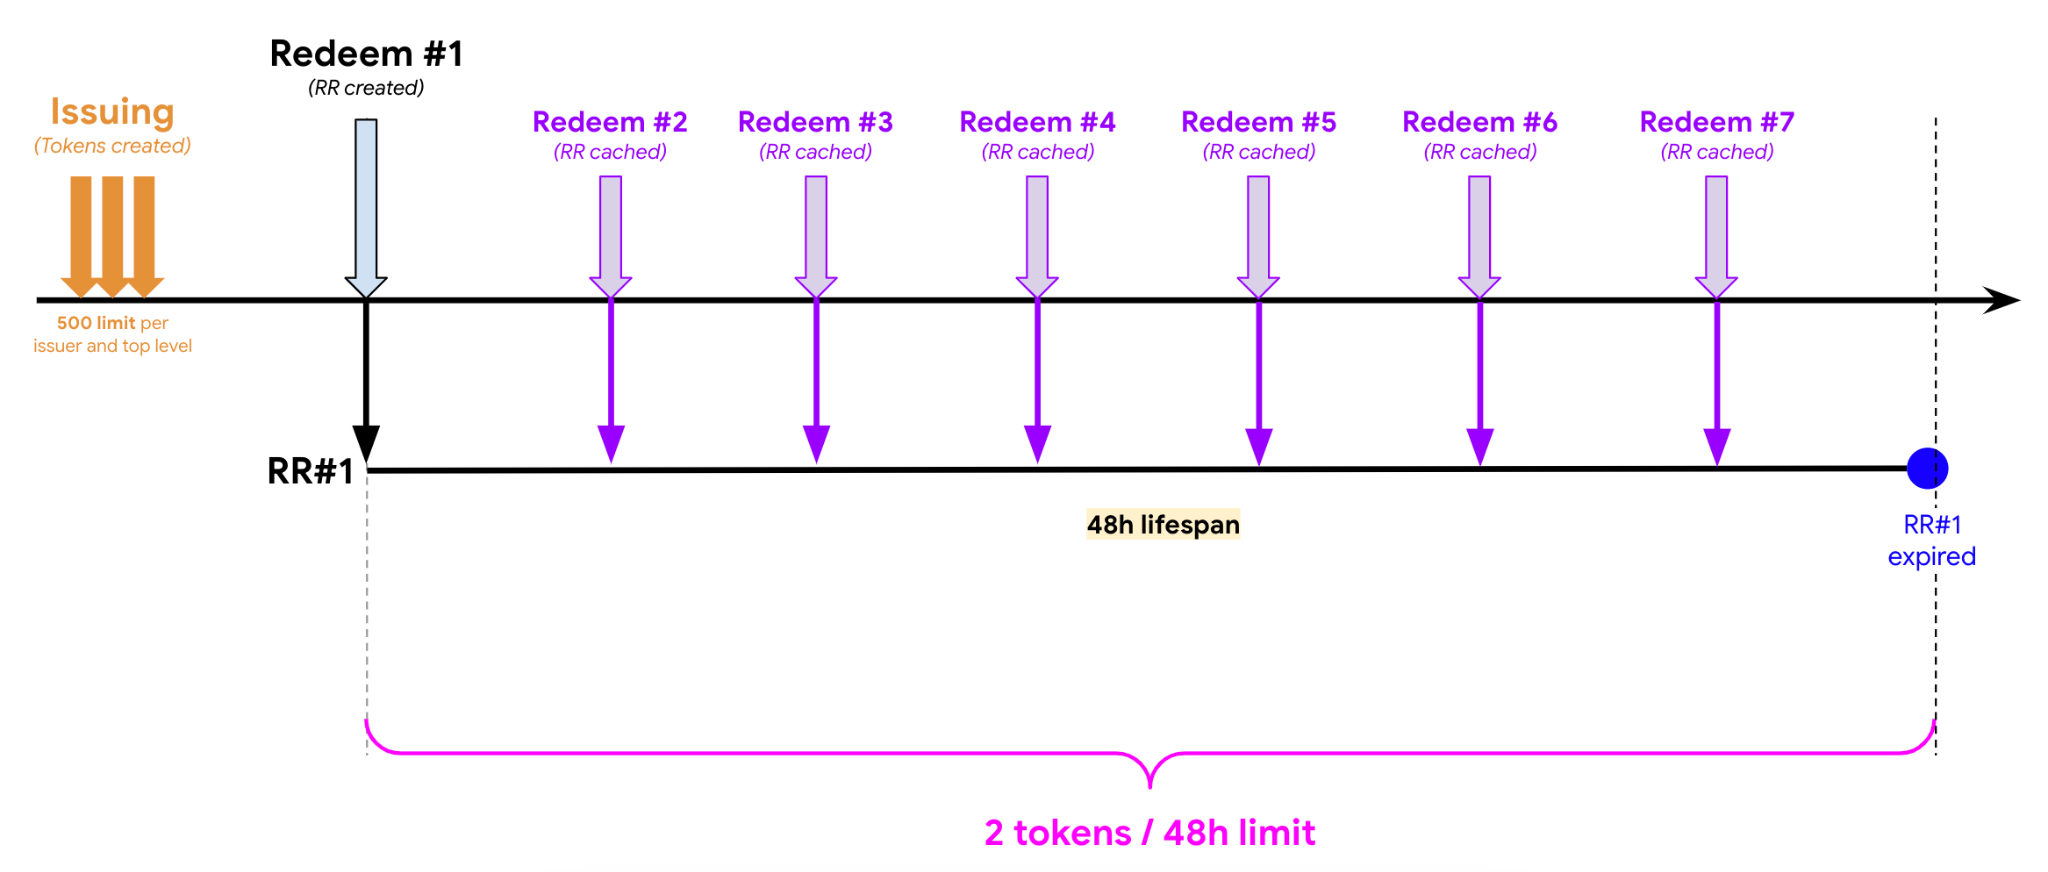
Scenario #3: RR lifespan is 48 hours and redemption is performed multiple times during the 48 hours window.
Run the demo
Before adopting PST, we recommend getting set up with the demo first. To try out the PST demo , you will need to run Chrome with flags to enable the demo issuer key commitments (follow instructions available on the demo page).
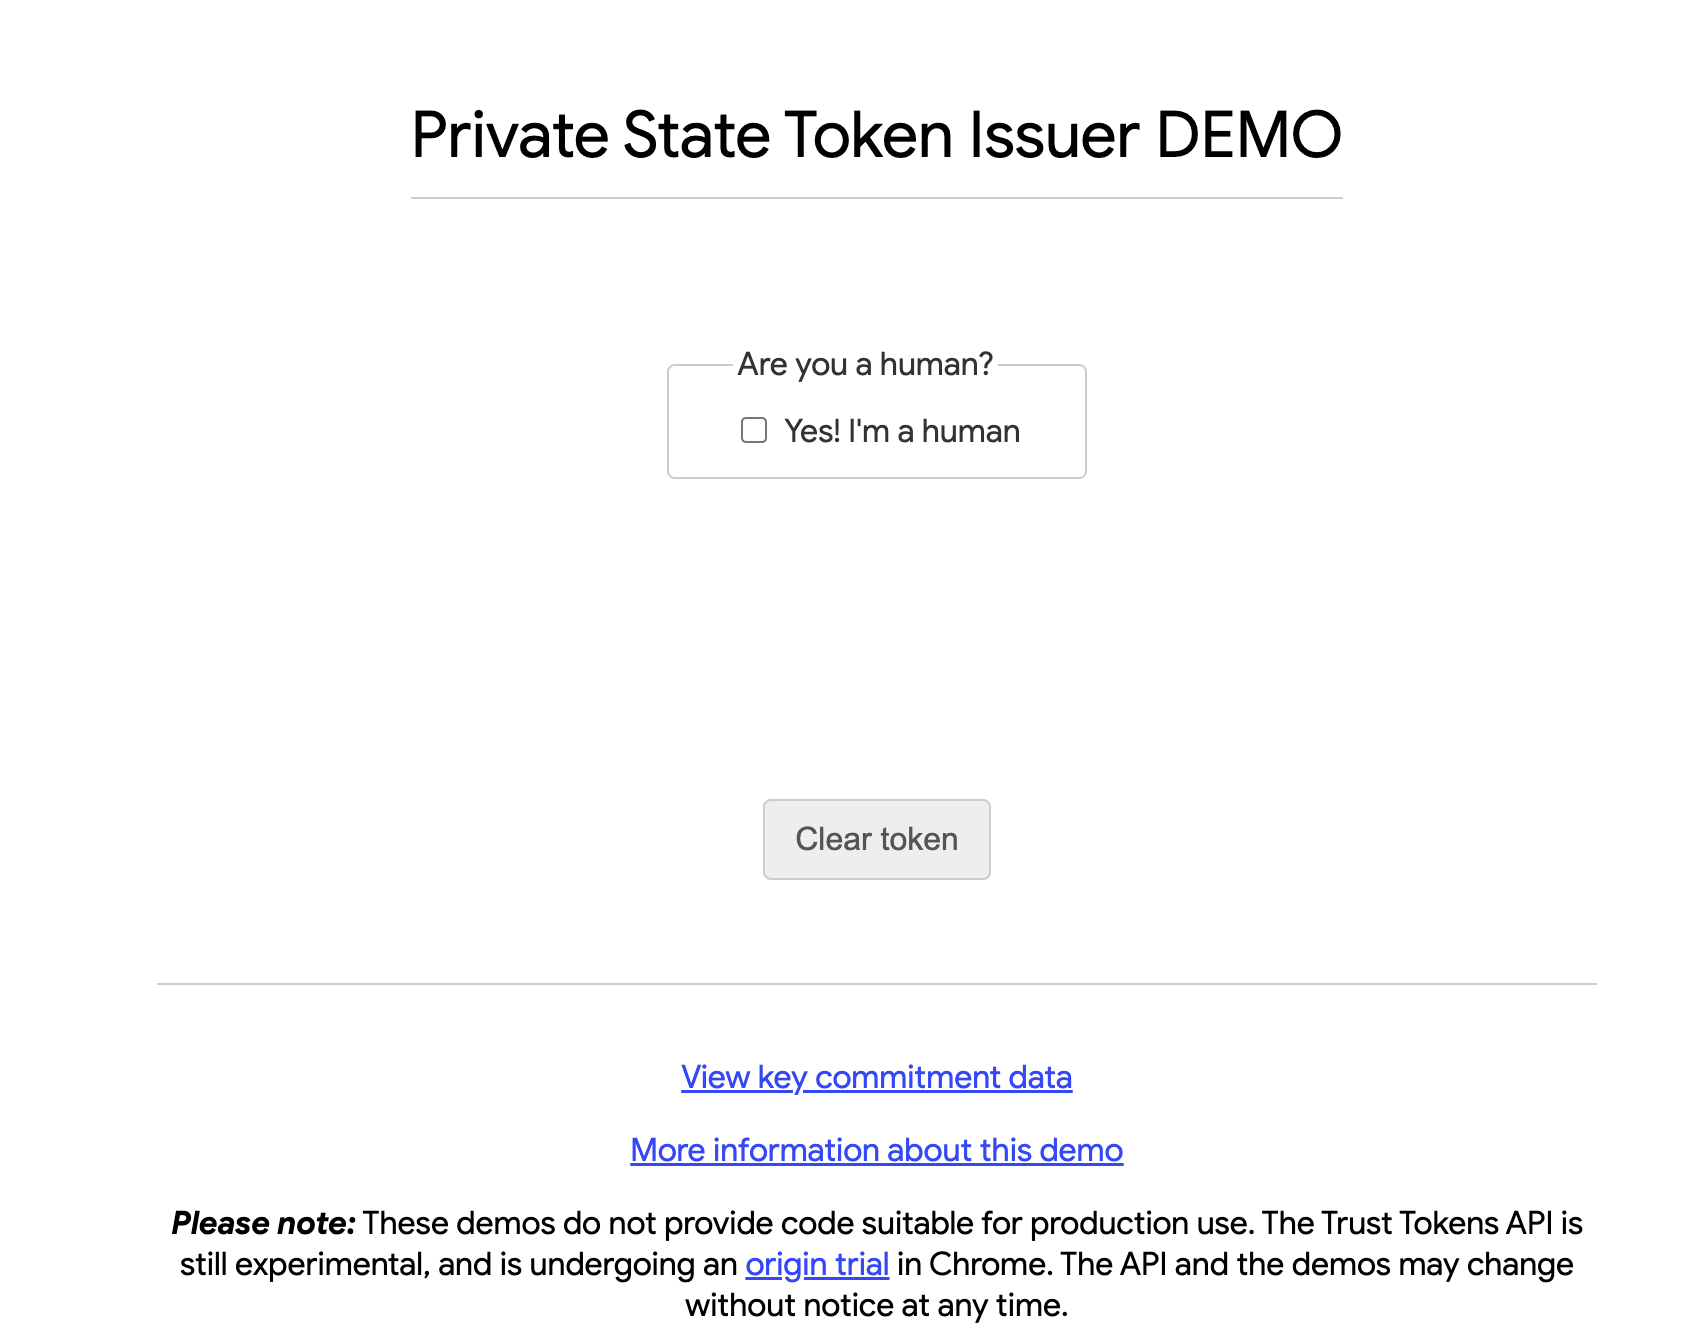
By running this demo, your browser is using the demo issuer and redeemer servers to provide and consume tokens.
Technical considerations
The demo will run best if you implement the following steps:
- Make sure you stop all Chrome instances before running Chrome with flags.
- If you are running on a Windows machine, take a look into this guide on how to pass parameters to the Chrome executable binary.
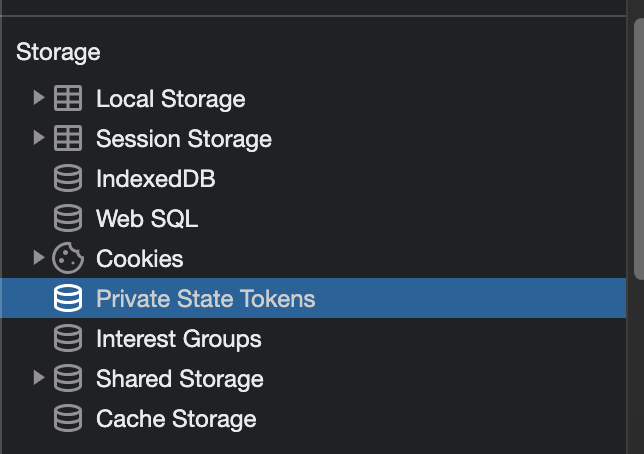
- Open Chrome DevTools under Applications > Storage > Private State Tokens while using the demo application to see the tokens issued/redeemed by the demo issuer.
Set up for adoption
Become an issuer
Issuers play a key role in PST. They assign values to the tokens to determine if a user is a bot or not. If you want to get started with PST as an issuer, you will need to register by completing the Issuer registration process.
To apply to become an issuer, the issuer website's operator must open a new issue on the GitHub repository using the "New PST Issuer" template. Follow the guidance on the repository to fill out the issue. Once an endpoint has been verified, it will be merged into this repository and Chrome server-side infrastructure will begin fetching those keys.
Issuer servers
Issuers and redeemers are the key actors for PST; servers and tokens are the key tools for PST. While we already have provided some details on tokens and in the Github documentation, we wanted to offer more details on PST servers. To get set up as an issuer of PST, you need to first set up an issuing server.
Deploy your environment: issuer servers
To implement the token issuer server you will need to build your own server side application exposing HTTP endpoints.
The issuer component is composed of two main modules: (1) the issuer server and (2) the token issuer.
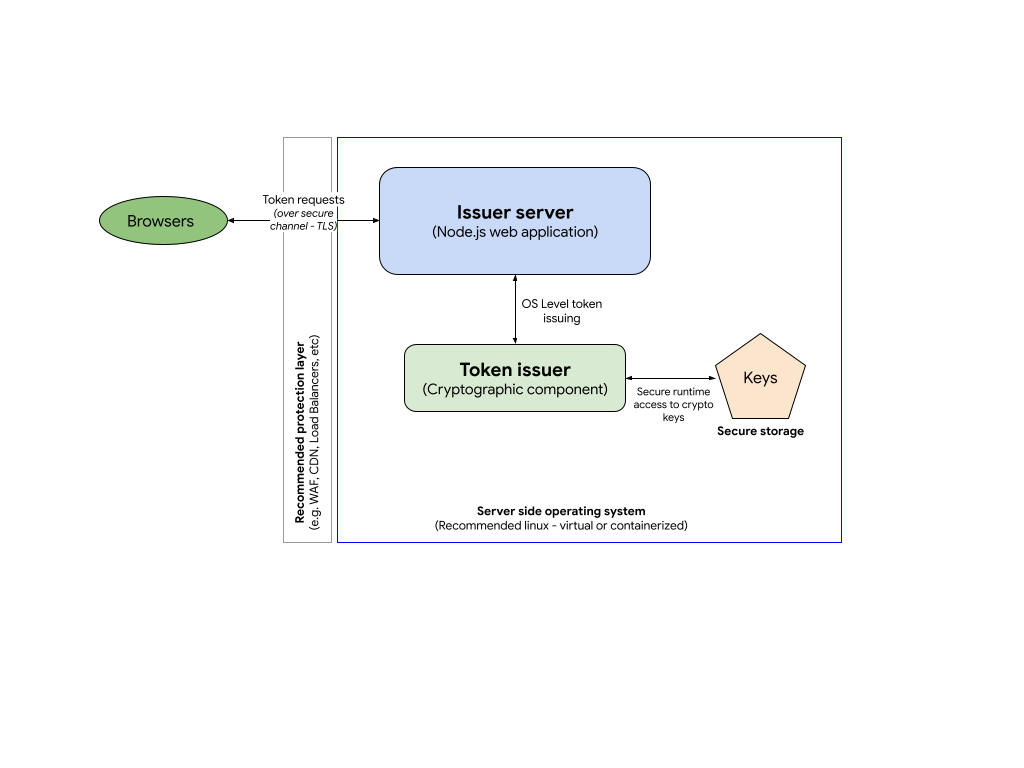
As with all web-facing applications, we recommend an additional layer of protection to your issuer server.
Issuer server: In our example implementation, our issuing server is a Node.js server that uses the Express framework to host the Issuer HTTP endpoints. You can check out sample code on GitHub or the demo issuer.
Token issuer: The issuer cryptographic component doesn't require any specific language but due to the performance requirements of this component, we're providing a C implementation as an example, which uses the Boring SSL library to manage tokens. You can find the issuer code example and more information about the installation on GitHub
Keys: The token issuer component uses custom EC keys to encrypt tokens. These keys must be protected and stored in secure storage.
Technical requirements for issuer servers
As per the protocol, you will need to implement at least two HTTP endpoints in your issuer server:
- Key-commitment (for example,
/.well-known/private-state-token/key-commitment): This endpoint is where your encryption public key details will be available to browsers to confirm that your server is legitimate.- Code sample on GitHub
- See the demo
- Token issuance (for example,
/.well-known/private-state-token/issuance): The token issuing endpoint where all token requests will be handled. This endpoint will be the integration point for the token issuer component.- Code sample on GitHub
- See the demo
As mentioned previously, due to the expected high traffic this server will be potentially handling, we recommend you to deploy it using a scalable infrastructure (for example, in a cloud environment) to be able to adjust your backend based on a variable demand.
Send a call to the issuer server
Implement a website fetch call to your issuer stack in order to issue new tokens.
 // issuer request
    await fetch("/.well-known/private-state-token/issuance", {
      method: "POST",
      privateToken: {
        version: 1,
        operation: "token-request"
      }
    });
Redeemer servers
You will need to implement the token redemption service by building your own server-side application. This will allow you to read the tokens that an issuer sends. The following steps outline how to redeem tokens as well as how to read the redemption records that are associated with those tokens.
You can opt to run the issuer and the redeemer in the same server (or group of servers).
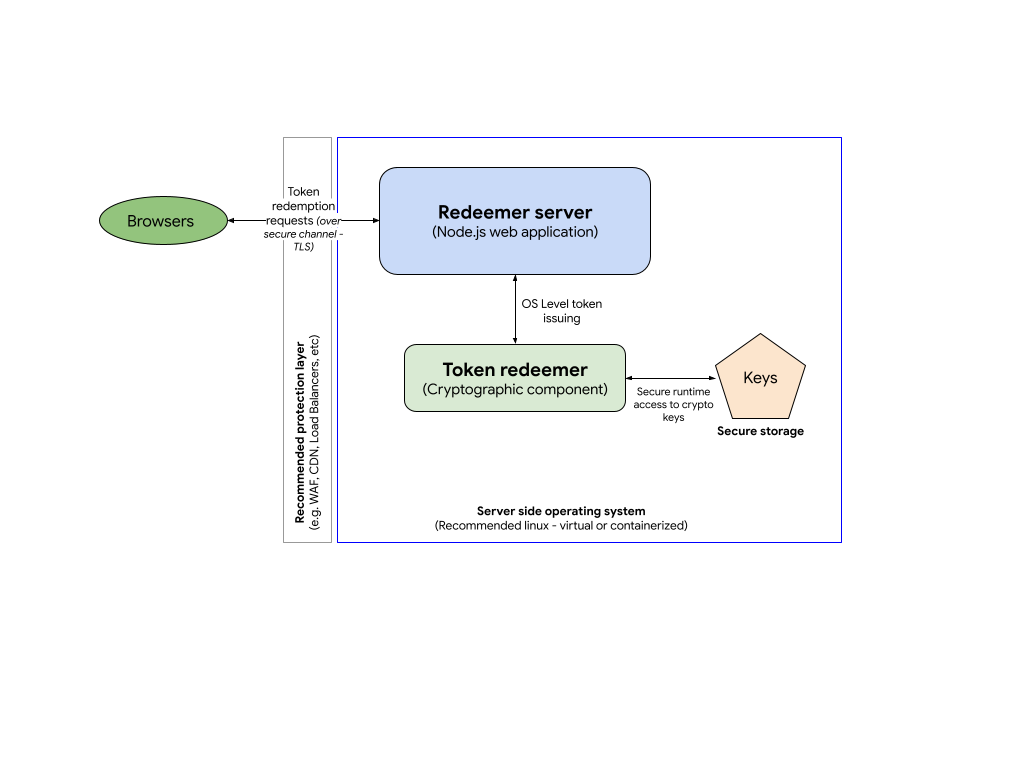
Technical requirements for redeemer servers
As per the protocol, you will need to implement at least two HTTP endpoints for your redeemer server:
/.well-known/private-state-token/redemption: endpoint where all token redemption will be handled. This endpoint will be where the token redeemer component will be integrated- Example code on GitHub
- Demo
Send a call to the redeemer server
To redeem tokens, you will need to implement a website fetch call to your redeemer stack in order to redeem tokens issued before.
    // redemption request
    await fetch("/.well-known/private-state-token/redemption", {
      method: "POST",
      privateToken: {
        version: 1,
        operation: "token-redemption",
        refreshPolicy: "none"
      }
    });
See code sample.
After redeeming a token, you can send the redemption record (RR) by doing another fetch call:
    // attach redemption records from the issuers to the request
    await fetch("<DESTINATION_RESOURCE>", {
      method: "POST",
      privateToken: {
        version: 1,
        operation: "send-redemption-record",
        issuers: [<ISSUER_DOMAIN>]
      }
    });
See code sample.
Deploy your implementation
To test your implementation, first navigate to the web page where the issuing call is made and confirm that the token(s) are created following your logic. Verify in your backend that the calls were made according to the specification. Then, navigate to the web page where the redeeming call is made and confirm that the RRs are created, following your logic.
Real world deployment
We recommend that you pick target websites that are part of your specific use case:
- Small number of monthly visits (~ <1 million visits/month): You should begin by deploying the API to a small audience first
- You own it and control it: If necessary you can quickly disable the implementation without complex approvals
- No more than one issuer: To limit the amount of tokens in order to simplify testing.
- No more than two redeemers: You need to simplify troubleshooting in case of problems.
Permissions policy
To function properly, the PST API must be available to the top-level page and any subresources that use the API.
The token-request operation is controlled by the private-state-token-issuance
directive. The operations token-redemption and send-redemption-record are
controlled by the private-state-token-redemption directive. In Chrome 132 and
later, the allowlist for these directives is set to * (all origins) by
default. This means that the feature is available to the top-level page,
same-origin iframes, and cross-origin iframes without explicit delegation.
You can opt out of PST token issuance or redemption for specific pages on your site by including private-state-token-issuance=() and private-state-token-redemption=() in the Permissions-Policy header for each page.
You can also use the Permissions-Policy header to control third-party access to PST. As parameters to the header origin list, use self and any origins you would like to allow access to the API. For example, to completely disable use of PST within all browsing contexts except for your own origin and https://example.com, set the following HTTP response headers:
Permissions-Policy:private-state-token-issuance=(self "https://example.com"),private-state-token-redemption=(self "https://example.com")
To enable the API for all cross-origin resources, set the origin list to *.
Learn how to control Privacy Sandbox features with Permissions Policy or delve deeper into understanding Permissions Policy.
Troubleshooting
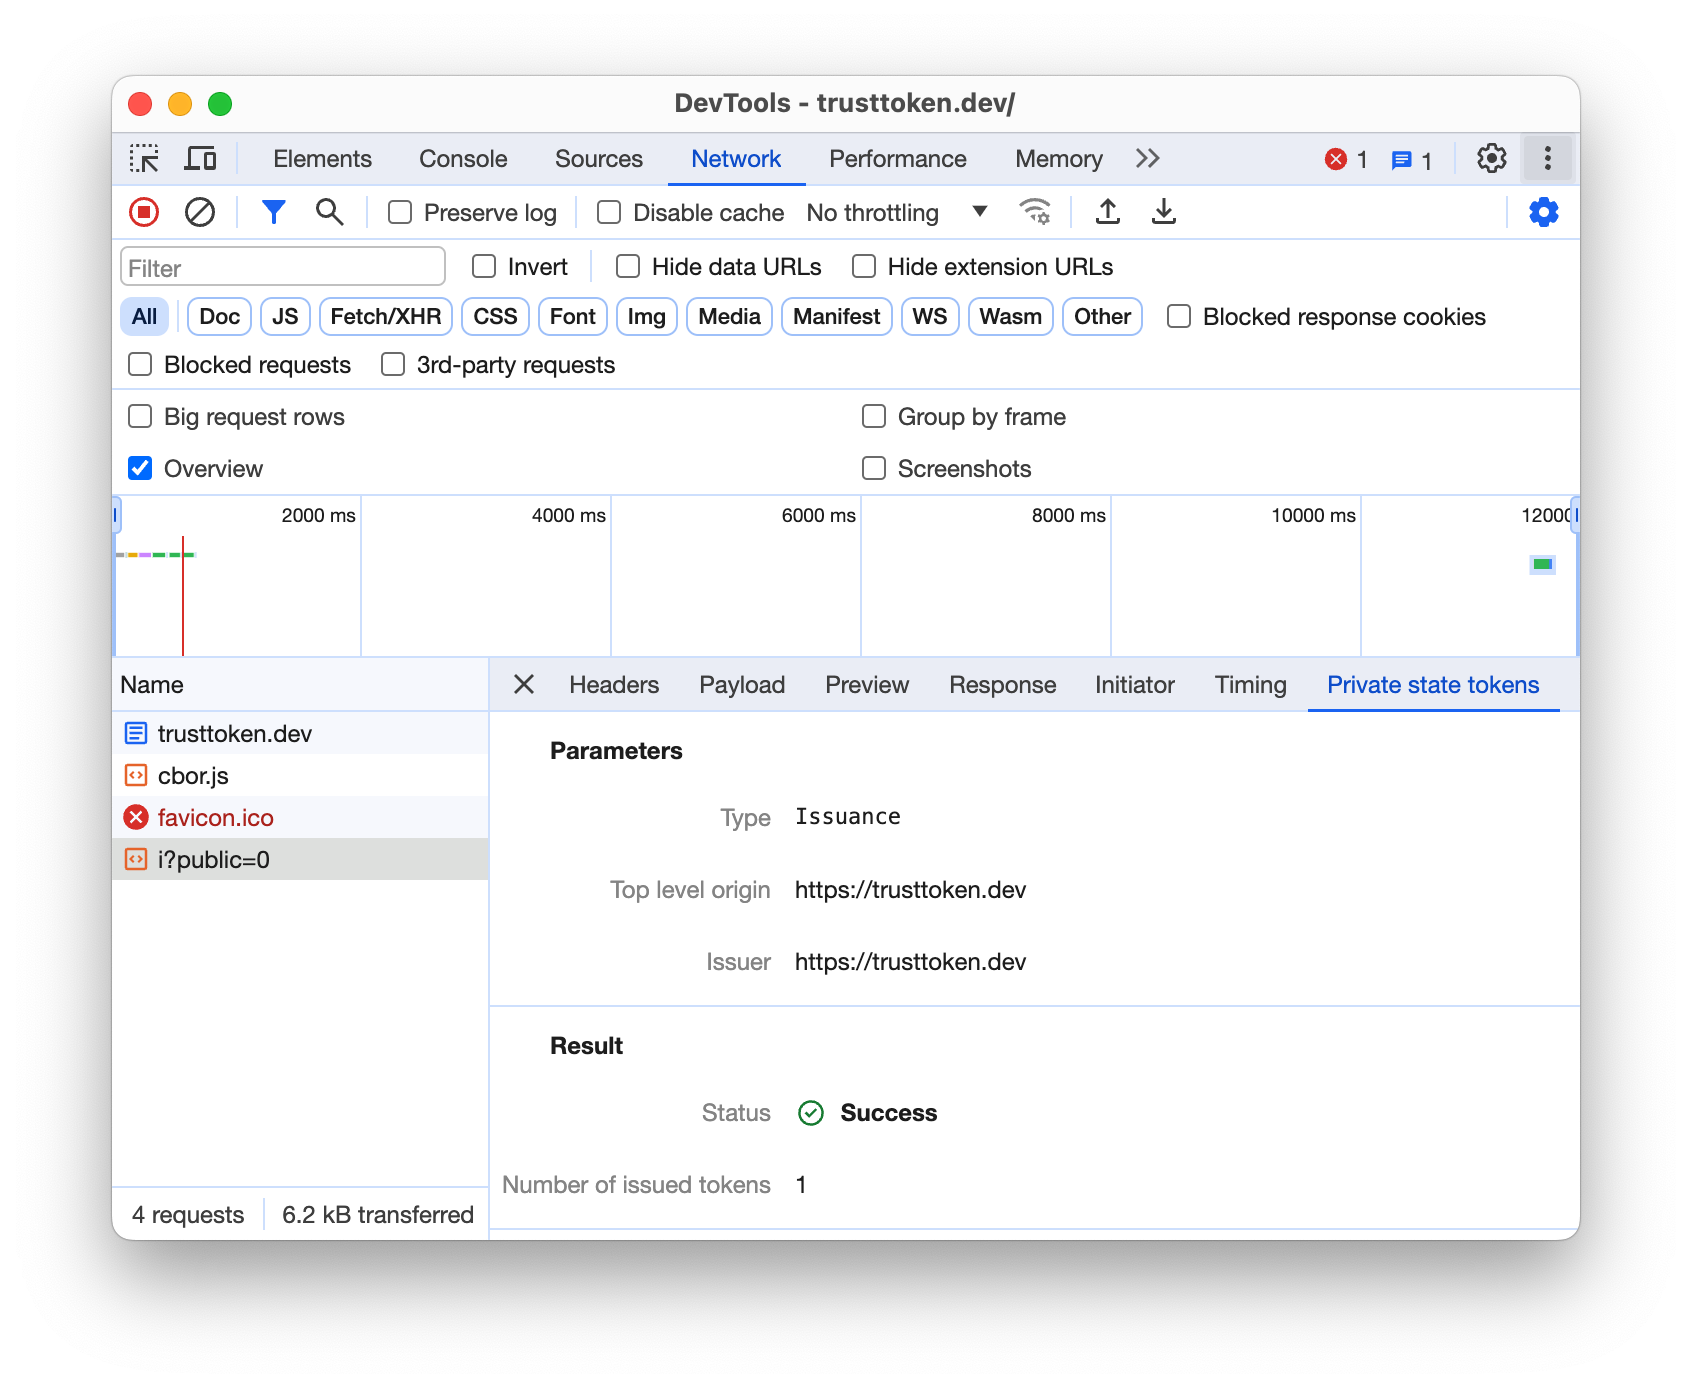
You can inspect PSTs from the Chrome DevTools Network and Application tabs.
On the Network tab:
On the Application tab:
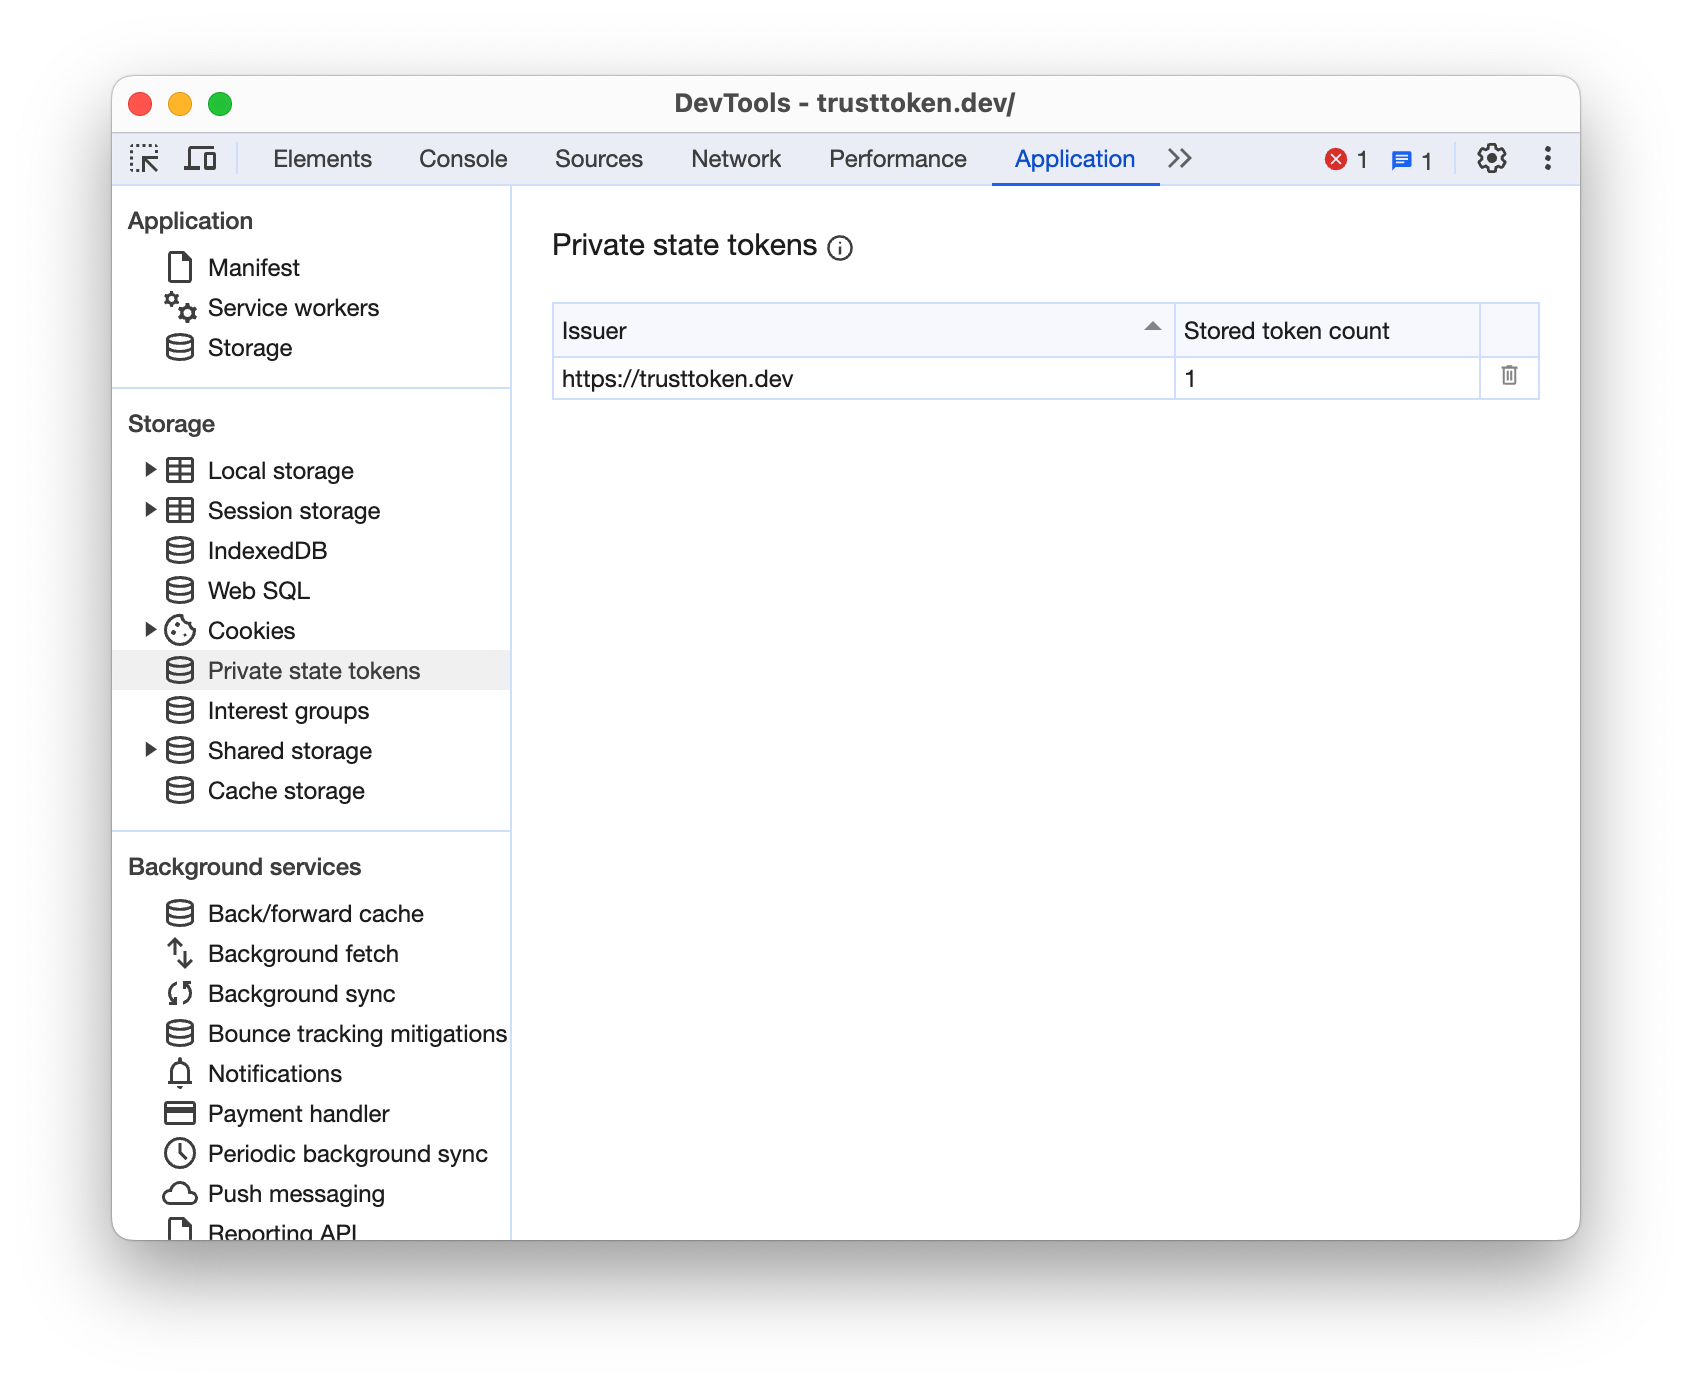
Read more about this DevTools integration.
Client best practices
If your website's critical functions depend on certain token issuers, prioritize them. Call hasPrivateToken(issuer) for these preferred issuers before loading any other scripts. This is crucial to prevent potential redemption failures.
The number of issuers per top-level is capped at two, and third-party scripts may also try to call hasPrivateToken(issuer) to prioritize their own preferred issuers. So, secure your essential issuers upfront to make sure your site operates as expected.
  // Prioritize your critical token issuer.
  document.hasPrivateToken('https://critical-issuer.example')
    .then(hasToken => {
      if (hasToken) {
        // Use the token or perform actions based on its availability.
      } else {
        // Handle the case where the token is not available.
      }
    });

  // Load third-party scripts or secure another token issuer (up to two in total).
Server best practices and troubleshooting
For your issuer and redeemer server to operate effectively, we recommend implementing the following best practices to ensure that you don't run into any access, security, logging, or traffic challenges for PST.
- Your endpoints must apply strong cryptography by using TLS 1.3 or 1.2.
- Your infrastructure must be ready to handle variable traffic volumes (including spikes).
- Make sure your keys are protected and secure, aligned with your Access Control Policy, Key Management Strategy, and Business Continuity Plans.
- Add observability metrics to your stack to make sure you will have visibility to understand usage, bottlenecks and performance issues after going to production.
More information
- Review developer docs:
- Begin by reading the overview to get up to speed with PST and its capabilities.
- Watch the PST intro video.
- Try the PST demo.
- Also read the API explainer to understand more details about it.
- Read more about the current spec of the API.
- Contribute to the conversation via GitHub issues or W3C calls.
- To better understand any of the terminology, review the Privacy Sandbox glossary.
- To learn more about Chrome concepts, such as 'origin trial' or 'Chrome flags', review the short videos and articles available from goo.gle/cc.