Developer Guide for Resonance Audio for Unity
This guide shows you how to:
- Add Resonance Audio components to your Unity projects
- Configure Resonance Audio room effects
- Use Resonance Audio reverb baking tools
See Getting started with Resonance Audio for Unity for details on installing the SDK and an overview of Resonance Audio components. This introductory guide also includes details on upgrading projects from GVR Audio components to Resonance Audio.
Add Resonance Audio components to your scenes
Resonance Audio components enhance the features of Unity’s built-in audio components. For details on this enhanced functionality, see “Resonance Audio components” in Getting started with Resonance Audio for Unity.
Prerequisite: configure your Unity project to use Resonance Audio
Configure your Unity project to use Resonance Audio for spatialized audio rendering.
-
Use Edit > Project Settings > Audio to open the AudioManager settings.
-
Select Resonance Audio as the Spatializer Plugin.
-
Select Resonance Audio as the Ambisonic Decoder Plugin.
Add an audio listener to your scene
Add a ResonanceAudioListener to your scene only if you are using the enhanced
functionality that it adds to Unity’s AudioListener. This component is not
required in order to use other Resonance Audio components. It is also not required
in order to use Resonance Audio for spatialized audio rendering.
- (Optional) Attach a new
ResonanceAudioListenercomponent to the same game object that has your UnityAudioListenercomponent. Typically, this is theMain Camera.
Add a sound source to your scene
-
Add a Unity
AudioSourcecomponent to a game object that you want to use as a sound source. -
Set the following
AudioSourceproperties in order to allow Resonance Audio to spatialize this audio source:-
Select an
AudioClip. -
Set the Output audio mixer group to the Master bus of the ResonanceAudioMixer.
-
Set the Spatial Blend slider to 3D.
-
Enable Spatialize checkbox. Note that, this checkbox is only visible when you’ve configured your project to use the Resonance Audio spatializer plugin.
-
Enable Spatialize Post Effects to insert the spatializer effect after effect filters.
</li>
-
-
(Optional) Add a
ResonanceAudioSourcecomponent to the game object if you need the enhanced functionality that it adds to the UnityAudioSource.
Note that if you add aResonanceAudioSourceto a game object without adding anAudioSourcefirst, Unity adds anAudioSourceautomatically to the game object.
 </li>
</li>Alternatively, you can add the SDK’s ResonanceAudioSource prefab to your scene. This prefab has the required properties already set.
Add an Ambisonic soundfield to your scene
-
Add a new
ResonanceAudioSourcecomponent to a game object that you want to use as a sound source. A UnityAudioSourcecomponent is added automatically to the game object if it does not already have one. -
Locate the Unity
AudioSourcecomponent on this game object and set the following properties:-
Select an
AudioClip. Note that the selected Ambisonic file should be in ACN/SN3D format and should have Ambisonic checked in the in the audio clip’s asset import settings. -
Set the Output audio mixer group to the Master bus of the ResonanceAudioMixer.
-
Make sure the Spatialize checkbox is disabled. Note that, this checkbox is only visible when you’ve configured your project to use the Resonance Audio spatializer plugin.
-
-
Click Play. You should hear the new soundfield played back.
Alternatively, you can add the SDK’s ResonanceAudioSoundfield prefab to your scene. This prefab has the required properties already set.
Add an audio room to your scene
-
Attach a new
ResonanceAudioRoomcomponent to a game object to which you want to attach the audio room.A yellow rectangular Gizmo appears in the Scene view, showing the adjusted room boundaries.
-
You can adjust audio room properties, such as surface materials and reverb modifiers, to fine tune your environment as needed. See Room effects in Unity for more details on configuring room effects.
Add a reverb probe to your scene
See Reverb baking tools in Unity.
Room effects in Unity
Room effects can be configured in the ResonanceAudioRoom script component.
Adjust the following parameters to achieve realistic environmental audio for your scenes.
Surface materials
You can assign an acoustic surface material to each of the six Resonance Audio Room acoustic surfaces. Use the surface’s drop-downs to select surface materials.
Each of the acoustic materials defines different degrees of absorption or reflectivity at different frequencies. For example, Heavy Curtain absorbs most high frequencies, giving rooms a dryer, warmer, sound. Polished Concrete reflects more sound energy at all frequencies, resulting in much brighter and more echoic room characteristics.
Reflectivity
This parameter lets you control the strength of early reflections in a Resonance Audio Room, giving your users an impression of the size and shape of the room around them.
For example, you can reduce the value of this parameter to simulate the sounds of tightly confined small spaces.
Reverb properties
Three parameters affect late reverberation in the Resonance Audio Room:
Reverb Gain
This parameter lets you adjust room effects’ loudness, compared to direct
sound coming from Resonance Audio sources in a scene.
You can use this parameter to adjust how “wet” or “dry” the mix sounds. For example, if you want the room reverb to be less powerful, adjust the mix to be more “dry”.
Reverb Brightness
This parameter lets you balance the amount of low or high frequencies in your
reverb. Resonance Audio Room effects do this by providing different reverb decay
rates at different frequencies, just like in real rooms.
You can use this parameter to adjust how full a room sounds. For example, reduce reverb brightness to give the impression that a room is fuller and simulate the sounds of a room containing many objects or people.
Reverb Time
This parameter lets you increase or decrease reverb length. The value is a
multiplier on the reverb time calculated from the surface materials and room
dimensions that you specify for the Resonance Audio Room.
You can use this parameter to make acoustic adjustments to the size of the simulated room.
Room size
Use the X, Y, and Z parameters to set the dimensions of a Resonance Audio Room in meters.
Room Size dimensions affect room sound and set boundaries that, when crossed, trigger the room effects to toggle on and off or transition smoothly from one Resonance Audio Room to another.
Reverb baking tools in Unity

Geometry-based reverb baking enables highly realistic reverbs by ray-tracing against static scene geometry. This reverb feature complements the Resonance Audio Room, which models only box-shaped rooms but can be reconfigured during runtime.
This feature provides:
-
Modeling of arbitrary geometries: Actual scene geometries are used, so acoustic characteristics are better captured.
-
Flexible assignment of surface materials: Materials are not limited to just one per wall.
-
Less manual configuration: You do not have to “decompose” a complex shape, like a forest or cave, into a series of box-shaped components.
Try out a reverb baking demo
-
In the Unity Project window, go to Assets > ResonanceAudio > Demos > Scenes and double-click ReverbBakingDemo.
-
Take a look at the demo components.
The scene contains:- Spaces with different acoustic properties: a cathedral, a bathroom, and a cave
- Eight Reverb Probes placed around the spaces
- A Player game object
The reverb probes are the source of ray-tracing for reverb precomputation. The reverb probes also contain the precomputed reverb that has been “baked”.
In this scene, they are preloaded with results (RT60s). RT60s describe the time it takes for sounds in different frequency bands to decay by 60 dB in an acoustic environment.
Each probe has a shape of a sphere or a box. When a listener enters the shape, its baked reverb is applied.
-
Make sure to wear headphones and click Play. You should hear the player clapping their hands.
-
Use arrow keys or
WASDkeys and a mouse to hear the reverb change as you move around the scene.
Create a reverb probe
A reverb probe defines a location where reverb properties are computed (or sampled). The properties are baked using ray-tracing to simulate sound waves interacting with the environment.
You can define a reverb probe’s region of application. This is the region where baked reverb is applied when the Resonance Audio Listener enters it.
You can create and configure a new probe or create additional probes by duplicating and modifying an existing one.
To create a reverb probe:
-
Use one of the following options:
- Create an empty game object. Then, use one of the following options to
add a ResonanceAudioReverbProbe.
From What to do **Inspector** window Select **Add Component** > **ResonanceAudioReverbProbe** **Component** menu Select **ResonanceAudio** > **ResonanceAudioReverbProbe** - Use a prefab:
Go to the Assets directory and select ResonanceAudio > Prefabs.
Drag a
ResonanceAudioReverbProbe.prefabinto the scene hierarchy.
- Create an empty game object. Then, use one of the following options to
add a ResonanceAudioReverbProbe.
-
After adding a reverb probe to your scene, you should see a magenta-colored box in the scene view. The box represents the reverb probe’s region of application.

Placing a reverb probe
-
Place probes in acoustically distinct places (Probe 1 and 2 in the following example).
-
Add probes where reverb is expected to vary spatially, such as in the transition between two different spaces (Probe 3).
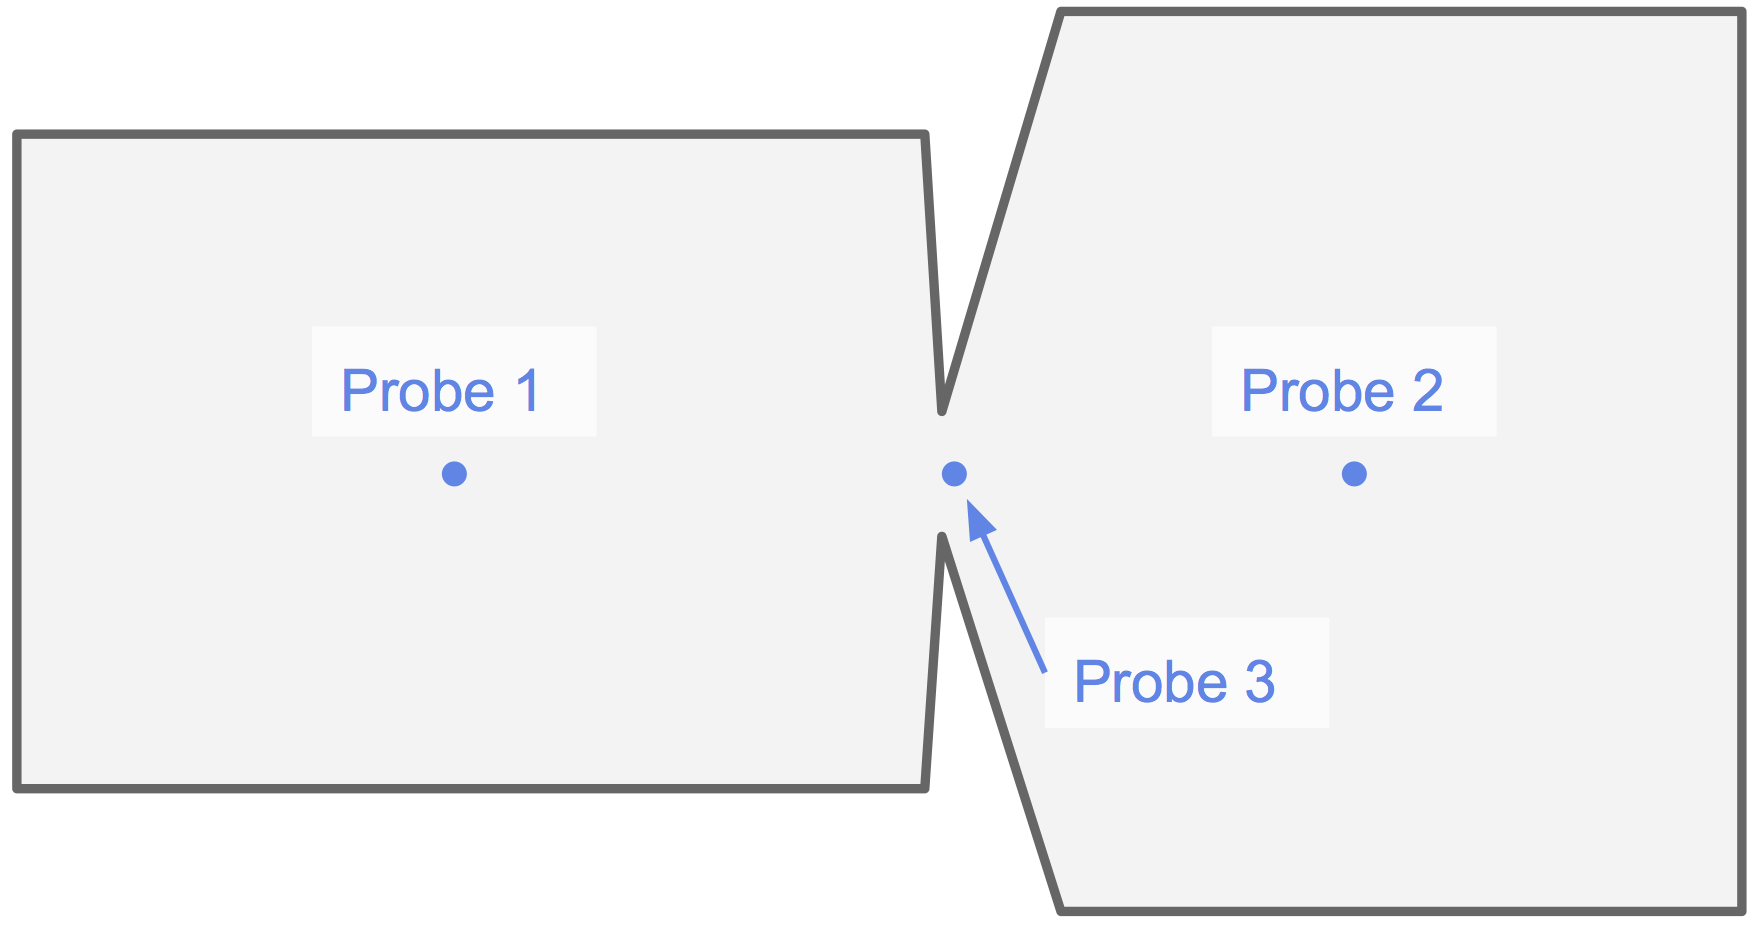
In general, the more the reverb is expected to vary spatially, the more probes are needed.
Modifying a reverb probe
To modify existing reverb probes:
- Use the Shape drop-down to select a sphere or box.
The corresponding magenta-colored wireframe appears in the scene view. -
Adjust the probe using one of the following options:
-
Adjust the reverb probe size (in meters):
-
Sphere: Specify a Radius.
-
Box: Specify Size values for the three box dimensions.
-
-
Use the Unity Editor’s move/rotate/scale handles to modify the probe.
-
Controlling when reverb probes are active
Use the reverb probe’s Only When Visible checkbox to avoid enabling a reverb probe when the player enters the probe’s region of application but does not have a clear line of sight to the probe.
This can be helpful in cases where the simple box or sphere shape of the region of application does not match well with actual scene geometries.
For example, the spherical region of application for Cathedral Sanctuary Reverb Probe does not fit perfectly to the building. If the listener (the white camera icon below) is outside the building but inside the spherical region, the reverb inside the building is applied. This might not be the desired effect.
If you enable Only When Visible, the listener no longer hears the reverb baked in the Cathedral Sanctuary Reverb Probe, even when the listener is inside its region of application.

Understanding overlapping reverb probes
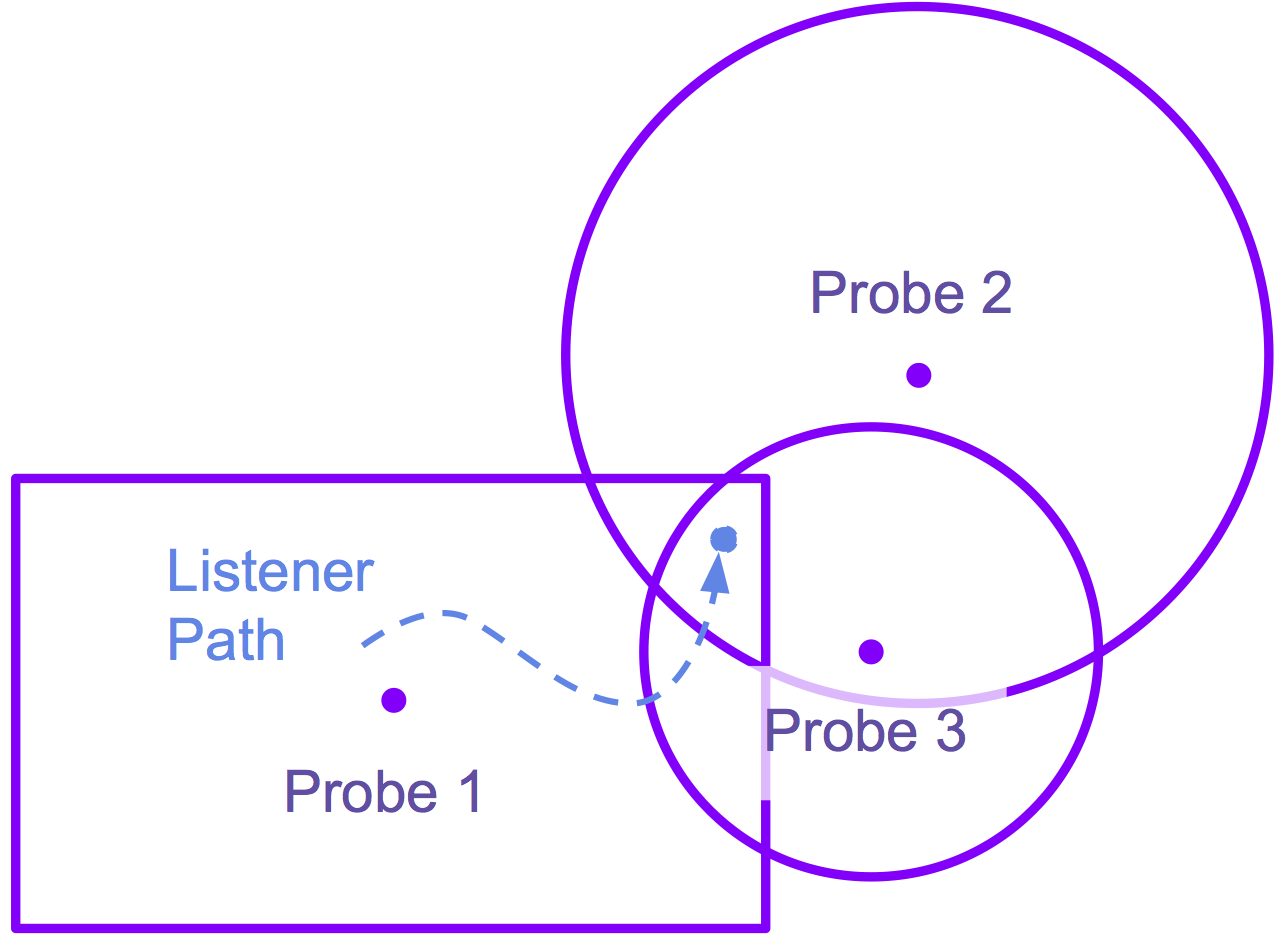
When the listener is inside the shapes defined by several reverb probes, the most recently entered probe is used. If a probe’s Only When Visible option is enabled, then the most recently entered “visible” reverb probe is used.
In the following example, the listener was originally in Probe 1, then entered Probe 3, and finally crossed the boundary between Probe 3 and 2. The listener is in an overlapping application region of all three probes, but only reverb baked in Probe 2 is applied.
Configure reverb baking settings
-
From the menu select ResonanceAudio > Reverb Baking to open the Reverb Baking configuration window.

Map visual materials to acoustic materials
Support for mapping visual materials to acoustic materials assumes that objects that look alike should sound alike. If this is not the case for your project, consider separating one visual material into several. Then, map each of these visual materials to its own acoustic material.
-
In the Reverb Baking window, click the object picker of the Material Map row and select ReverbBakingDemoMaterialMap.
-
Double-click the field showing ReverbBakingDemoMaterialMap. An asset is selected and the material mappings are shown in the Inspector window.
All visual materials and the terrain used in the scene are listed in the lefthand column. -
Map the visual materials to acoustic materials using the drop-down menus in the righthand column.
Select Visualize Mode in the Reverb Baking window to see the mapped acoustic materials in the scene view. -
(Optional) Click Reset All to delete your mappings. All visual materials are mapped to “Transparent” by default.
-
(Optional) From the menu select Assets > Create > ResonanceAudio > Material Map to create a different set of mappings. In the Reverb Baking window, select the newly created material map asset to load and modify the mappings.

Baking reverb to probes
-
In the Reverb Baking window, locate the Select Reverb Probes menu.
-
Select probes for reverb baking.
-
Click Bake to precompute the reverb probes. A log message “Reverb baking is completed successfully.” shows in the console window when it is done.
-
Take a look at one of the selected Reverb Probes. In the Inspector window, there should be some RT60s for different frequency bands (low-frequency to high-frequency bands appear left to right).
-
Use Gain, Brightness, and Time settings for configuring post-baking reverb properties for each probe.
-
Click Play and walk around in the scene to hear the updated baked reverb in action.

Include only specific game objects in reverb computations
In some cases, you cannot include every geometry in reverb computations for your scene. For example, if your scene has a “smoke” object and it has a plume-shaped geometry, you might not want to include the plume in the reverb computation because it does not interact with sound.
To exclude game objects from reverb computation, use one of these methods:
Exclude a layer
- Identify an existing layer or define a new layer to exclude.
For example, in the _ReverbBakingDemo_ scene, the _Terrain_ game object
is assigned to the "Ignore Raycast" layer.
- Uncheck this layer in the **Reverb Mask** drop-down menu to exclude it from reverb computations.
- (Optional) Select **Everything** in the **Reverb Mask** menu to include all layers in reverb computation. Included objects reflect sound based on their mapped acoustic materials.

Toggle non-static game objects
Reverbs are precomputed and cannot change in runtime. For this reason, you
might not want to include non-static objects, such as a moving character, in
reverb computations.
-
Disable the Include Non-Static Game Objects option to exclude non-static objects from reverb computations.
For example, in the demo scene, the Bathroom_door object is not static. If Include Non-Static Game Objects is disabled, the Bathroom_door object does not appear in Visualize Mode.
This demo scene uses the following models, which are licensed under CC BY 3.0:
- Sink + Mirrors, by Grian Talamonti
- Bathroom Sink Faucet, by Jarlan Perez
- Toilet Paper Roll, by Jarlan Perez
