The Controller Emulator app has two use-cases:
It allows you to use a second Android phone in place of a Daydream controller, in case you don't have access to one.
You can also use it with Unity and Unreal to emulate a Daydream controller in the engines' in-editor preview.
Setup
To use the Controller Emulator, you must have a spare phone (not your headset phone) running KitKat or above. These instructions were tested using a Nexus 5X. This phone is used to emulate the Daydream controller and must have a gyroscope. We will refer to this phone as the controller phone.
Install the Controller Emulator on your controller phone.
Pair your headset phone to your controller phone via Bluetooth.
- On both phones, go to Settings > Bluetooth.
- Optionally, rename your controller phone in order to make it easier to identify. To do this, press , then Rename this device. Change its name to, for example, (Your Name)'s Controller Phone.
- On the headset phone, tap the controller phone's name on the list of devices. This will show a dialog box on both devices to confirm the pairing.
- Confirm the pairing, then return to the home screen on both devices.
Configure the Controller Emulator device.
- On the headset phone, launch the app for Daydream you installed earlier.
- Press the button at the bottom of the screen, then press Setup.
- You should now be in the Google VR Services settings screen. Tap the Version item 7 times to show the Developer Options.
- Select Controller emulator device.
- Select the controller phone from the list.
- Close the app by pressing the square Recents button in the bottom-right and swiping the app away.
Remember that your headset phone and controller phone must be paired via Bluetooth in order to use the Controller Emulator. Refer to the steps in the previous section for how to do this.
Interface
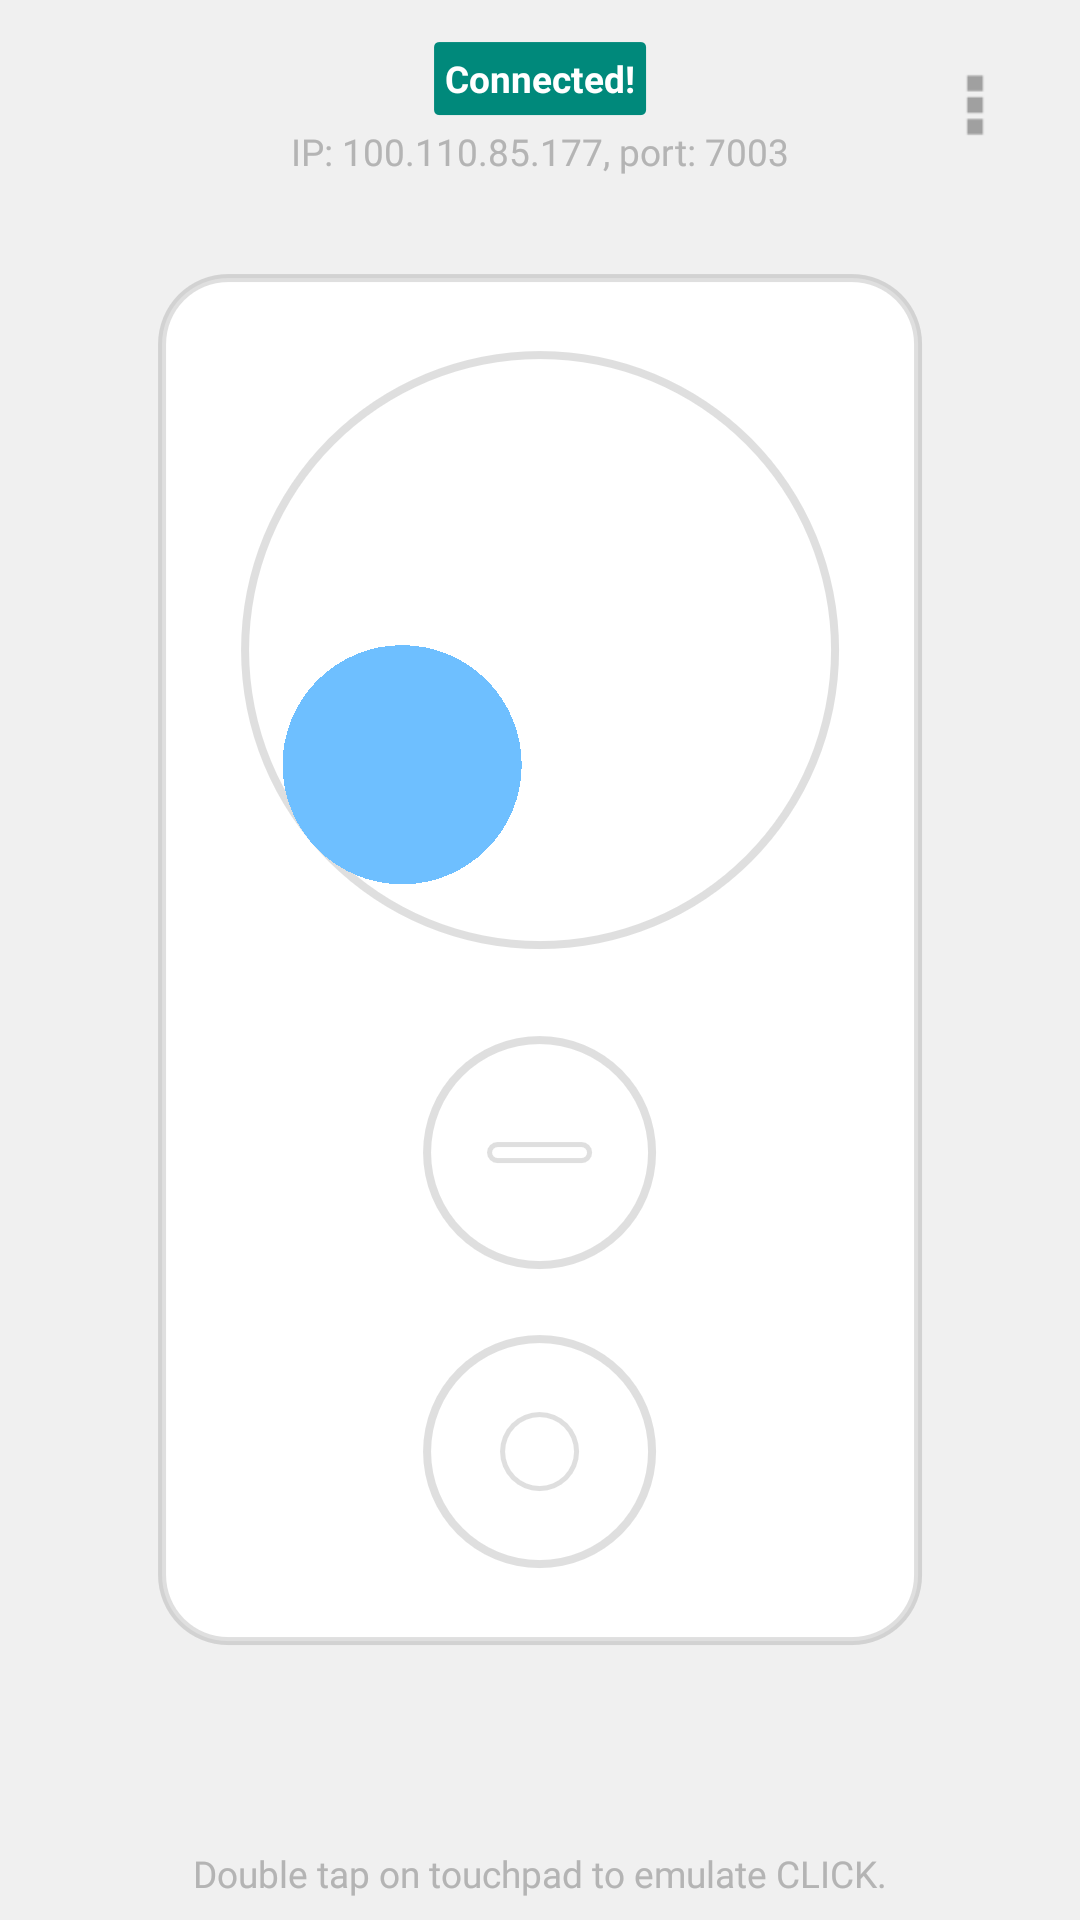
The Controller Emulator UI contains these elements:
Connection indicator (top): This text indicates whether the emulator is connected to a headset phone. It also shows network information for the controller phone.
Touchpad area (large circle): This area emulates the touchpad area of a controller. It does not support multi-touch.
Touchpad click emulation: On the real controller, the touchpad can be clicked by pressing down on it. This is considered to be a button, and is called the "click button". Clicking the touchpad on a physical controller is emulated by double-tapping the touchpad in the Controller Emulator and will send Click button events to the app.
App button (immediately below touchpad): This button sends App button events to the app.
Home button (bottom): This button is reserved for system use and cannot be used by your app. It is also used to recenter the controller.
The behavior of the touchpad, Click button and App button are up to your application. Typically, the click should map to your application's primary action (e.g. selecting, shooting) and the app button should be used for secondary actions (e.g. menu, pause, tool selection).
The physical controller also includes buttons to control the volume of your
headset phone which are not emulated. The
Controller
class shows the various inputs and buttons you can listen to.
Recenter the controller
If you find that the headset and controller are not aligned, you can recenter them. To recenter, press and hold the Home button on the controller/emulator (the lower button with a circle). Hold the controller/phone in front of you and level with the horizon for at least 1 second, then release the Home button.
Overlay
Since users can't see a controller with a headset on, it is designed to be easy to understand by touch alone. To simulate this with the Controller Emulator, you can use a physical cutout so you can feel the trackpad and button areas.
| Controller Emulator Overlays | |
|---|---|
| Letter | Download |
| Controller Emulator Overlay - A4 | Download |
| Controller Emulator Overlay - Vector | Download |
Game engines
You can use the Controller Emulator in Play mode of both the Unity and Unreal editors as follows:
Enable USB debugging by going to Settings > Developer options.
- If Developer options is hidden, go to Settings > About phone and tap Build number seven times. Return to the previous screen to find Developer options.
Connect the controller phone to your computer with a USB cable.
(Unity only) Select the
USBoption forEmulatorConnectionModeon theGvrControllerInputscript in the Unity scene.
The controller phone should now connect automatically when you are in Play Mode.
(Unity only) Note that this is incompatible with Instant Preview, and the Controller Emulator will not work over USB if any USB-connected phone has the Instant Preview app installed.