This tutorial shows how to build a Google Chat app that helps
Google Chat users manage their personal and business contacts. To collect
information, the Chat app prompts users to complete
a contact form in card messages and dialogs.
See the Chat app in action:
- 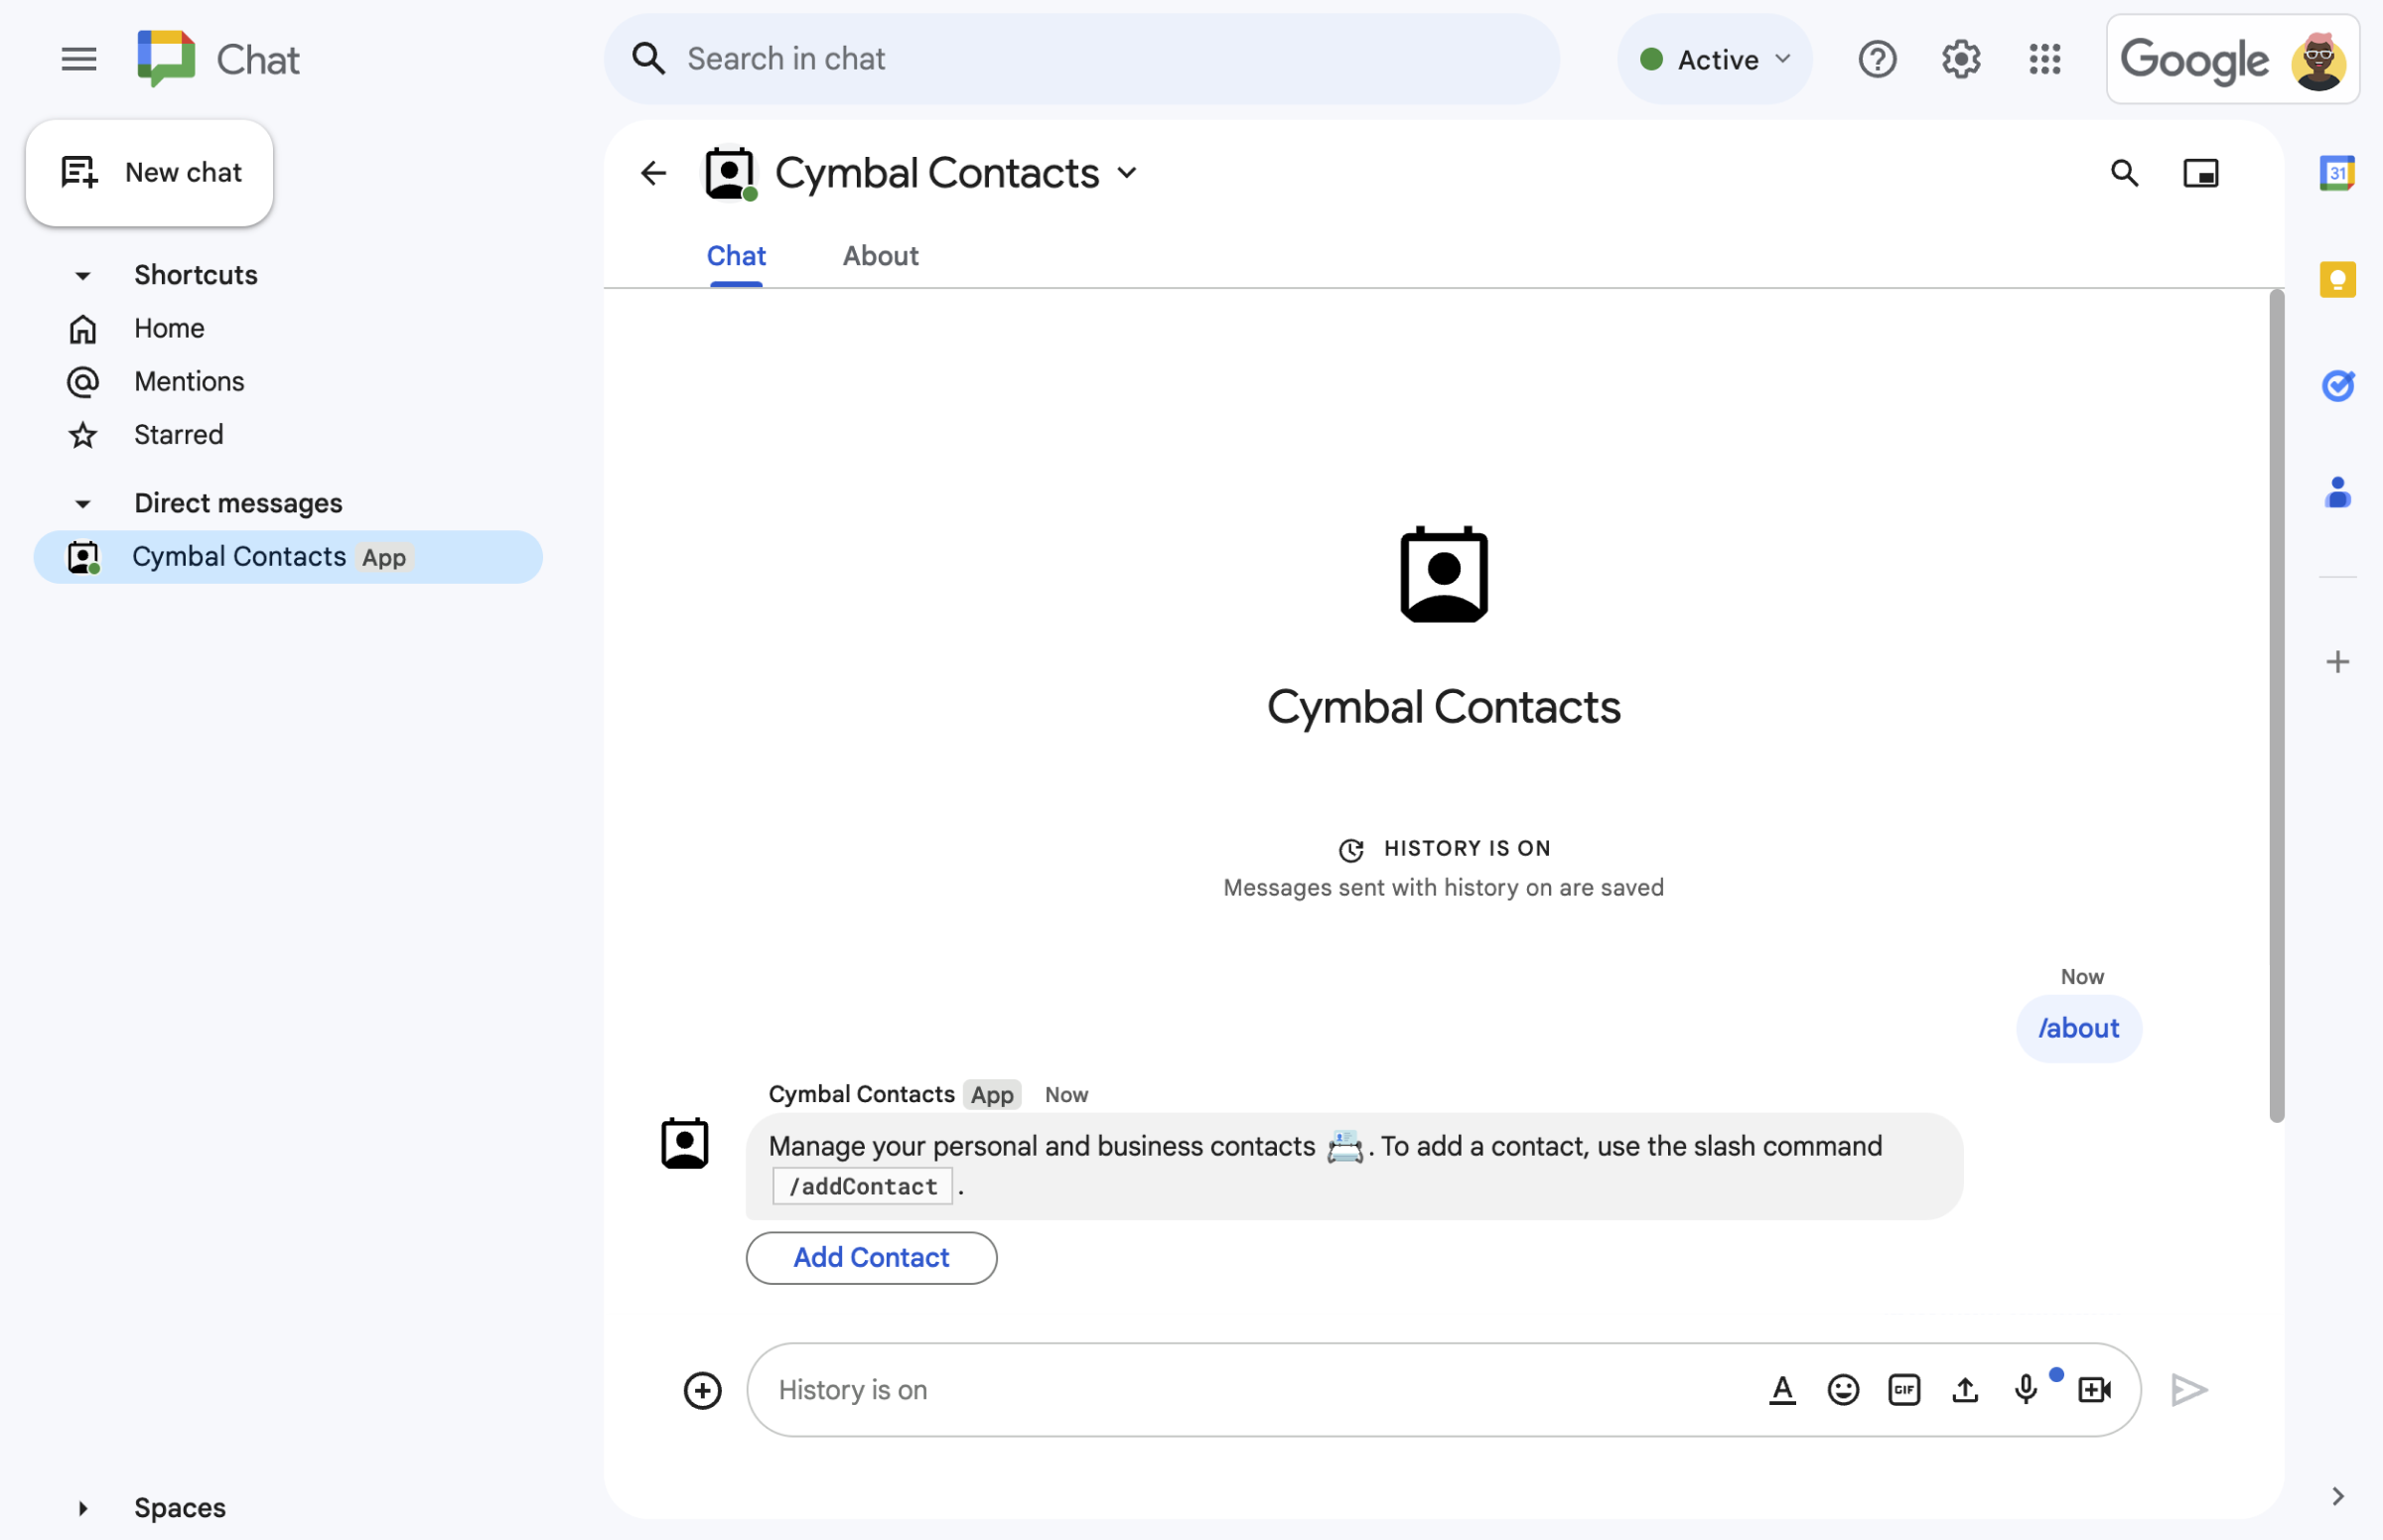 **Figure 1.** The Chat app responds to the slash command `/about` with a text message and button that opens a contact form.
- 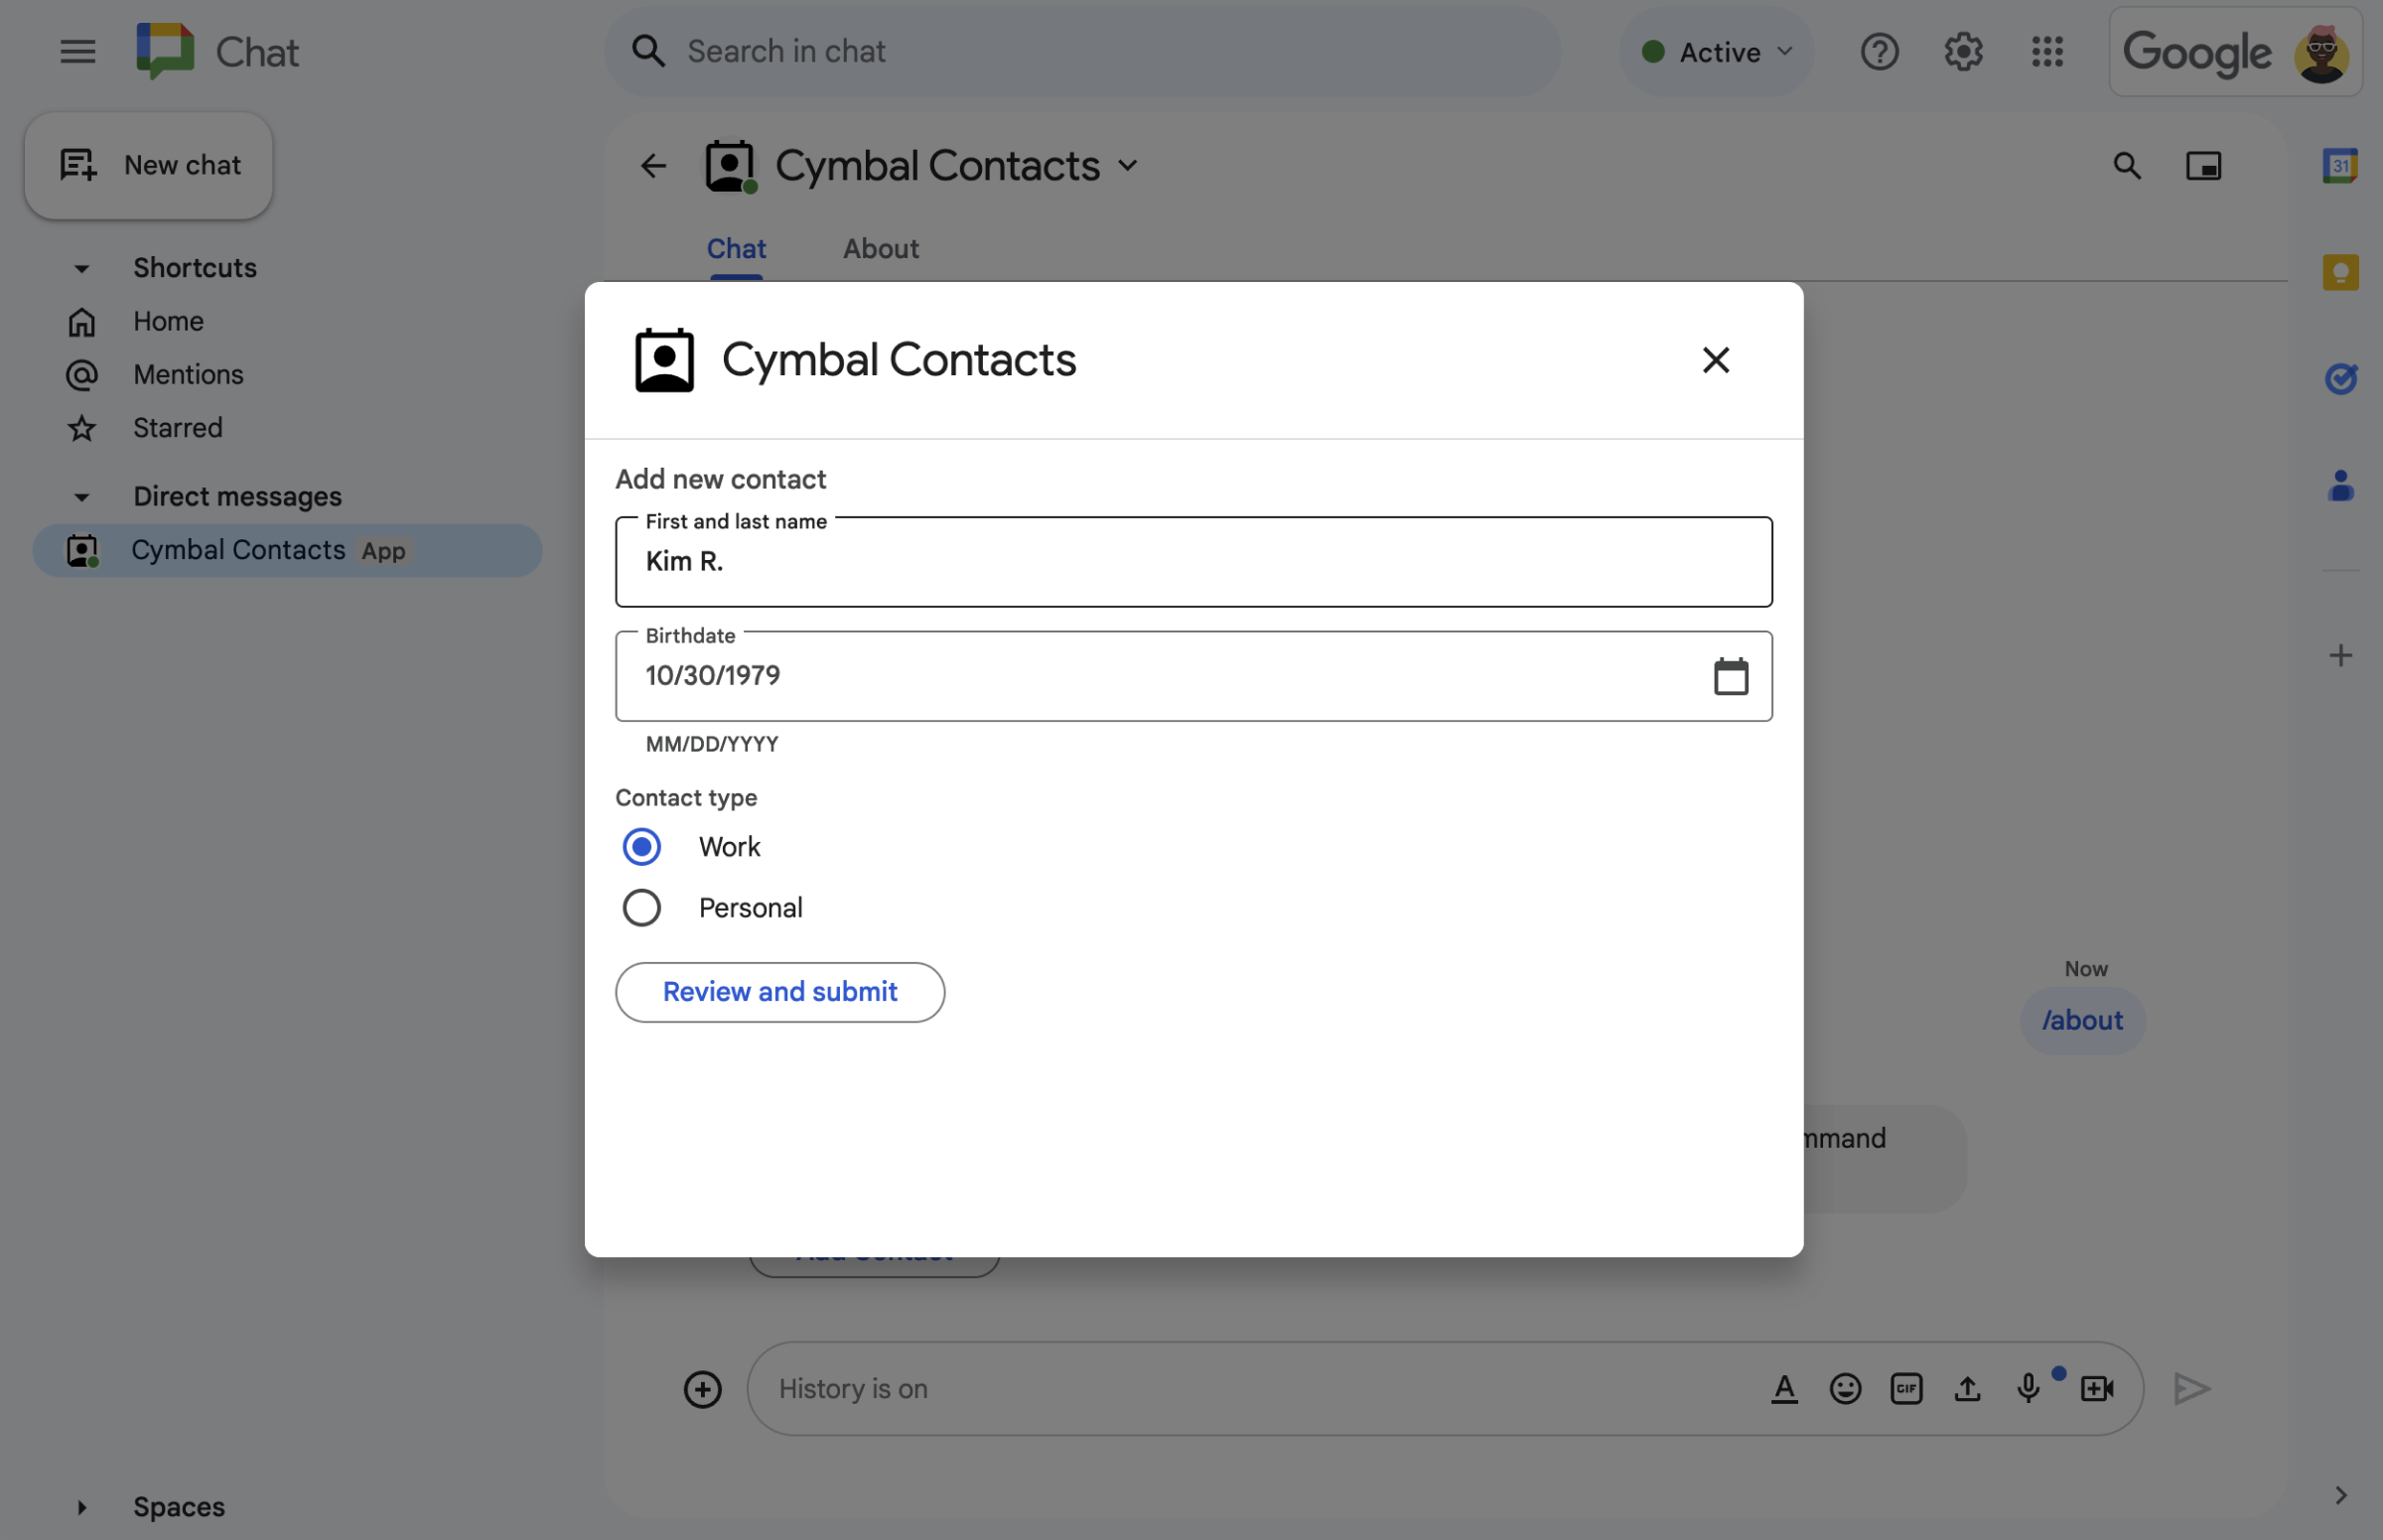 **Figure 2.** The Chat app opens a dialog where users can input information about a contact.
- 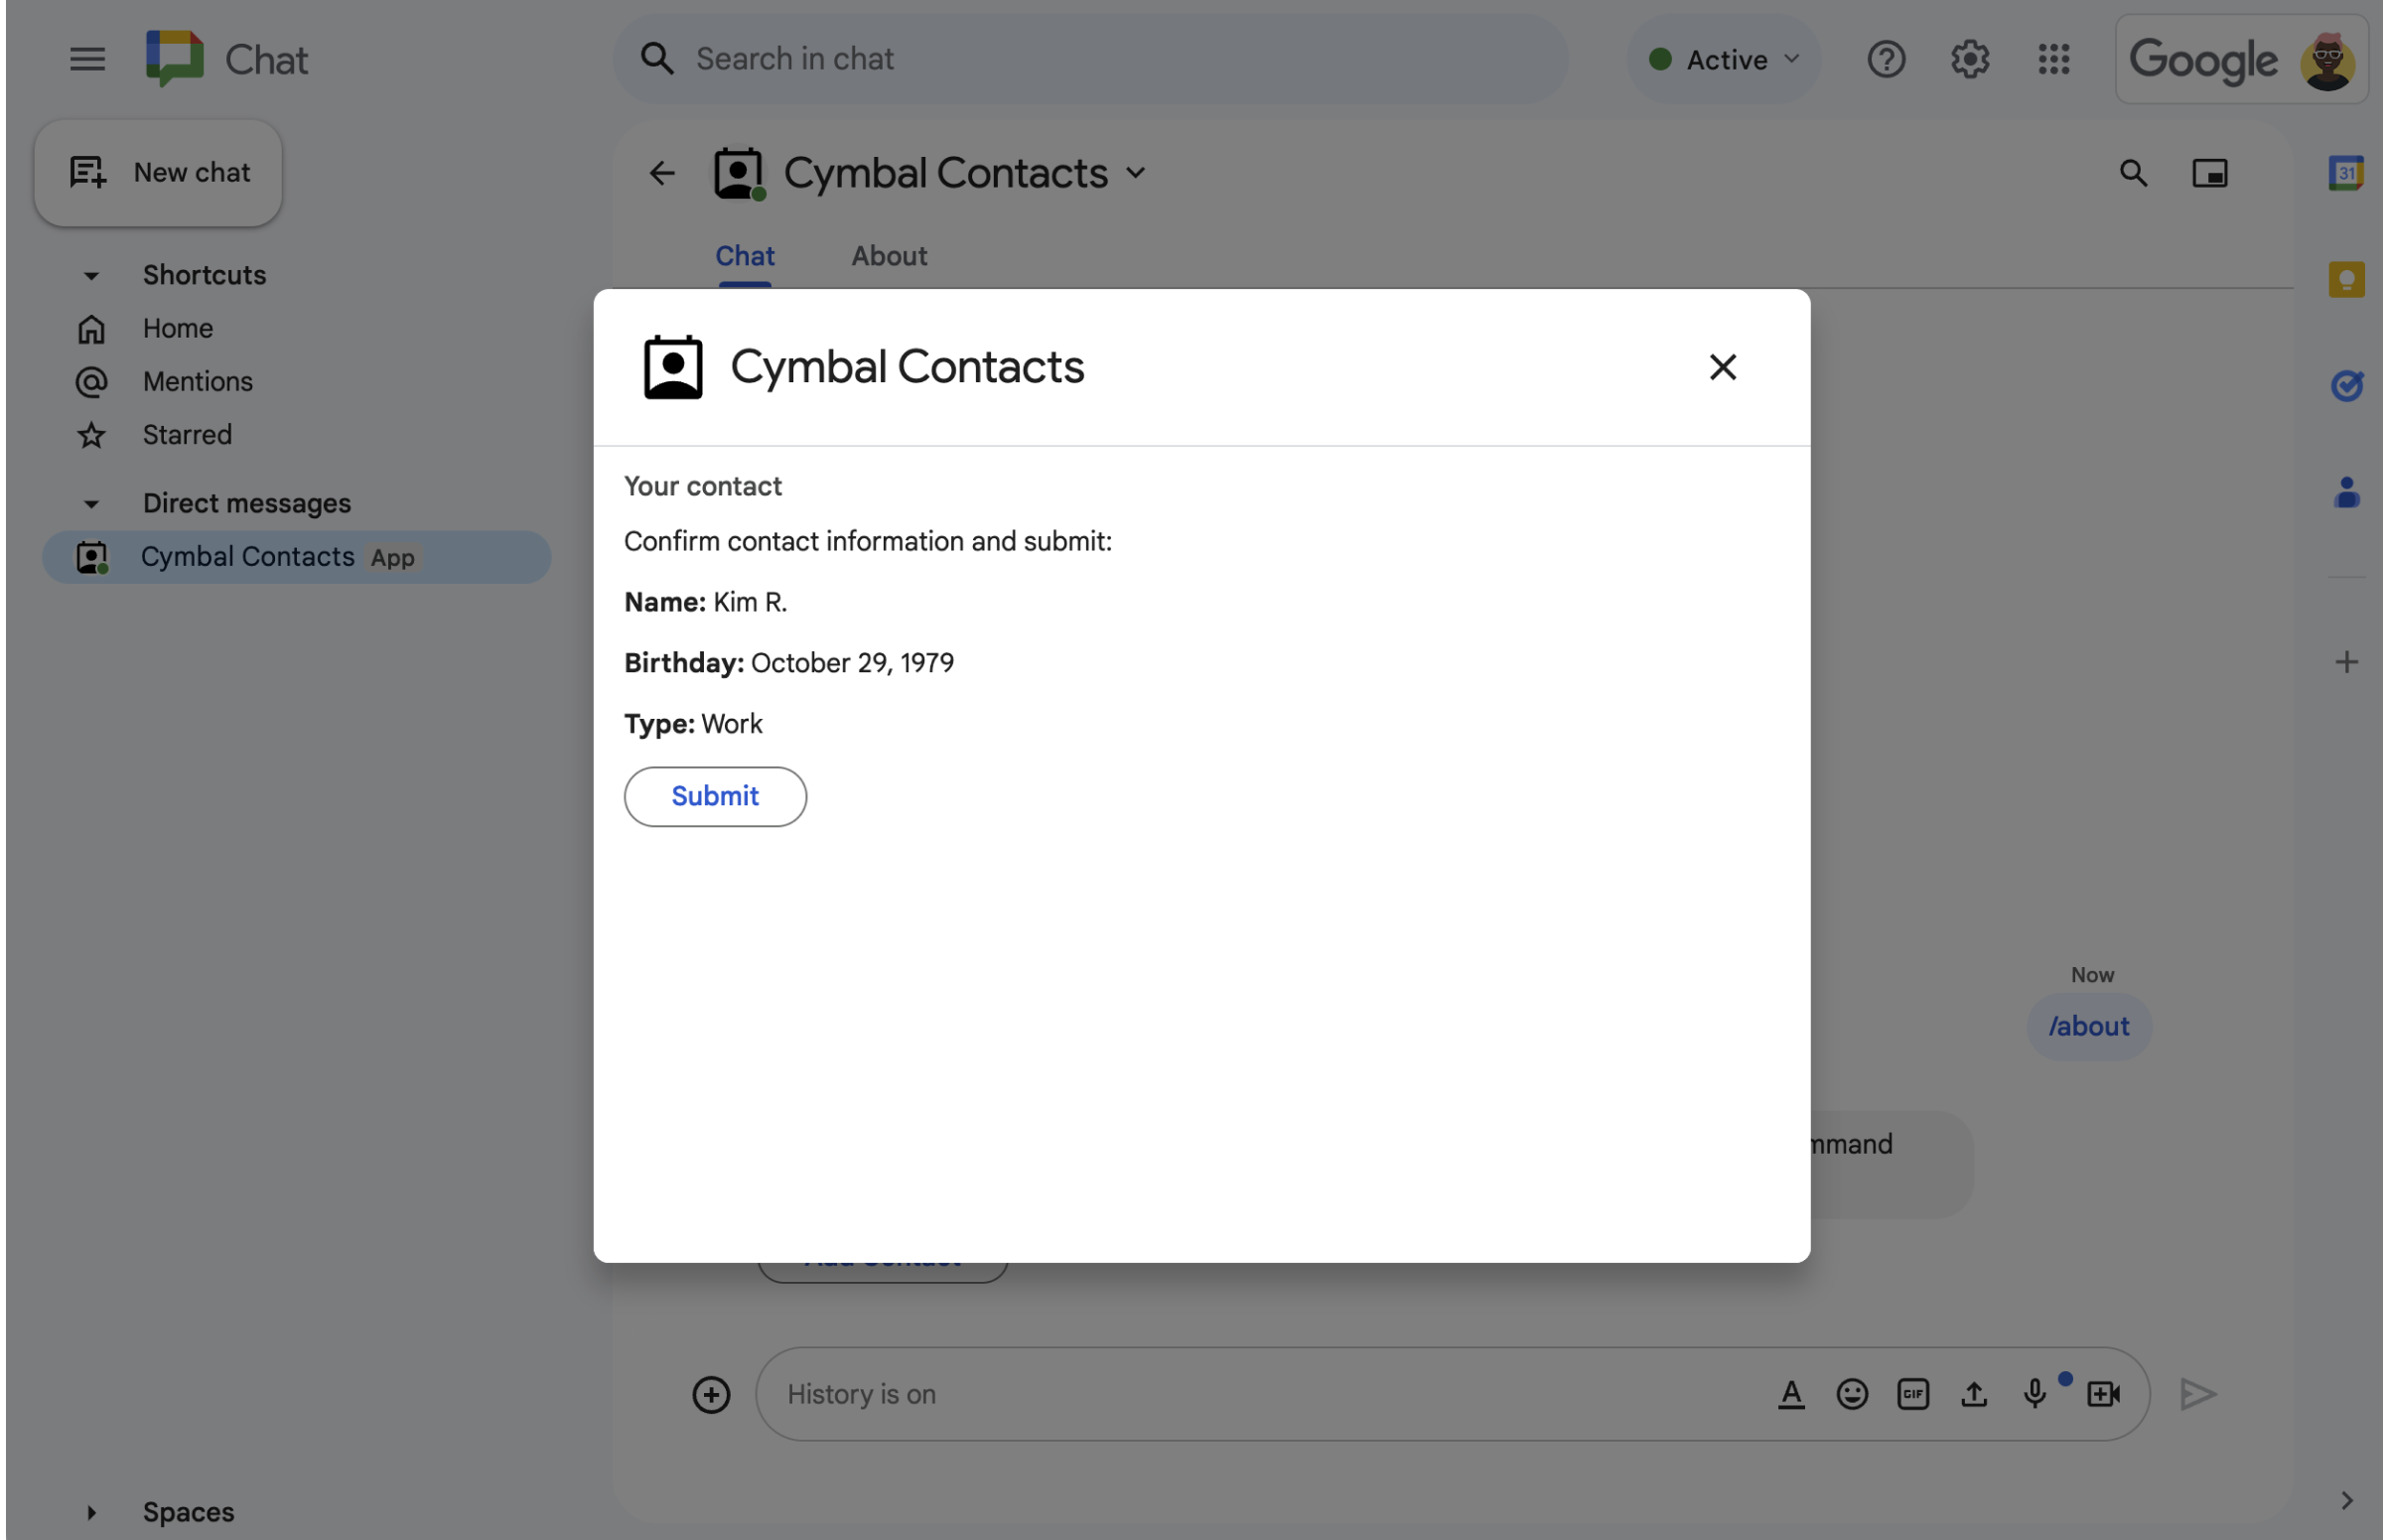 **Figure 3.** The Chat app returns a confirmation dialog so that users can review and confirm the information before submitting.
- 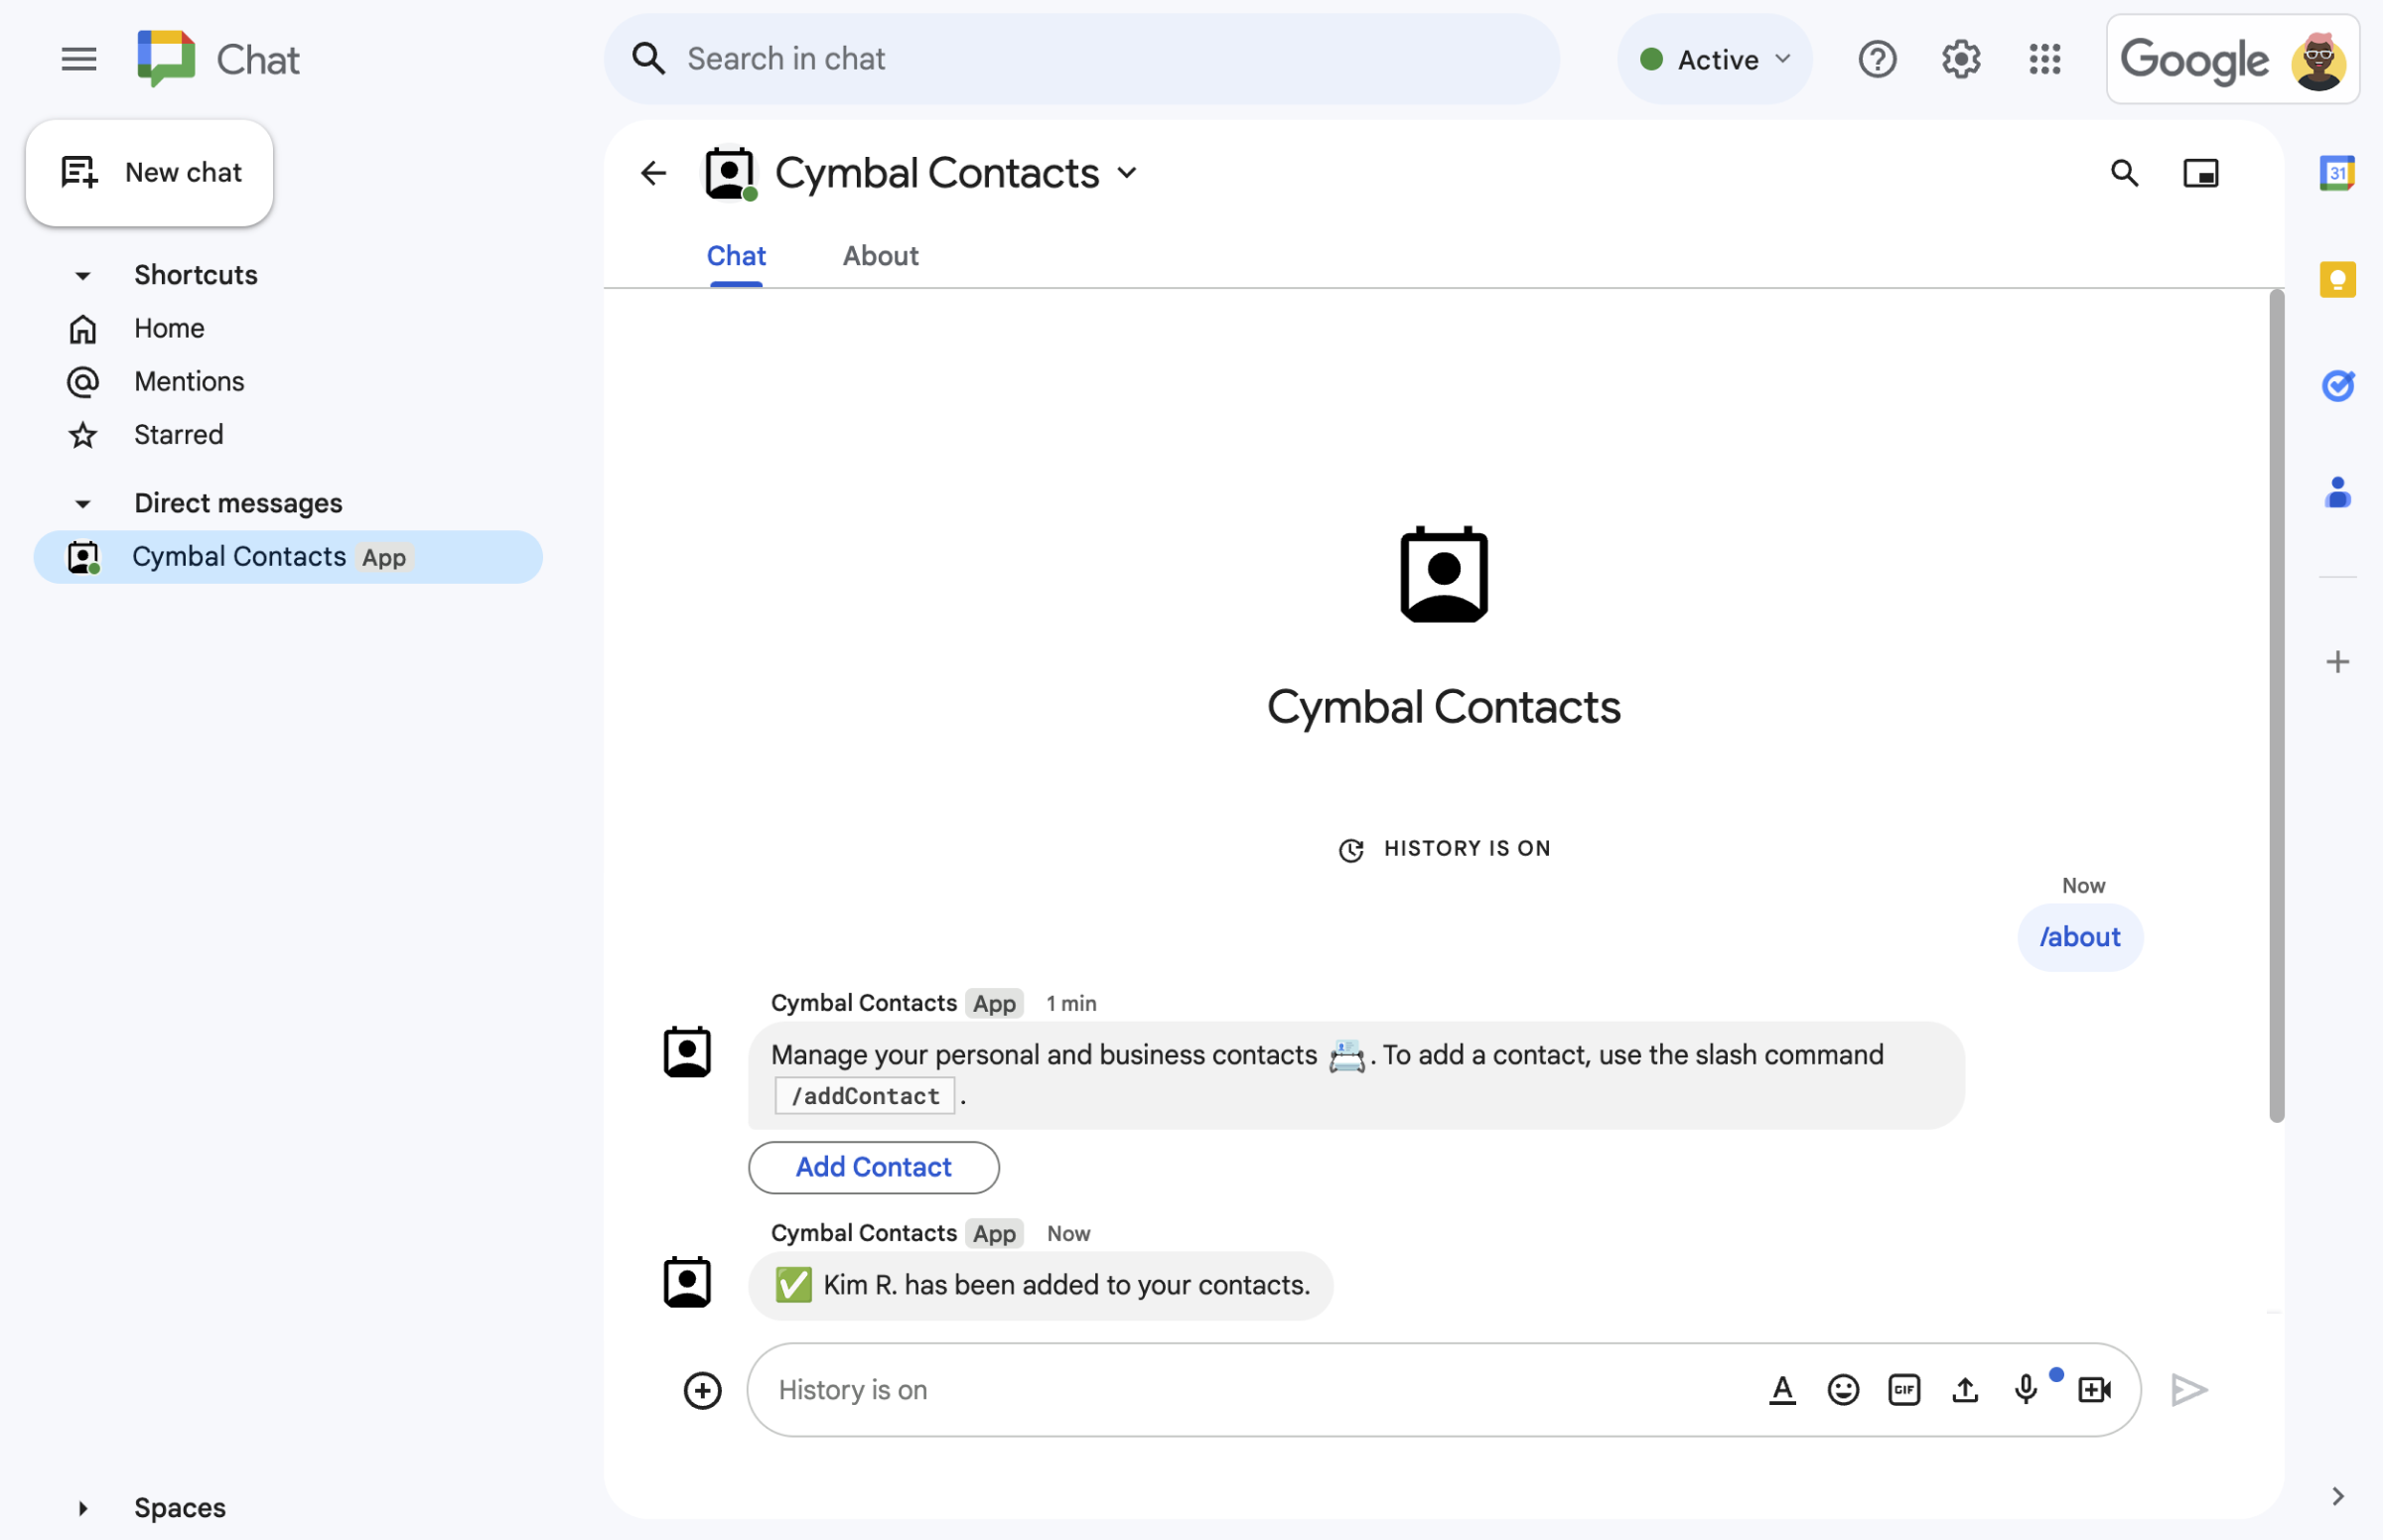 **Figure 4.** After the user submits the form, the Chat app sends a private text message to confirm the submission.
- 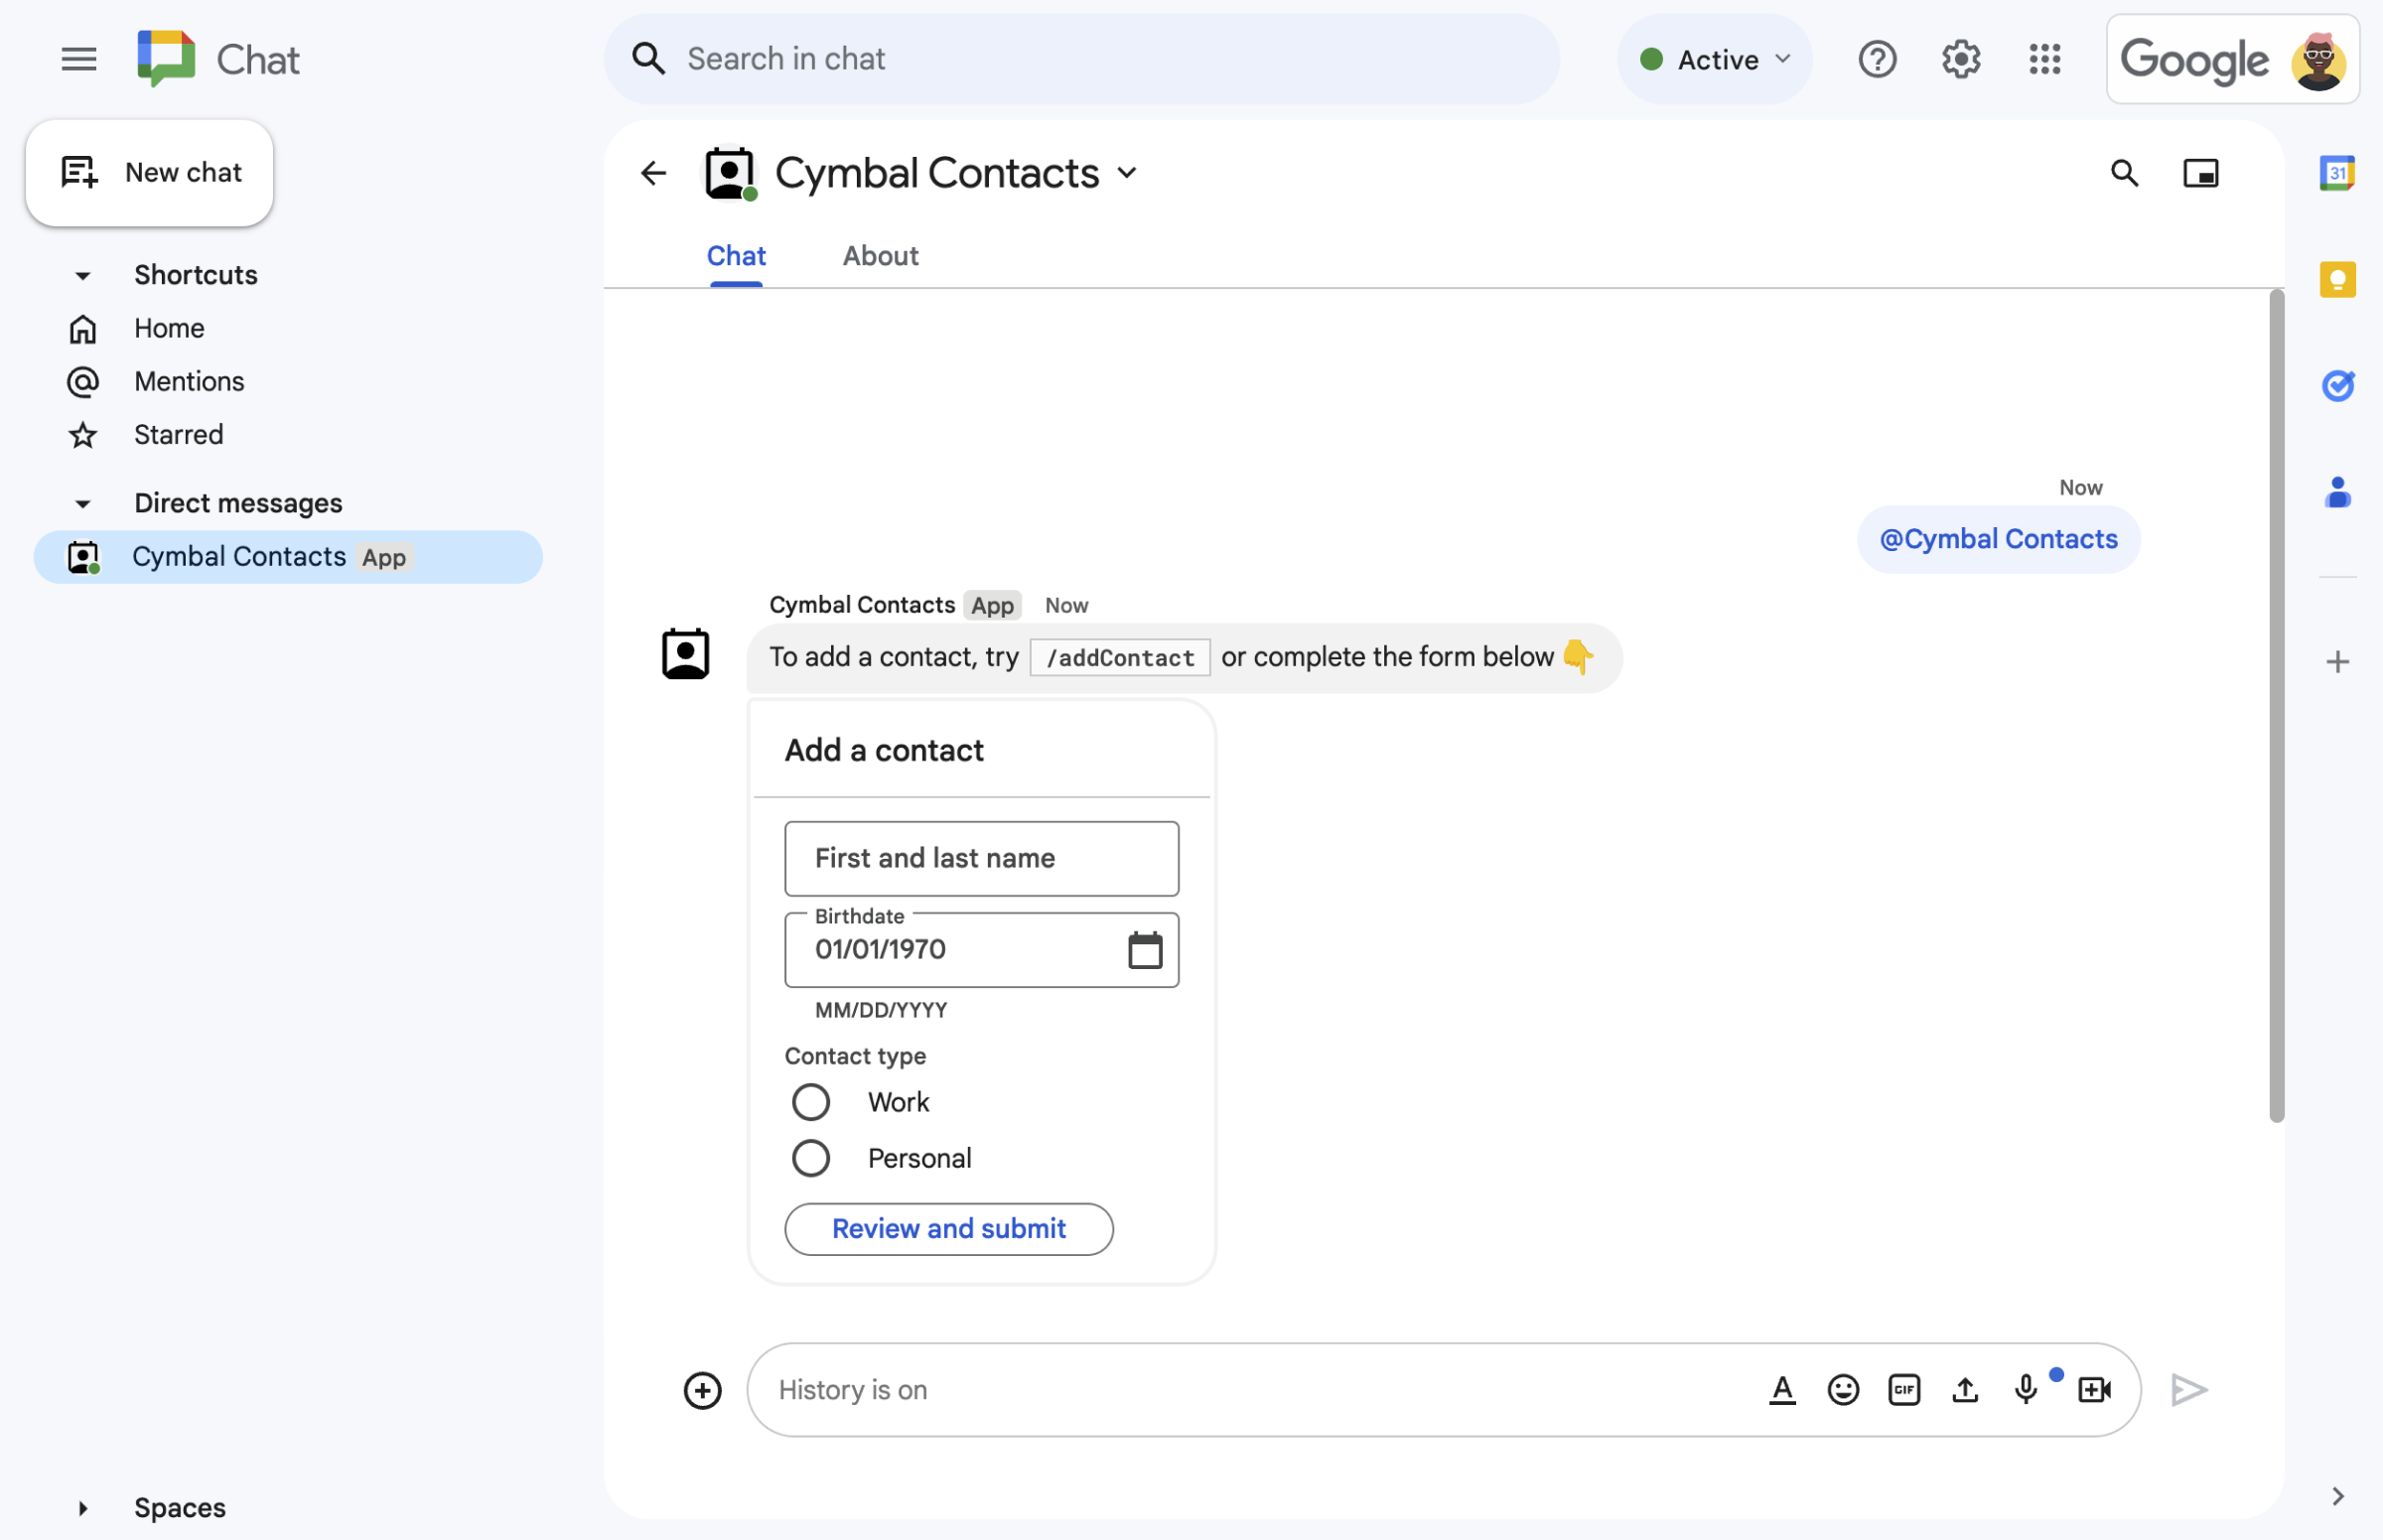 **Figure 5.** The Chat app also prompts users to add a contact from a card in a message.
## Prerequisites
- A Business or Enterprise [Google Workspace](https://support.google.com/a/answer/6043576) account with access to [Google Chat](https://workspace.google.com/products/chat/).
- [Create a Google Cloud project](https://developers.google.com/workspace/guides/create-project).
## Objectives
- [Design and build user interfaces (UIs)](https://developers.google.com/workspace/chat/design-components-card-dialog) as `card` objects, and display the UIs in messages and dialogs.
- Receive and process information that users submit using [form input widgets](https://developers.google.com/workspace/chat/read-form-data#build-cards).
- [Respond to commands](https://developers.google.com/workspace/chat/commands) with messages that contain text, cards, and accessory widgets.
## Architecture
The Chat app is built in
[Google Apps Script](https://developers.google.com/apps-script) (as a Google Workspace add-on that
extends Google Chat) and responds to
[user interactions](https://developers.google.com/workspace/chat/receive-respond-interactions) (`onMessage`,
`onAppCommand`, and button clicks that invoke `openInitialDialog`,
`openConfirmationDialog`, and `submitForm`) to process and respond to
Chat users.
The following shows how a user might typically interact with the
Chat app:
1. A user opens a direct message with the Chat app, or
adds the Chat app to an existing space.
2. The Chat app prompts the user to add a contact by
building and displaying a contact form as a
[`card`](https://developers.google.com/workspace/chat/api/reference/rest/v1/cards#card)
object. To present the contact form, the Chat app
responds to users in the following ways:
- Responds to @mentions and direct messages (`onMessage`) with a card message that contains the contact form.
- Responds to the slash command `/addContact` (`onAppCommand`) by opening a dialog with the contact form.
- Responds to the slash command `/about` (`onAppCommand`) with a text message that has an **Add a contact** button that users can click to invoke `openInitialDialog` and open a dialog with the contact form.
3. When presented with the contact form, the user inputs contact information
into the following fields and widgets:
- **First and last name** : a [`textInput`](https://developers.google.com/workspace/chat/api/reference/rest/v1/cards#Message.TextInput) widget that accepts strings.
- **Birthdate** : a [`dateTimePicker`](https://developers.google.com/workspace/chat/api/reference/rest/v1/cards#Message.DateTimePicker) widget that accepts only dates.
- **Contact type** : a [`selectionInput`](https://developers.google.com/workspace/chat/api/reference/rest/v1/cards#Message.SelectionInput) widget of radio buttons that lets users select and submit a single string value (either `Personal` or `Work`).
- **Review and submit** button: a [`buttonList`](https://developers.google.com/workspace/chat/api/reference/rest/v1/cards#Message.ButtonList) array with `button` widget that the user clicks to submit the values that they input.
4. The Google Chat app invokes `openConfirmationDialog` to process
the values that the user inputs, and displays the values in a confirmation
card.
5. The user reviews the confirmation card and clicks the **Submit** button
to invoke `submitForm` and finalize the contact information.
6. The Google Chat app sends a private text message that
confirms the submission.
## Prepare the environment
This section shows how to configure a Google Cloud project for the
Chat app.
### Open your Cloud project in the Google API Console
If it's not open already, open the Cloud project that you intend to use
for this sample:
1. In the Google API Console, go to the **Select a project** page.
[Select a Cloud project](https://console.cloud.google.com/projectselector2)
2. Select the Google Cloud project you want to use. Or, click **Create project** and follow the on-screen instructions. If you create a Google Cloud project, you might need to [turn on billing for the project](https://cloud.google.com/billing/docs/how-to/modify-project#enable_billing_for_a_project).
### Set up authentication and authorization
Google Chat apps require you to configure an
[OAuth consent screen](https://developers.google.com/workspace/guides/configure-oauth-consent) so that
users can authorize your app in Google Workspace applications, including
Google Chat.
In this tutorial, you deploy a Chat app that's only for
testing and internal use, so it's OK to use placeholder information for the
consent screen. Before publishing the Chat app, replace
any placeholder information with real information.
1. In the Google API Console, go to Menu
\>
**Google Auth platform**
\>
**Branding**.
[Go to Branding](https://console.developers.google.com/auth/branding)
2. If you have already configured the
Google Auth platform, you can configure
the following OAuth Consent Screen settings in
[Branding](https://console.developers.google.com/auth/branding),
[Audience](https://console.developers.google.com/auth/audience),
and [Data Access](https://console.developers.google.com/auth/scopes).
If you see a message that says
**Google Auth platform not configured yet** ,
click **Get Started**:
1. Under **App Information** , in **App name** , type `Contact Manager`.
2. In **User support email**, select your email address or an appropriate Google group.
3. Click **Next**.
4. Under **Audience** , select **Internal** . If you can't select **Internal** , select **External**.
5. Click **Next**.
6. Under **Contact Information** , enter an **Email address** where you can be notified about any changes to your project.
7. Click **Next**.
8. Under **Finish** , review the [Google API Services User Data Policy](https://developers.google.com/terms/api-services-user-data-policy) and if you agree, select **I agree to the Google API Services: User Data Policy**.
9. Click **Continue**.
10. Click **Create**.
11. If you selected **External** for user type, add test users:
1. Click **Audience**.
2. Under **Test users** , click **Add users**.
3. Enter your email address and any other authorized test users, then click **Save**.
## Create and deploy the Chat app
In the following section, you create and update an
Apps Script project with the application code (`Code.gs` and
`appsscript.json`) for your Chat app.
Optionally, you can view the entire project on GitHub.
[View on GitHub](https://github.com/googleworkspace/add-ons-samples/tree/main/apps-script/chat/contact-form-app)
Here's an overview of each file:
`Code.gs`
: Handles all app logic, including user interactions (`onMessage`,
`onAppCommand`, `openInitialDialog`, `openConfirmationDialog`, and
`submitForm`) and the form input widgets displayed in cards in messages and
dialogs.
#### View `Code.gs` code
apps-script/chat/contact-form-app/Code.gs [View on GitHub](https://github.com/googleworkspace/add-ons-samples/blob/main/apps-script/chat/contact-form-app/Code.gs)
```javascript
/**
* Copyright 2025 Google LLC
*
* Licensed under the Apache License, Version 2.0 (the "License");
* you may not use this file except in compliance with the License.
* You may obtain a copy of the License at
*
* http://www.apache.org/licenses/LICENSE-2.0
*
* Unless required by applicable law or agreed to in writing, software
* distributed under the License is distributed on an "AS IS" BASIS,
* WITHOUT WARRANTIES OR CONDITIONS OF ANY KIND, either express or implied.
* See the License for the specific language governing permissions and
* limitations under the License.
*/
/**
* Responds to a message in Google Chat.
*
* @param {Object} event The event object from the Google Workspace add-on.
* @return {Object} response that handles dialogs.
*/
function onMessage(event) {
// Reply with a message that contains a button to open the initial dialog
return { hostAppDataAction: { chatDataAction: { createMessageAction: { message: {
text: "To add a contact, use the `ADD CONTACT` button below.",
accessoryWidgets: [
{ buttonList: { buttons: [{
text: "ADD CONTACT",
onClick: { action: {
function: "openInitialDialog",
interaction: "OPEN_DIALOG"
}}
}]}}
]
}}}}};
}
/**
* Opens the initial step of the dialog that lets users add contact details.
*
* @param {Object} event The event object from the Google Workspace add-on.
* @return {Object} open the dialog.
*/
function openInitialDialog(event) {
return { action: { navigations: [{ pushCard: { sections: [{ widgets: [
{ textInput: {
name: "contactName",
label: "First and last name",
type: "SINGLE_LINE"
}},
{ dateTimePicker: {
name: "contactBirthdate",
label: "Birthdate",
type: "DATE_ONLY"
}},
{ selectionInput: {
name: "contactType",
label: "Contact type",
type: "RADIO_BUTTON",
items: [
{ text: "Work", value: "Work", selected: false },
{ text: "Personal", value: "Personal", selected: false }
]
}},
{ buttonList: { buttons: [{
text: "NEXT",
onClick: { action: { function : "openConfirmationDialog" }}
}]}}
]}]}}]}};
}
/**
* Opens the second step of the dialog that lets users confirm details.
*
* @param {Object} event The event object from the Google Workspace add-on.
* @return {Object} update the dialog.
*/
function openConfirmationDialog(event) {
// Retrieve the form input values
const name = event.commonEventObject.formInputs["contactName"].stringInputs.value[0];
const birthdate = event.commonEventObject.formInputs["contactBirthdate"].dateInput.msSinceEpoch;
const type = event.commonEventObject.formInputs["contactType"].stringInputs.value[0];
// Display the input values for confirmation
return { action: { navigations: [{ pushCard: { sections: [{ widgets: [
{ textParagraph: { text: "Confirm contact information and submit:" }},
{ textParagraph: { text: "Name: " + name }},
{ textParagraph: { text: "Birthday: " + new Date(birthdate) }},
{ textParagraph: { text: "Type: " + type }},
{ buttonList: { buttons: [{
text: "SUBMIT",
onClick: { action: {
function: "submitDialog",
// Pass input values as parameters for last dialog step (submission)
parameters: [
{ key: "contactName", value: name },
{ key: "contactBirthdate", value: birthdate },
{ key: "contactType", value: type }
]
}}
}]}}
]}]}}]}};
}
/**
* Handles submission and closes the dialog.
*
* @param {Object} event The event object from the Google Workspace add-on.
* @return {Object} close the dialog with a status in text notification or message.
*/
function submitDialog(event) {
// Validate the parameters.
if (!event.commonEventObject.parameters["contactName"]) {
return { action: {
navigations: [{ endNavigation: { action: "CLOSE_DIALOG"}}],
notification: { text: "Failure, the contact name was missing!" }
}};
}
return { hostAppDataAction: { chatDataAction: { createMessageAction: { message: {
text: "✅ " + event.commonEventObject.parameters["contactName"] + " has been added to your contacts."
}}}}};
}
```
`appsscript.json`
: The
[Apps Script manifest](https://developers.google.com/apps-script/manifest)
that defines and configures the Apps Script project for the
Chat app.
#### View `appsscript.json` code
apps-script/chat/contact-form-app/appsscript.json [View on GitHub](https://github.com/googleworkspace/add-ons-samples/blob/main/apps-script/chat/contact-form-app/appsscript.json)
```json
{
"timeZone": "America/Los_Angeles",
"dependencies": {},
"exceptionLogging": "STACKDRIVER",
"runtimeVersion": "V8",
"addOns": {
"common": {
"name": "Contact Form app",
"logoUrl": "https://developers.google.com/workspace/add-ons/images/contact-icon.png"
},
"chat": {}
}
}
```
### Create the Apps Script project
To create an Apps Script project from the `Code.gs` and
`appsscript.json` files:
1. Go to [Google Apps Script](https://script.google.com) and click **New
project**.
2. Name your Apps Script project:
1. Click **Untitled project**.
2. In **Project title** , type `Contact Manager - Google Chat app`.
3. Click **Rename**.
3. Replace the contents of `Code.gs` with the `Code.gs` sample code above.
4. Click **Project Settings**  and select **Show "appsscript.json" manifest file in editor**.
5. Return to the **Editor** and replace the contents of `appsscript.json` with
the `appsscript.json` manifest code above, then save your project.
In the future, if you want to use certain Google APIs or publish your app, you must associate your Cloud project with your Apps Script project. For this guide, you don't need to do so. To learn more, see the [Google Cloud projects guide](https://developers.google.com/apps-script/guides/cloud-platform-projects).
### Create an Apps Script deployment
Now that all the code is in place, deploy the Apps Script
project. You use the deployment ID when you configure the
Chat app in the Google Cloud.
1. In Apps Script, open the Chat app's
project.
[Go to Apps Script](https://script.google.com)
2. Click **Deploy** \> **New deployment**.
3. If **Add-on** isn't already selected, next to
**Select type** , click deployment types  and select **Add-on**.
4. In **Description** , enter a description for this version, like
`Test of Contact Manager`.
5. Click **Deploy**. Apps Script reports successful
deployment and provides a deployment ID.
6. Click **Copy** to copy
the deployment ID and then click **Done**.
### Configure the Chat app in the Google API Console
This section shows how to configure the Google Chat API in the Google API Console
with information about your Chat app, including the
ID of the deployment that you just created from your Apps Script
project.
1. In the Google API Console, click **Menu**
\> **APIs \& Services**
\> **Enabled APIs \& Services**
\> **Google Chat API**
\> **Configuration**.
[Go to Chat API configuration](https://console.developers.google.com/apis/api/chat.googleapis.com/hangouts-chat)
2. In **App name** , type `Contact Manager`.
3. In **Avatar URL** , type `https://developers.google.com/chat/images/contact-icon.png`.
4. In **Description** , type `Manage your personal and business contacts`.
5. Click the **Enable Interactive features** toggle to the on position.
6. Under **Functionality** , select **Join spaces and group conversations**.
7. Under **Connection settings** , select **Apps Script**.
8. In **Deployment ID**, paste the Apps Script Deployment ID
that you copied in the previous section when you created the
Apps Script deployment.
9. Under **Triggers**, configure the functions that respond to user
interactions:
- For the **Message** trigger, enter `onMessage`.
- For the **App command** trigger, enter `onAppCommand`.
10. Under **Commands** , set up the slash commands `/about` and
`/addContact`:
1. Click **Add a command** to set up the first slash command.
2. In **Command ID** , type `1`.
3. In **Description** , type `Learn how to use this Chat app to manage your contacts`.
4. Under **Command type** , select `Slash command`.
5. In **Slash command name** , type `/about`.
6. Click **Done**.
7. Click **Add a command** to set up another slash command.
8. In **Command ID** , type `2`.
9. In **Description** , type `Submit information about a contact`.
10. Under **Command type** , select `Slash command`.
11. In **Slash command name** , type `/addContact`.
12. Select **Opens a dialog**.
13. Click **Done**.
11. Under **Visibility** , select the
**Make this Chat app available to specific people and groups in YOUR DOMAIN** checkbox and enter your email address.
12. Under **Logs** , select **Log errors to Logging**.
13. Click **Save**. A configuration saved message appears.
The Chat app is ready to install and test in
Chat.
## Test the Chat app
To test your Chat app, open a direct message space with
the Chat app and send a message:
1. Open Google Chat using the Google Workspace account that you
provided when you added yourself as a trusted tester.
[Go to Google Chat](https://chat.google.com)
2. Click **New chat**.
3. In the **Add 1 or more people** field, type the name of your Chat app.
4. Select your Chat app from the results. A direct
message opens.
**Note:** If you don't see your Chat app in the list of results, ensure that you've included your Google Workspace account in the **Visibility** settings of the [**Chat API Configuration**](https://developers.google.com/workspace/chat/configure-chat-api) page in the Google API Console.
1. In the new direct message with the Chat app,
type `/addContact`and press enter.
2. In the dialog that opens, enter contact information:
1. In the **First and last name** text field, enter a name.
2. In the **Birthdate** date picker, select a date.
3. Under **Contact type** , select the **Work** or **Personal** radio button.
3. Click **Review and submit**.
4. In the confirmation dialog, review the information that you submitted and
click **Submit** . The Chat app replies with a text
message that says
`✅ CONTACT NAME has been added to your contacts.`.
5. Optionally, you can also test and submit the contact form in the following
ways:
- Use the `/about` slash command. Chat app replies with a text message and an accessory widget button that says `Add a contact`. You can click the button to open a dialog with the contact form.
- Send the Chat app a direct message without a slash command, such as `Hello`. The Chat app replies with a text and card that contains the contact form.
## Clean up
To avoid incurring charges to your Google Cloud account for the
resources used in this tutorial, we recommend that you delete the
Cloud project.
> [!CAUTION]
> **Caution:** Deleting a project has the following effects:
>
> - **Everything in the project is deleted.** If you used an existing project for this tutorial, when you delete it, you also delete any other work you've done in the project.
> - **Custom project IDs are lost.** When you created this project, you might have created a custom project ID that you want to use in the future. To preserve the URLs that use the project ID, such as a URL on appspot.com, delete the selected resources inside the project instead of deleting the whole project.
>
> If you plan to explore multiple tutorials and quickstarts, reusing projects can help you avoid exceeding project quota limits.
1. In the Google API Console, go to the **Manage resources** page. Click **Menu** \> **IAM \& Admin** \> **Manage Resources** .
[Go to Resource Manager](https://console.developers.google.com/cloud-resource-manager)
2. In the project list, select the project you want to delete and then click **Delete** .
3. In the dialog, type the project ID and then click **Shut down** to delete the project.
## Related topics
- [Respond to commands](https://developers.google.com/workspace/chat/commands)
- [Collect and process information from Google Chat users](https://developers.google.com/workspace/chat/read-form-data)
- [Open interactive dialogs](https://developers.google.com/workspace/chat/dialogs)
- [Explore other Google Chat app samples](https://developers.google.com/workspace/chat/samples)
## Chat apps that aren't add-ons: Manage contacts from Google Chat
The following instructions and code samples apply to a
Chat app that isn't a Google Workspace add-on
([View on GitHub](https://github.com/googleworkspace/google-chat-samples/tree/main/apps-script/contact-form-app)).
### Apps Script files
`main.gs`
: Handles all app logic, including interaction events about when users send
messages to the Chat app, click buttons from a
Chat app message, or open and close dialogs.
apps-script/contact-form-app/main.gs [View on GitHub](https://github.com/googleworkspace/google-chat-samples/blob/main/apps-script/contact-form-app/main.gs)
```javascript
/**
* Copyright 2024 Google Inc.
*
* Licensed under the Apache License, Version 2.0 (the "License");
* you may not use this file except in compliance with the License.
* You may obtain a copy of the License at
*
* http://www.apache.org/licenses/LICENSE-2.0
*
* Unless required by applicable law or agreed to in writing, software
* distributed under the License is distributed on an "AS IS" BASIS,
* WITHOUT WARRANTIES OR CONDITIONS OF ANY KIND, either express or implied.
* See the License for the specific language governing permissions and
* limitations under the License.
*/
/**
* Responds to a MESSAGE interaction event in Google Chat.
*
* @param {Object} event the MESSAGE interaction event from Chat API.
* @return {Object} message response that opens a dialog or sends private
* message with text and card.
*/
function onMessage(event) {
if (event.message.slashCommand) {
switch (event.message.slashCommand.commandId) {
case 1:
// If the slash command is "/about", responds with a text message and button
// that opens a dialog.
return {
text: "Manage your personal and business contacts 📇. To add a " +
"contact, use the slash command `/addContact`.",
accessoryWidgets: [{
buttonList: { buttons: [{
text: "Add Contact",
onClick: { action: {
function: "openInitialDialog",
interaction: "OPEN_DIALOG"
}}
}]}
}]
}
case 2:
// If the slash command is "/addContact", opens a dialog.
return openInitialDialog();
}
}
// If user sends the Chat app a message without a slash command, the app responds
// privately with a text and card to add a contact.
return {
privateMessageViewer: event.user,
text: "To add a contact, try `/addContact` or complete the form below:",
cardsV2: [{
cardId: "addContactForm",
card: {
header: { title: "Add a contact" },
sections:[{ widgets: CONTACT_FORM_WIDGETS.concat([{
buttonList: { buttons: [{
text: "Review and submit",
onClick: { action: { function : "openConfirmation" }}
}]}
}])}]
}
}]
};
}
/**
* Responds to CARD_CLICKED interaction events in Google Chat.
*
* @param {Object} event the CARD_CLICKED interaction event from Google Chat.
* @return {Object} message responses specific to the dialog handling.
*/
function onCardClick(event) {
// Initial dialog form page
if (event.common.invokedFunction === "openInitialDialog") {
return openInitialDialog();
// Confirmation dialog form page
} else if (event.common.invokedFunction === "openConfirmation") {
return openConfirmation(event);
// Submission dialog form page
} else if (event.common.invokedFunction === "submitForm") {
return submitForm(event);
}
}
/**
* Opens the initial step of the dialog that lets users add contact details.
*
* @return {Object} a message with an action response to open a dialog.
*/
function openInitialDialog() {
return { actionResponse: {
type: "DIALOG",
dialogAction: { dialog: { body: { sections: [{
header: "Add new contact",
widgets: CONTACT_FORM_WIDGETS.concat([{
buttonList: { buttons: [{
text: "Review and submit",
onClick: { action: { function: "openConfirmation" }}
}]}
}])
}]}}}
}};
}
/**
* Returns the second step as a dialog or card message that lets users confirm details.
*
* @param {Object} event the interactive event with form inputs.
* @return {Object} returns a dialog or private card message.
*/
function openConfirmation(event) {
const name = fetchFormValue(event, "contactName") ?? "";
const birthdate = fetchFormValue(event, "contactBirthdate") ?? "";
const type = fetchFormValue(event, "contactType") ?? "";
const cardConfirmation = {
header: "Your contact",
widgets: [{
textParagraph: { text: "Confirm contact information and submit:" }}, {
textParagraph: { text: "Name: " + name }}, {
textParagraph: {
text: "Birthday: " + convertMillisToDateString(birthdate)
}}, {
textParagraph: { text: "Type: " + type }}, {
buttonList: { buttons: [{
text: "Submit",
onClick: { action: {
function: "submitForm",
parameters: [{
key: "contactName", value: name }, {
key: "contactBirthdate", value: birthdate }, {
key: "contactType", value: type
}]
}}
}]}
}]
};
// Returns a dialog with contact information that the user input.
if (event.isDialogEvent) {
return { action_response: {
type: "DIALOG",
dialogAction: { dialog: { body: { sections: [ cardConfirmation ]}}}
}};
}
// Updates existing card message with contact information that the user input.
return {
actionResponse: { type: "UPDATE_MESSAGE" },
privateMessageViewer: event.user,
cardsV2: [{
card: { sections: [cardConfirmation]}
}]
}
}
/**
* Validates and submits information from a dialog or card message
* and notifies status.
*
* @param {Object} event the interactive event with parameters.
* @return {Object} a message response that opens a dialog or posts a private
* message.
*/
function submitForm(event) {
const contactName = event.common.parameters["contactName"];
// Checks to make sure the user entered a contact name.
// If no name value detected, returns an error message.
const errorMessage = "Don't forget to name your new contact!";
if (!contactName && event.dialogEventType === "SUBMIT_DIALOG") {
return { actionResponse: {
type: "DIALOG",
dialogAction: { actionStatus: {
statusCode: "INVALID_ARGUMENT",
userFacingMessage: errorMessage
}}
}};
}
if (!contactName) {
return {
privateMessageViewer: event.user,
text: errorMessage
};
}
// The Chat app indicates that it received form data from the dialog or card.
// Sends private text message that confirms submission.
const confirmationMessage = "✅ " + contactName + " has been added to your contacts.";
if (event.dialogEventType === "SUBMIT_DIALOG") {
return {
actionResponse: {
type: "DIALOG",
dialogAction: { actionStatus: {
statusCode: "OK",
userFacingMessage: "Success " + contactName
}}
}
};
}
return {
actionResponse: { type: "NEW_MESSAGE" },
privateMessageViewer: event.user,
text: confirmationMessage
};
}
/**
* Extracts form input value for a given widget.
*
* @param {Object} event the CARD_CLICKED interaction event from Google Chat.
* @param {String} widgetName a unique ID for the widget, specified in the widget's name field.
* @returns the value inputted by the user, null if no value can be found.
*/
function fetchFormValue(event, widgetName) {
const formItem = event.common.formInputs[widgetName][""];
// For widgets that receive StringInputs data, the value input by the user.
if (formItem.hasOwnProperty("stringInputs")) {
const stringInput = event.common.formInputs[widgetName][""].stringInputs.value[0];
if (stringInput != null) {
return stringInput;
}
// For widgets that receive dateInput data, the value input by the user.
} else if (formItem.hasOwnProperty("dateInput")) {
const dateInput = event.common.formInputs[widgetName][""].dateInput.msSinceEpoch;
if (dateInput != null) {
return dateInput;
}
}
return null;
}
/**
* Converts date in milliseconds since epoch to user-friendly string.
*
* @param {Object} millis the milliseconds since epoch time.
* @return {string} Display-friend date (English US).
*/
function convertMillisToDateString(millis) {
const date = new Date(millis);
const options = { year: 'numeric', month: 'long', day: 'numeric' };
return date.toLocaleDateString('en-US', options);
}
```
`contactForm.gs`
: Contains the widgets that receive form data from users. These form input
widgets are displayed in cards that appear in messages and dialogs.
apps-script/contact-form-app/contactForm.gs [View on GitHub](https://github.com/googleworkspace/google-chat-samples/blob/main/apps-script/contact-form-app/contactForm.gs)
```javascript
/**
* Copyright 2024 Google Inc.
*
* Licensed under the Apache License, Version 2.0 (the "License");
* you may not use this file except in compliance with the License.
* You may obtain a copy of the License at
*
* http://www.apache.org/licenses/LICENSE-2.0
*
* Unless required by applicable law or agreed to in writing, software
* distributed under the License is distributed on an "AS IS" BASIS,
* WITHOUT WARRANTIES OR CONDITIONS OF ANY KIND, either express or implied.
* See the License for the specific language governing permissions and
* limitations under the License.
*/
/**
* The section of the contact card that contains the form input widgets. Used in a dialog and card message.
* To add and preview widgets, use the Card Builder: https://addons.gsuite.google.com/uikit/builder
*/
const CONTACT_FORM_WIDGETS = [
{
"textInput": {
"name": "contactName",
"label": "First and last name",
"type": "SINGLE_LINE"
}
},
{
"dateTimePicker": {
"name": "contactBirthdate",
"label": "Birthdate",
"type": "DATE_ONLY"
}
},
{
"selectionInput": {
"name": "contactType",
"label": "Contact type",
"type": "RADIO_BUTTON",
"items": [
{
"text": "Work",
"value": "Work",
"selected": false
},
{
"text": "Personal",
"value": "Personal",
"selected": false
}
]
}
}
];
```
`appsscript.json`
: The Apps Script manifest that defines and configures the
Apps Script project for the Chat app
that isn't an add-on.
apps-script/contact-form-app/appsscript.json [View on GitHub](https://github.com/googleworkspace/google-chat-samples/blob/main/apps-script/contact-form-app/appsscript.json)
```json
{
"timeZone": "America/Los_Angeles",
"dependencies": {},
"exceptionLogging": "STACKDRIVER",
"runtimeVersion": "V8",
"chat": {}
}
```
### Create and configure the Apps Script project
1. Open the [Manage contacts in Google Chat](https://script.google.com/d/1Tl_A9UEfttarNauVscZvQbMh-UuG7MFo72HYL33ba85kIQIflf83GXMR/edit?usp=sharing) Apps Script project for a Chat app that isn't an add-on and make a copy.
2. When configuring the Chat API in the Google API Console: Clear **Build this Chat app as a Google Workspace add-on** . A dialog opens asking you to confirm. In the dialog, click **Disable**.