This tutorial shows you how to make a Google Chat app that
responds to incidents in real time. When responding to an incident, the app
creates and populates a Chat space, facilitates incident
resolution with messages, app commands, and dialogs, and uses AI to summarize
the incident response in a Google Docs document.
This tutorial uses authorization scopes that begins with
`https://www.googleapis.com/auth/chat.app.*`.
For the Chat app to use those scopes, you must get a
one-time [administrator approval](https://support.google.com/a?p=chat-app-auth).
> [!WARNING]
> **Warning:** To follow this tutorial, you'll
> need to publish the app internally and then install it for all users using Admin
> dashboard. This action will make the app visible to all users in the domain. We
> recommend using a test domain for this tutorial.
An *incident* is an event that requires the immediate attention of a team
of people to resolve. Examples of incidents include:
- A time-sensitive case is created in a Customer Relationship Management (CRM) platform, requiring a service team to collaborate on a resolution.
- A system goes offline, alerting a group of site reliability engineers (SREs) so that they can work together to bring it back online.
- A high magnitude earthquake occurs, and emergency workers need to coordinate their response.
For the purposes of this tutorial, the incident alert starts when someone
reports the incident with a button click from a web page. The web page simulates
an incident by asking users to enter basic incident information: title,
description, and email addresses of the responders.
See the incident management Chat app in action:
-  **Figure 1.** The website where someone can report an incident.
-  **Figure 2.** Notification that the incident Chat space is created.
-  **Figure 3.** The incident response Chat space.
-  **Figure 4.** Resolving the incident with a slash command.
-  **Figure 5.** Incident resolution dialog.
-  **Figure 6.** Incident resolution Google Docs document shared in space.
-  **Figure 7.** The AI summary incident resolution Google Docs document.
## Prerequisites
If you need any of these prerequisites turned on for your organization, ask
your Google Workspace administrator to turn them on:
- A Business or Enterprise [Google Workspace](https://support.google.com/a/answer/6043576) account with access to [Google Chat](https://workspace.google.com/products/chat/).
- To have [Directory](https://support.google.com/a/answer/60218) (contact sharing) turned on for Google Workspace. The incident app uses the directory to look up the incident responders' contact info, like name and email address. Incident responders must be users with a Chat account in your Google Workspace organization.
## Objectives
- Build a Chat app that responds to incidents.
- Help users respond to incidents by doing the following:
- Creating incident response spaces.
- Posting messages summarizing incidents and responses.
- Supporting collaboration with interactive Chat app features.
- Summarize conversations and resolutions with Vertex AI.
## Architecture
The following diagram shows the architecture of the Google Workspace
and Google Cloud resources used by the incident response
Chat app.
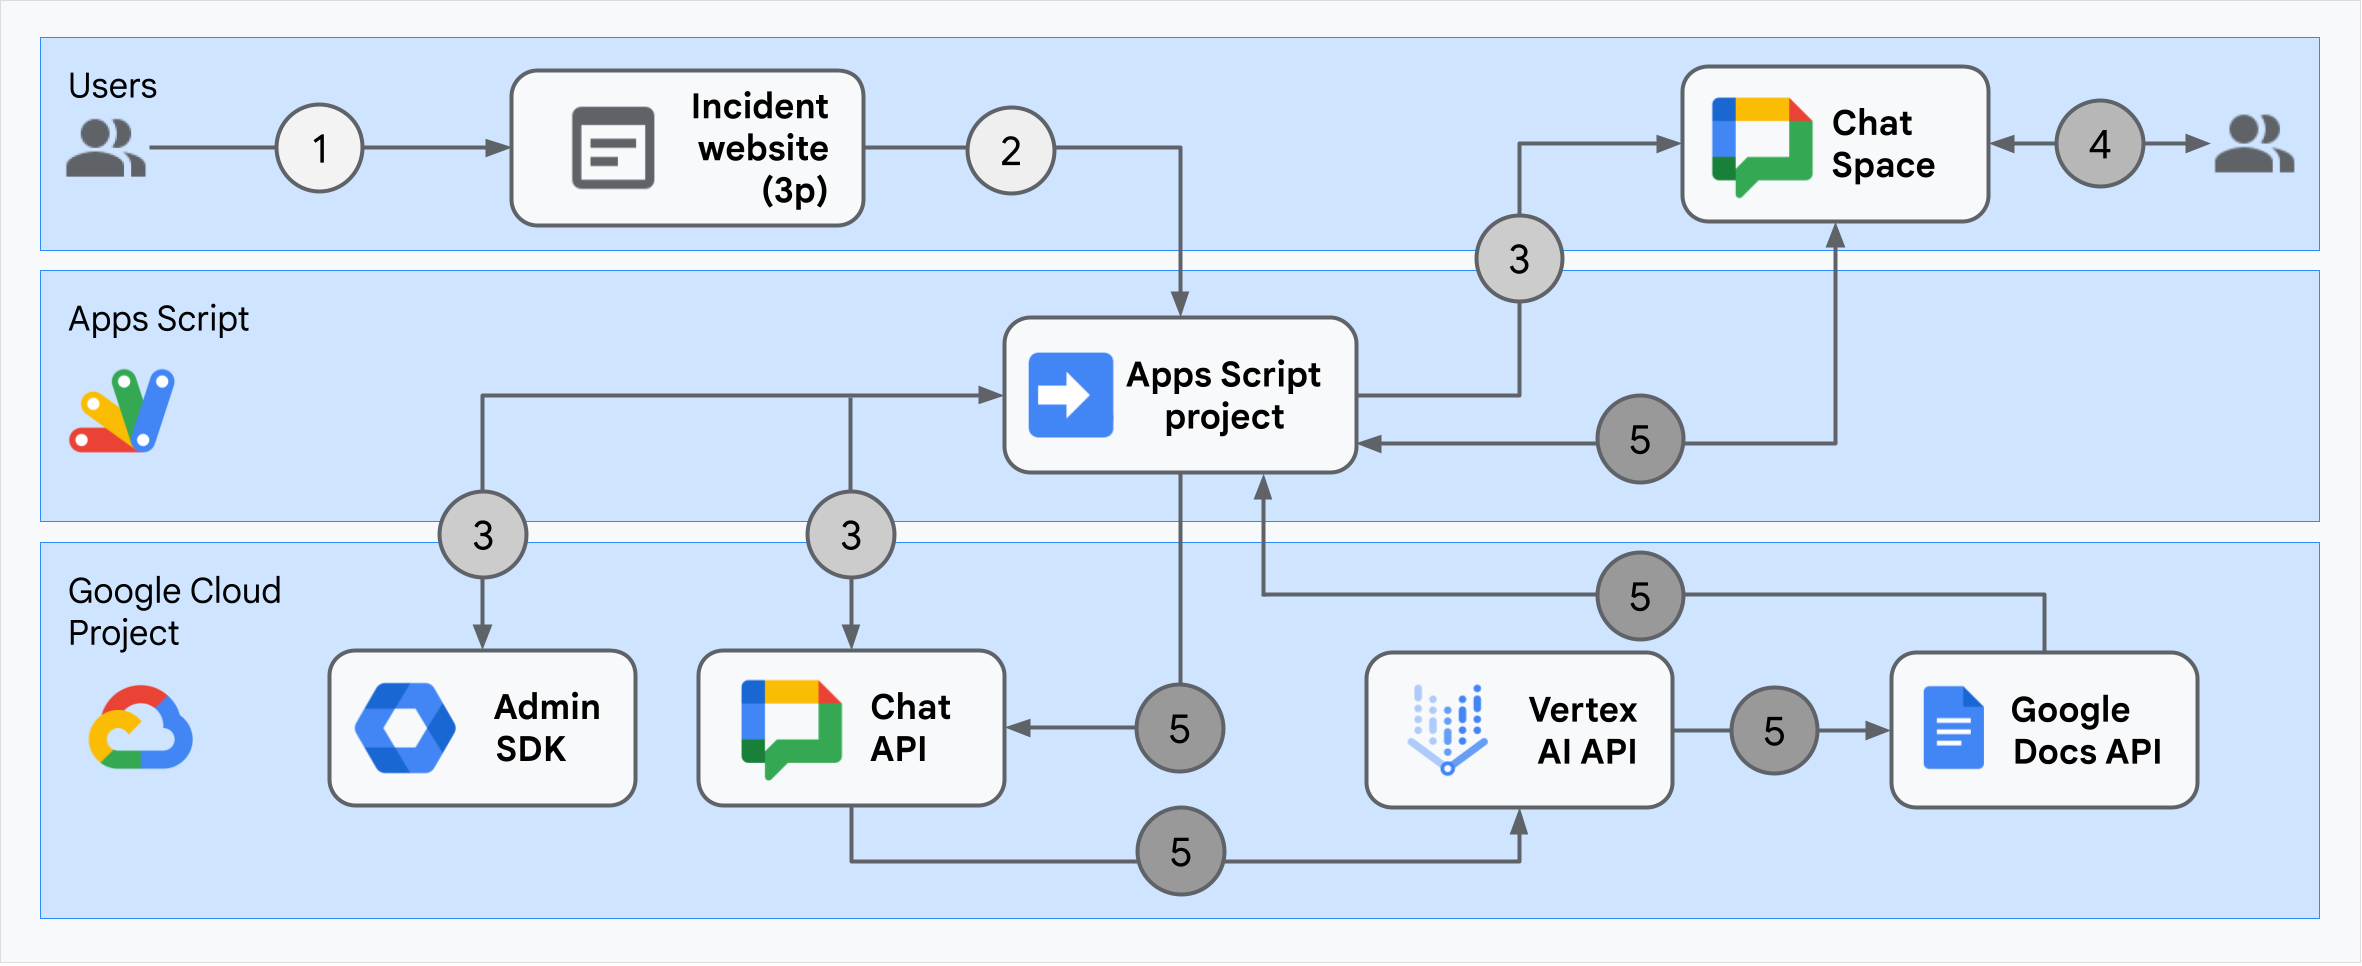
The architecture shows how the incident response
Chat app processes an incident and resolution.
1. A user starts an incident from an external website hosted on
Apps Script.
2. The website sends an asynchronous HTTP request to the
Chat app, also hosted on Apps Script.
3. The incident response Chat app processes the
request:
1. The Apps Script Admin SDK service gets team member
information, like user ID and email address.
2. With a set of HTTP requests to Chat API using the
Apps Script Advanced Chat service,
the incident response
Chat app creates an incident Chat
space, populates it with team members, and sends a message to the space.
4. Team members discuss the incident in the Chat space.
5. A team member invokes a quick command to signal a resolution to the
incident.
1. An HTTP call to Chat API using the Apps Script
Advanced Chat service lists all the Chat
space's messages.
2. Vertex AI receives the listed messages and generates a summary.
3. The Apps Script `DocumentApp` service creates a
Docs document and adds Vertex AI's summary to the
document.
4. The incident response Chat app calls
Chat API to send a message sharing a link to the summary
Docs document.
## Prepare the environment
This section shows how to create and configure a Google Cloud project for the
Chat app.
### Create a Google Cloud project
### Google API Console
1. In the Google API Console, go to Menu \> **IAM \& Admin** \> **Create a Project** .
[Go to Create a Project](https://console.developers.google.com/projectcreate)
2. In the **Project Name** field, enter a descriptive name for your project.
Optional: To edit the **Project ID** , click **Edit**. The project ID can't be changed
after the project is created, so choose an ID that meets your needs for the lifetime of the
project.
3. In the **Location** field, click **Browse** to display potential locations for your project. Then, click **Select** .
> [!CAUTION]
> **Caution: Can't find your Google Workspace organization?**
> This means you aren't signed in to a Google Workspace account. Some of the features described in Google Workspace developer documentation are only available to projects associated with an organization.
4. Click **Create**. The Google API Console navigates to the Dashboard page and your project is created within a few minutes.
### gcloud CLI
In one of the following development environments, access the Google Cloud
CLI (`gcloud`):
- **Cloud Shell** : To use an online terminal with the gcloud CLI already set up, activate Cloud Shell.
[Activate Cloud Shell](https://console.developers.google.com/?cloudshell=true)
- **Local Shell** : To use a local development environment, [install](https://cloud.google.com/sdk/docs/install) and [initialize](https://cloud.google.com/sdk/docs/initializing) the gcloud CLI.
To create a Cloud project, use the `gcloud projects create` command:
gcloud projects create PROJECT_ID
Replace PROJECT_ID by setting the ID for the project you want to create.
### Enable billing for the Cloud project
> [!CAUTION]
> If you're unable to link a billing account, you don't have the permissions needed to make this change. For more information, see [Permissions required to enable billing](https://cloud.google.com/billing/docs/how-to/modify-project#required-permissions-enable).
### Google API Console
1. In the Google API Console, go to **Billing** . Click **Menu** \> **Billing** \> **My Projects** .
[Go to Billing for My Projects](https://console.developers.google.com/billing/projects)
2. In **Select an organization**, choose the organization associated with your Google Cloud project.
3. In the project row, open the **Actions** menu (), click **Change billing**, and choose the Cloud Billing account.
4. Click **Set account**.
### gcloud CLI
1. To list available billing accounts, run:
gcloud billing accounts list
2. Link a billing account with a Google Cloud project:
gcloud billing projects link PROJECT_ID --billing-account=BILLING_ACCOUNT_ID
Replace the following:
- `PROJECT_ID` is the **Project ID** for the Cloud project for which you want to enable billing.
- `BILLING_ACCOUNT_ID` is the **billing account ID** to link with the Google Cloud project.
### Enable the APIs
### Google API Console
1. In the Google API Console, enable the Google Chat API, the Google Docs API,
the Admin SDK API, the Google Workspace Marketplace SDK, and the Vertex
AI API.
[Enable the APIs](https://console.developers.google.com/flows/enableapi?apiid=chat.googleapis.com,+docs.googleapis.com,+admin.googleapis.com,+aiplatform.googleapis.com,+appsmarket-component.googleapis.com)
2. Confirm that you're enabling the APIs in the correct
Cloud project, then click **Next**.
3. Confirm that you're enabling the correct APIs, then click **Enable**.
### gcloud CLI
1. If necessary, set the current Cloud project to the one you
created with the `gcloud config set project` command:
gcloud config set project PROJECT_ID
Replace PROJECT_ID with the **Project ID** of the
Cloud project you created.
2. Enable the Google Chat API, Google Docs API, Admin SDK API, Google Workspace
Marketplace SDK, and Vertex AI API with the `gcloud services enable`
command:
gcloud services enable chat.googleapis.com docs.googleapis.com admin.googleapis.com aiplatform.googleapis.com appsmarket-component.googleapis.com
## Set up authentication and authorization
The Chat app accesses Google Chat API using
the Chat app's credentials. The app accesses the
Admin SDK API and Google Docs API with user credentials.
### Set up user authentication and authorization
Authentication and authorization lets the
Chat app access resources in Google Workspace
and Google Cloud to process an incident response. Specifically, user
authentication is used to call Docs API and Admin SDK API.
In this tutorial, you publish the app internally to your Workspace domain, so
it's acceptable to use placeholder information. Before publishing the app
externally, replace placeholder information with real information in the
consent screen.
1. In the Google API Console, go to Menu
\>
**Google Auth platform**
\>
**Branding**.
[Go to Branding](https://console.developers.google.com/auth/branding)
2. If you have already configured the
Google Auth platform, you can configure
the following OAuth Consent Screen settings in
[Branding](https://console.developers.google.com/auth/branding),
[Audience](https://console.developers.google.com/auth/audience),
and [Data Access](https://console.developers.google.com/auth/scopes).
If you see a message that says
**Google Auth platform not configured yet** ,
click **Get Started**:
1. Under **App Information** , in **App name** , type `Incident Management`.
2. In **User support email**, select your email address or an appropriate Google group.
3. Click **Next**.
4. Under **Audience** , select **Internal** . If you can't select **Internal** , select **External**.
5. Click **Next**.
6. Under **Contact Information** , enter an **Email address** where you can be notified about any changes to your project.
7. Click **Next**.
8. Under **Finish** , review the [Google API Services User Data Policy](https://developers.google.com/terms/api-services-user-data-policy) and if you agree, select **I agree to the Google API Services: User Data Policy**.
9. Click **Continue**.
10. Click **Create**.
11. If you selected **External** for user type, add test users:
1. Click **Audience**.
2. Under **Test users** , click **Add users**.
3. Enter your email address and any other authorized test users, then click **Save**.
3. Click **Data Access** \> **Add or Remove
Scopes**. A panel appears with a list of scopes for each API that you've
enabled in your Google Cloud project.
1. Under **Manually add scopes**, paste the following scopes:
- `https://www.googleapis.com/auth/documents`
- `https://www.googleapis.com/auth/admin.directory.user.readonly`
- `https://www.googleapis.com/auth/script.external_request`
- `https://www.googleapis.com/auth/userinfo.email`
- `https://www.googleapis.com/auth/cloud-platform`
2. Click **Add to Table**.
3. Click **Update**.
4. After selecting the scopes required by your app, on the **Data Access**
page, click **Save**.
### Set up app authentication and authorization
App Authentication is used to call Chat API.
#### Create a service account in Google Cloud console
To create a service account, follow these steps:
### Google Cloud Console
1. In the Google Cloud Console, go to Menu \> **IAM \& Admin** \> **Service Accounts** .
[Go to Service Accounts](https://console.developers.google.com/iam-admin/serviceaccounts)
The remaining steps appear in the Google Cloud Console.
2. Select a Google Cloud project.
3. Click **Create service account**.
4. Enter a service account name to display in the Google Cloud Console.
> [!NOTE]
> Note: By default, Google creates a unique service account ID based on the service account name. You can modify the ID in the service account ID field. You cannot change the ID later.
5. If you don't want to set access controls now, click **Done** to finish creating the service account. To set access controls now, click **Create and continue** and proceed to the next step.
> [!NOTE]
> **Note:** Granting access control here only affects Google Cloud resources. Google Workspace resources (such as Google Sheets and Google Drive) are shared and configured separately.
6. Optional: Assign roles to your service account to grant access to your Google Cloud project's resources in addition to Google Workspace resources. For more details, refer to [Manage access to projects, folders, and organizations](https://docs.cloud.google.com/iam/docs/granting-changing-revoking-access).
7. Click **Continue**.
8. Optional: Enter users or groups that can manage and perform actions with this service account. For more details, refer to [Service account impersonation](https://docs.cloud.google.com/iam/docs/service-account-impersonation).
9. Click **Done** to finish creating the service account.
Make a note of the email address for the service account.
### gcloud CLI
1. Create the service account:
gcloud iam service-accounts create `SERVICE_ACCOUNT_NAME` \
--display-name="`SERVICE_ACCOUNT_NAME`"
2. Optional: Assign roles to your service account to grant access to your Google Cloud project's resources in addition to Google Workspace resources. For more details, refer to [Manage access to projects, folders, and organizations](https://docs.cloud.google.com/iam/docs/granting-changing-revoking-access).
The service account appears on the service account page. Next, create a private
key for the service account.
#### Create a private key
> [!WARNING]
> **Warning:** This example uses an exported
> service account key for simplicity's sake. Exporting a private key is not
> recommended in production because it shouldn't be stored in an insecure
> location, such as source control.
>
> To learn more about secure service
> account implementations and best practices, see
> [Choose
> when to use service accounts](https://cloud.google.com/iam/docs/best-practices-for-using-and-managing-service-accounts#choose-when-to-use).
To create and download a private key for the service account, follow these
steps:
1. In the Google Cloud Console, go to Menu \> **IAM \& Admin** \> **Service Accounts** .
[Go to Service Accounts](https://console.cloud.google.com/iam-admin/serviceaccounts)
The remaining steps appear in the Google Cloud Console.
2. Select a Google Cloud project.
3. Click the email address of the service account that you want to create a key for.
4. Click the **Keys** tab.
5. Click the **Add key** drop-down menu, then select **Create new key**.
6. Select **JSON** as the **Key type** and click **Create** .
Your new public/private key pair is generated and downloaded to your
machine as a service account key file. Save the downloaded JSON file as `credentials.json`
in your working directory. This file is the only copy of this key. After you
download the key file, you cannot download it again. For information about how to store
your key securely, see
[Best practices for managing service account keys](https://docs.cloud.google.com/iam/docs/best-practices-for-managing-service-account-keys).
For more information about service accounts, see
[service accounts](https://cloud.google.com/iam/docs/service-accounts)
in the Google Cloud IAM documentation.
#### Create a Google Workspace Marketplace-compatible OAuth client
To create a Google Workspace Marketplace-compatible OAuth client, follow these
steps:
1. In the Google API Console, go to Menu
\> **IAM \& Admin**
\> **Service Accounts**.
[Go to Service Accounts](https://console.developers.google.com/iam-admin/serviceaccounts)
2. Click the service account you created for your
Chat app.
3. Click **Advanced settings**.
4. Click **Create Google Workspace Marketplace-compatible OAuth client**.
5. Click **Continue**.
A confirmation message appears that says a
Google Workspace Marketplace-compatible OAuth client has been created.
## Create and deploy the Chat app
In the following section, you copy and update an entire
Apps Script project that contains all the required application
code for your Chat app, so there's no need to copy and
paste each file.
Some functions include underscores at the end of their names, like
`concatenateAllSpaceMessages_()` from `ChatApp.gs`. The underscore hides the
function from the incident initialization web page when it's open in a browser.
For more information, see [Private functions](https://developers.google.com/apps-script/guides/html/communication#private_functions).
Apps Script supports two file types, `.gs` scripts and `.html`
files. To abide by this support, the app's client-side JavaScript is included
inside `` tags and its CSS is included inside `` tags inside
an HTML file.
Optionally, you can view the entire project on GitHub.
[View on GitHub](https://github.com/googleworkspace/add-ons-samples/tree/main/apps-script/chat/incident-response-app-auth)
Here's an overview of each file:
`Consts.gs`
: Defines constants referenced by other code files,
including your Cloud project ID, Vertex AI location ID, app
credentials for the service account, and the quick command ID for closing an
incident.
#### View `Consts.gs` code
apps-script/chat/incident-response-app-auth/Consts.gs [View on GitHub](https://github.com/googleworkspace/add-ons-samples/blob/main/apps-script/chat/incident-response-app-auth/Consts.gs)
```javascript
const PROJECT_ID = 'replace-with-your-project-id';
const APP_CREDENTIALS = 'replace-with-your-app-credentials';
const APP_CREDENTIALS_SCOPES = 'https://www.googleapis.com/auth/chat.bot https://www.googleapis.com/auth/chat.app.memberships https://www.googleapis.com/auth/chat.app.spaces.create';
const VERTEX_AI_LOCATION_ID = 'us-central1';
const CLOSE_INCIDENT_COMMAND_ID = 1;
const MODEL_ID = 'gemini-2.5-flash-lite';
```
`ChatApp.gs`
: Handles Chat interaction events, including
messages, button clicks, app commands (`onAppCommand`), and dialogs.
Responds to the `Close incident` quick command by opening a dialog to gather
incident resolution details. Reads messages in the space by calling the
`spaces.messages.list` method in the Chat API.
Gets user IDs using the Admin SDK Directory service in
Apps Script.
#### View `ChatApp.gs` code
apps-script/chat/incident-response-app-auth/ChatApp.gs [View on GitHub](https://github.com/googleworkspace/add-ons-samples/blob/main/apps-script/chat/incident-response-app-auth/ChatApp.gs)
```javascript
/**
* Responds to a MESSAGE event in Google Chat.
*
* It always responds with a simple "Hello" text message.
*
* @param {Object} event the event object from Google Chat
*/
function onMessage(event) {
return { hostAppDataAction: { chatDataAction: { createMessageAction: { message: {
text: "Hello from Incident Response app!"
}}}}};
}
/**
* Responds to an APP_COMMAND event in Google Chat.
*
* @param {Object} event the event object from Google Chat
*/
function onAppCommand(event) {
if (event.chat.appCommandPayload.appCommandMetadata.appCommandId != CLOSE_INCIDENT_COMMAND_ID) {
return { hostAppDataAction: { chatDataAction: { createMessageAction: { message: {
text: "Command not recognized. Use the quick command `Close incident` to close the incident managed by this space."
}}}}};
}
return { action: { navigations: [{ pushCard: { sections: [{
header: "Close Incident",
widgets: [{
textInput: {
label: "Please describe the incident resolution",
type: "MULTIPLE_LINE",
name: "description"
}
}, {
buttonList: { buttons: [{
text: "Close Incident",
onClick: { action: { function: "closeIncident" }}
}]}
}]
}]}}]}};
}
/**
* Responds to a BUTTON_CLICKED event in Google Chat from Close Incident dialog.
*
* @param {Object} event the event object from Google Chat
*/
function closeIncident(event) {
if (event.chat.buttonClickedPayload.isDialogEvent) {
if (event.chat.buttonClickedPayload.dialogEventType == 'SUBMIT_DIALOG') {
return processSubmitDialog_(event);
}
return { action: { navigations: [{ endNavigation: {
action: "CLOSE_DIALOG" }
}]}};
}
}
/**
* Responds to a BUTTON_CLICKED event in Google Chat from Close Incident dialog submission.
*
* It creates a Doc with a summary of the incident information and posts a message
* to the space with a link to the Doc.
*
* @param {Object} event the event object from Google Chat
*/
function processSubmitDialog_(event) {
const resolution = event.commonEventObject.formInputs.description.stringInputs.value[0];
const space = event.chat.buttonClickedPayload.space;
const chatHistory = concatenateAllSpaceMessages_(space.name);
const chatSummary = summarizeChatHistory_(chatHistory);
const docUrl = createDoc_(space.displayName, resolution, chatHistory, chatSummary);
return { hostAppDataAction: { chatDataAction: { createMessageAction: { message: {
text: `Incident closed with the following resolution: ${resolution}\n\nHere is the automatically generated post-mortem:\n${docUrl}`
}}}}};
}
/**
* Lists all the messages in the Chat space, then concatenate all of them into
* a single text containing the full Chat history.
*
* For simplicity for this demo, it only fetches the first 100 messages.
*
* @return {string} a text containing all the messages in the space in the format:
* Sender's name: Message
*/
function concatenateAllSpaceMessages_(spaceName) {
// Call Chat API method spaces.messages.list
const response = Chat.Spaces.Messages.list(spaceName, { 'pageSize': 100 });
const messages = response.messages;
// Fetch the display names of the message senders and returns a text
// concatenating all the messages.
let userMap = new Map();
return messages
.map(message => `${getUserDisplayName_(userMap, message.sender.name)}: ${message.text}`)
.join('\n');
}
/**
* Obtains the display name of a user by using the Admin Directory API.
*
* The fetched display name is cached in the provided map, so we only call the API
* once per user.
*
* If the user does not have a display name, then the full name is used.
*
* @param {Map} userMap a map containing the display names previously fetched
* @param {string} userName the resource name of the user
* @return {string} the user's display name
*/
function getUserDisplayName_(userMap, userName) {
if (userMap.has(userName)) {
return userMap.get(userName);
}
let displayName = 'Unknown User';
try {
const user = AdminDirectory.Users.get(
userName.replace("users/", ""),
{ projection: 'BASIC', viewType: 'domain_public' });
displayName = user.name.displayName ? user.name.displayName : user.name.fullName;
} catch (e) {
// Ignore error if the API call fails (for example, because it's an
// out-of-domain user or Chat app) and just use 'Unknown User'.
}
userMap.set(userName, displayName);
return displayName;
}
```
`ChatSpaceCreator.gs`
: Receives form data users enter on the incident
initialization web page, and uses it to set up a Chat
space by creating and populating it, and then posts a message about the
incident.
#### View `ChatSpaceCreator.gs` code
apps-script/chat/incident-response-app-auth/ChatSpaceCreator.gs [View on GitHub](https://github.com/googleworkspace/add-ons-samples/blob/main/apps-script/chat/incident-response-app-auth/ChatSpaceCreator.gs)
```javascript
/**
* Handles an incident by creating a chat space with the provided title and members, and posting a message.
* All the actions are done using application credentials.
*
* @param {Object} formData - The data submitted by the user. It should contain the fields:
* - title: The display name of the chat space.
* - description: The description of the incident.
* - users: A comma-separated string of user emails to be added to the space.
* @return {string} The resource name of the new space.
*/
function handleIncident(formData) {
const users = formData.users.trim().length > 0 ? formData.users.split(',') : [];
const service = getService_();
if (!service.hasAccess()) {
console.error(service.getLastError());
return;
}
const spaceName = createChatSpace_(formData.title, service);
createHumanMembership_(spaceName, getUserEmail(), service);
for (const user of users ){
createHumanMembership_(spaceName, user, service);
}
createMessage_(spaceName, formData.description, service);
return spaceName;
}
/**
* Creates a chat space.
*
* @param {string} displayName - The name of the chat space.
* @param {object} service - The credentials of the service account.
* @returns {string} The resource name of the new space.
*/
function createChatSpace_(displayName, service) {
try {
// For private apps, the alias can be used
const my_customer_alias = "customers/my_customer";
// Specify the space to create.
const space = {
displayName: displayName,
spaceType: 'SPACE',
customer: my_customer_alias
};
// Call Chat API with a service account to create a message.
const createdSpace = Chat.Spaces.create(
space,
{},
// Authenticate with the service account token.
{'Authorization': 'Bearer ' + service.getAccessToken()});
return createdSpace.name;
} catch (err) {
// TODO (developer) - Handle exception.
console.log('Failed to create space with error %s', err.message);
}
}
/**
* Creates a human membership in a chat space.
*
* @param {string} spaceName - The resource name of the space.
* @param {string} email - The email of the user to be added.
* @param {object} service - The credentials of the service account.
*/
function createHumanMembership_(spaceName, email, service){
try{
const membership = {
member: {
name: 'users/'+email,
// User type for the membership
type: 'HUMAN'
}
};
const result = Chat.Spaces.Members.create(
membership,
spaceName,
{},
{'Authorization': 'Bearer ' + service.getAccessToken()}
);
} catch (err){
console.log('Failed to create membership with error %s', err.message)
}
}
/**
* Creates a chat message.
*
* @param {string} spaceName - The resource name of the space.
* @param {string} message - The text to be posted.
* @param {object} service - The credentials of the service account.
* @return {string} the resource name of the new message.
*/
function createMessage_(spaceName, message, service) {
try {
const request = {
text: message
};
// Call Chat API with a service account to create a message.
const result = Chat.Spaces.Messages.create(
request,
spaceName,
{},
// Authenticate with the service account token.
{'Authorization': 'Bearer ' + service.getAccessToken()});
return result.name;
} catch (err) {
// TODO (developer) - Handle exception.
console.log('Failed to create message with error %s', err.message);
}
}
/**
* Creates a service for the service account.
* @return {object} - The credentials of the service account.
*/
function getService_() {
return OAuth2.createService(APP_CREDENTIALS.client_email)
.setTokenUrl('https://oauth2.googleapis.com/token')
.setPrivateKey(APP_CREDENTIALS.private_key)
.setIssuer(APP_CREDENTIALS.client_email)
.setSubject(APP_CREDENTIALS.client_email)
.setScope(APP_CREDENTIALS_SCOPES)
.setPropertyStore(PropertiesService.getScriptProperties());
}
```
`DocsApi.gs`
: Calls the Docs API to create a Docs document in a
user's Google Drive and writes a summary of the incident information,
created in `VertexAiApi.gs`, to the document.
#### View `DocsApi.gs` code
apps-script/chat/incident-response-app-auth/DocsApi.gs [View on GitHub](https://github.com/googleworkspace/add-ons-samples/blob/main/apps-script/chat/incident-response-app-auth/DocsApi.gs)
```javascript
/**
* Creates a Doc in the user's Google Drive and writes a summary of the incident information to it.
*
* @param {string} title The title of the incident
* @param {string} resolution Incident resolution described by the user
* @param {string} chatHistory The whole Chat history be included in the document
* @param {string} chatSummary A summary of the Chat conversation to be included in the document
* @return {string} the URL of the created Doc
*/
function createDoc_(title, resolution, chatHistory, chatSummary) {
let doc = DocumentApp.create(title);
let body = doc.getBody();
body.appendParagraph(`Post-Mortem: ${title}`).setHeading(DocumentApp.ParagraphHeading.TITLE);
body.appendParagraph("Resolution").setHeading(DocumentApp.ParagraphHeading.HEADING1);
body.appendParagraph(resolution);
body.appendParagraph("Summary of the conversation").setHeading(DocumentApp.ParagraphHeading.HEADING1);
body.appendParagraph(chatSummary);
body.appendParagraph("Full Chat history").setHeading(DocumentApp.ParagraphHeading.HEADING1);
body.appendParagraph(chatHistory);
return doc.getUrl();
}
```
`VertexAiApi.gs`
: Summarizes the conversation in the Chat
space using Vertex AI API. This summary is posted in a
specially-created document in `DocsAPI.gs`.
#### View `VertexAiApi.gs` code
apps-script/chat/incident-response-app-auth/VertexAiApi.gs [View on GitHub](https://github.com/googleworkspace/add-ons-samples/blob/main/apps-script/chat/incident-response-app-auth/VertexAiApi.gs)
```javascript
/**
* Summarizes a Chat conversation using the Vertex AI text prediction API.
*
* @param {string} chatHistory The Chat history that will be summarized.
* @return {string} The content from the text prediction response.
*/
function summarizeChatHistory_(chatHistory) {
const API_ENDPOINT = `https://${VERTEX_AI_LOCATION_ID}-aiplatform.googleapis.com/v1/projects/${PROJECT_ID}/locations/${VERTEX_AI_LOCATION_ID}/publishers/google/models/${MODEL_ID}:generateContent`;
const prompt =
"Summarize the following conversation between Engineers resolving an incident"
+ " in a few sentences. Use only the information from the conversation.\n\n"
+ chatHistory;
// Get the access token.
const accessToken = ScriptApp.getOAuthToken();
const headers = {
'Authorization': 'Bearer ' + accessToken,
'Content-Type': 'application/json',
};
const payload = {
'contents': {
'role': 'user',
'parts' : [
{
'text': prompt
}
]
}
}
const options = {
'method': 'post',
'headers': headers,
'payload': JSON.stringify(payload),
'muteHttpExceptions': true,
};
try {
const response = UrlFetchApp.fetch(API_ENDPOINT, options);
const responseCode = response.getResponseCode();
const responseText = response.getContentText();
if (responseCode === 200) {
const jsonResponse = JSON.parse(responseText);
console.log(jsonResponse)
if (jsonResponse.candidates && jsonResponse.candidates.length > 0) {
return jsonResponse.candidates[0].content.parts[0].text; // Access the summarized text
} else {
return "No summary found in response.";
}
} else {
console.error("Vertex AI API Error:", responseCode, responseText);
return `Error: ${responseCode} - ${responseText}`;
}
} catch (e) {
console.error("UrlFetchApp Error:", e);
return "Error: " + e.toString();
}
}
```
`WebController.gs`
: Serves the incident initialization website.
#### View `WebController.gs` code
apps-script/chat/incident-response-app-auth/WebController.gs [View on GitHub](https://github.com/googleworkspace/add-ons-samples/blob/main/apps-script/chat/incident-response-app-auth/WebController.gs)
```javascript
/**
* Serves the web page from Index.html.
*/
function doGet() {
return HtmlService
.createTemplateFromFile('Index')
.evaluate();
}
/**
* Serves the web content from the specified filename.
*/
function include(filename) {
return HtmlService
.createHtmlOutputFromFile(filename)
.getContent();
}
/**
* Returns the email address of the user running the script.
*/
function getUserEmail() {
return Session.getActiveUser().getEmail();
}
```
`Index.html`
: The HTML comprising the incident initialization website.
#### View `Index.html` code
apps-script/chat/incident-response-app-auth/Index.html [View on GitHub](https://github.com/googleworkspace/add-ons-samples/blob/main/apps-script/chat/incident-response-app-auth/Index.html)
```html
Incident Manager
```
`JavaScript.html`
: Handles form behavior including submits,
errors, and clears, for the incident initialization website. It's included
into `Index.html` by the custom `include` function in `WebController.gs`.
#### View `JavaScript.html` code
apps-script/chat/incident-response-app-auth/JavaScript.html [View on GitHub](https://github.com/googleworkspace/add-ons-samples/blob/main/apps-script/chat/incident-response-app-auth/JavaScript.html)
```html
```
`Stylesheet.html`
: The CSS for the incident initialization website. It's
included into `Index.html` by the custom `include` function in
`WebController.gs`.
#### View `Stylesheet.html` code
apps-script/chat/incident-response-app-auth/Stylesheet.html [View on GitHub](https://github.com/googleworkspace/add-ons-samples/blob/main/apps-script/chat/incident-response-app-auth/Stylesheet.html)
```html
```
### Find your Cloud project number and ID
1. In the Google API Console, go to your Cloud project.
[Go to Google API Console](https://console.developers.google.com/)
2. Click Settings and Utilities
\> **Project settings**.
3. Note the values in the **Project number** and **Project ID** fields. You
use them in the following sections.
### Create the Apps Script project
To create an Apps Script project and connect it with your
Cloud project:
1. Click the following button to open the **Respond to incidents with Google Chat** Apps Script project.
[Open the project](https://script.google.com/d/1a4yeU_u-KSgWm_eGkzsO48zus-8dehLrbNJxlDbkvFvgSayPonPjFA3n/edit?usp=sharing)
2. Click **Overview**.
3. On the overview page, click  **Make a copy**.
4. Name your copy of the Apps Script project:
1. Click **Copy of Respond to incidents with Google Chat**.
2. In **Project title** , type `Incident Management Chat app`.
3. Click **Rename**.
5. In your copy of the Apps Script project, go to the `Consts.gs`
file and replace `YOUR_PROJECT_ID` with the ID of your
Cloud project.
### Set the Apps Script project's Cloud project
1. In your Apps Script project, click  **Project Settings**.
2. Under **Google Cloud Platform (GCP) Project** , click **Change project**.
3. In **GCP project number**, paste the project number of your Cloud project.
4. Click **Set project**. The Cloud project and Apps Script project are now connected.
### Create an Apps Script deployment
Now that all the code is in place, deploy the Apps Script
project. You use the deployment ID when you configure the
Chat app in the Google Cloud.
1. In Apps Script, open the incident response app's project.
[Go to Apps Script](https://script.google.com)
2. Click **Deploy** \> **New deployment**.
3. If **Add-on** and **Web app** aren't already selected, next to
**Select type** , click deployment types  and select **Add-on** and **Web app**.
4. In **Description** , enter a description for this version, like
`Complete version of incident management app`.
5. In **Execute as** , select **User accessing the web app**
6. In **Who has access** , select **Anyone within your Workspace organization**,
where "your Workspace organization" is the name of your
Google Workspace organization.
7. Click **Deploy**. Apps Script reports successful
deployment and provides a deployment ID and a URL for the incident
initialization web page.
8. Make note of the **Web app** URL to visit later when you start an incident.
Copy the **Deployment ID**. You use this ID while configuring the
Chat app in Google API Console.
9. Click **Done**.
## Configure the Chat app in the Google API Console
This section shows how to configure the Google Chat API in the Google API Console
with information about your Chat app, including the
ID of the deployment that you just created from your Apps Script
project.
1. In the Google API Console, click **Menu**
\> **APIs \& Services**
\> **Enabled APIs \& Services**
\> **Google Chat API**
\> **Configuration**.
[Go to Chat API configuration](https://console.developers.google.com/apis/api/chat.googleapis.com/hangouts-chat)
2. In **App name** , type `Incident Management`.
3. In **Avatar URL** , type `https://developers.google.com/chat/images/quickstart-app-avatar.png`.
4. In **Description** , type `Responds to incidents.`.
5. Click the **Enable Interactive features** toggle to the on position.
6. Under **Functionality** , select **Join spaces and group conversations**.
7. Under **Connection settings** , select **Apps Script**.
8. In **Deployment ID**, paste the Apps Script Deployment ID
that you copied earlier from the Apps Script project
deployment.
9. Under **Triggers** , configure `onAppCommand` for the **App command**
trigger.
10. Register a [quick command](https://developers.google.com/workspace/chat/commands) that the
fully implemented Chat app uses:
1. Under **Commands** , click **Add a command**.
2. In **Command ID** , type `1`.
3. In **Description** , type
`Closes the incident being discussed in the space.`
4. Under **Command type** , select **Quick command**.
5. In **Quick command name** , type `Close incident`.
6. Select **Opens a dialog** (or **Dialog**).
7. Click **Done**. The command is registered and listed.
11. Under **Visibility** , select
**Make this Chat app available to specific people and groups in Your
Workspace Domain** and enter your email address.
12. Under **Logs** , select **Log errors to Logging**.
13. Click **Save**. A configuration saved message appears, meaning the app is
ready to test.
## Receive administrator approval
To receive administrator approval, you must configure the
Chat app in the Google Workspace Marketplace SDK.
### Configure the Chat app in the Google Workspace Marketplace SDK
To configure the Chat app in the
Google Workspace Marketplace SDK, follow these steps:
1. In the Google API Console, go to go to
**Menu**
\> **APIs \& Services**
\> **Enabled APIs \& services**
\> **Google Workspace Marketplace SDK**
\> **App Configuration**.
[Go to App Configuration](https://console.developers.google.com/apis/api/appsmarket-component.googleapis.com/googleapps_sdk)
2. Complete the App Configuration page. How you configure your
Chat app depends on who your intended audience is
and other factors. For help completing the app configuration page, see
[Configure your app in the SDK](https://developers.google.com/workspace/marketplace/enable-configure-sdk).
For the purposes of this guide, enter the following information:
1. Under **App visibility** , select **Private**.
2. Under **Installation settings** , select **Admin install**.
3. Under **App integrations** , select **Chat app**.
4. Under **OAuth scopes** , enter the following scopes:
- `https://www.googleapis.com/auth/chat.app.spaces`
- `https://www.googleapis.com/auth/chat.app.memberships`
5. Under **Developer information** , enter your **Developer name** , **Developer website URL** , and **Developer email**.
6. Click **Save draft**.
After configuring the app, update the store listing:
1. In the Google Cloud console, go to go to **Menu** \> **APIs \& Services** \> **Enabled APIs \& services** \> **Google Workspace Marketplace SDK** \> **Store Listing**.
2. In **App details**, select Web Development as a Category.
3. In **Graphic Assets**, upload applications icons in requested formats.
4. In **Screenshots**, upload a screenshot of the application.
5. In **Support Links**, populate a Terms of Service URL, Privacy URL and Support URL.
6. In **Distribution**, Select the regions where this application will be available.
7. Click **Publish**.
### Get administrator approval
Now that your service account is configured to receive administrator approval,
obtain it from a Google Workspace administrator who can grant approval by
following the steps in [Set up authorization for Chat apps](https://support.google.com/a/answer/15137461?visit_id=638783856097573816-203044261&p=chat-app-auth&rd=1).
## Test the Chat app
To test the incident management Chat app, initiate an
incident from the web page and verify that the Chat app
works as expected:
1. Go to the Apps Script deployment web app URL.
2. When Apps Script asks permission to access your data,
click **Review permissions** , sign in with an appropriate Google Account
in your Google Workspace domain, and click **Allow**.
3. The incident initialization web page opens. Enter test information:
1. In **Incident title** , type `The First Incident`.
2. Optionally, in **Incident responders**, enter the email addresses of your fellow incident responders. They must be users with a Google Chat account in your Google Workspace organization or space creation fails. Don't enter your own email address because it's included automatically.
3. In **Initial message** , type `Testing the incident management Chat app.`
4. Click **Create Chat Space** . A `creating space` message appears.
5. After the space is created, a `Space created!` message appears. Click
**Open space**, which opens the space in Chat in a new tab.
6. Optionally, you and the other incident responders can send messages in the
space. The app summarizes these messages using Vertex AI and shares a
retrospective document.
7. To end the incident response and begin the resolution process, in the
Chat space, launch the quick command `Close incident`. An
incident management dialog opens.
8. In **Close incident** , enter a description for the incident resolution,
like `Test complete`.
9. Click **Close Incident**.
The Incident Management app lists the messages in the space, summarizes them
with Vertex AI, pastes the summary in a Google Docs document, and shares the
document in the space.
## Clean up
To avoid incurring charges to your Google Cloud account for the
resources used in this tutorial, we recommend that you delete the
Cloud project.
> [!CAUTION]
> **Caution:** Deleting a project has the following effects:
>
> - **Everything in the project is deleted.** If you used an existing project for this tutorial, when you delete it, you also delete any other work you've done in the project.
> - **Custom project IDs are lost.** When you created this project, you might have created a custom project ID that you want to use in the future. To preserve the URLs that use the project ID, such as a URL on appspot.com, delete the selected resources inside the project instead of deleting the whole project.
>
> If you plan to explore multiple tutorials and quickstarts, reusing projects can help you avoid exceeding project quota limits.
1. In the Google API Console, go to the **Manage resources** page. Click **Menu** \> **IAM \& Admin** \> **Manage Resources** .
[Go to Resource Manager](https://console.developers.google.com/cloud-resource-manager)
2. In the project list, select the project you want to delete and then click **Delete** .
3. In the dialog, type the project ID and then click **Shut down** to delete the project.
## Related topics
- The incident response app authenticates with user credentials to call APIs and invoke Google Cloud services, like the Chat API and Vertex AI API. This means that the user initializing an incident must have access to these services. To make the app more robust, consider calling the Vertex AI API with a service account instead of the user credentials of the user invoking the `Close incident` quick command. For help configuring a service account for the Vertex AI API, see [Use a custom service
account](https://cloud.google.com/vertex-ai/docs/general/custom-service-account).
## Chat apps that aren't add-ons: Respond to incidents with Google Chat, Vertex AI, and Google Apps Script (App authentication)
The following instructions and code samples apply to a
Chat app that isn't a Google Workspace add-on
([View on GitHub](https://github.com/googleworkspace/google-chat-samples/tree/main/apps-script/incident-response-app-auth)).
### Create and configure the Apps Script project
1. Open the [Respond to incidents with Google Chat](https://script.google.com/d/1rPyW_0NO6ZgBhObmCDDFGBzIvXNdsFnvNJMOx6qWBbMCZ0oaQ21gkRwR/edit?usp=sharing) Apps Script project for a Chat app that isn't an add-on and make a copy.
2. When configuring the Chat API in the Google API Console: Clear **Build this Chat app as a Google Workspace add-on** . A dialog opens asking you to confirm. In the dialog, click **Disable**.
3. Register the `/closeIncident` slash command (Command ID `1`, select **Opens
a dialog** ) and type `/closeIncident` in the space to resolve an incident.
### Source code
`Consts.gs`
:
apps-script/incident-response-app-auth/Consts.gs [View on GitHub](https://github.com/googleworkspace/google-chat-samples/blob/main/apps-script/incident-response-app-auth/Consts.gs)
```javascript
const PROJECT_ID = 'replace-with-your-project-id';
const CLOSE_INCIDENT_COMMAND_ID = 1;
const APP_CREDENTIALS = 'replace-with-your-app-credentials';
const APP_CREDENTIALS_SCOPES = 'https://www.googleapis.com/auth/chat.bot https://www.googleapis.com/auth/chat.app.memberships https://www.googleapis.com/auth/chat.app.spaces.create';
const VERTEX_AI_LOCATION_ID = 'us-central1';
const MODEL_ID = 'gemini-1.5-flash-002';
```
`ChatApp.gs`
:
apps-script/incident-response-app-auth/ChatApp.gs [View on GitHub](https://github.com/googleworkspace/google-chat-samples/blob/main/apps-script/incident-response-app-auth/ChatApp.gs)
```javascript
/**
* Responds to a MESSAGE event in Google Chat.
*
* This app only responds to a slash command with the ID 1 ("/closeIncident").
* It will respond to any other message with a simple "Hello" text message.
*
* @param {Object} event the event object from Google Chat
*/
function onMessage(event) {
if (event.message.slashCommand) {
return processSlashCommand_(event);
}
return { "text": "Hello from Incident Response app!" };
}
/**
* Responds to a CARD_CLICKED event in Google Chat.
*
* This app only responds to one kind of dialog (Close Incident).
*
* @param {Object} event the event object from Google Chat
*/
function onCardClick(event) {
if (event.isDialogEvent) {
if (event.dialogEventType == 'SUBMIT_DIALOG') {
return processSubmitDialog_(event);
}
return {
actionResponse: {
type: "DIALOG",
dialogAction: {
actionStatus: "OK"
}
}
};
}
}
/**
* Responds to a MESSAGE event with a Slash command in Google Chat.
*
* This app only responds to a slash command with the ID 1 ("/closeIncident")
* by returning a Dialog.
*
* @param {Object} event the event object from Google Chat
*/
function processSlashCommand_(event) {
if (event.message.slashCommand.commandId != CLOSE_INCIDENT_COMMAND_ID) {
return {
"text": "Command not recognized. Use the command `/closeIncident` to close the incident managed by this space."
};
}
const sections = [
{
header: "Close Incident",
widgets: [
{
textInput: {
label: "Please describe the incident resolution",
type: "MULTIPLE_LINE",
name: "description"
}
},
{
buttonList: {
buttons: [
{
text: "Close Incident",
onClick: {
action: {
function: "closeIncident"
}
}
}
]
}
}
]
}
];
return {
actionResponse: {
type: "DIALOG",
dialogAction: {
dialog: {
body: {
sections,
}
}
}
}
};
}
/**
* Responds to a CARD_CLICKED event with a Dialog submission in Google Chat.
*
* This app only responds to one kind of dialog (Close Incident).
* It creates a Doc with a summary of the incident information and posts a message
* to the space with a link to the Doc.
*
* @param {Object} event the event object from Google Chat
*/
function processSubmitDialog_(event) {
const resolution = event.common.formInputs.description[""].stringInputs.value[0];
const chatHistory = concatenateAllSpaceMessages_(event.space.name);
const chatSummary = summarizeChatHistory_(chatHistory);
const docUrl = createDoc_(event.space.displayName, resolution, chatHistory, chatSummary);
return {
actionResponse: {
type: "NEW_MESSAGE",
},
text: `Incident closed with the following resolution: ${resolution}\n\nHere is the automatically generated post-mortem:\n${docUrl}`
};
}
/**
* Lists all the messages in the Chat space, then concatenate all of them into
* a single text containing the full Chat history.
*
* For simplicity for this demo, it only fetches the first 100 messages.
*
* Messages with slash commands are filtered out, so the returned history will
* contain only the conversations between users and not app command invocations.
*
* @return {string} a text containing all the messages in the space in the format:
* Sender's name: Message
*/
function concatenateAllSpaceMessages_(spaceName) {
// Call Chat API method spaces.messages.list
const response = Chat.Spaces.Messages.list(spaceName, { 'pageSize': 100 });
const messages = response.messages;
// Fetch the display names of the message senders and returns a text
// concatenating all the messages.
let userMap = new Map();
return messages
.filter(message => message.slashCommand === undefined)
.map(message => `${getUserDisplayName_(userMap, message.sender.name)}: ${message.text}`)
.join('\n');
}
/**
* Obtains the display name of a user by using the Admin Directory API.
*
* The fetched display name is cached in the provided map, so we only call the API
* once per user.
*
* If the user does not have a display name, then the full name is used.
*
* @param {Map} userMap a map containing the display names previously fetched
* @param {string} userName the resource name of the user
* @return {string} the user's display name
*/
function getUserDisplayName_(userMap, userName) {
if (userMap.has(userName)) {
return userMap.get(userName);
}
let displayName = 'Unknown User';
try {
const user = AdminDirectory.Users.get(
userName.replace("users/", ""),
{ projection: 'BASIC', viewType: 'domain_public' });
displayName = user.name.displayName ? user.name.displayName : user.name.fullName;
} catch (e) {
// Ignore error if the API call fails (for example, because it's an
// out-of-domain user or Chat app)) and just use 'Unknown User'.
}
userMap.set(userName, displayName);
return displayName;
}
```
`ChatSpaceCreator.gs`
:
apps-script/incident-response-app-auth/ChatSpaceCreator.gs [View on GitHub](https://github.com/googleworkspace/google-chat-samples/blob/main/apps-script/incident-response-app-auth/ChatSpaceCreator.gs)
```javascript
/**
* Handles an incident by creating a chat space, adding members, and posting a message.
* All the actions are done using application credentials.
*
* @param {Object} formData - The data submitted by the user. It should contain the fields:
* - title: The display name of the chat space.
* - description: The description of the incident.
* - users: A comma-separated string of user emails to be added to the space.
* @return {string} The resource name of the new space.
*/
function handleIncident(formData) {
const users = formData.users.trim().length > 0 ? formData.users.split(',') : [];
const service = getService_();
if (!service.hasAccess()) {
console.error(service.getLastError());
return;
}
const spaceName = createChatSpace_(formData.title, service);
createHumanMembership_(spaceName, getUserEmail(), service);
for (const user of users ){
createHumanMembership_(spaceName, user, service);
}
createMessage_(spaceName, formData.description, service);
return spaceName;
}
/**
* Creates a chat space with application credentials.
*
* @param {string} displayName - The name of the chat space.
* @param {object} service - The credentials of the service account.
* @returns {string} The resource name of the new space.
*/
function createChatSpace_(displayName, service) {
try {
// For private apps, the alias can be used
const my_customer_alias = "customers/my_customer";
// Specify the space to create.
const space = {
displayName: displayName,
spaceType: 'SPACE',
customer: my_customer_alias
};
// Call Chat API with a service account to create a message.
const createdSpace = Chat.Spaces.create(
space,
{},
// Authenticate with the service account token.
{'Authorization': 'Bearer ' + service.getAccessToken()});
return createdSpace.name;
} catch (err) {
// TODO (developer) - Handle exception.
console.log('Failed to create space with error %s', err.message);
}
}
/*
* Creates a chat message with application credentials.
*
* @param {string} spaceName - The resource name of the space.
* @param {string} message - The text to be posted.
* @param {object} service - The credentials of the service account.
* @return {string} the resource name of the new space.
*/
function createMessage_(spaceName, message, service) {
try {
// Call Chat API with a service account to create a message.
const result = Chat.Spaces.Messages.create(
{'text': message},
spaceName,
{},
// Authenticate with the service account token.
{'Authorization': 'Bearer ' + service.getAccessToken()});
} catch (err) {
// TODO (developer) - Handle exception.
console.log('Failed to create message with error %s', err.message);
}
}
/**
* Creates a human membership in a chat space with application credentials.
*
* @param {string} spaceName - The resource name of the space.
* @param {string} email - The email of the user to be added.
* @param {object} service - The credentials of the service account.
*/
function createHumanMembership_(spaceName, email, service){
try{
const membership = {
member: {
name: 'users/'+email,
// User type for the membership
type: 'HUMAN'
}
};
const result = Chat.Spaces.Members.create(
membership,
spaceName,
{},
{'Authorization': 'Bearer ' + service.getAccessToken()}
);
} catch (err){
console.log('Failed to create membership with error %s', err.message)
}
}
/*
* Creates a service for the service account.
* @return {object} - The credentials of the service account.
*/
function getService_() {
return OAuth2.createService(APP_CREDENTIALS.client_email)
.setTokenUrl('https://oauth2.googleapis.com/token')
.setPrivateKey(APP_CREDENTIALS.private_key)
.setIssuer(APP_CREDENTIALS.client_email)
.setSubject(APP_CREDENTIALS.client_email)
.setScope(APP_CREDENTIALS_SCOPES)
.setPropertyStore(PropertiesService.getScriptProperties());
}
```
`DocsApi.gs`
:
apps-script/incident-response-app-auth/DocsApi.gs [View on GitHub](https://github.com/googleworkspace/google-chat-samples/blob/main/apps-script/incident-response-app-auth/DocsApi.gs)
```javascript
/**
* Creates a Doc in the user's Google Drive and writes a summary of the incident information to it.
*
* @param {string} title The title of the incident
* @param {string} resolution Incident resolution described by the user
* @param {string} chatHistory The whole Chat history be included in the document
* @param {string} chatSummary A summary of the Chat conversation to be included in the document
* @return {string} the URL of the created Doc
*/
function createDoc_(title, resolution, chatHistory, chatSummary) {
let doc = DocumentApp.create(title);
let body = doc.getBody();
body.appendParagraph(`Post-Mortem: ${title}`).setHeading(DocumentApp.ParagraphHeading.TITLE);
body.appendParagraph("Resolution").setHeading(DocumentApp.ParagraphHeading.HEADING1);
body.appendParagraph(resolution);
body.appendParagraph("Summary of the conversation").setHeading(DocumentApp.ParagraphHeading.HEADING1);
body.appendParagraph(chatSummary);
body.appendParagraph("Full Chat history").setHeading(DocumentApp.ParagraphHeading.HEADING1);
body.appendParagraph(chatHistory);
return doc.getUrl();
}
```
`VertexAiApi.gs`
:
apps-script/incident-response-app-auth/VertexAiApi.gs [View on GitHub](https://github.com/googleworkspace/google-chat-samples/blob/main/apps-script/incident-response-app-auth/VertexAiApi.gs)
```javascript
/**
* Summarizes a Chat conversation using the Vertex AI text prediction API.
*
* @param {string} chatHistory The Chat history that will be summarized.
* @return {string} The content from the text prediction response.
*/
function summarizeChatHistory_(chatHistory) {
const API_ENDPOINT = `https://${VERTEX_AI_LOCATION_ID}-aiplatform.googleapis.com/v1/projects/${PROJECT_ID}/locations/${VERTEX_AI_LOCATION_ID}/publishers/google/models/${MODEL_ID}:generateContent`;
const prompt = "Summarize the following conversation between Engineers resolving an incident"
+ " in a few sentences. Use only the information from the conversation.\n\n" + chatHistory;
// Get the access token.
const accessToken = ScriptApp.getOAuthToken();
const headers = {
'Authorization': 'Bearer ' + accessToken,
'Content-Type': 'application/json',
};
const payload = {
'contents': {
'role': 'user',
'parts' : [
{
'text': prompt
}
]
}
}
const options = {
'method': 'post',
'headers': headers,
'payload': JSON.stringify(payload),
'muteHttpExceptions': true,
};
try {
const response = UrlFetchApp.fetch(API_ENDPOINT, options);
const responseCode = response.getResponseCode();
const responseText = response.getContentText();
if (responseCode === 200) {
const jsonResponse = JSON.parse(responseText);
console.log(jsonResponse)
if (jsonResponse.candidates && jsonResponse.candidates.length > 0) {
return jsonResponse.candidates[0].content.parts[0].text; // Access the summarized text
} else {
return "No summary found in response.";
}
} else {
console.error("Vertex AI API Error:", responseCode, responseText);
return `Error: ${responseCode} - ${responseText}`;
}
} catch (e) {
console.error("UrlFetchApp Error:", e);
return "Error: " + e.toString();
}
}
```
`WebController.gs`
:
apps-script/incident-response-app-auth/WebController.gs [View on GitHub](https://github.com/googleworkspace/google-chat-samples/blob/main/apps-script/incident-response-app-auth/WebController.gs)
```javascript
/**
* Serves the web page from Index.html.
*/
function doGet() {
return HtmlService
.createTemplateFromFile('Index')
.evaluate();
}
/**
* Serves the web content from the specified filename.
*/
function include(filename) {
return HtmlService
.createHtmlOutputFromFile(filename)
.getContent();
}
/**
* Returns the email address of the user running the script.
*/
function getUserEmail() {
return Session.getActiveUser().getEmail();
}
```
`Index.html`
:
apps-script/incident-response-app-auth/Index.html [View on GitHub](https://github.com/googleworkspace/google-chat-samples/blob/main/apps-script/incident-response-app-auth/Index.html)
```html
Incident Manager
```
`JavaScript.html`
:
apps-script/incident-response-app-auth/JavaScript.html [View on GitHub](https://github.com/googleworkspace/google-chat-samples/blob/main/apps-script/incident-response-app-auth/JavaScript.html)
```html
```
`Stylesheet.html`
:
apps-script/incident-response-app-auth/Stylesheet.html [View on GitHub](https://github.com/googleworkspace/google-chat-samples/blob/main/apps-script/incident-response-app-auth/Stylesheet.html)
```html
```