
במדריך הזה נסביר איך ליצור אפליקציה ל-Google Chat שמגיבה לאירועים בזמן אמת. כשמגיבים לאירוע, האפליקציה יוצרת מרחב ב-Chat ומאכלסת אותו, עוזרת לפתור את האירוע באמצעות הודעות, פקודות לוכסן ודיאלוגים, ומשתמשת ב-AI כדי לסכם את התגובה לאירוע במסמך Google Docs.
אירוע הוא אירוע שדורש טיפול מיידי של צוות אנשים כדי לפתור אותו. דוגמאות לאירועים:
- בקשת תמיכה דחופה נוצרת בפלטפורמה לניהול קשרי לקוחות (CRM), וצוות שירות צריך לשתף פעולה כדי לפתור אותה.
- מערכת עוברת למצב אופליין, וקבוצה של מהנדסי Site Reliability (SRE) מקבלת התראה כדי שיוכלו לעבוד יחד ולהחזיר אותה למצב אונליין.
- מתרחשת רעידת אדמה בעוצמה גבוהה, ועובדי החירום צריכים לתאם את התגובה שלהם.
לצורך המדריך הזה, ההתראה על האירוע מתחילה כשמישהו מדווח על האירוע בלחיצה על לחצן מדף אינטרנט. דף האינטרנט מדמה אירוע על ידי בקשה מהמשתמשים להזין מידע בסיסי על האירוע: שם, תיאור וכתובות אימייל של המשיבים.
כך נראית אפליקציית Chat לניהול אירועים בפעולה:
-
איור 1. האתר שבו אפשר לדווח על תקרית. -
איור 2. התראה על יצירת המרחב ב-Chat לדיווח על האירוע. -
איור 3. מרחב ב-Chat לטיפול בתקרית. -
איור 4. לפתור את האירוע באמצעות פקודה של שורת הפקודות. -
איור 5. תיבת הדו-שיח של פתרון האירוע. -
איור 6. מסמך Google Docs עם פתרון האירוע ששותף במרחב. -
איור 7. מסמך Google Docs עם סיכום ה-AI של פתרון האירוע.
דרישות מוקדמות
אם אתם צריכים להפעיל בארגון שלכם את אחת מהדרישות המוקדמות האלה, אתם צריכים לבקש מהאדמין שלכם ב-Google Workspace להפעיל אותן:
- חשבון Google Workspace במהדורת Business או Enterprise עם גישה ל-Google Chat.
- להפעיל את המאגר הארגוני (שיתוף אנשי קשר) ב-Google Workspace. אפליקציית האירוע משתמשת בספרייה כדי לחפש את פרטי הקשר של המשיבים לאירוע, כמו שם וכתובת אימייל. אנשי התגובה לאירועים צריכים להיות משתמשים עם חשבון Google Chat בארגון Google Workspace שלכם.
מטרות
- פיתוח אפליקציה ל-Chat שמגיבה לתקריות.
- כדי לעזור למשתמשים להגיב לאירועים, אפשר לבצע את הפעולות הבאות:
- יצירת מרחבים משותפים לתגובה לאירועים.
- פרסום הודעות עם סיכום של תקריות ותגובות.
- תמיכה בשיתוף פעולה באמצעות תכונות אינטראקטיביות של אפליקציית Chat.
- סיכום שיחות ופתרונות בעזרת Vertex AI.
ארכיטקטורה
בתרשים הבא מוצגת הארכיטקטורה של משאבי Google Workspace ו-Google Cloud שבהם נעשה שימוש באפליקציית Google Chat לתגובה לאירועים.
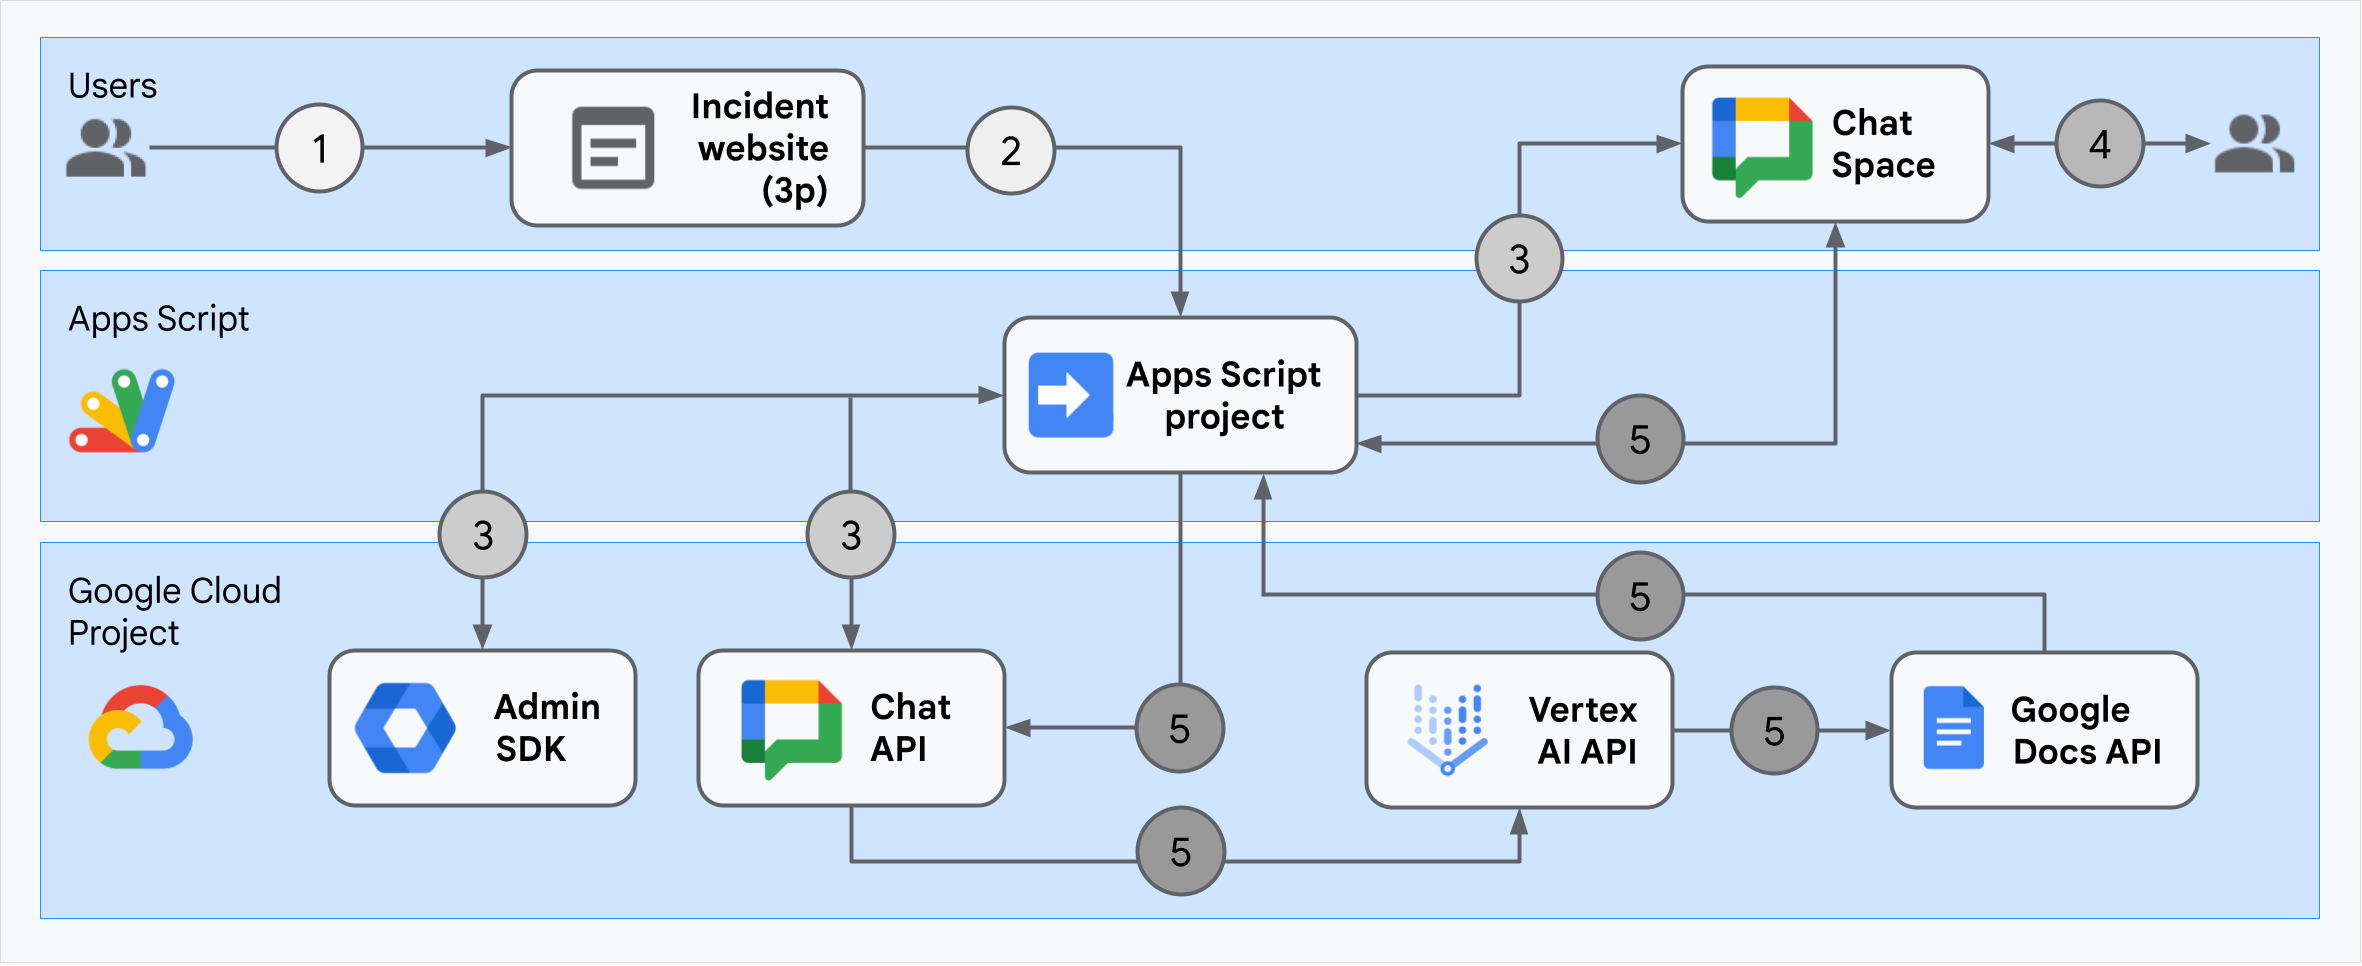
הארכיטקטורה מראה איך אפליקציית Google Chat לתגובה לאירועים מעבדת אירוע ופתרון.
משתמש מתחיל אירוע מאתר חיצוני שמארח ב-Apps Script.
האתר שולח בקשת HTTP אסינכרונית לאפליקציית Google Chat, שמתארחת גם היא ב-Apps Script.
אפליקציית Google Chat לתגובה לאירועים מעבדת את הבקשה:
שירות Apps Script Admin SDK מקבל מידע על חברי הצוות, כמו מזהה משתמש וכתובת אימייל.
באמצעות קבוצה של בקשות HTTP ל-Chat API באמצעות שירות Chat המתקדם של Apps Script, אפליקציית Google Chat לטיפול באירועים יוצרת מרחב ב-Chat לטיפול באירוע, מוסיפה אליו את חברי הצוות ושולחת הודעה למרחב.
חברי הצוות דנים באירוע במרחב ב-Chat.
חבר צוות מפעיל פקודה של שורת הפקודות כדי לסמן שהתקרית נפתרה.
קריאת HTTP ל-Chat API באמצעות שירות Chat המתקדם של Apps Script מציגה את כל ההודעות במרחב ב-Chat.
Vertex AI מקבל את ההודעות שצוינו ויוצר סיכום.
שירות
DocumentAppשל Apps Script יוצר מסמך Docs ומוסיף למסמך את הסיכום של Vertex AI.אפליקציית Google Chat לתגובה לאירועים קוראת ל-Chat API כדי לשלוח הודעה עם קישור לסיכום במסמך Docs.
הכנת הסביבה
בקטע הזה מוסבר איך ליצור ולהגדיר פרויקט ב-Google Cloud לאפליקציית Chat.
יצירת פרויקט של Google Cloud
מסוף Google Cloud
- במסוף Google Cloud, עוברים אל תפריט > IAM & Admin > Create a Project (יצירת פרויקט).
-
בשדה Project Name (שם הפרויקט), מזינים שם תיאורי לפרויקט.
אופציונלי: כדי לערוך את מזהה הפרויקט, לוחצים על עריכה. אי אפשר לשנות את מזהה הפרויקט אחרי שהוא נוצר, לכן חשוב לבחור מזהה שיענה על הצרכים שלכם למשך חיי הפרויקט.
- בשדה Location, לוחצים על Browse כדי להציג מיקומים אפשריים לפרויקט. אחר כך לוחצים על בחירה.
- לוחצים על יצירה. מערכת Google Cloud מעבירה אתכם לדף Dashboard והפרויקט נוצר תוך כמה דקות.
CLI של gcloud
באחת מסביבות הפיתוח הבאות, ניגשים אל Google Cloud CLI (gcloud):
-
Cloud Shell: כדי להשתמש בטרמינל אונליין שבו כבר מוגדר ה-CLI של gcloud, צריך להפעיל את Cloud Shell.
הפעלת Cloud Shell -
מעטפת מקומית: כדי להשתמש בסביבת פיתוח מקומית, צריך להתקין ולהפעיל את ה-CLI של gcloud.
כדי ליצור פרויקט ב-Cloud, משתמשים בפקודהgcloud projects create: gcloud projects create PROJECT_ID
הפעלת החיוב בפרויקט ב-Cloud
מסוף Google Cloud
- במסוף Google Cloud, עוברים אל Billing. לוחצים על תפריט > חיוב > הפרויקטים שלי.
- בקטע Select an organization (בחירת ארגון), בוחרים את הארגון שמשויך לפרויקט שלכם ב-Google Cloud.
- בשורת הפרויקט, פותחים את התפריט Actions (), לוחצים על Change billing ובוחרים את החשבון לחיוב ב-Cloud.
- לוחצים על Set account.
CLI של gcloud
- כדי להציג רשימה של החשבונות לחיוב שזמינים לכם, מריצים את הפקודה:
gcloud billing accounts list - קישור חשבון לחיוב לפרויקט ב-Google Cloud:
gcloud billing projects link PROJECT_ID --billing-account=BILLING_ACCOUNT_IDמחליפים את מה שכתוב בשדות הבאים:
-
PROJECT_IDהוא מזהה הפרויקט של פרויקט Cloud שרוצים להפעיל בו חיוב. -
BILLING_ACCOUNT_IDהוא מזהה החשבון לחיוב שאליו רוצים לקשר את הפרויקט ב-Google Cloud.
-
הפעלת ממשקי ה-API
מסוף Google Cloud
במסוף Google Cloud, מפעילים את Google Chat API, את Google Docs API, את Admin SDK API ואת Vertex AI API.
מוודאים שמפעילים את ממשקי ה-API בפרויקט הנכון ב-Cloud ולוחצים על הבא.
מוודאים שמפעילים את ממשקי ה-API הנכונים ולוחצים על הפעלה.
CLI של gcloud
אם צריך, מגדירים את פרויקט Cloud הנוכחי לפרויקט שיצרתם באמצעות הפקודה
gcloud config set project:gcloud config set project PROJECT_IDמחליפים את PROJECT_ID במזהה הפרויקט של פרויקט Cloud שיצרתם.
מפעילים את Google Chat API, Google Docs API, Admin SDK API ו-Vertex AI API באמצעות הפקודה
gcloud services enable:gcloud services enable chat.googleapis.com docs.googleapis.com admin.googleapis.com aiplatform.googleapis.com
הגדרת אימות והרשאה
אימות והרשאה מאפשרים לאפליקציית Chat לגשת למשאבים ב-Google Workspace וב-Google Cloud כדי לטפל בתגובה לאירוע.
במדריך הזה מפרסמים את האפליקציה באופן פנימי, ולכן אפשר להשתמש במידע של placeholder. לפני שמפרסמים את האפליקציה באופן חיצוני, צריך להחליף את המידע של placeholder במידע אמיתי במסך ההסכמה.
במסוף Google Cloud, לוחצים על סמל התפריט > Google Auth platform > Branding.
אם כבר הגדרתם אתGoogle Auth platform, אתם יכולים לקבוע את ההגדרות הבאות של מסך ההסכמה ל-OAuth בקטעים Branding, Audience וData Access. אם מופיעה ההודעה Google Auth platform not configured yet, לוחצים על Get Started:
- בקטע App Information בשדה App name, מקלידים
Incident Management. - בקטע User support email, בוחרים את כתובת האימייל או קבוצת Google המתאימה.
- לוחצים על הבא.
- בקטע Audience, לוחצים על Internal. אם אי אפשר לבחור באפשרות פנימי, בוחרים באפשרות חיצוני.
- לוחצים על הבא.
- בקטע Contact Information, מזינים כתובת אימייל שאליה אפשר לשלוח התראות על שינויים בפרויקט.
- לוחצים על הבא.
- בקטע Finish, קוראים את המדיניות של Google בנושא נתוני משתמשים בשירותי API. אם אתם מסכימים, מסמנים את התיבה I agree to the Google API Services: User Data Policy.
- לוחצים על המשך.
- לוחצים על יצירה.
- אם בחרתם באפשרות חיצוני לסוג המשתמש, מוסיפים משתמשי בדיקה:
- לוחצים על קהל.
- בקטע משתמשי בדיקה, לוחצים על הוספת משתמשים.
- מזינים את כתובת האימייל שלכם ושל משתמשים מורשים אחרים לבדיקה, ואז לוחצים על שמירה.
- בקטע App Information בשדה App name, מקלידים
לוחצים על גישה לנתונים > הוספה או הסרה של היקפי הרשאה. מופיעה חלונית עם רשימת היקפי ההרשאות של כל API שהפעלתם בפרויקט ב-Google Cloud.
בקטע Manually add scopes (הוספת היקפי הרשאה באופן ידני), מדביקים את היקפי ההרשאה הבאים:
https://www.googleapis.com/auth/chat.spaces.createhttps://www.googleapis.com/auth/chat.membershipshttps://www.googleapis.com/auth/chat.memberships.apphttps://www.googleapis.com/auth/chat.messageshttps://www.googleapis.com/auth/documentshttps://www.googleapis.com/auth/admin.directory.user.readonlyhttps://www.googleapis.com/auth/script.external_requesthttps://www.googleapis.com/auth/userinfo.emailhttps://www.googleapis.com/auth/cloud-platform
לוחצים על הוספה לטבלה.
לוחצים על עדכון.
אחרי שבוחרים את ההיקפים שנדרשים לאפליקציה, לוחצים על שמירה בדף גישה לנתונים.
יצירה ופריסה של אפליקציה ל-Chat
בקטע הבא, מעתיקים ומעדכנים פרויקט שלם בסקריפט של Google Apps שמכיל את כל קוד האפליקציה הנדרש לאפליקציית Chat, כך שאין צורך להעתיק ולהדביק כל קובץ בנפרד.
חלק מהפונקציות כוללות קו תחתון בסוף השם שלהן, כמו
processSlashCommand_() מתוך ChatApp.gs. הקו התחתון מסתיר את הפונקציה מדף האינטרנט של אתחול האירוע כשהוא פתוח בדפדפן. מידע נוסף זמין במאמר בנושא פונקציות פרטיות.
Apps Script תומך בשני סוגי קבצים: .gs סקריפטים ו.html
קבצים. כדי לעמוד בדרישות התמיכה האלה, קוד ה-JavaScript בצד הלקוח של האפליקציה נכלל בתגי <script /> וקוד ה-CSS נכלל בתגי <style /> בתוך קובץ HTML.
אם רוצים, אפשר לראות את הפרויקט כולו ב-GitHub.
סקירה כללית של כל קובץ:
Consts.gsהקובץ מגדיר קבועים שאליהם מתייחסים קובצי קוד אחרים, כולל מזהה הפרויקט ב-Cloud, מזהה המיקום ב-Vertex AI ומזהה פקודת הלוכסן לסגירת אירוע.
הצגת קוד
Consts.gsChatApp.gsמטפל באירועי אינטראקציה ב-Chat, כולל הודעות, קליקים על כרטיסים, פקודות עם לוכסנים ודיאלוגים. מגיב לפקודת הלוכס
/closeIncidentעל ידי פתיחת תיבת דו-שיח לאיסוף פרטים על פתרון האירוע. קורא הודעות במרחב על ידי קריאה לשיטהspaces.messages.listב-Chat API. קבלת מזהי משתמשים באמצעות שירות Admin SDK Directory ב-Apps Script.הצגת קוד
ChatApp.gsChatSpaceCreator.gsמקבל את נתוני הטופס שהמשתמשים מזינים בדף האינטרנט של אתחול האירוע, ומשתמש בהם כדי להגדיר מרחב ב-Chat על ידי יצירה ומילוי שלו, ואז מפרסם הודעה לגבי האירוע.
הצגת קוד
ChatSpaceCreator.gsDocsApi.gsקורא את Google Docs API כדי ליצור מסמך ב-Google Docs ב-Google Drive של המשתמש, וכותב במסמך סיכום של פרטי האירוע שנוצר ב-
VertexAiApi.gs.הצגת קוד
DocsApi.gsVertexAiApi.gsמסכם את השיחה במרחב ב-Chat באמצעות Vertex AI. הסיכום הזה מתפרסם במסמך שנוצר במיוחד ב-
DocsAPI.gs.הצגת קוד
VertexAiApi.gsWebController.gsהשרת מציג את אתר ההפעלה של האירוע.
הצגת קוד
WebController.gsIndex.htmlקוד ה-HTML שמרכיב את אתר ההפעלה של האירוע.
הצגת קוד
Index.htmlJavaScript.htmlמטפל בהתנהגות של טפסים, כולל שליחות, שגיאות וניקויים, באתר לאתחול האירוע. היא נכללת ב-
Index.htmlעל ידי הפונקציה המותאמת אישיתincludeב-WebController.gs.הצגת קוד
JavaScript.htmlStylesheet.htmlה-CSS של אתר ההפעלה של האירוע. הוא נכלל ב-
Index.htmlעל ידי הפונקציה המותאמת אישיתincludeב-WebController.gs.הצגת קוד
Stylesheet.html
איך מוצאים את מספר הפרויקט ואת מזהה הפרויקט ב-Cloud
במסוף Google Cloud, נכנסים לפרויקט ב-Cloud.
לוחצים על סמל ההגדרות והכלים > הגדרות הפרויקט.
שימו לב לערכים בשדות מספר הפרויקט ומזהה הפרויקט. משתמשים בהם בקטעים הבאים.
יצירת פרויקט Apps Script
כדי ליצור פרויקט Apps Script ולקשר אותו לפרויקט Cloud:
- לוחצים על הלחצן הבא כדי לפתוח את פרויקט Apps Script של מענה לאירועים באמצעות Google Chat.
פתיחת הפרויקט - לוחצים על סקירה כללית.
- בדף הסקירה הכללית, לוחצים על
 יצירת עותק.
 נותנים שם לעותק של פרויקט Apps Script:
לוחצים על עותק של Respond to incidents with Google Chat (תגובה לאירועים באמצעות Google Chat).
בשדה שם הפרויקט, כותבים
Incident Management Chat app.לוחצים על Rename.
בעותק של פרויקט Apps Script, עוברים לקובץ
Consts.gsומחליפים אתYOUR_PROJECT_IDבמזהה של פרויקט Cloud.
הגדרת פרויקט Cloud לפרויקט Apps Script
- בפרויקט Apps Script, לוחצים על
 הגדרות הפרויקט.
 - בקטע פרויקט Google Cloud Platform (GCP), לוחצים על שינוי הפרויקט.
- בקטע מספר הפרויקט ב-GCP, מדביקים את מספר הפרויקט ב-Cloud.
- לוחצים על הגדרת פרויקט. הפרויקט ב-Cloud והפרויקט ב-Apps Script מקושרים עכשיו.
יצירת פריסה של Apps Script
אחרי שכל הקוד במקום, פורסים את פרויקט Apps Script. משתמשים במזהה הפריסה כשמגדירים את אפליקציית Chat ב-Google Cloud.
ב-Apps Script, פותחים את הפרויקט של אפליקציית התגובה לאירוע.
לוחצים על פריסה > פריסה חדשה.
אם האפשרויות תוסף ואפליקציית אינטרנט לא מסומנות, לוחצים על סוגי הפריסה
לצד בחירת סוג ובוחרים באפשרויות תוסף ואפליקציית אינטרנט.בשדה תיאור, מזינים תיאור לגרסה הזו, כמו
Complete version of incident management app.בקטע Execute as (הרצה כ), בוחרים באפשרות User accessing the web app (משתמש שנכנס לאפליקציית האינטרנט).
בקטע למי יש גישה, בוחרים באפשרות כל מי ששייך לארגון שלכם ב-Workspace, כאשר 'הארגון שלכם ב-Workspace' הוא השם של הארגון שלכם ב-Google Workspace.
לוחצים על פריסה. Apps Script מדווח על פריסה מוצלחת ומספק מזהה פריסה וכתובת URL לדף האינטרנט של אתחול האירוע.
כדאי לרשום את כתובת ה-URL של אפליקציית האינטרנט כדי להיכנס אליה בהמשך כשמתחילים אירוע. מעתיקים את מזהה הפריסה. משתמשים במזהה הזה כשמגדירים את אפליקציית Chat במסוף Google Cloud.
לוחצים על סיום.
הגדרת אפליקציית Chat במסוף Google Cloud
בקטע הזה נסביר איך להגדיר את Google Chat API במסוף Google Cloud עם מידע על אפליקציית Chat, כולל מזהה הפריסה שיצרתם זה עתה מפרויקט Apps Script.
במסוף Google Cloud, לוחצים על תפריט > מוצרים נוספים > Google Workspace > ספריית מוצרים > Google Chat API > ניהול > הגדרה.
מבטלים את הסימון של Build this Chat app as a Google Workspace add-on (פיתוח אפליקציית Chat כתוסף ל-Google Workspace). תיפתח תיבת דו-שיח שבה תתבקשו לאשר את הפעולה. בתיבת הדו-שיח, לוחצים על השבתה.
בשדה App name, כותבים
Incident Management.בקטע כתובת ה-URL של הדמות, מקלידים
https://developers.google.com/chat/images/quickstart-app-avatar.png.בשדה תיאור, מקלידים
Responds to incidents..לוחצים על המתג הפעלת תכונות אינטראקטיביות כדי להפעיל אותו.
בקטע פונקציונליות, בוחרים באפשרות הצטרפות למרחבים ולשיחות קבוצתיות.
בקטע הגדרות חיבור, בוחרים באפשרות Apps Script.
בשדה Deployment ID (מזהה פריסה), מדביקים את מזהה הפריסה של Apps Script שהעתקתם קודם מהפריסה של פרויקט Apps Script.
רושמים פקודת סלאש שבה משתמשת אפליקציית Chat שהוטמעה באופן מלא:
בקטע פקודות דרך שורת הפקודות, לוחצים על הוספת פקודה דרך שורת הפקודות.
בשדה Name, כותבים
Close incident.בשדה Command ID (מזהה הפקודה), מקלידים
1.בשדה תיאור, מקלידים
Closes the incident being discussed in the space.בקטע סוג הפקודה, בוחרים באפשרות פקודה דרך שורת הפקודות.
בשדה Slash command name, כותבים
/closeIncident.בוחרים באפשרות הקישור פותח תיבת דו-שיח.
לוחצים על סיום. פקודת הלוכסן רשומה ומופיעה ברשימה.
בקטע Visibility (חשיפה), בוחרים באפשרות Make this Chat app available to specific people and groups in Your Workspace Domain (הפיכת אפליקציית הצ'אט הזו לזמינה לאנשים ולקבוצות ספציפיים בדומיין שלכם ב-Workspace) ומזינים את כתובת האימייל.
בקטע יומנים, בוחרים באפשרות רישום שגיאות ביומן.
לוחצים על שמירה. מופיעה הודעה שההגדרה נשמרה, כלומר האפליקציה מוכנה לבדיקה.
בדיקת אפליקציית Chat
כדי לבדוק את אפליקציית Chat לניהול אירועים, יוזמים אירוע מדף האינטרנט ומוודאים שאפליקציית Chat פועלת כמצופה:
עוברים אל כתובת ה-URL של אפליקציית האינטרנט של פריסת Apps Script.
כש-Apps Script מבקש הרשאה לגשת לנתונים שלכם, לוחצים על בדיקת ההרשאות, נכנסים לחשבון Google המתאים בדומיין Google Workspace שלכם ולוחצים על אישור.
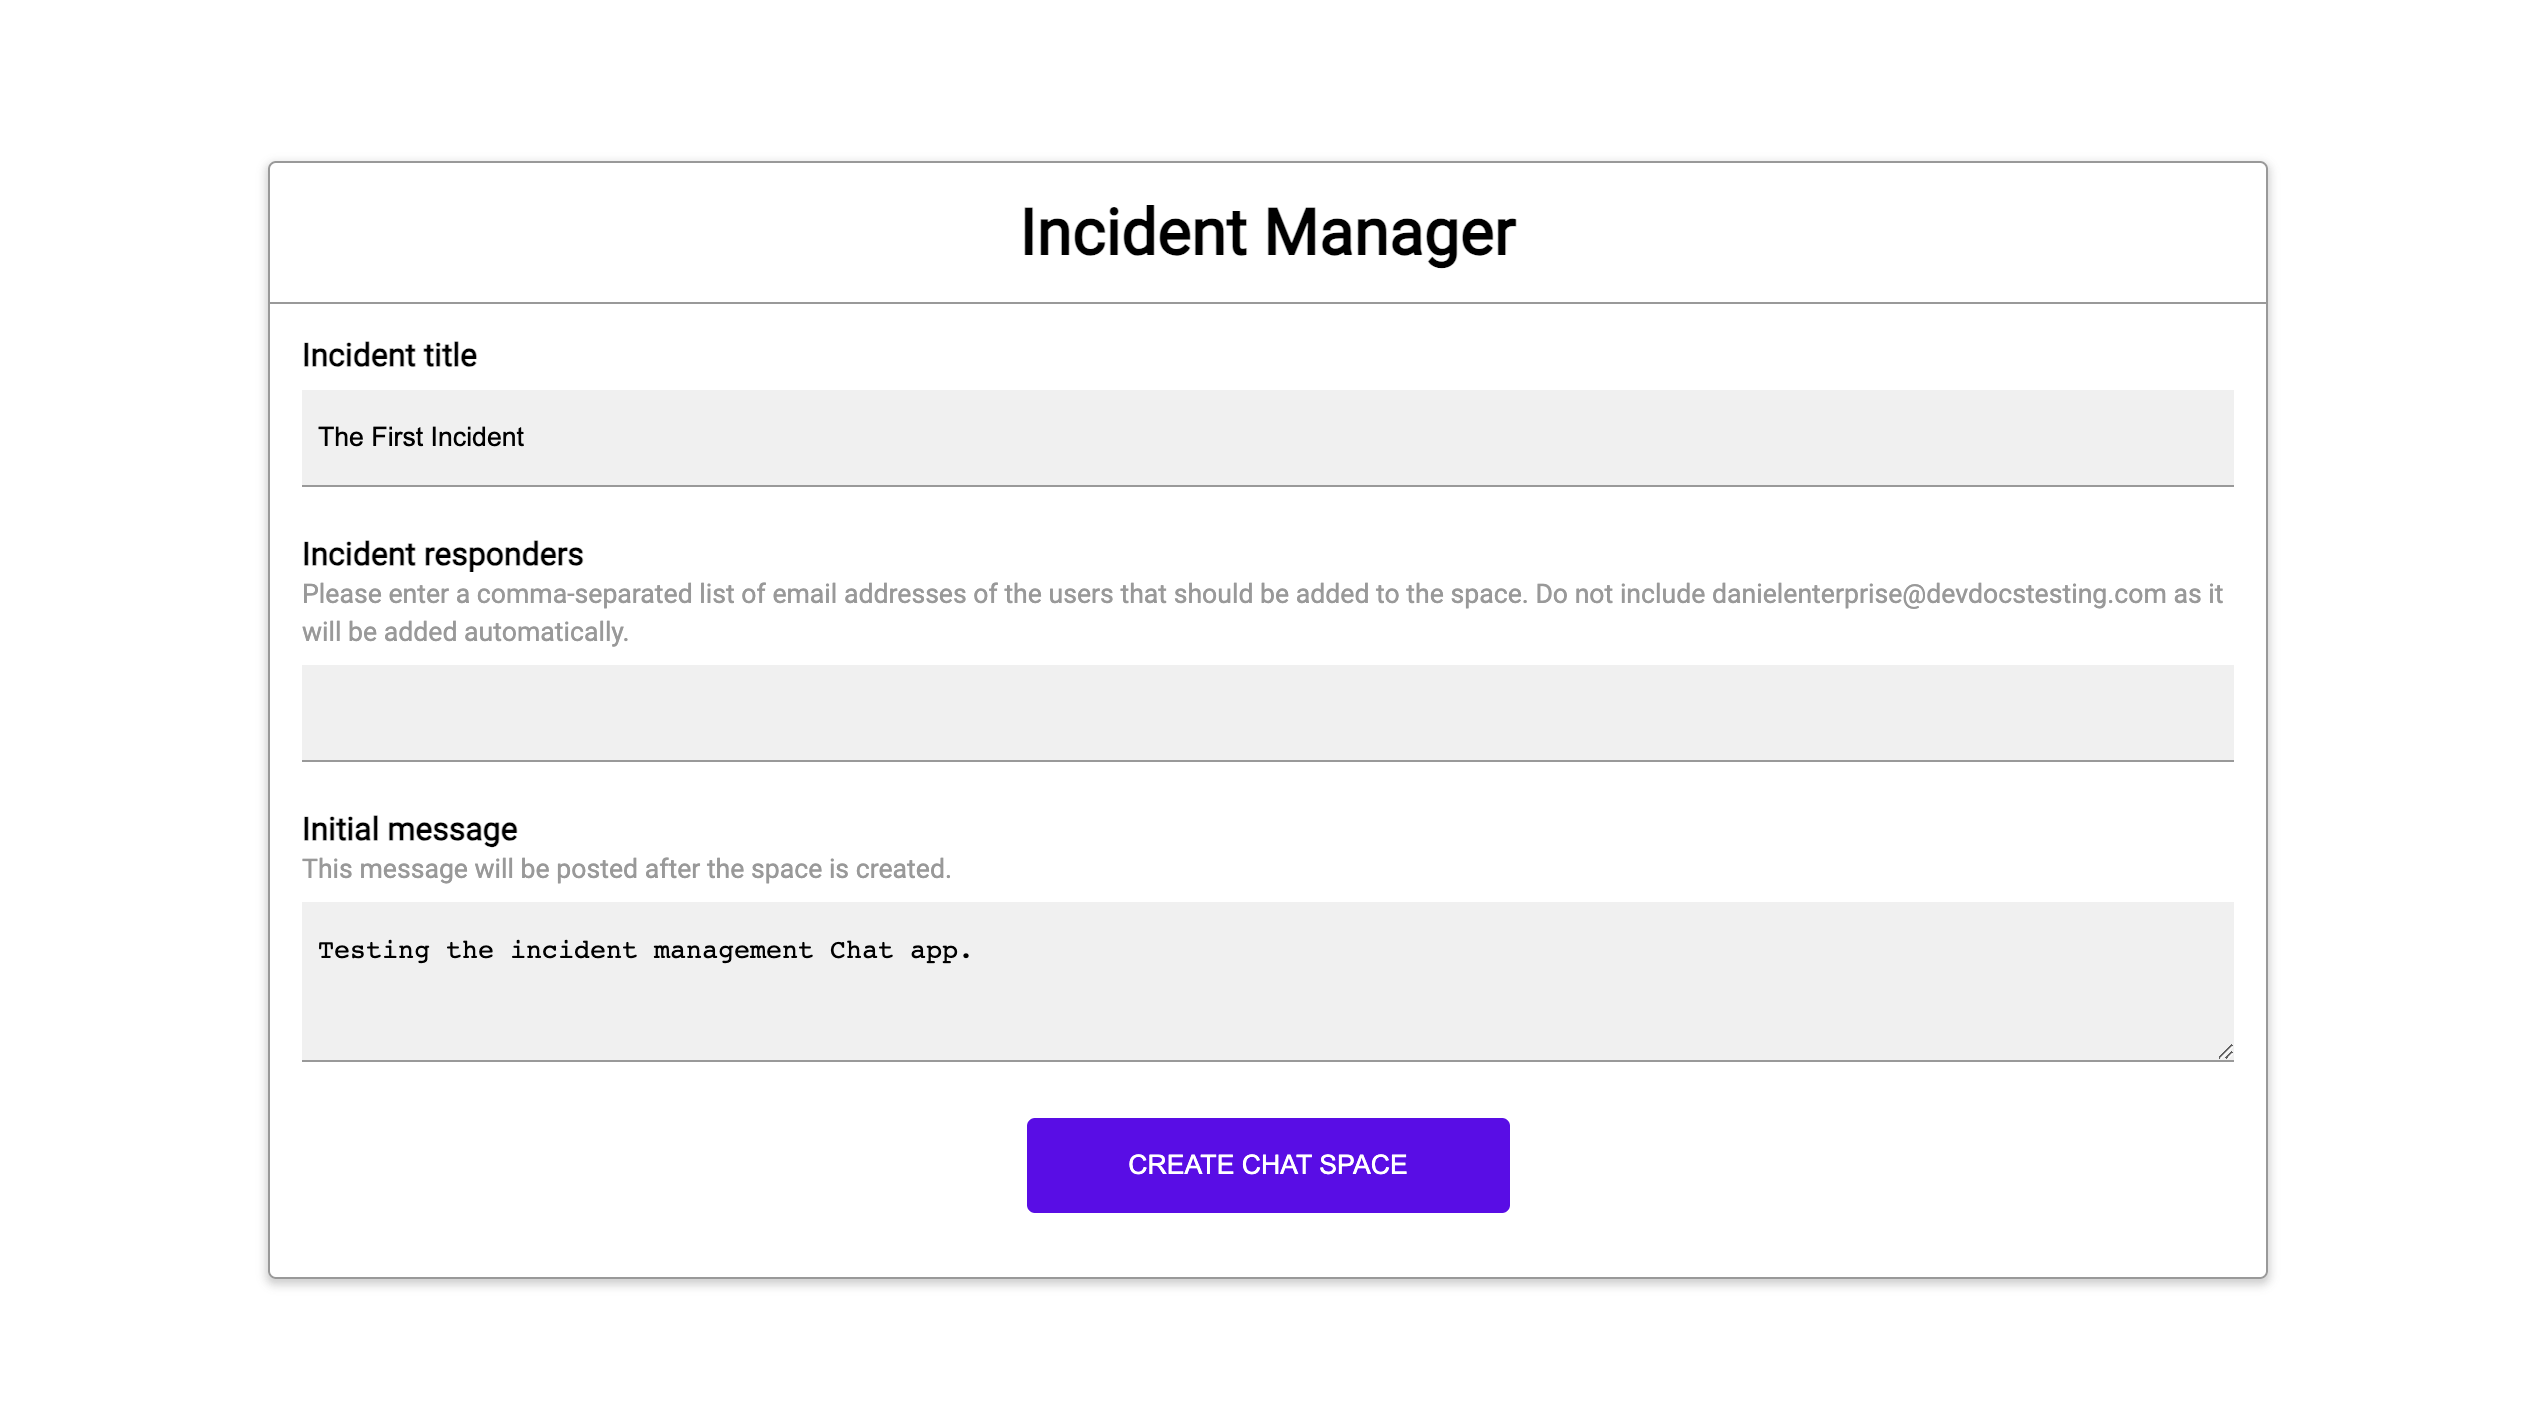
ייפתח דף האינטרנט של אתחול האירוע. מזינים את פרטי הבדיקה:
- בשדה Incident title, כותבים
The First Incident. - אופציונלי: בשדה Incident responders (משיבים לאירועים), מזינים את כתובות האימייל של שאר המשיבים לאירועים. הם צריכים להיות משתמשים עם חשבון Google Chat בארגון Google Workspace שלכם, אחרת לא תוכלו ליצור את המרחב. אל תזינו את כתובת האימייל שלכם, כי היא נכללת באופן אוטומטי.
- בהודעה ראשונית, מקלידים
Testing the incident management Chat app.
- בשדה Incident title, כותבים
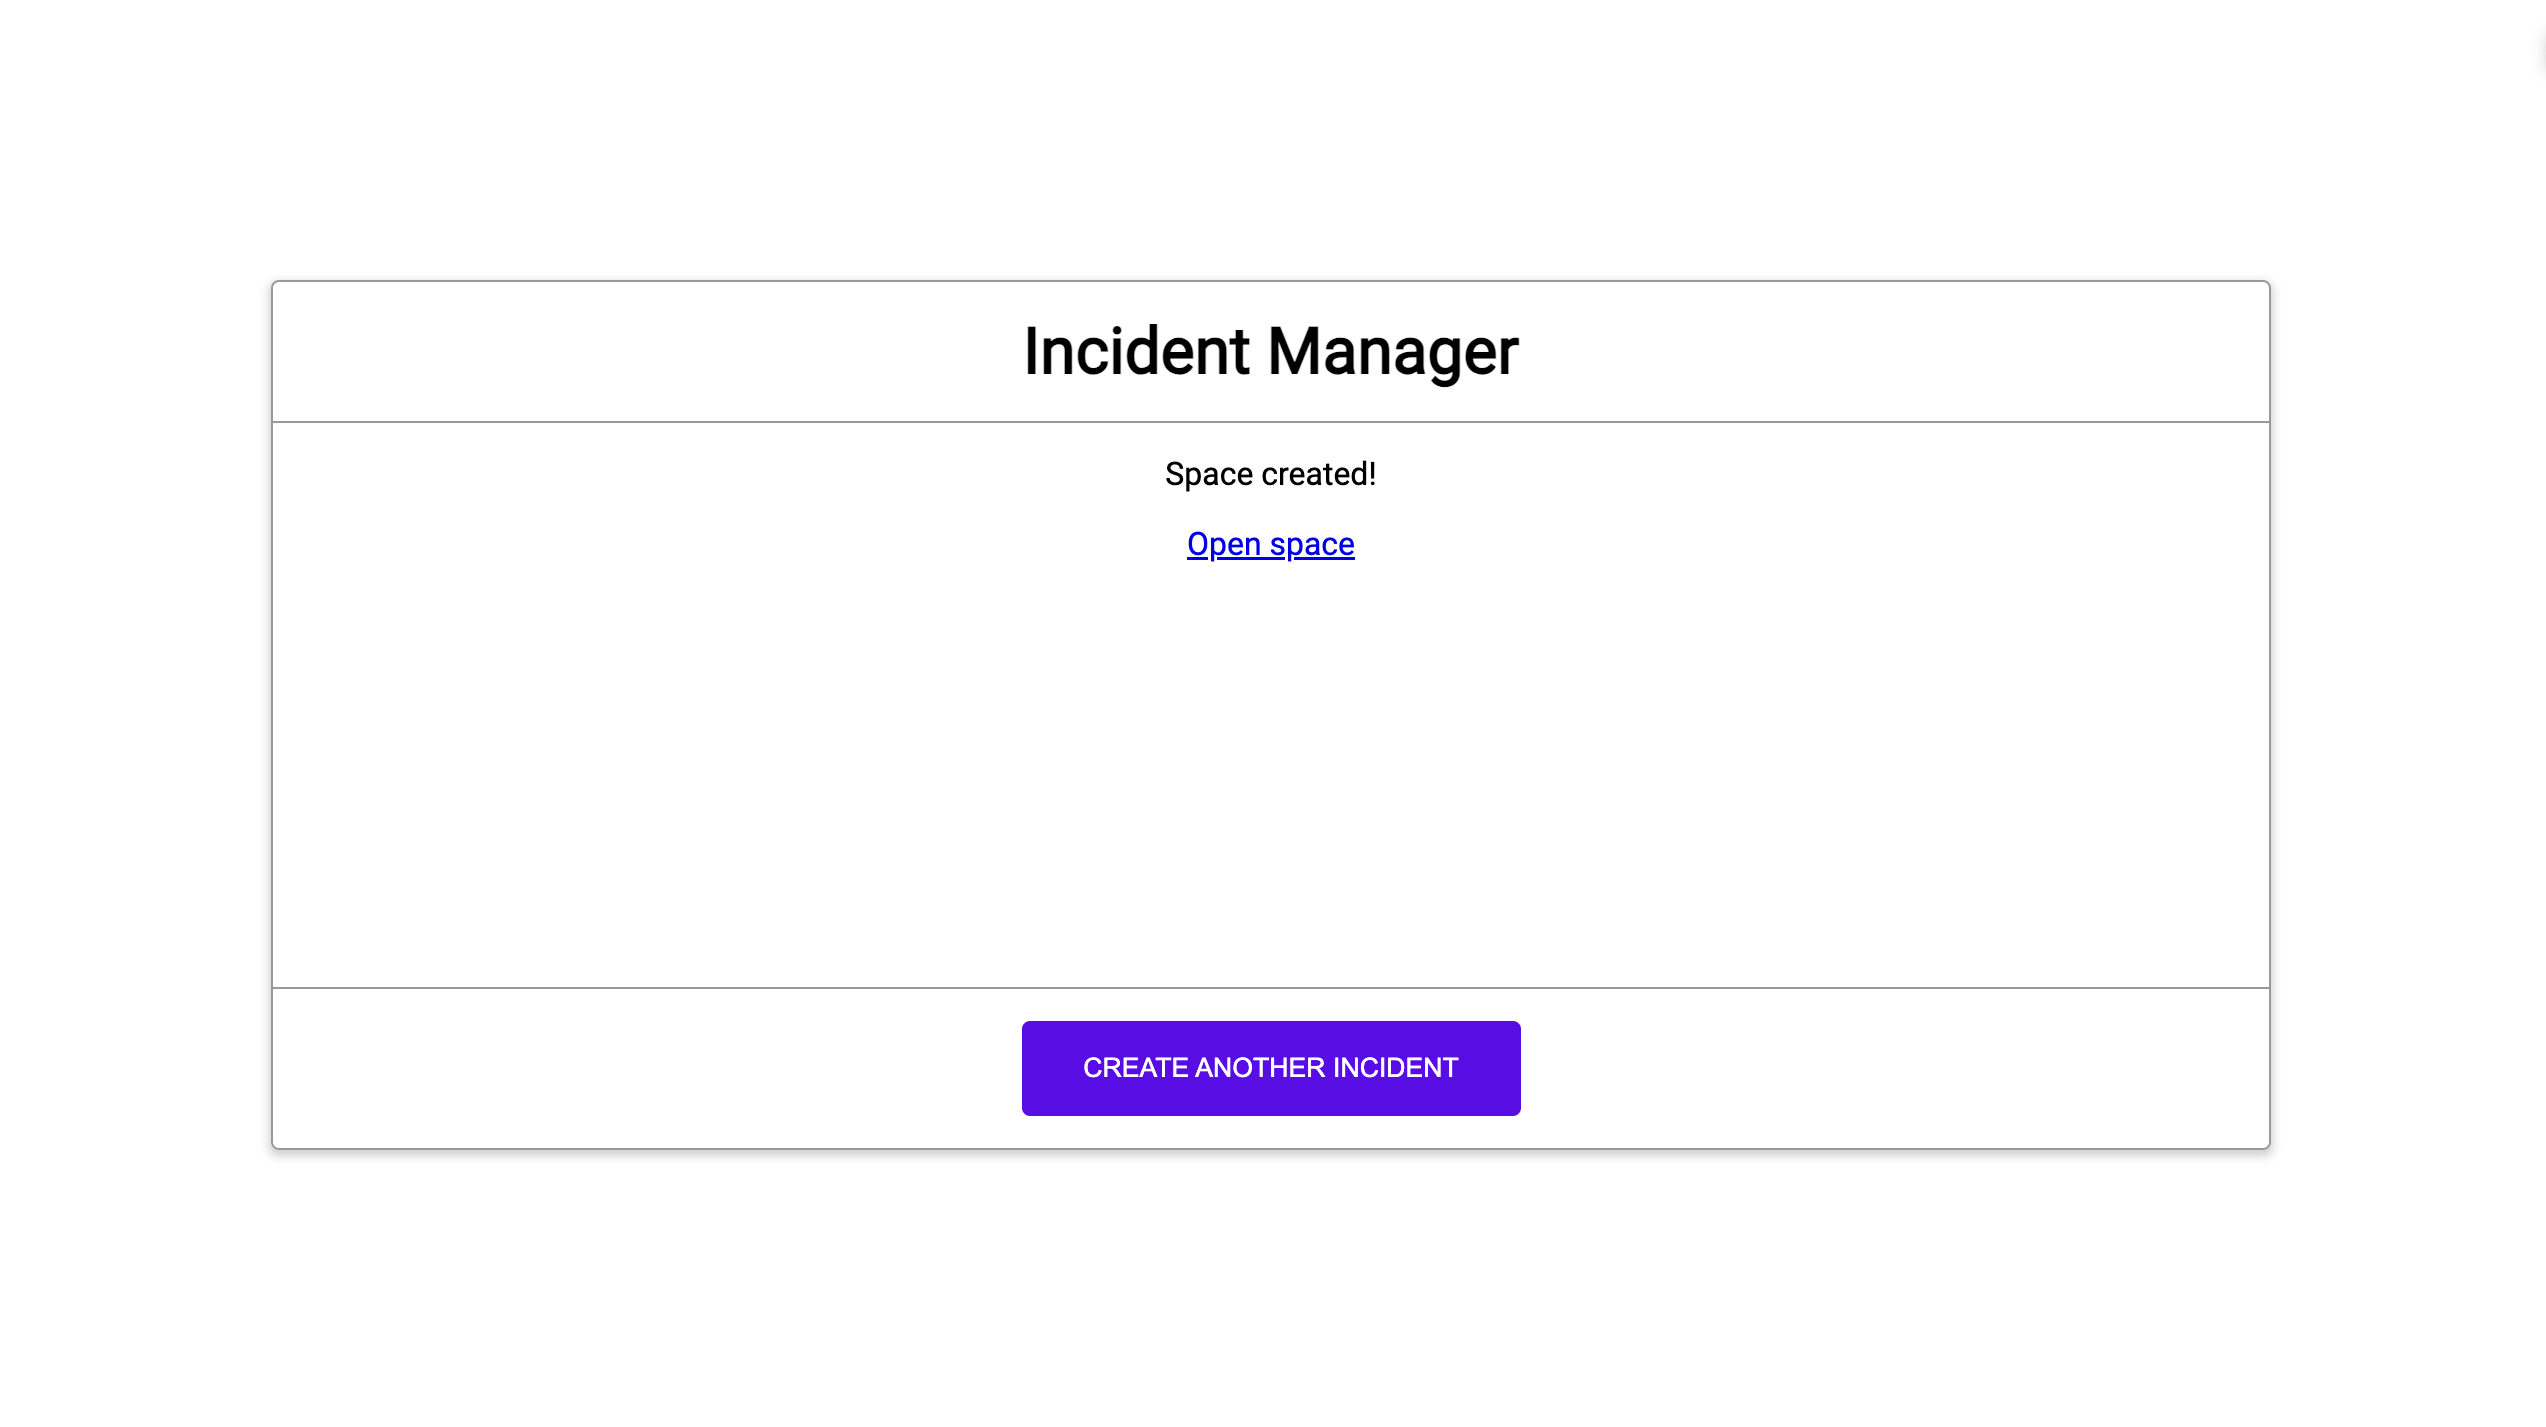
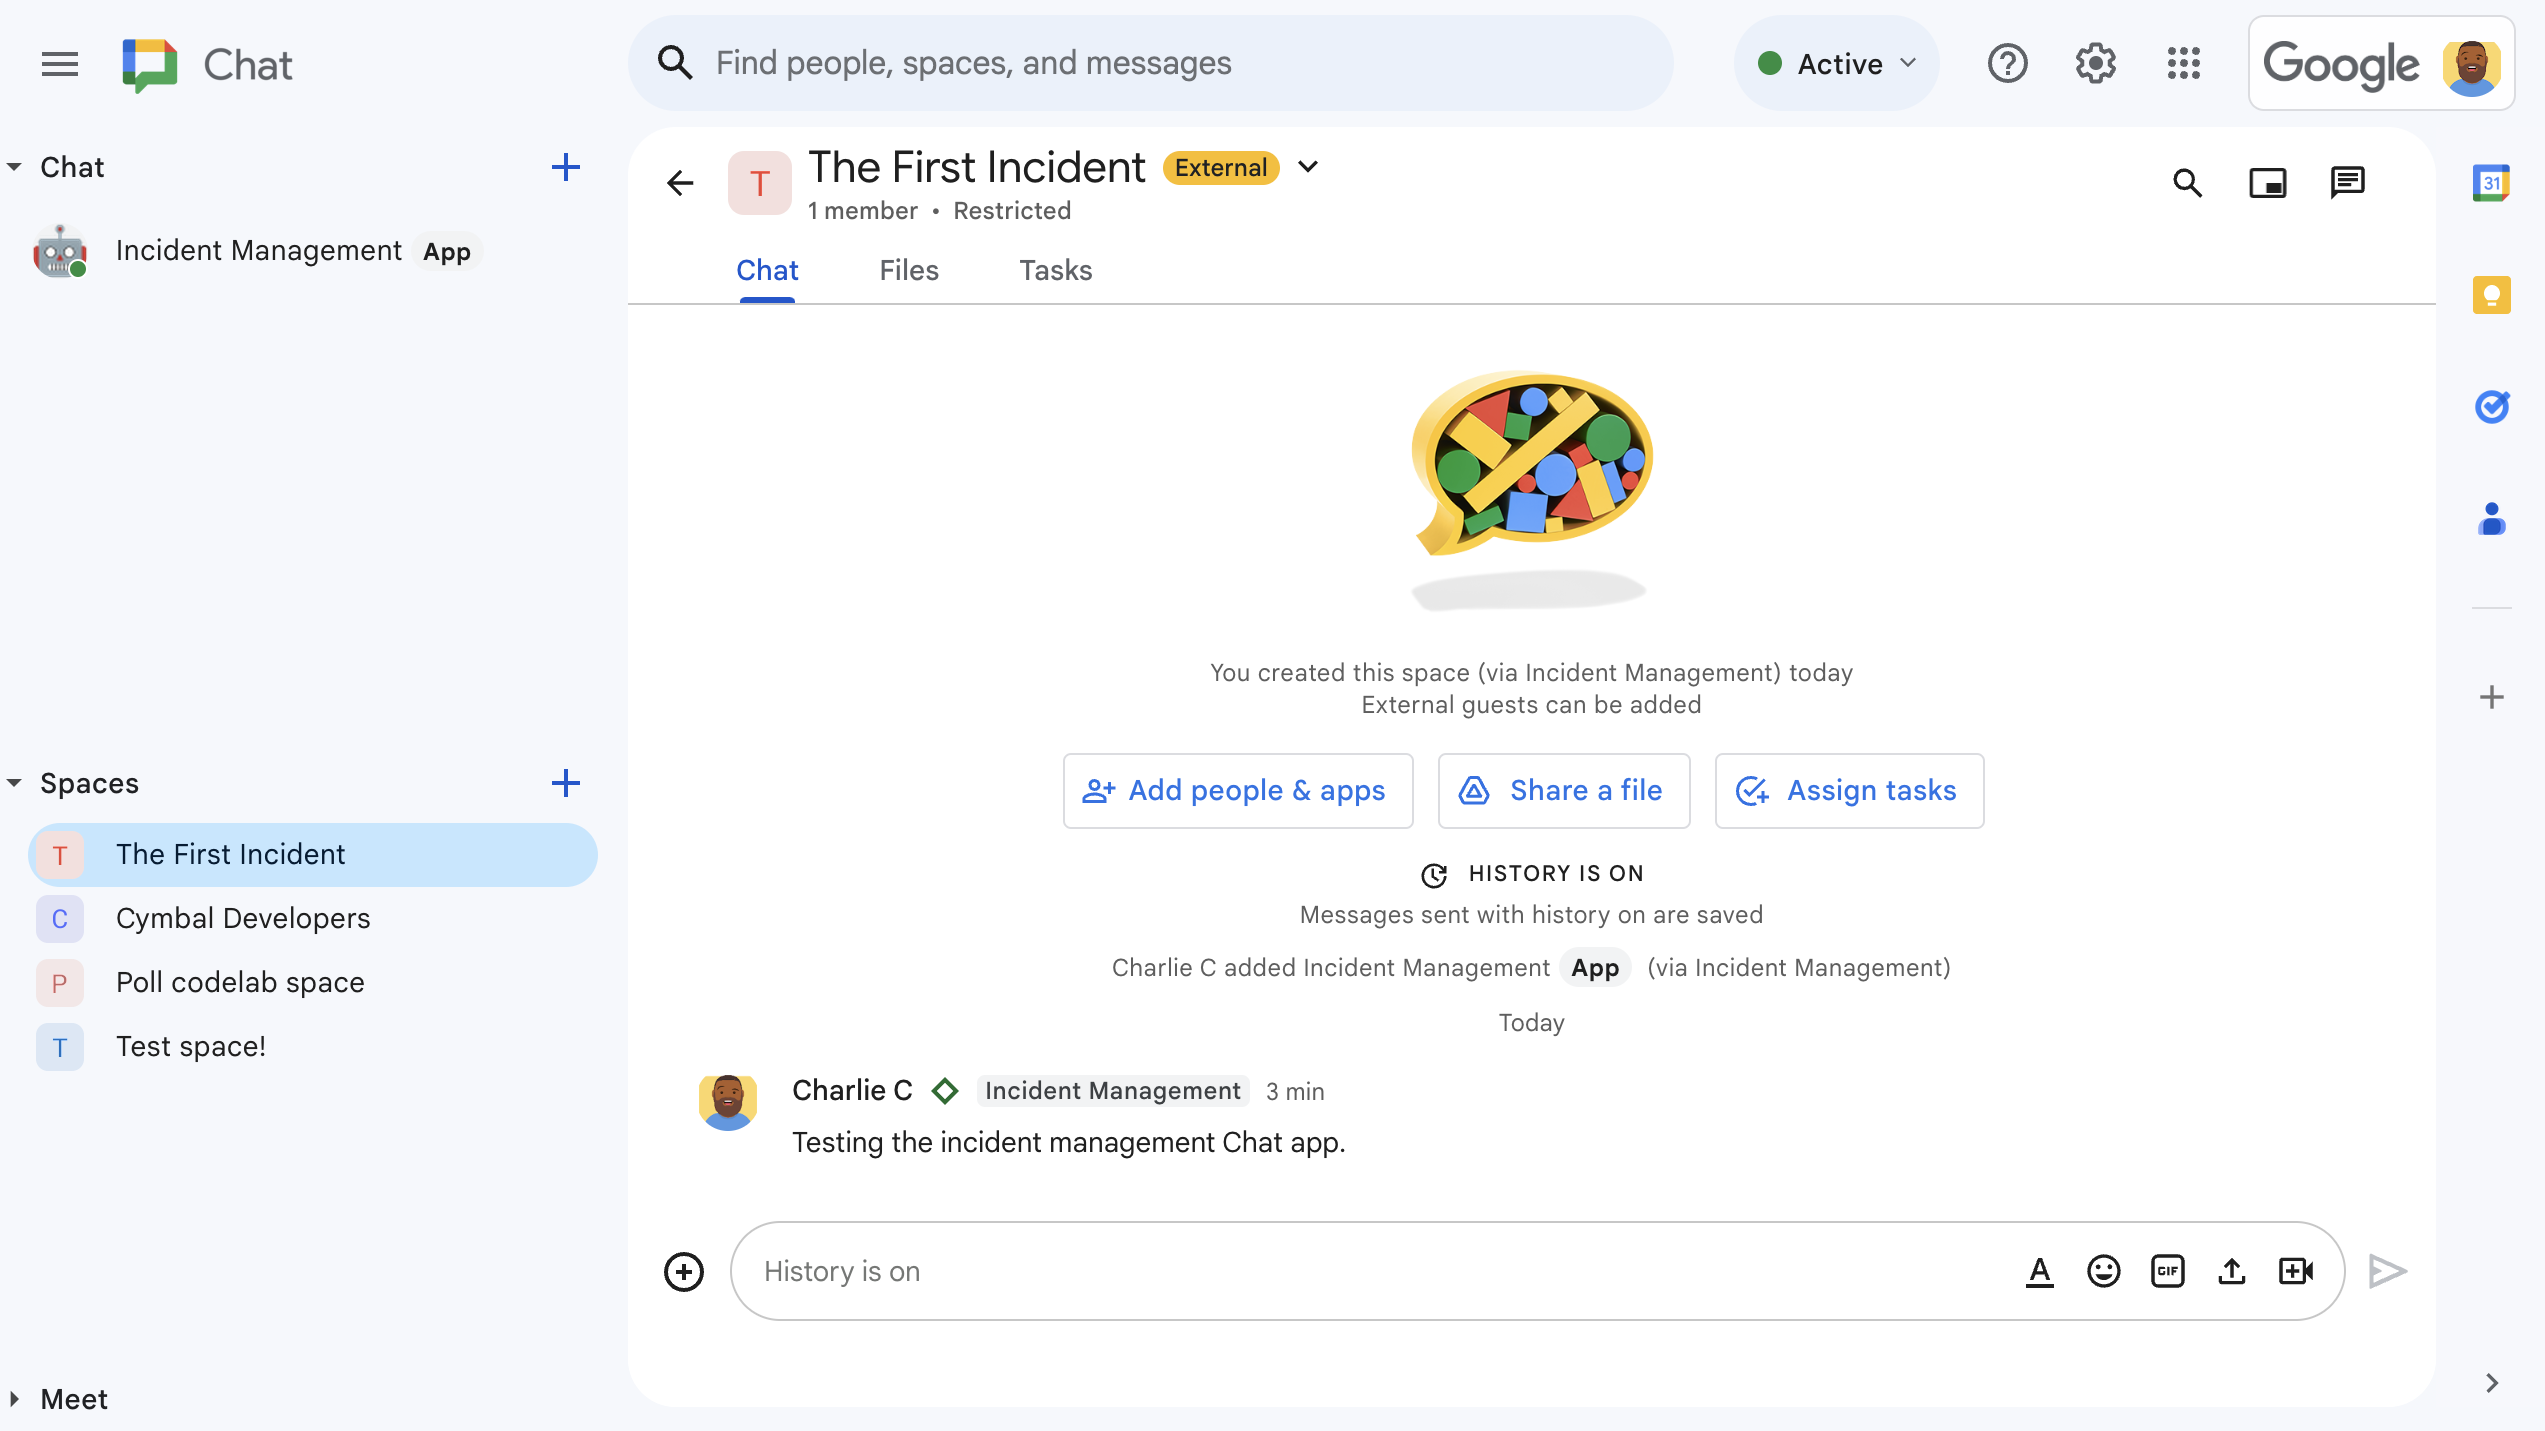
לוחצים על יצירת מרחב לצ'אט. תופיע ההודעה
creating space.אחרי שיוצרים את המרחב, מופיעה הודעה
Space created!. לוחצים על פתיחת המרחב כדי לפתוח את המרחב ב-Chat בכרטיסייה חדשה.אם רוצים, אתם וצוות התגובה לאירוע יכולים לשלוח הודעות במרחב. האפליקציה מסכמת את ההודעות האלה באמצעות Vertex AI ומשתפת מסמך רטרוספקטיבי.
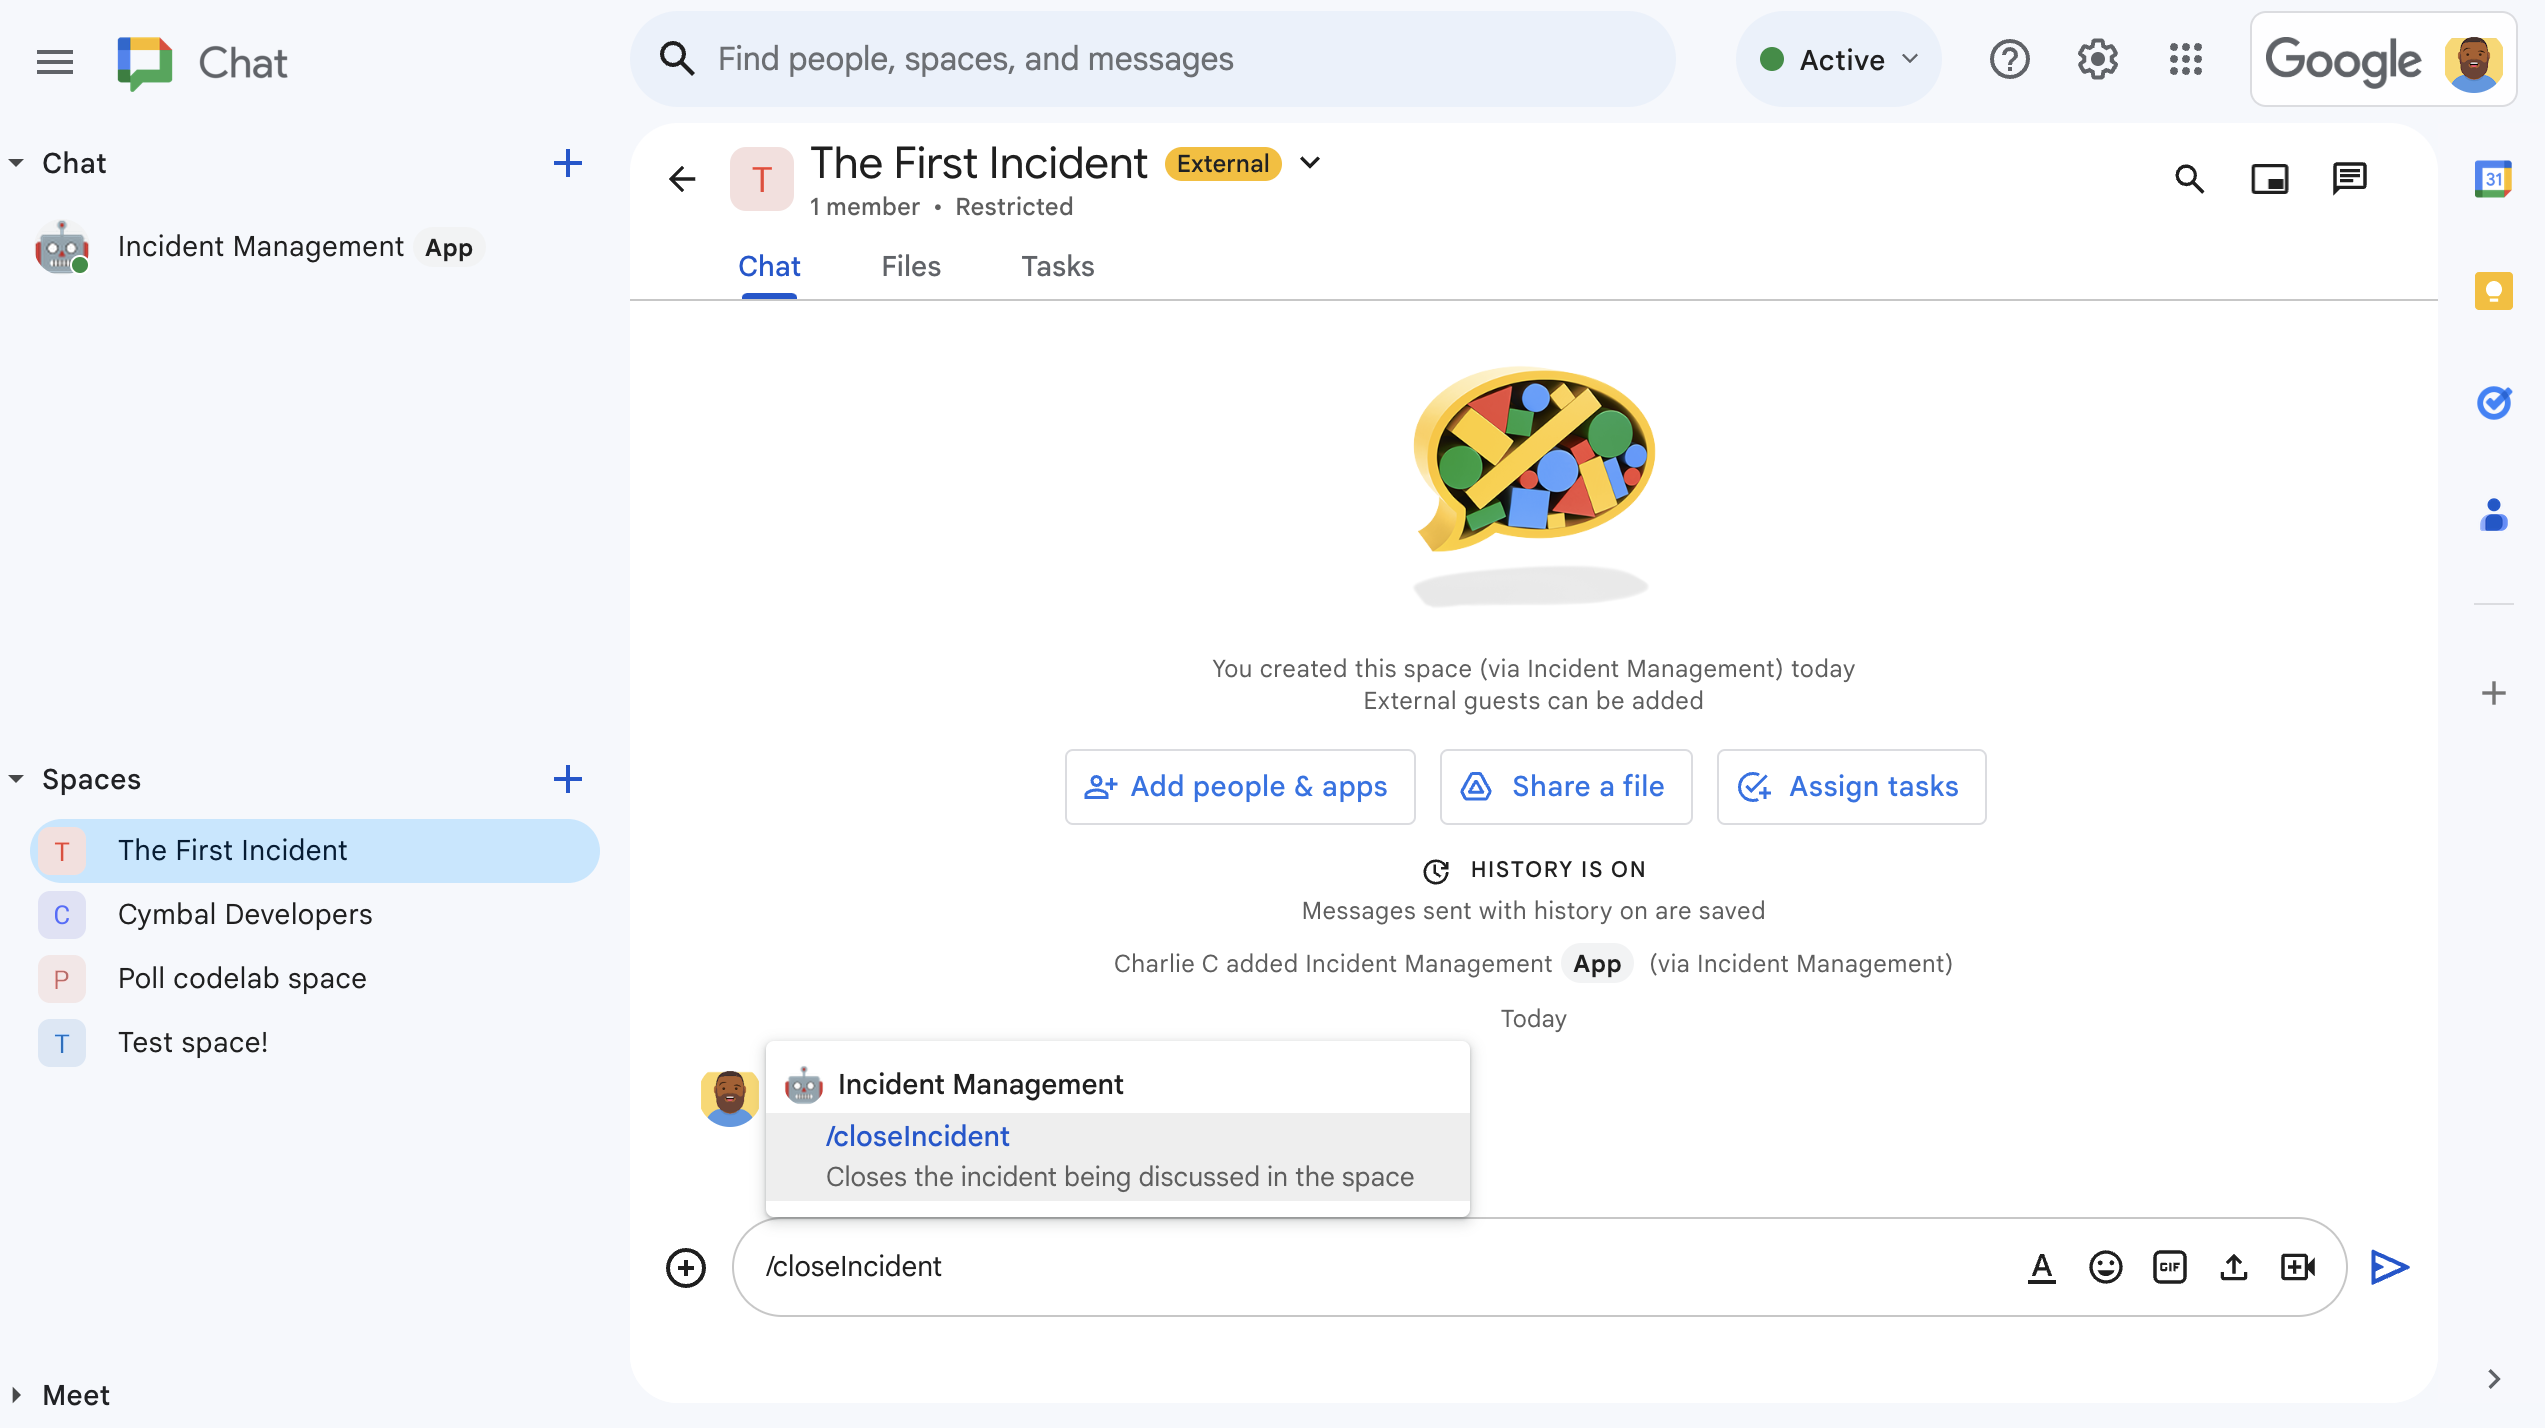
כדי לסיים את תגובת האירוע ולהתחיל את תהליך הפתרון, מקלידים
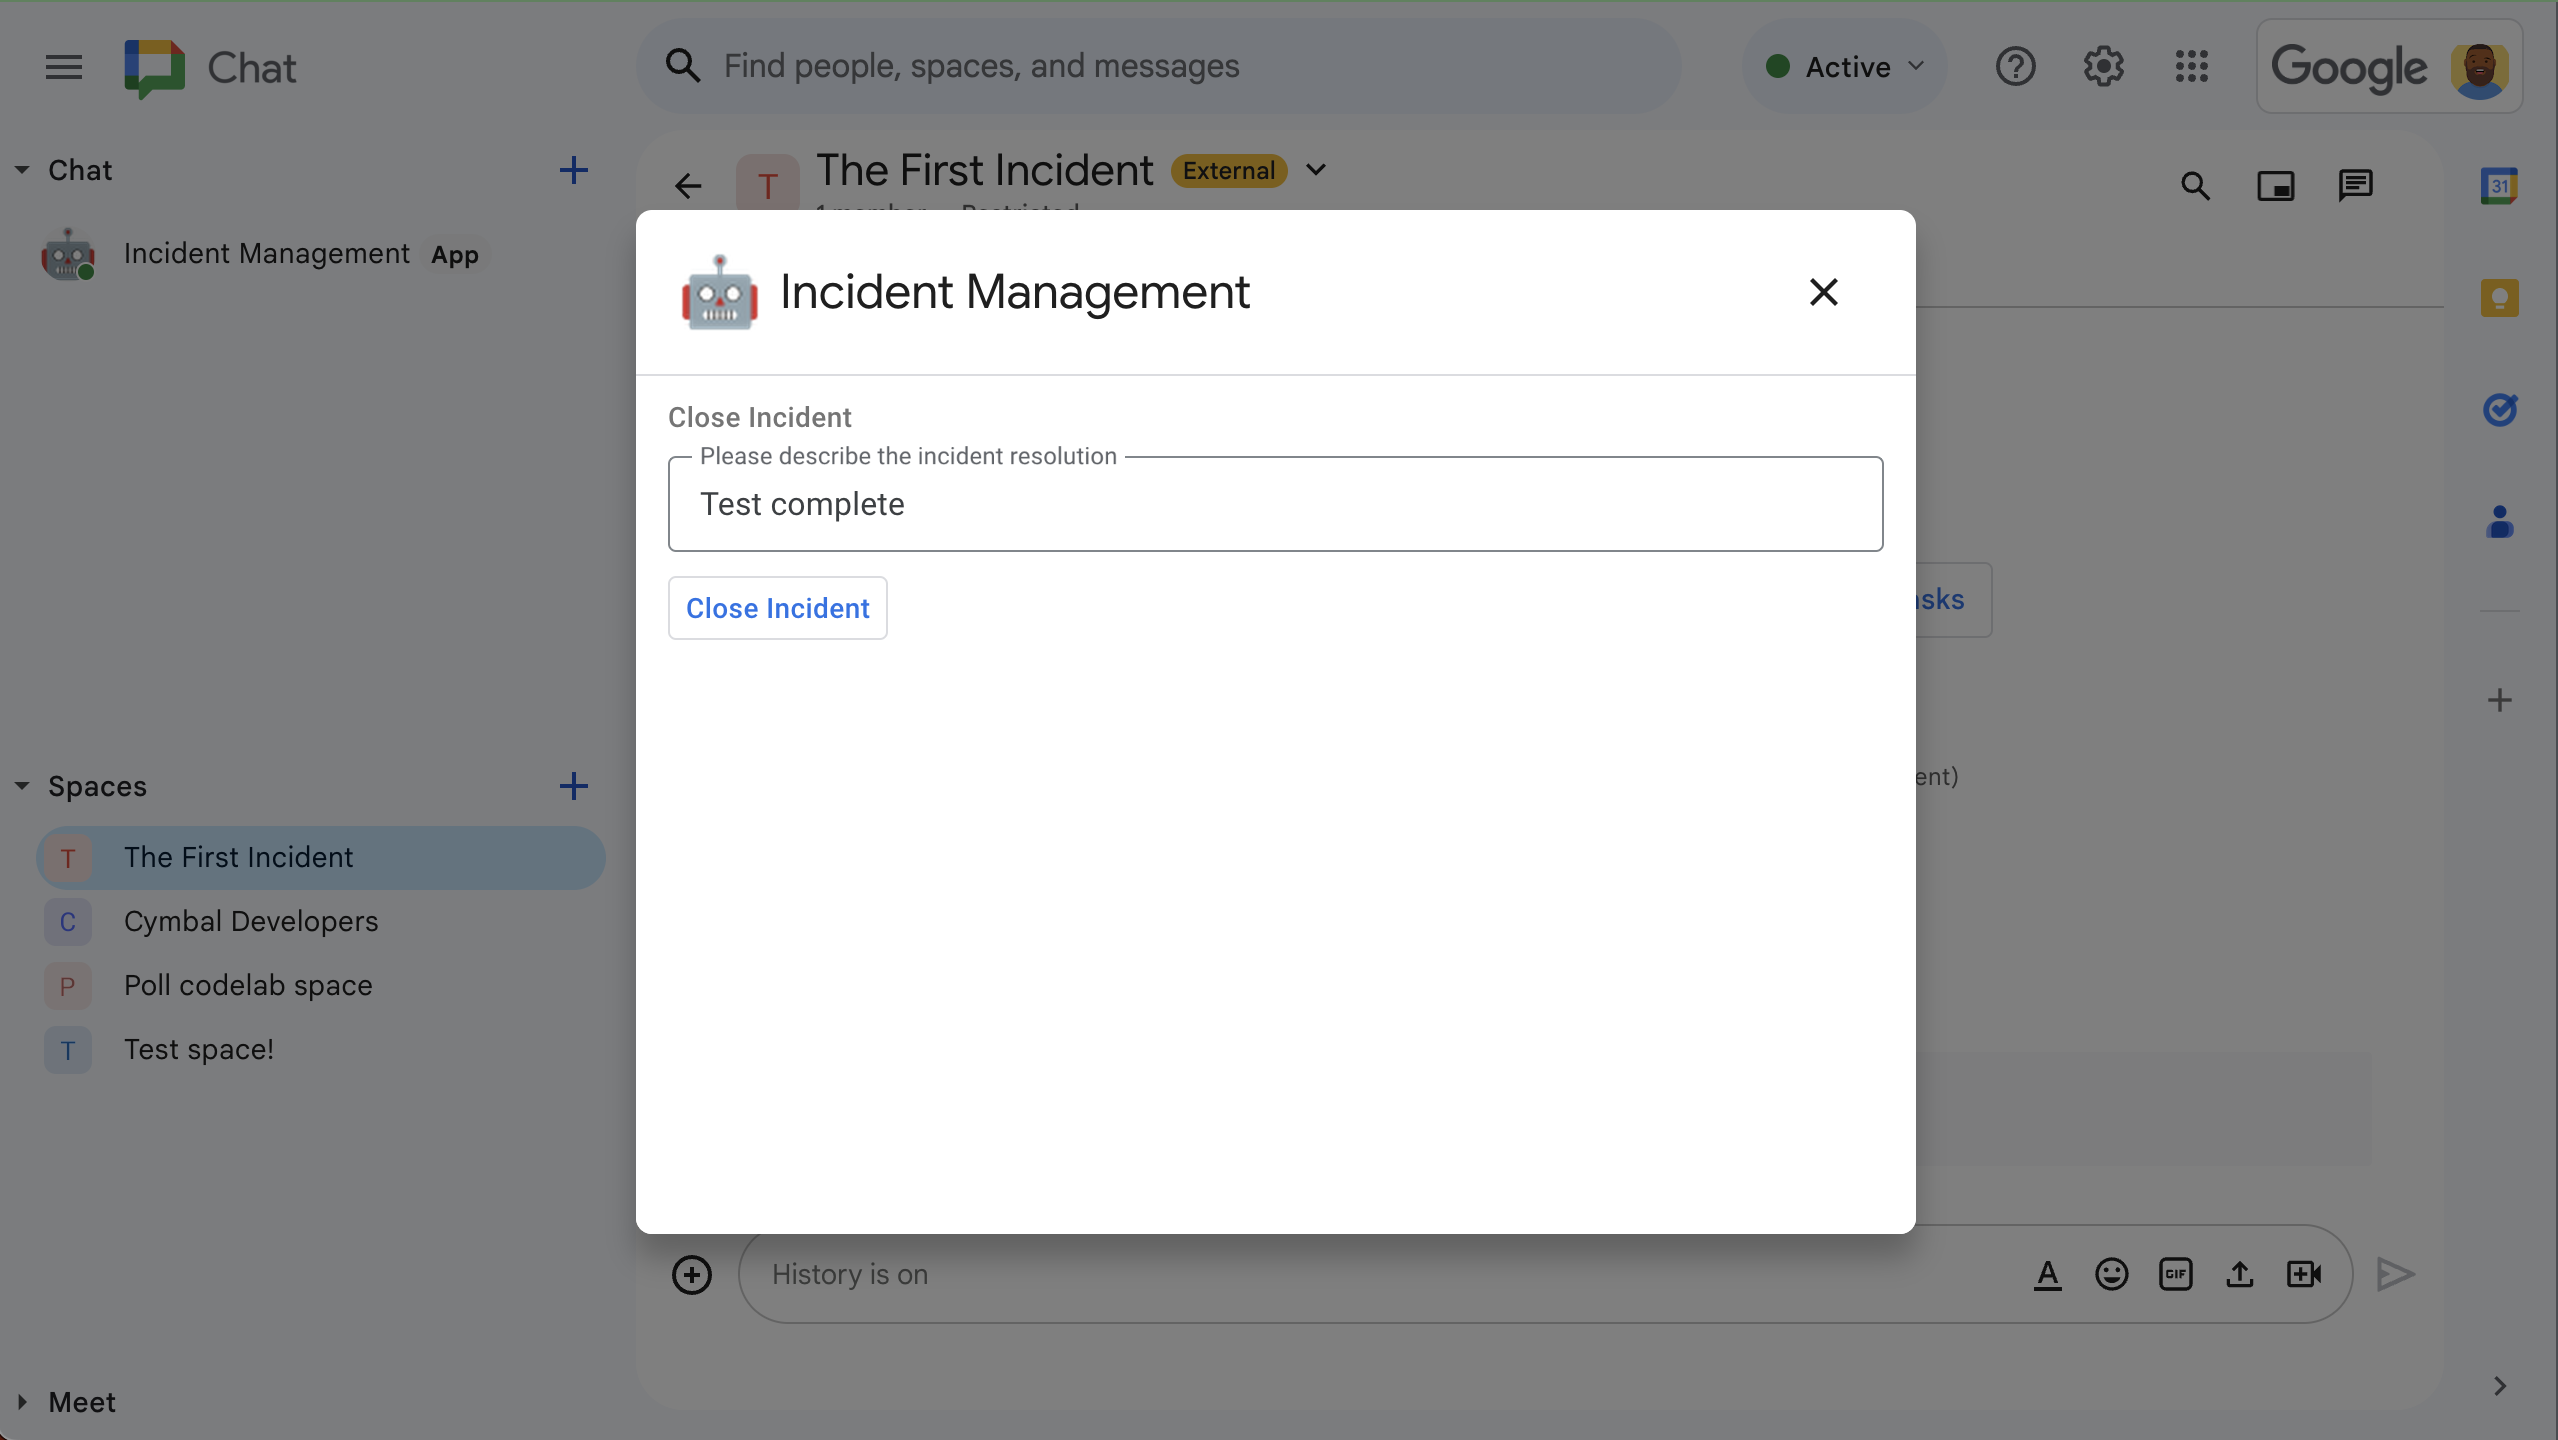
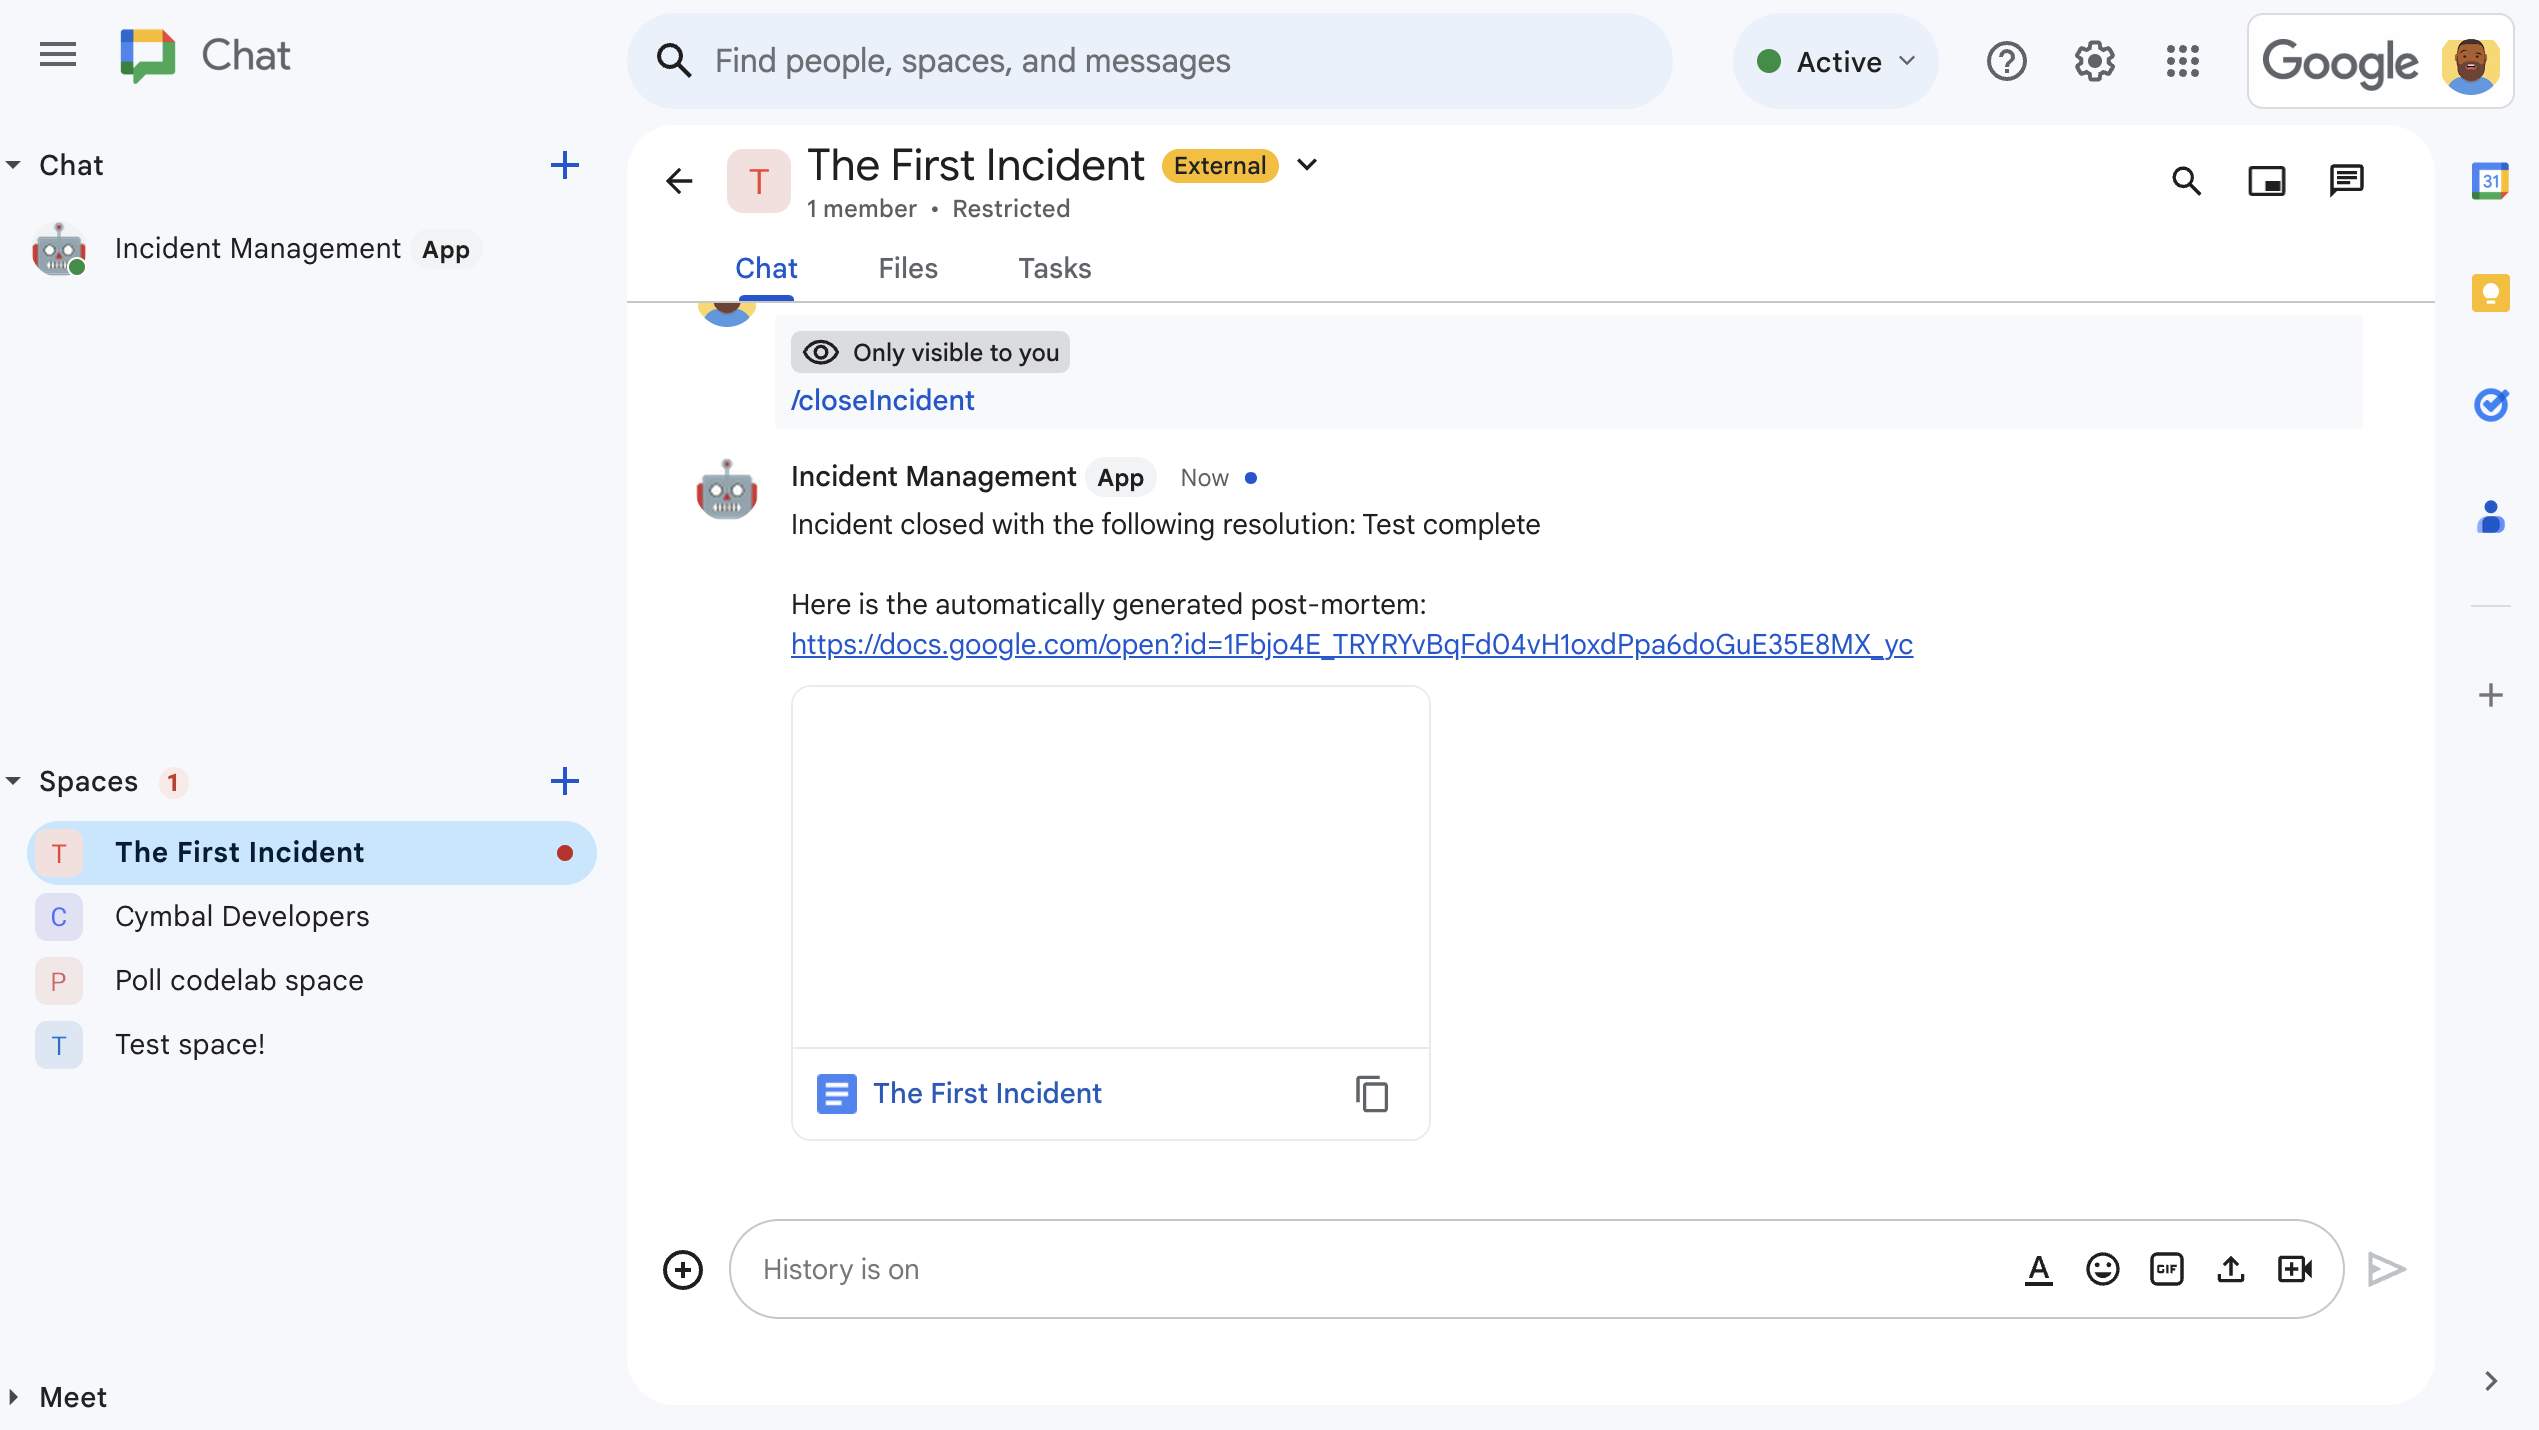
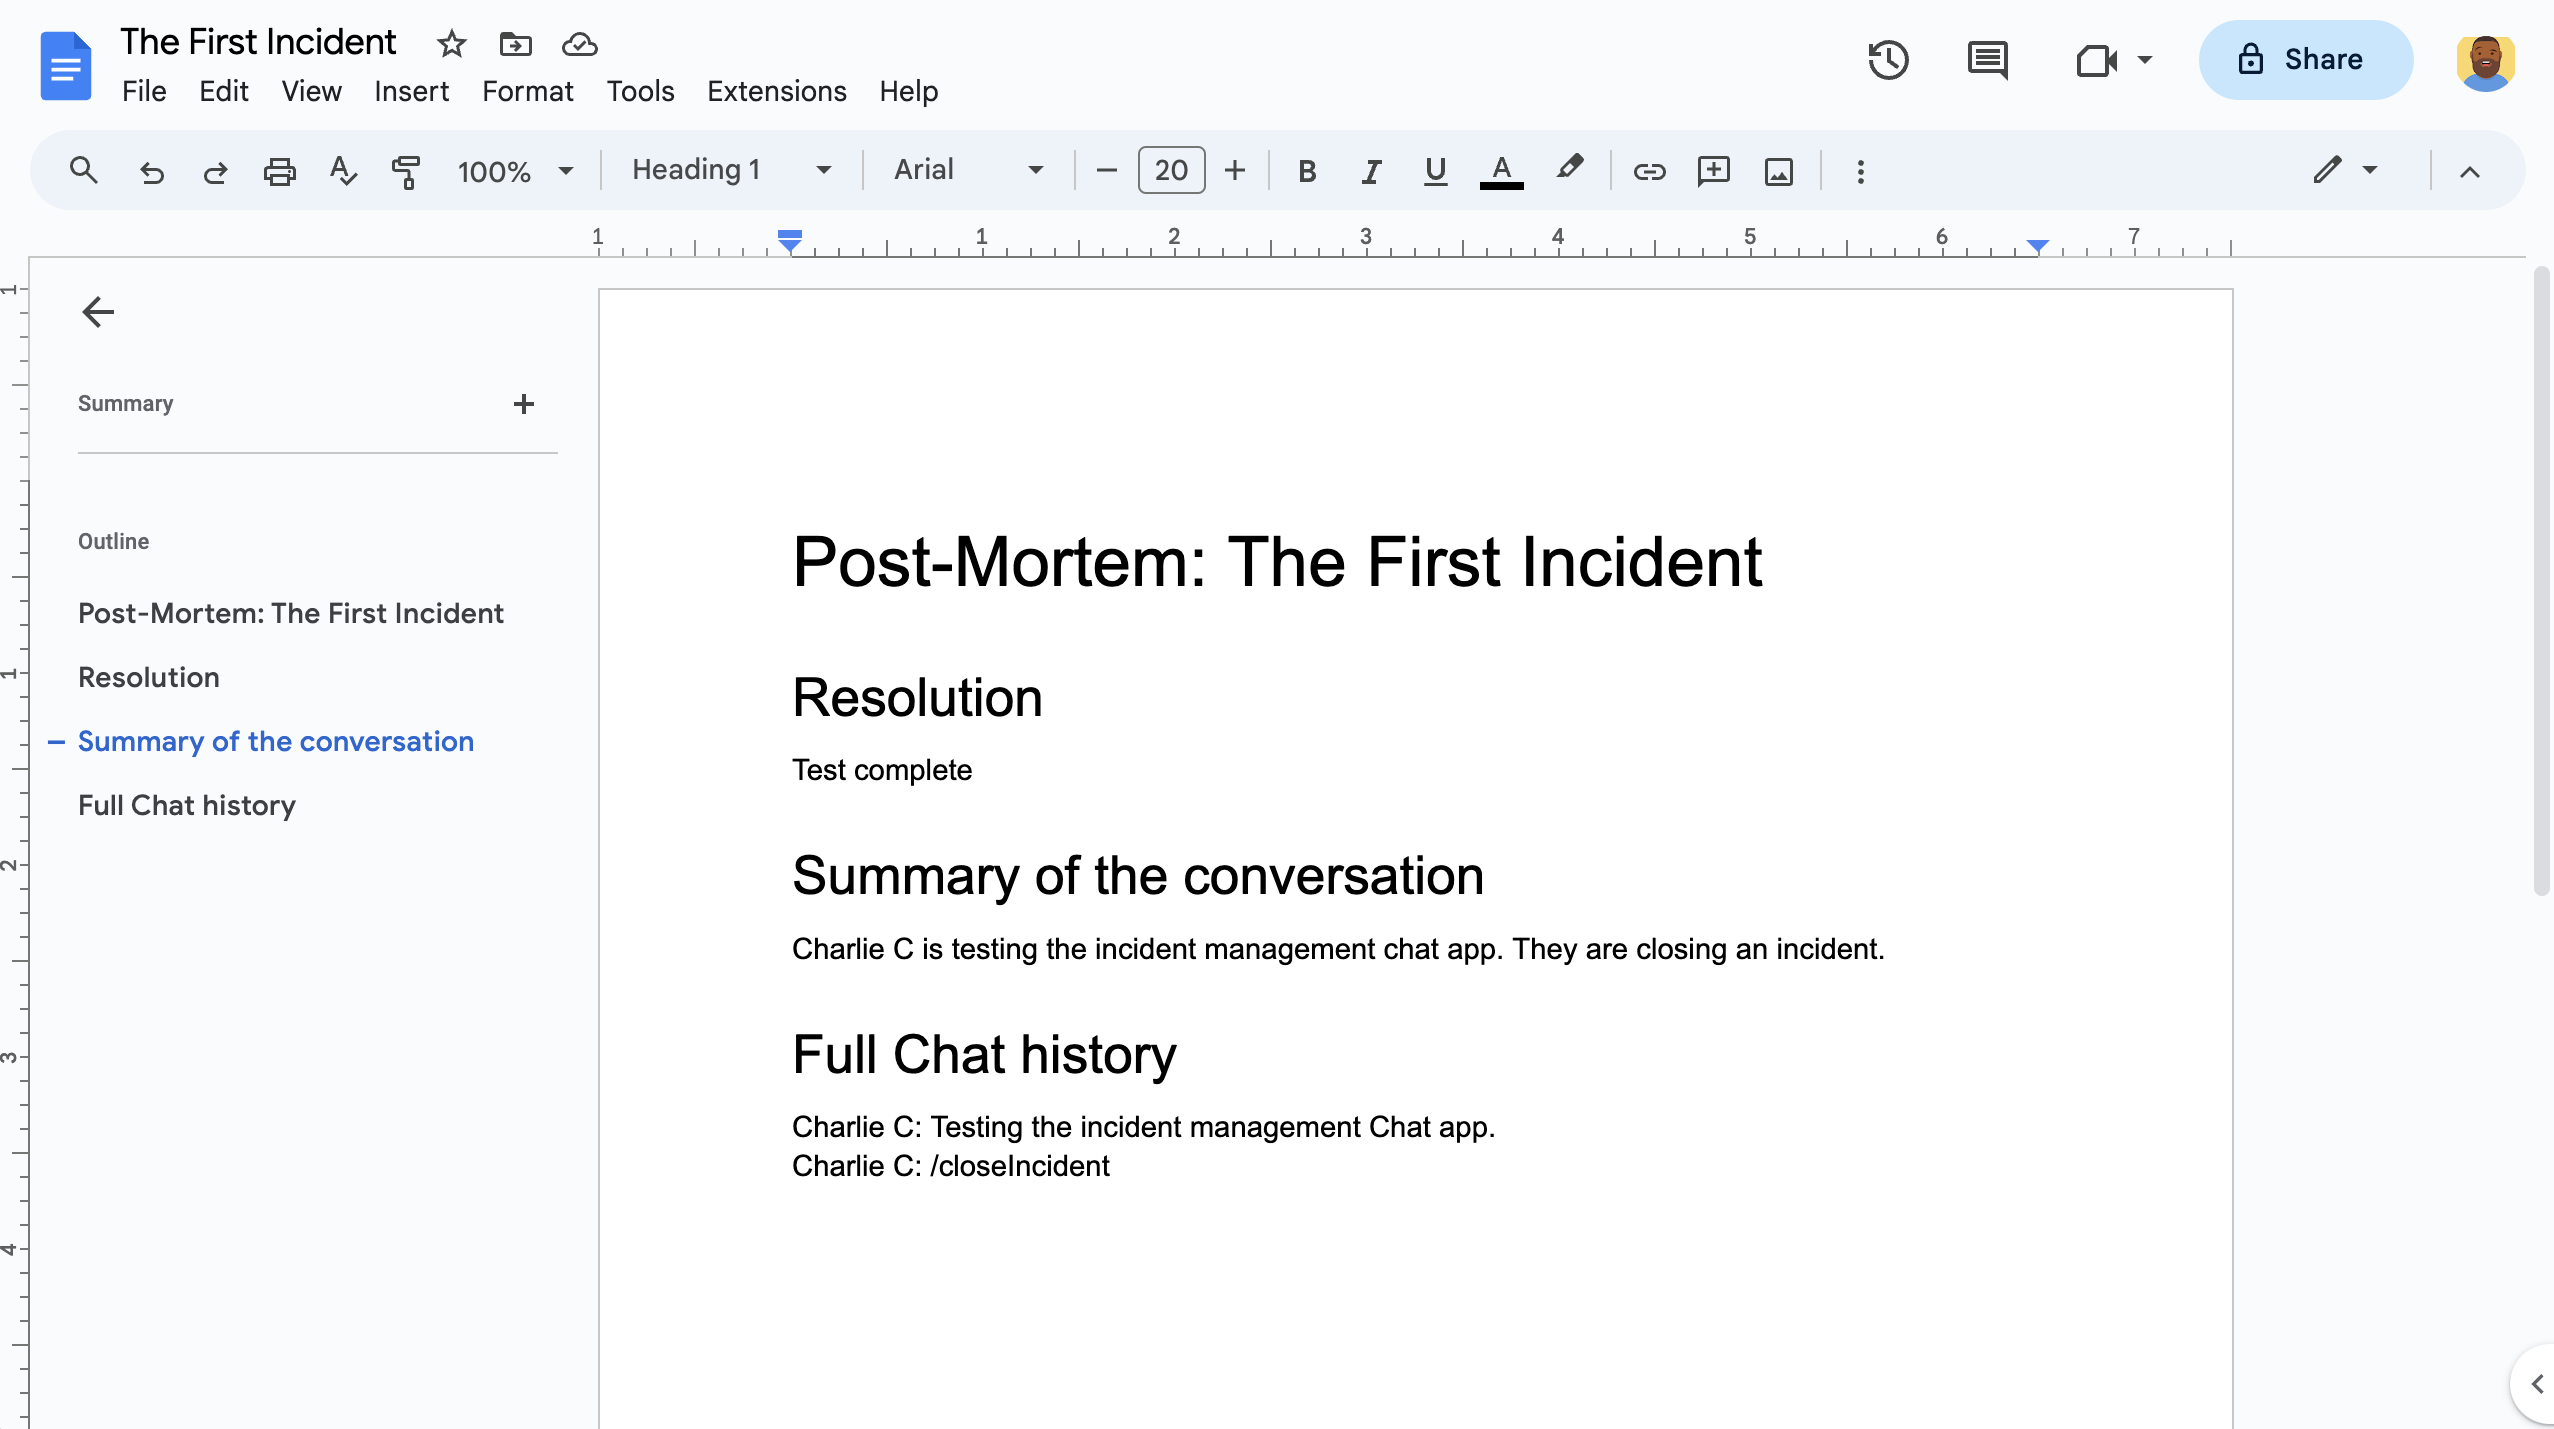
/closeIncidentבחדר הצ'אט. תיפתח תיבת דו-שיח של ניהול אירועים.בקטע סגירת האירוע, מזינים תיאור של פתרון האירוע, כמו
Test complete.לוחצים על סגירת האירוע.
אפליקציית ניהול האירועים מציגה את ההודעות במרחב, מסכמת אותן באמצעות Vertex AI, מדביקה את הסיכום במסמך Google Docs ומשתפת את המסמך במרחב.
הסרת המשאבים
כדי להימנע מחיובים בחשבון Google Cloud בגלל השימוש במשאבים שנעשה במסגרת המדריך הזה, מומלץ למחוק את פרויקט Cloud.
- במסוף Google Cloud, עוברים לדף Manage resources. לוחצים על תפריט > IAM & Admin > Manage Resources.
- ברשימת הפרויקטים, בוחרים את הפרויקט שרוצים למחוק ולוחצים על מחיקה .
- כדי למחוק את הפרויקט, כותבים את מזהה הפרויקט בתיבת הדו-שיח ולוחצים על Shut down.
נושאים קשורים
- קבלת תשובות לשאלות על סמך שיחות ב-Chat באמצעות אפליקציית Gemini Chat
- ניהול פרויקטים באמצעות Google Chat, Vertex AI ו-Firestore
- אפליקציית התגובה לאירועים מאמתת את עצמה באמצעות פרטי כניסה של משתמש כדי לקרוא לממשקי API ולהפעיל שירותי Google Cloud, כמו Chat API ו-Vertex AI API.
המשמעות היא שלמשתמש שמפעיל אירוע חייבת להיות גישה לשירותים האלה. כדי שהאפליקציה תהיה חזקה יותר, כדאי להשתמש בחשבון שירות כדי לקרוא ל-Vertex AI API, במקום להשתמש בפרטי הכניסה של המשתמש שמפעיל את
/closeIncidentפקודת הלוכסן. למידע נוסף על הגדרת חשבון שירות ל-Vertex AI API, ראו שימוש בחשבון שירות בהתאמה אישית.