
このチュートリアルでは、リアルタイムでインシデントに応答する Google Chat アプリを作成する方法について説明します。インシデントに対応する際、アプリは Chat スペースを作成して入力し、メッセージ、スラッシュ コマンド、ダイアログを使用してインシデントの解決を促進します。また、AI を使用してインシデント対応を Google ドキュメント ドキュメントにまとめます。
インシデントとは、解決のためにチームの早急な対応を必要とするイベントです。インシデントの例:
- 顧客関係管理(CRM)プラットフォームで緊急のケースが作成され、サービスチームが解決に向けて連携する必要があります。
- システムがオフラインになると、サイト信頼性エンジニア(SRE)のグループに通知され、SRE が協力してシステムをオンラインに戻すことができます。
- 大規模な地震が発生し、緊急対応要員が対応を調整する必要がある。
このチュートリアルでは、ユーザーがウェブページのボタンをクリックしてインシデントを報告すると、インシデント アラートが開始されます。このウェブページでは、基本的なインシデント情報(回答者のタイトル、説明、メールアドレス)の入力をユーザーに求めることで、インシデントをシミュレートします。
インシデント管理 Chat アプリの使用例を以下に示します。
-
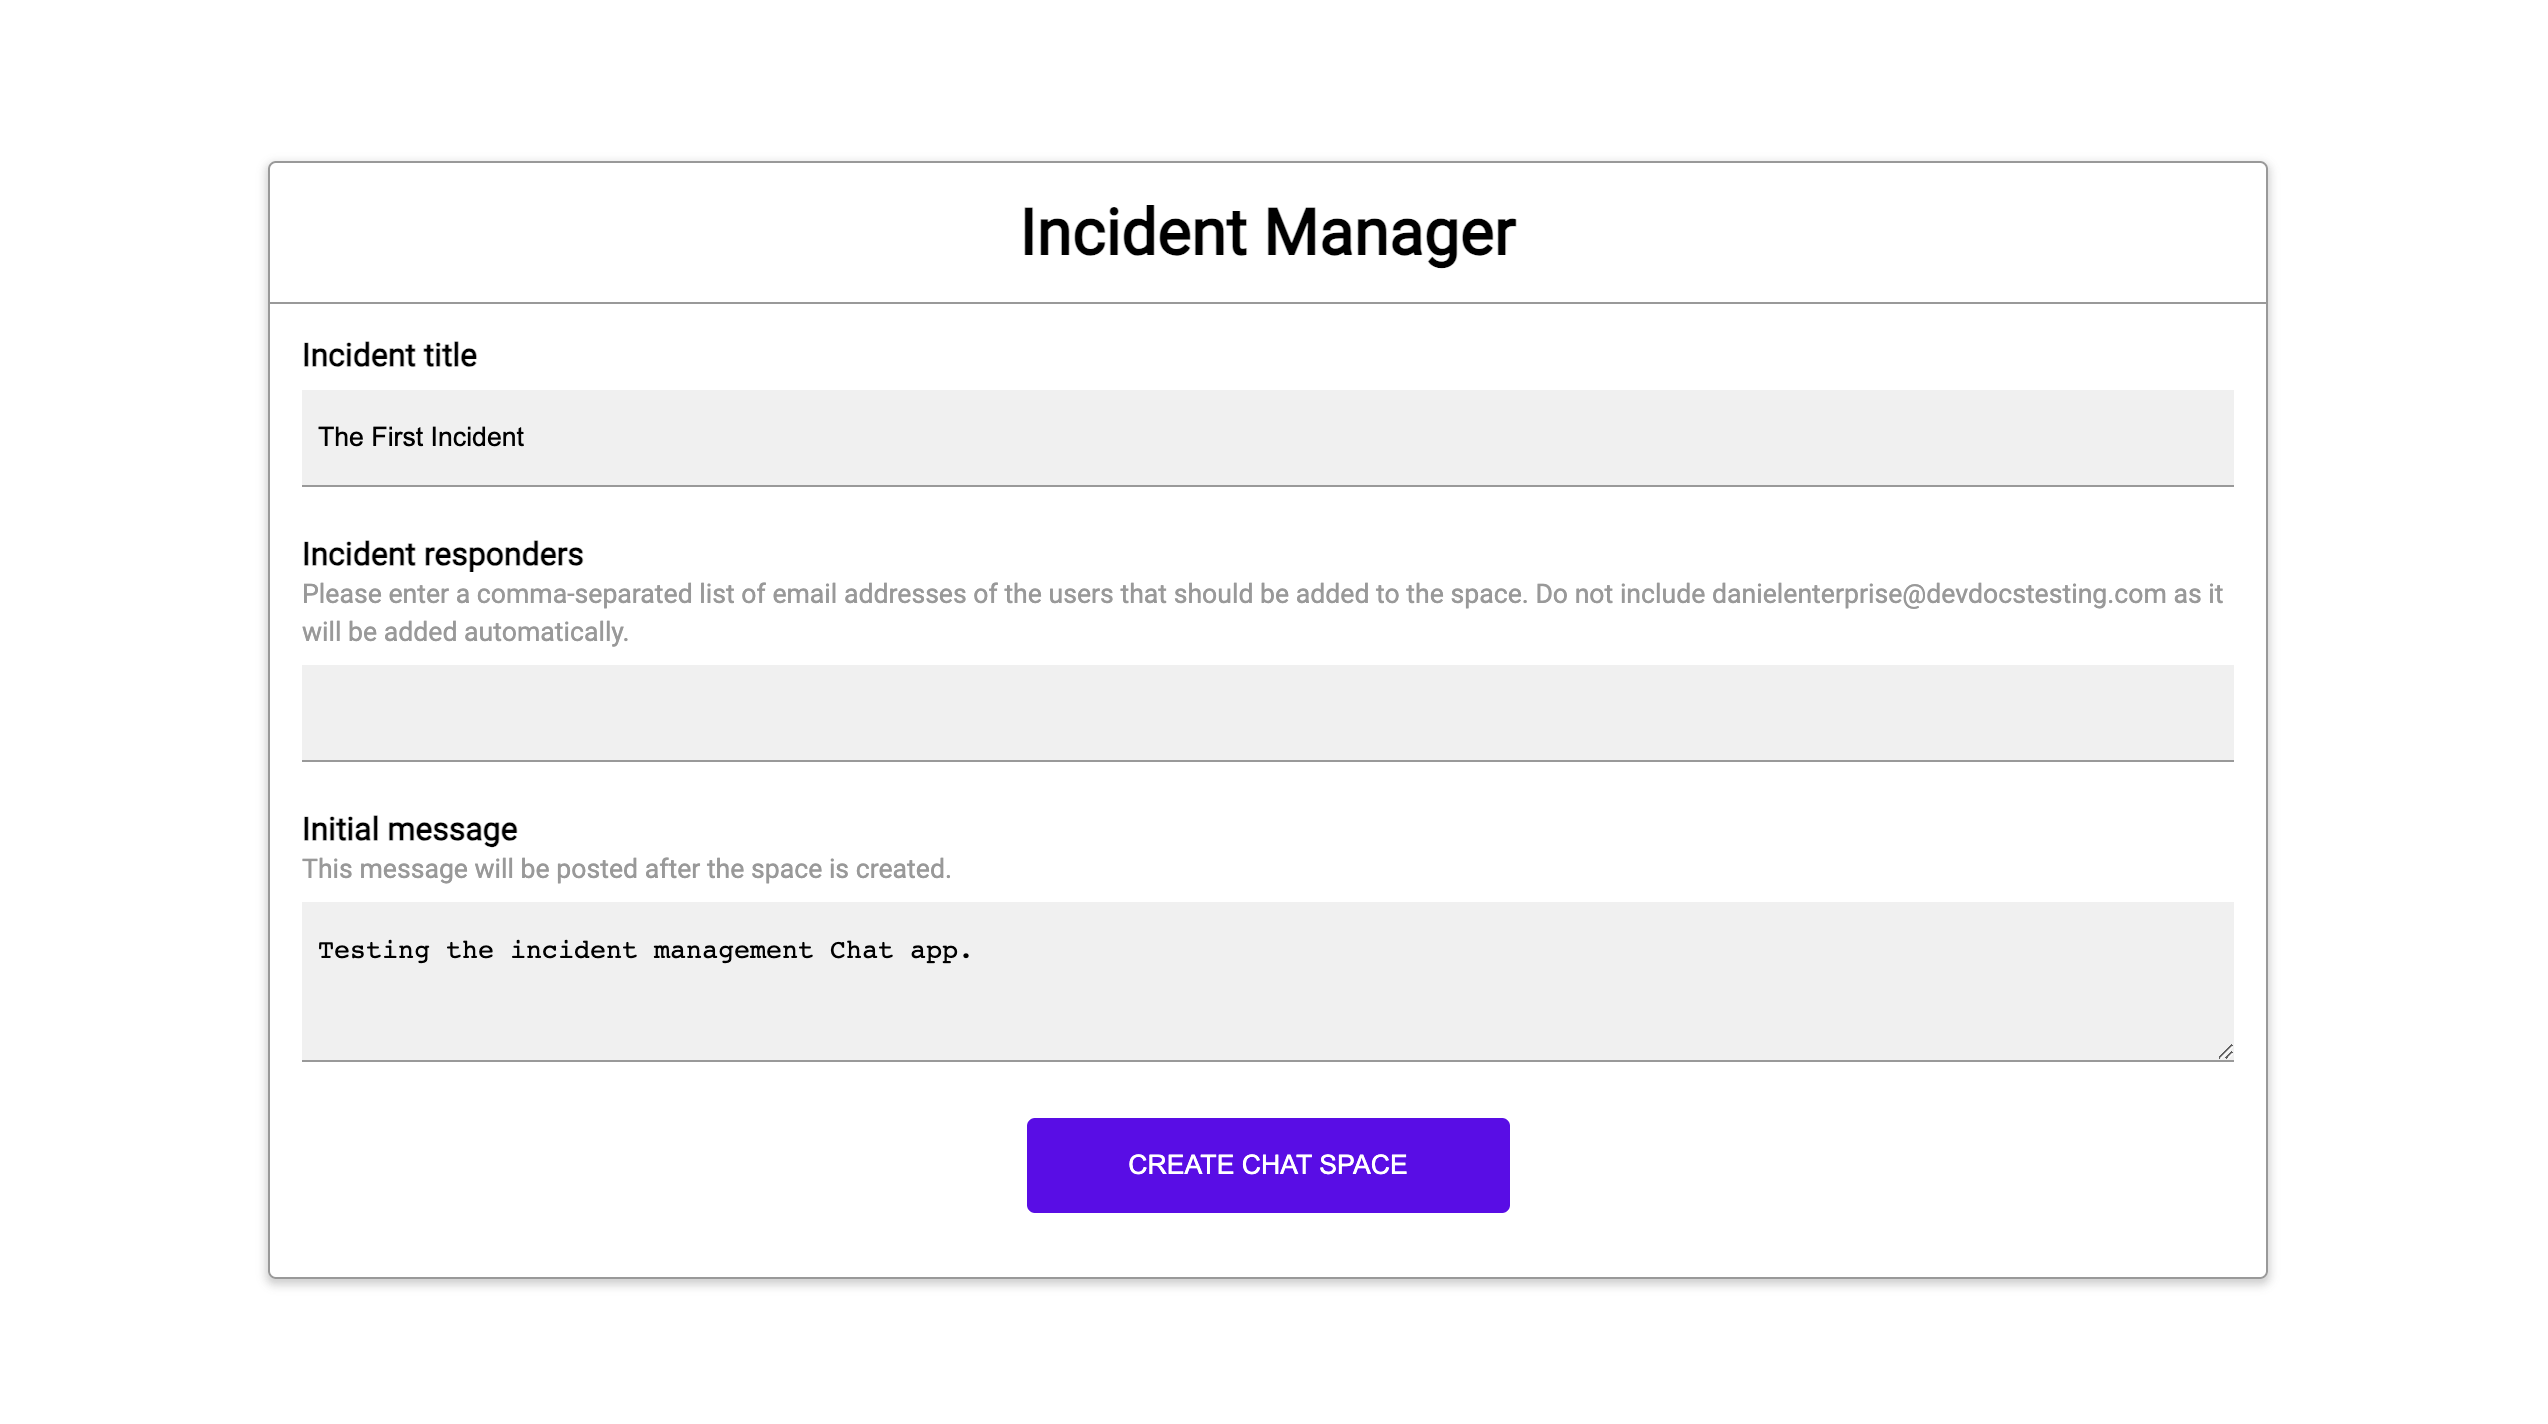
図 1: インシデントを報告できるウェブサイト。 -
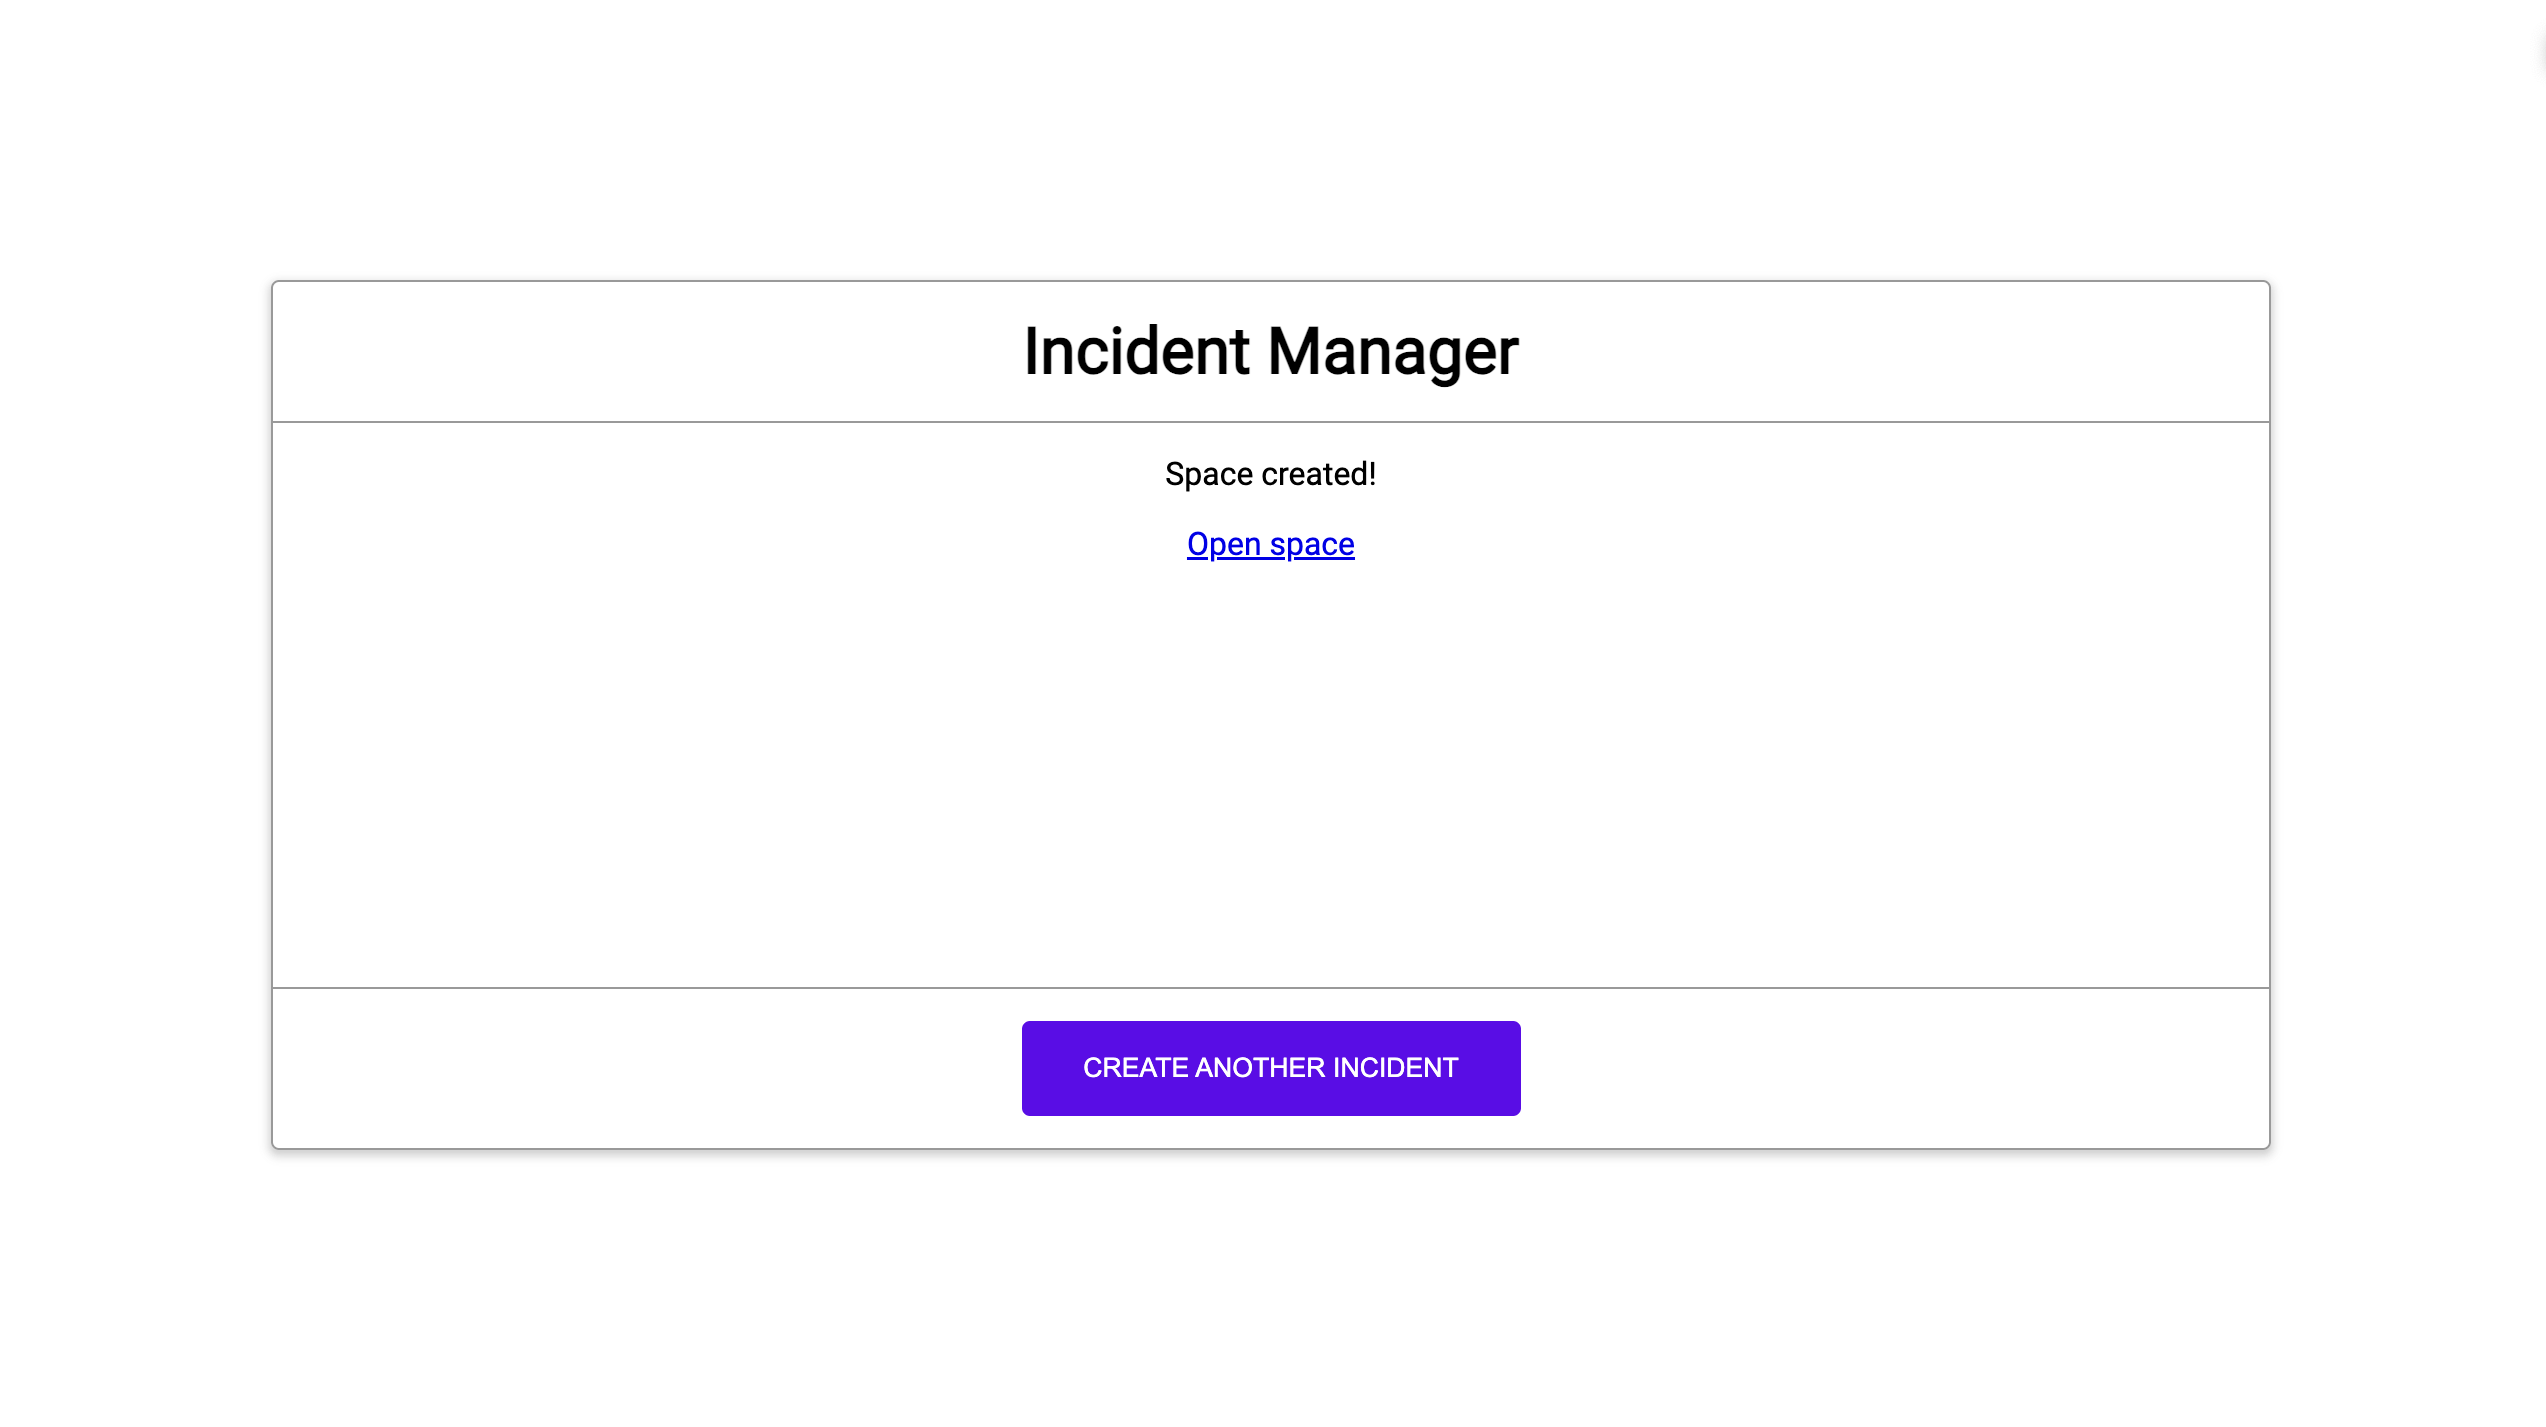
図 2. インシデント Chat スペースが作成されたことを知らせる通知。 -
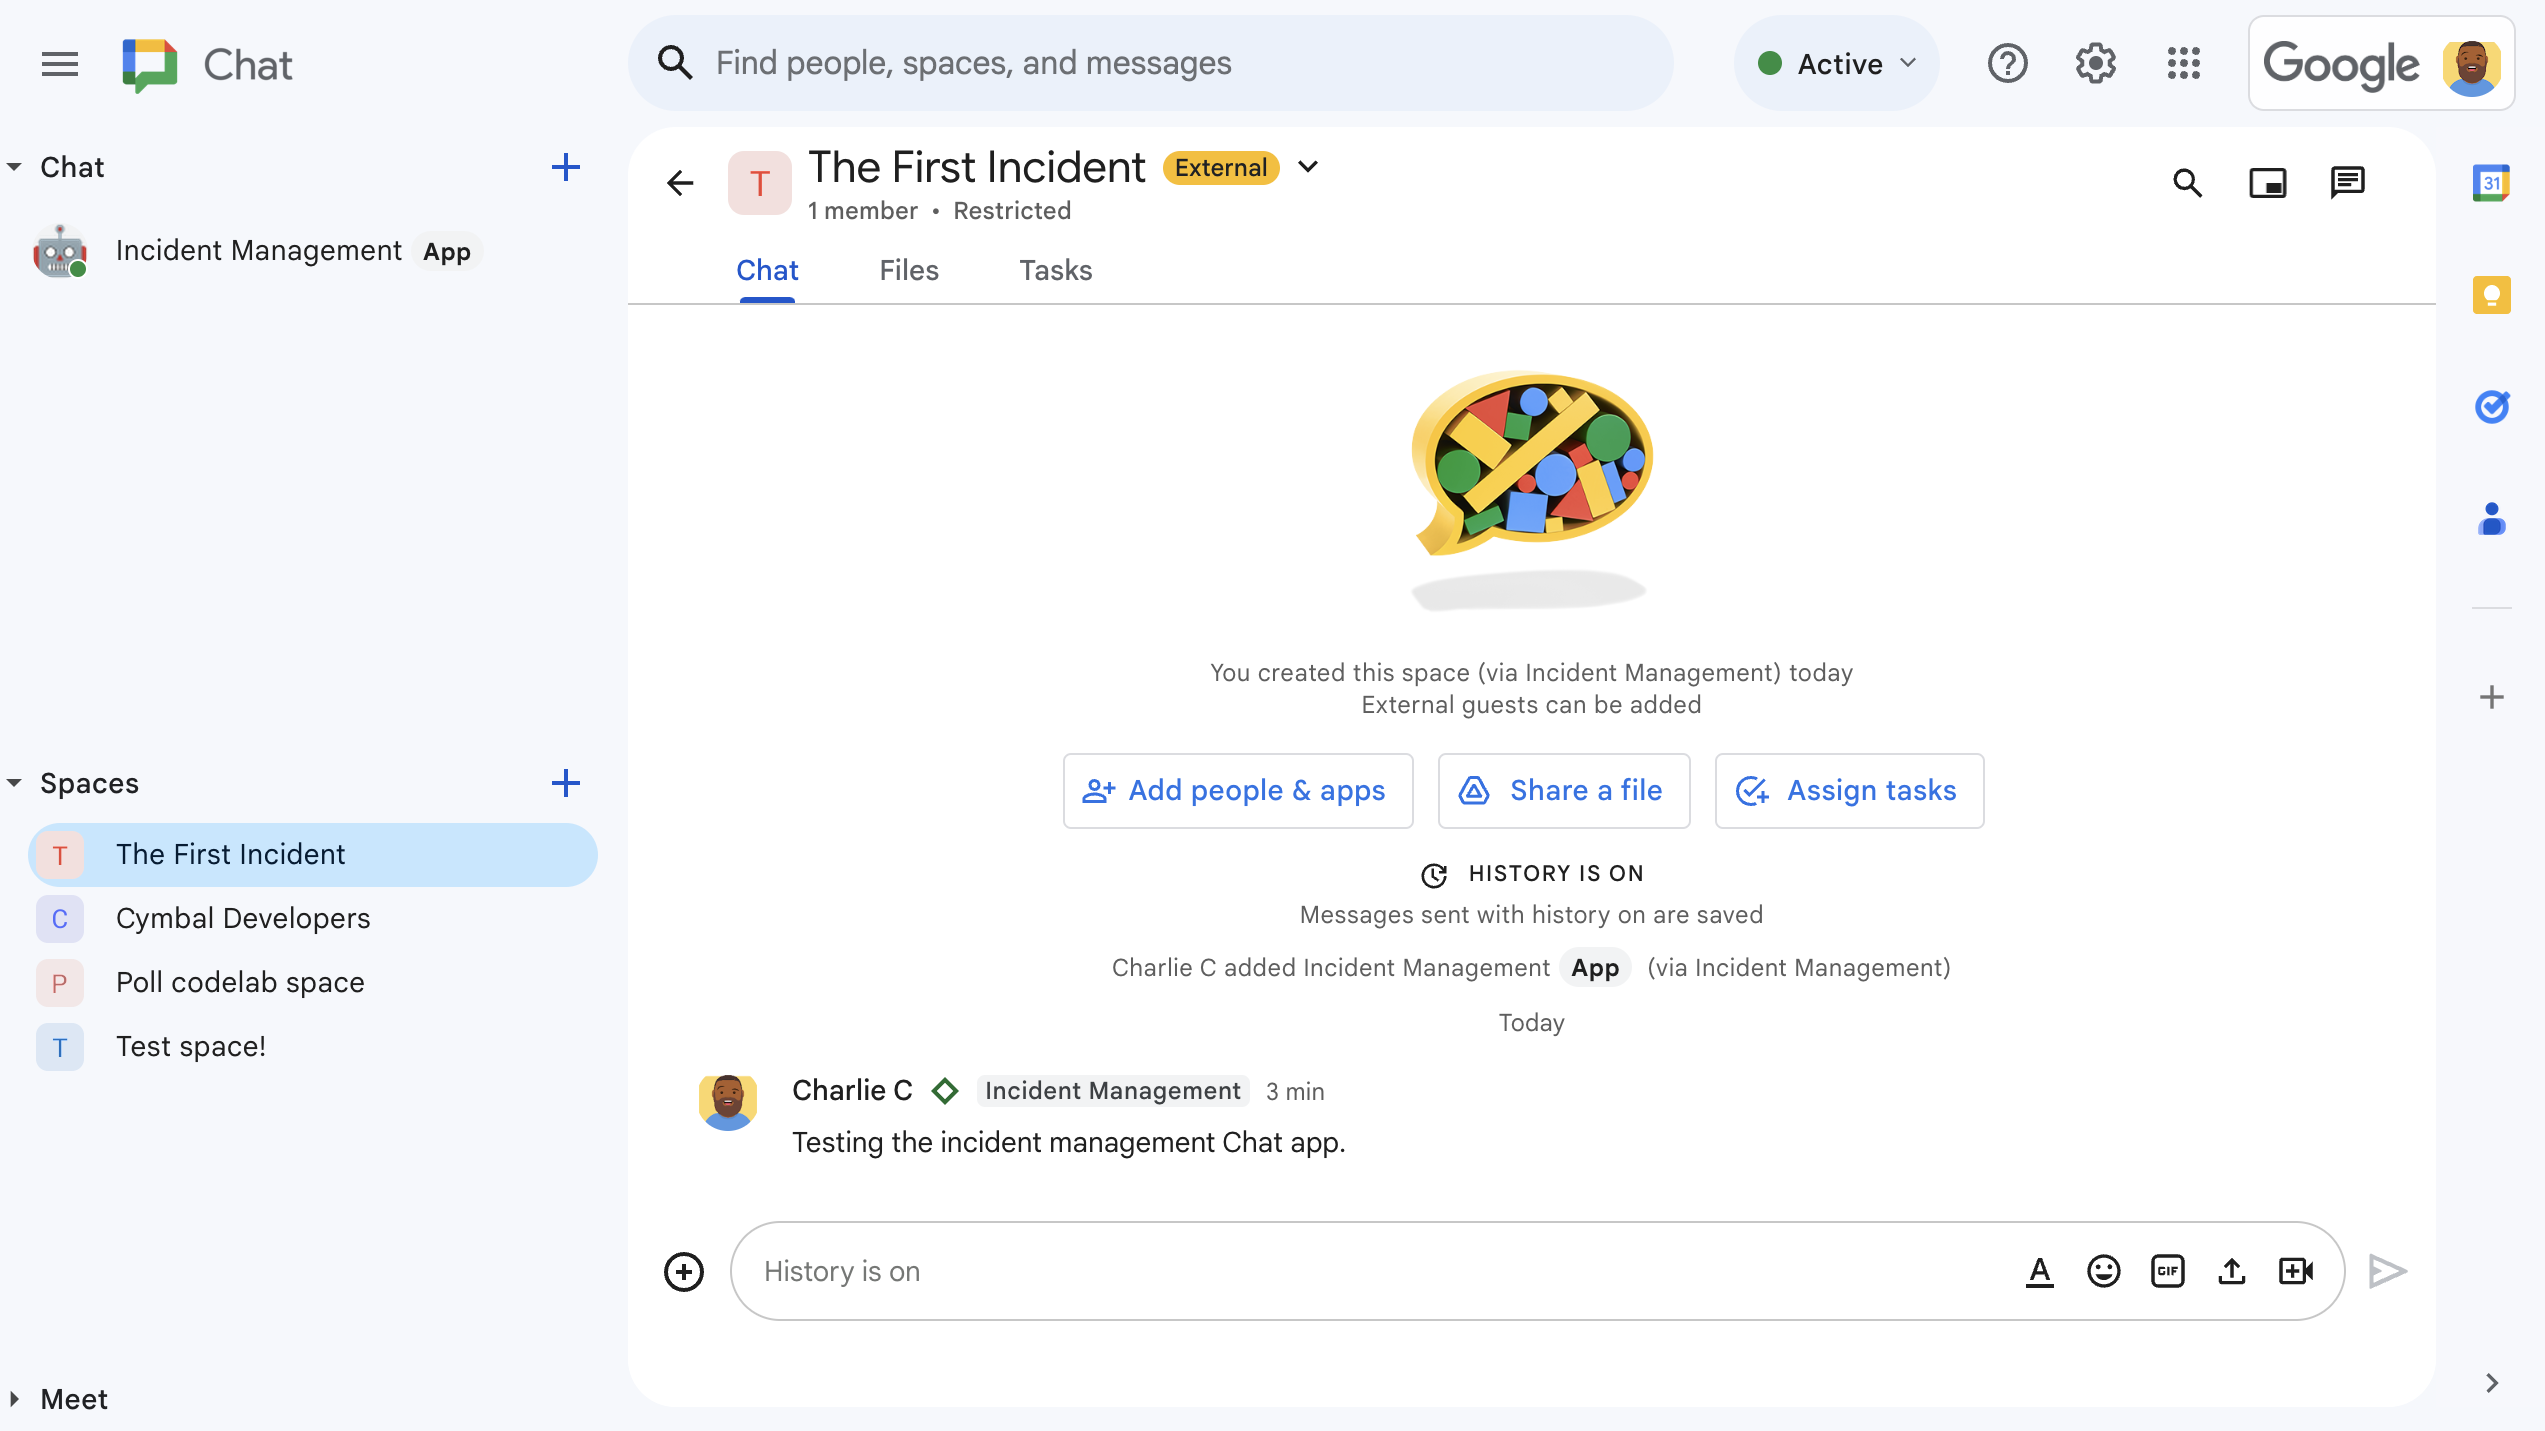
図 3. インシデント対応の Chat スペース。 -
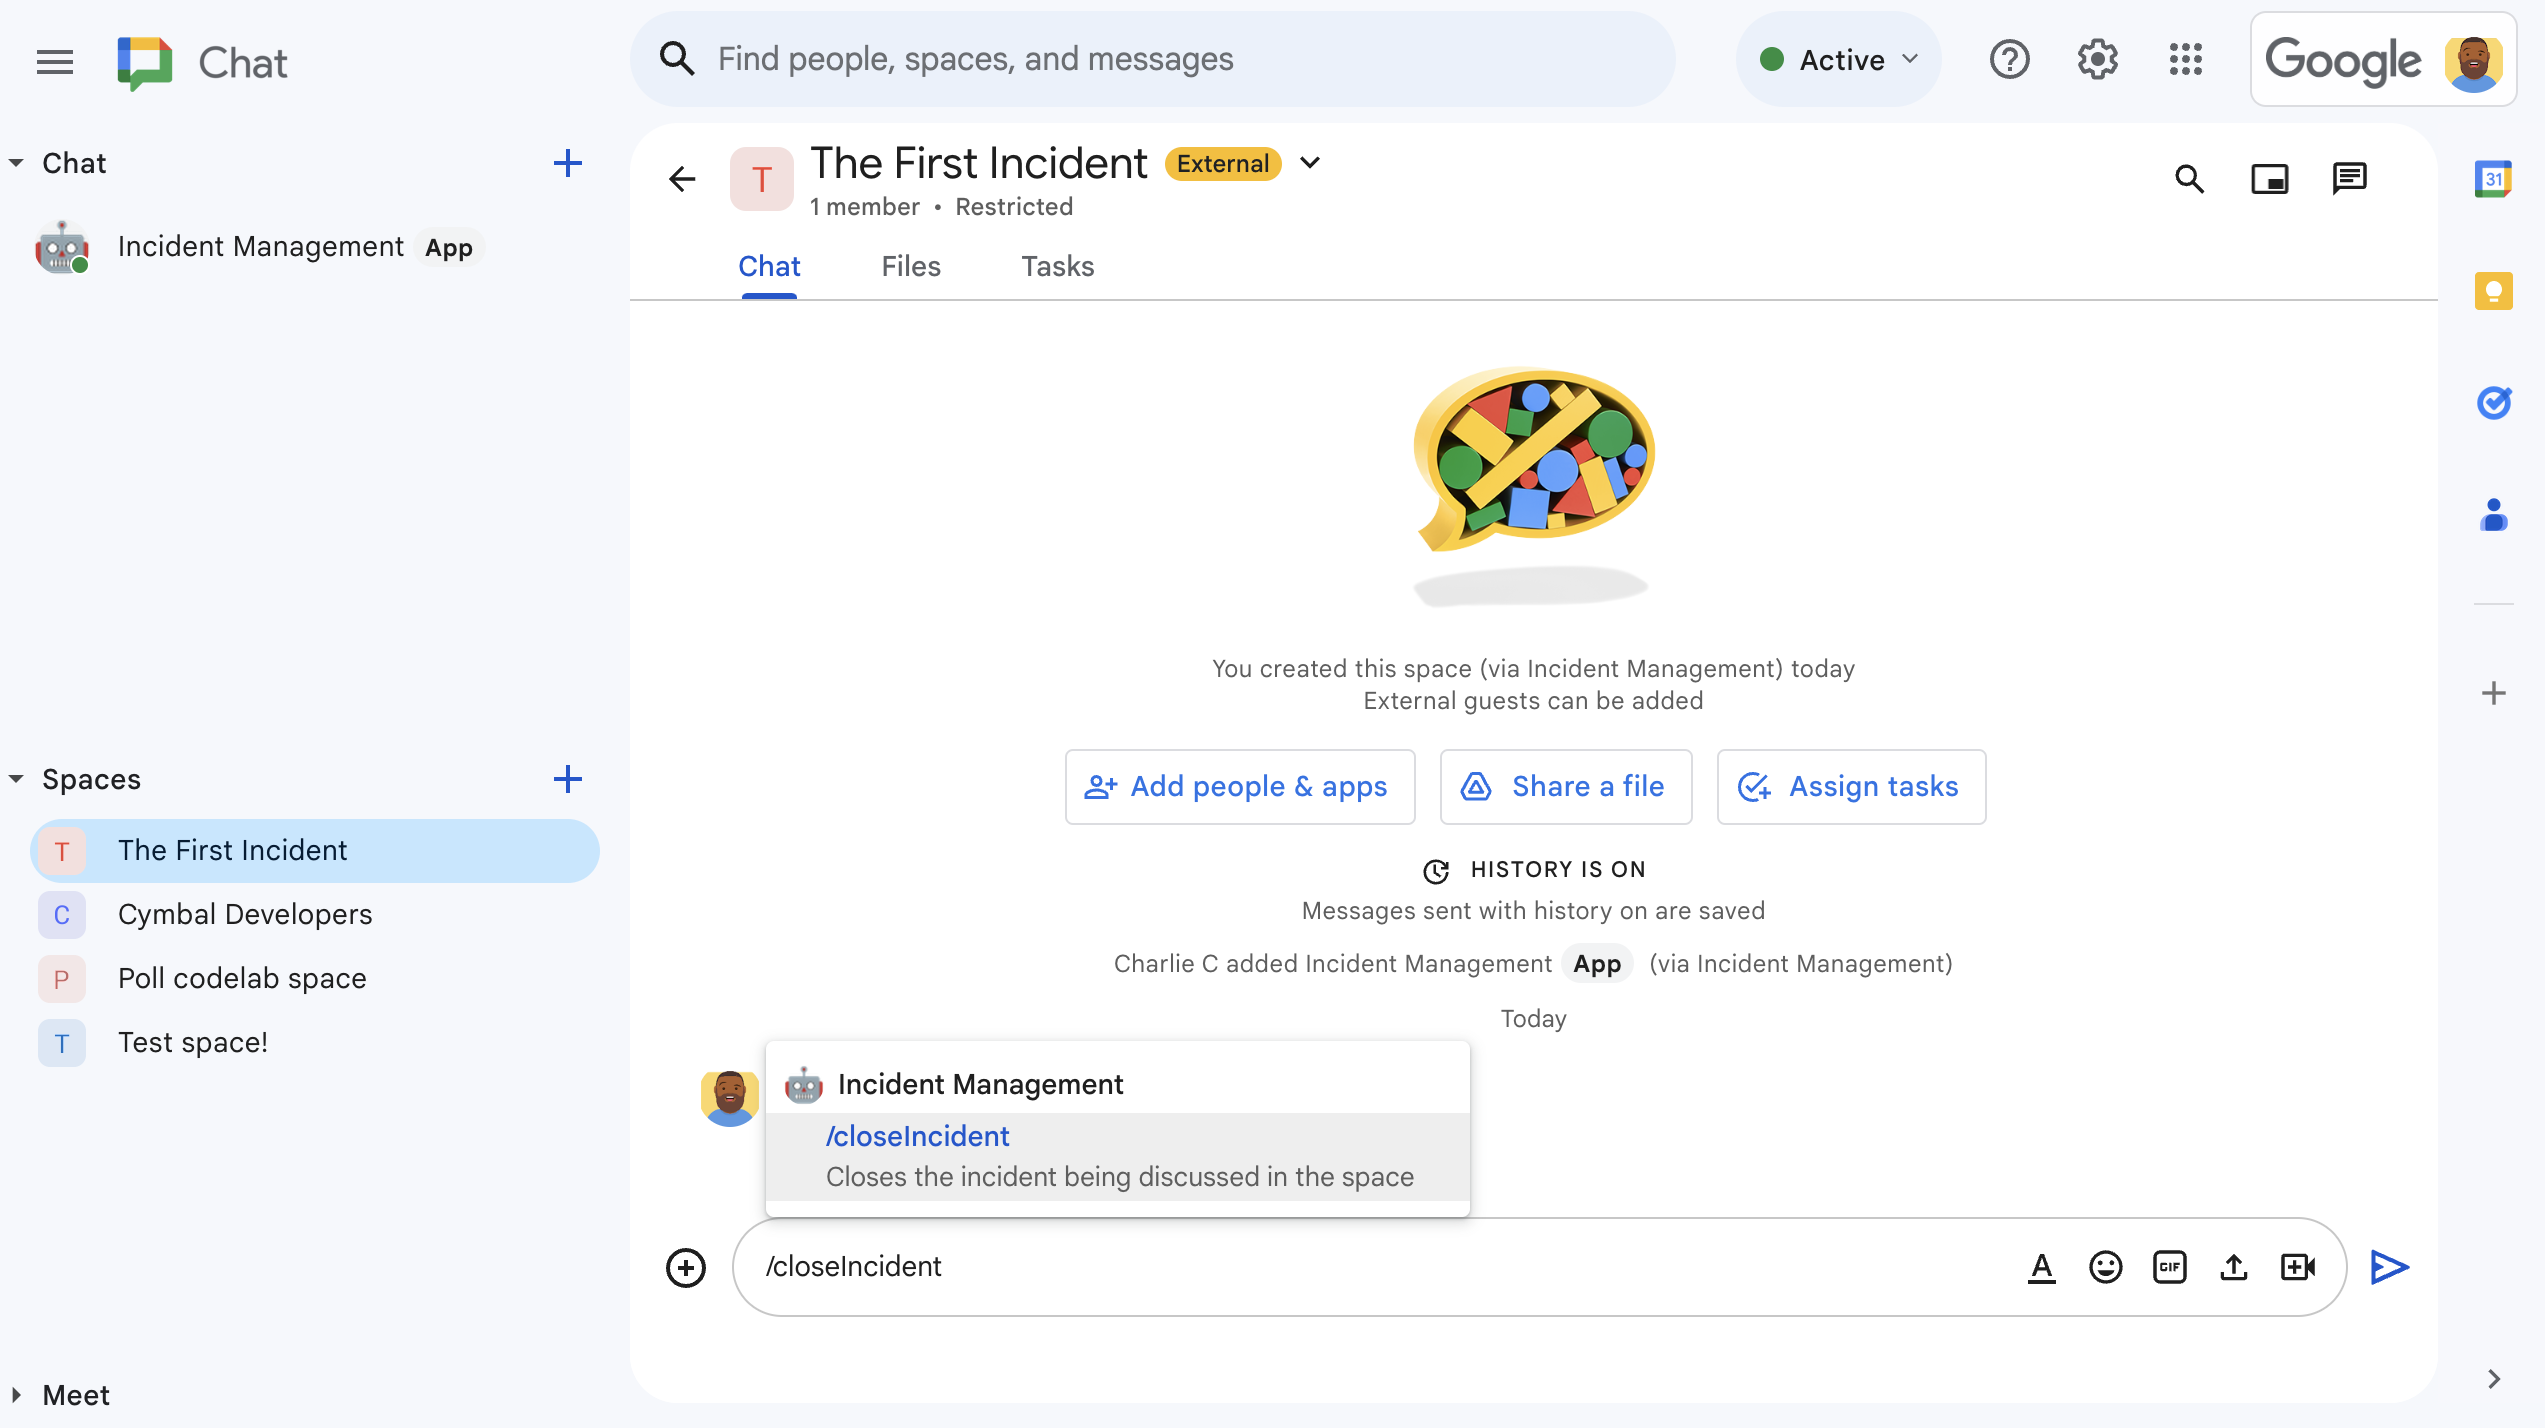
図 4.スラッシュ コマンドを使用してインシデントを解決する。 -
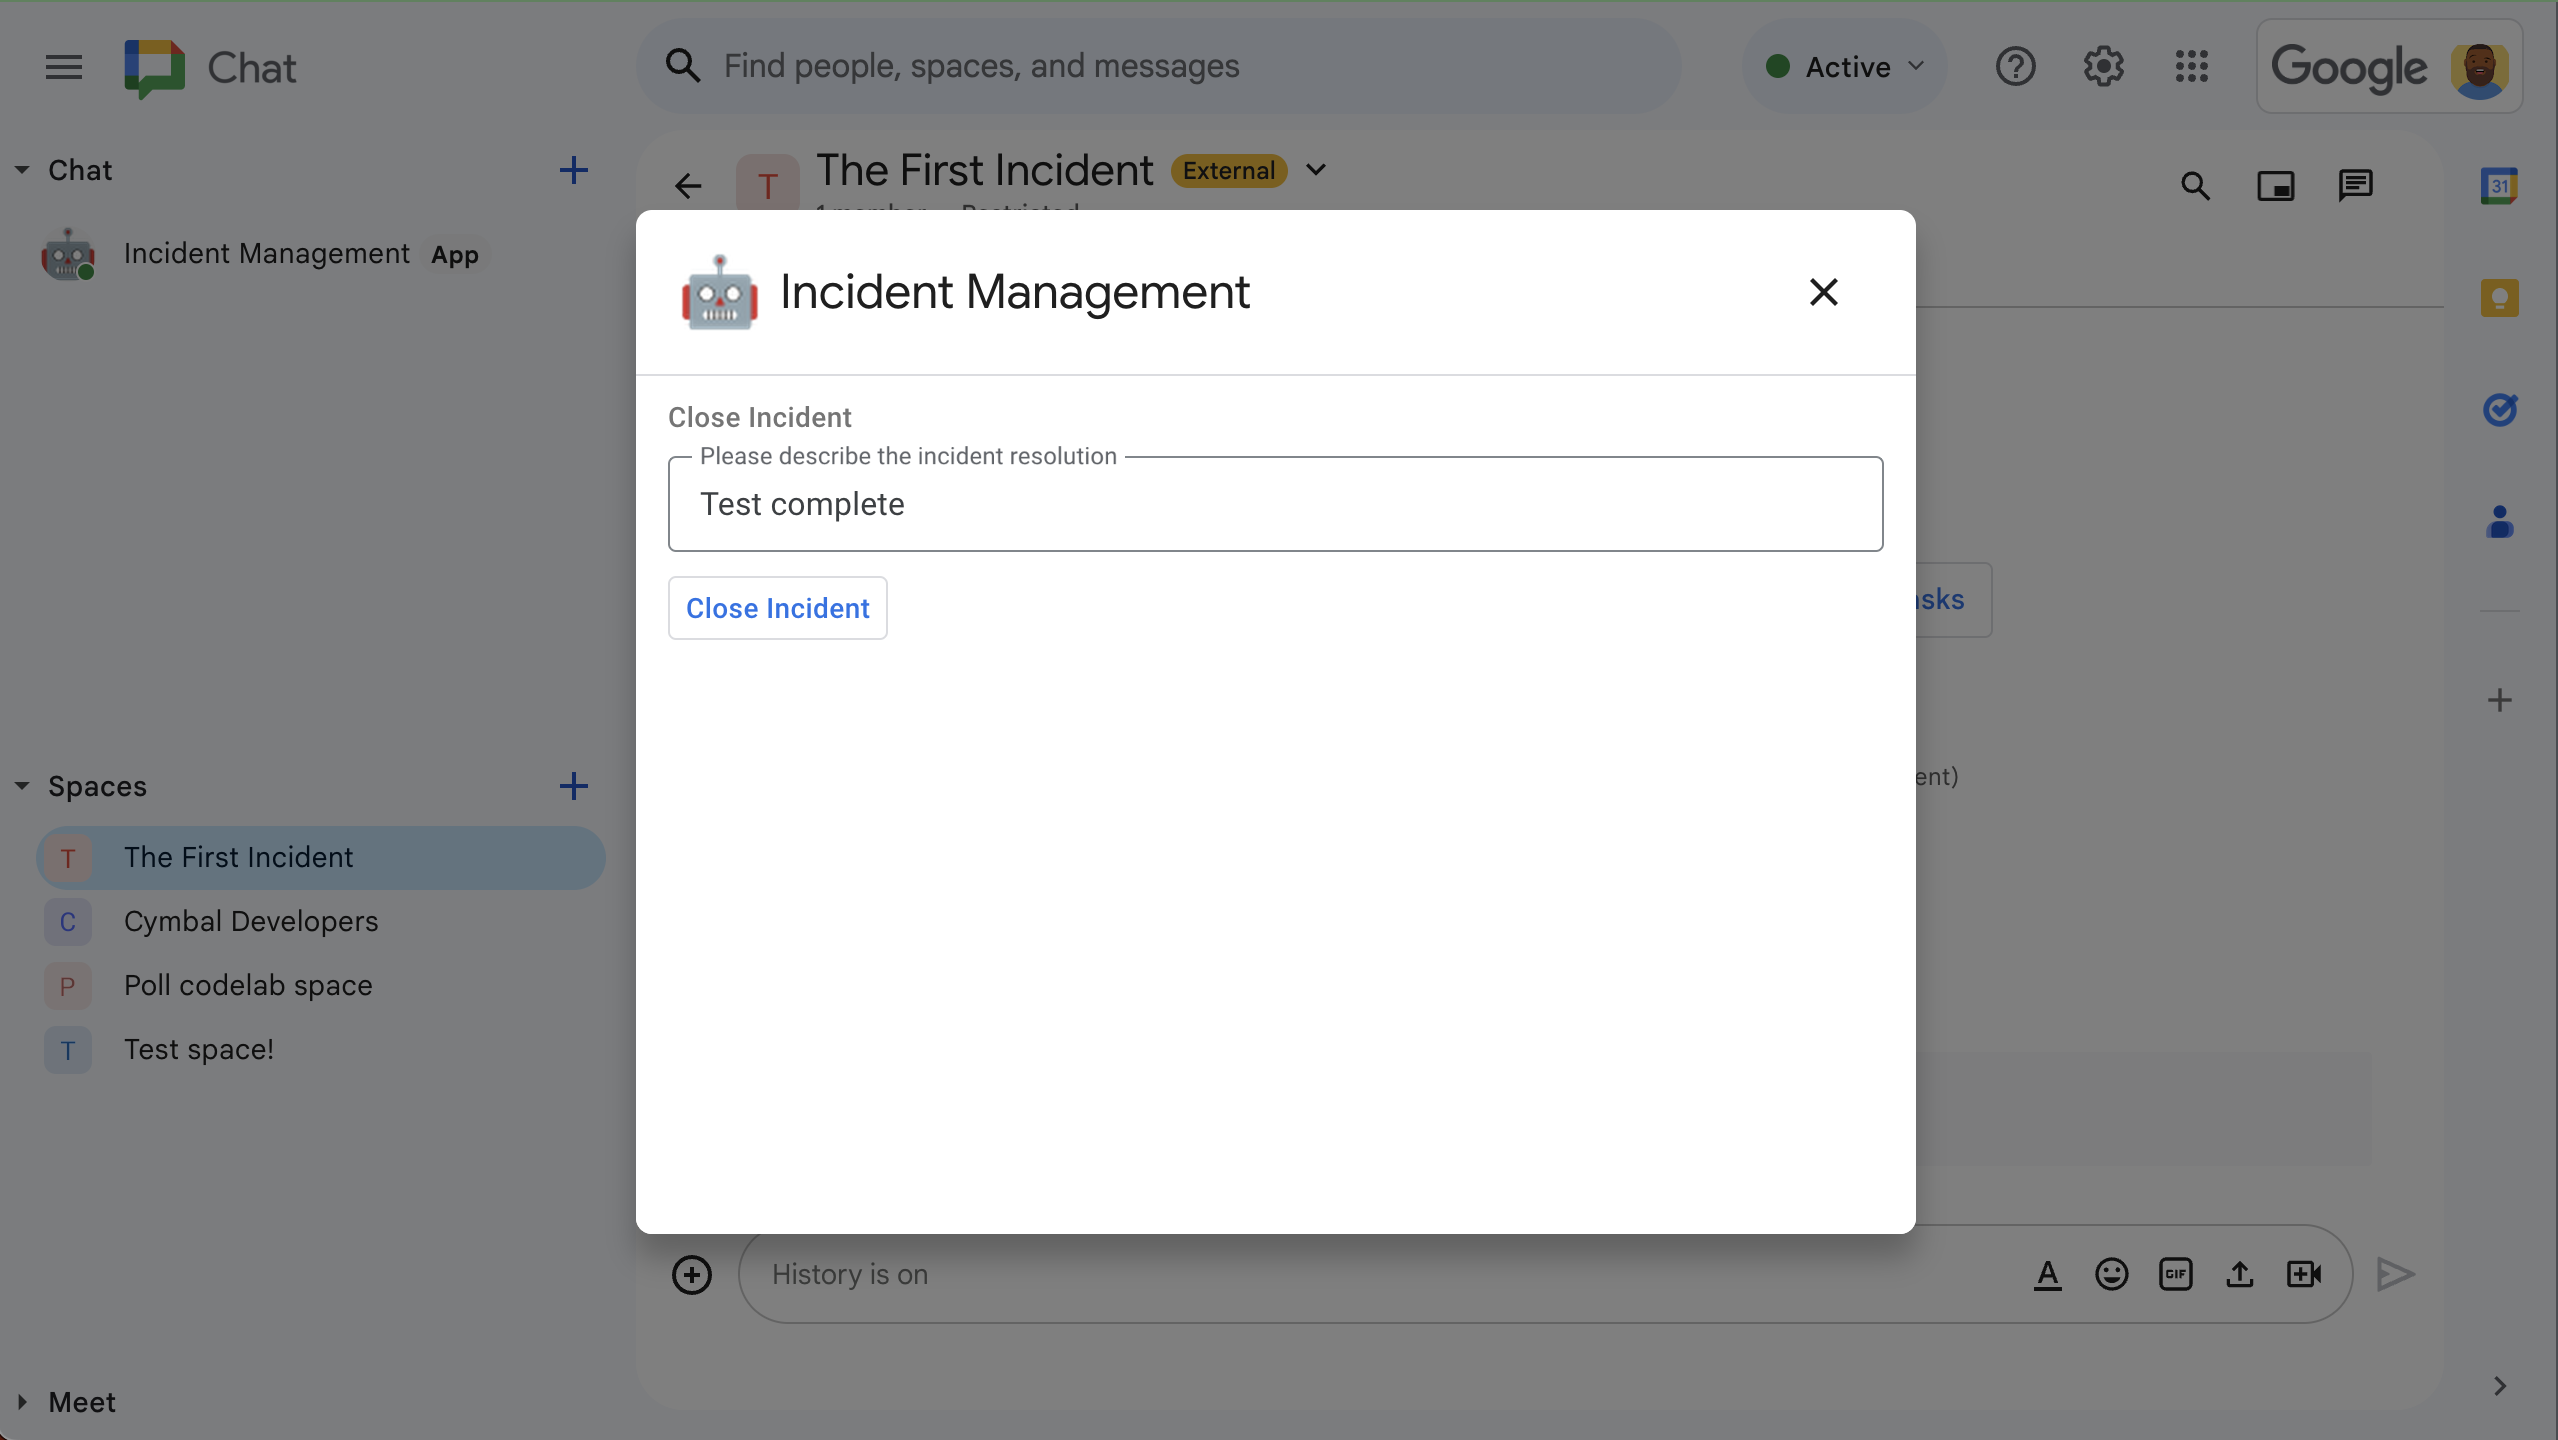
図 5.インシデント解決ダイアログ -
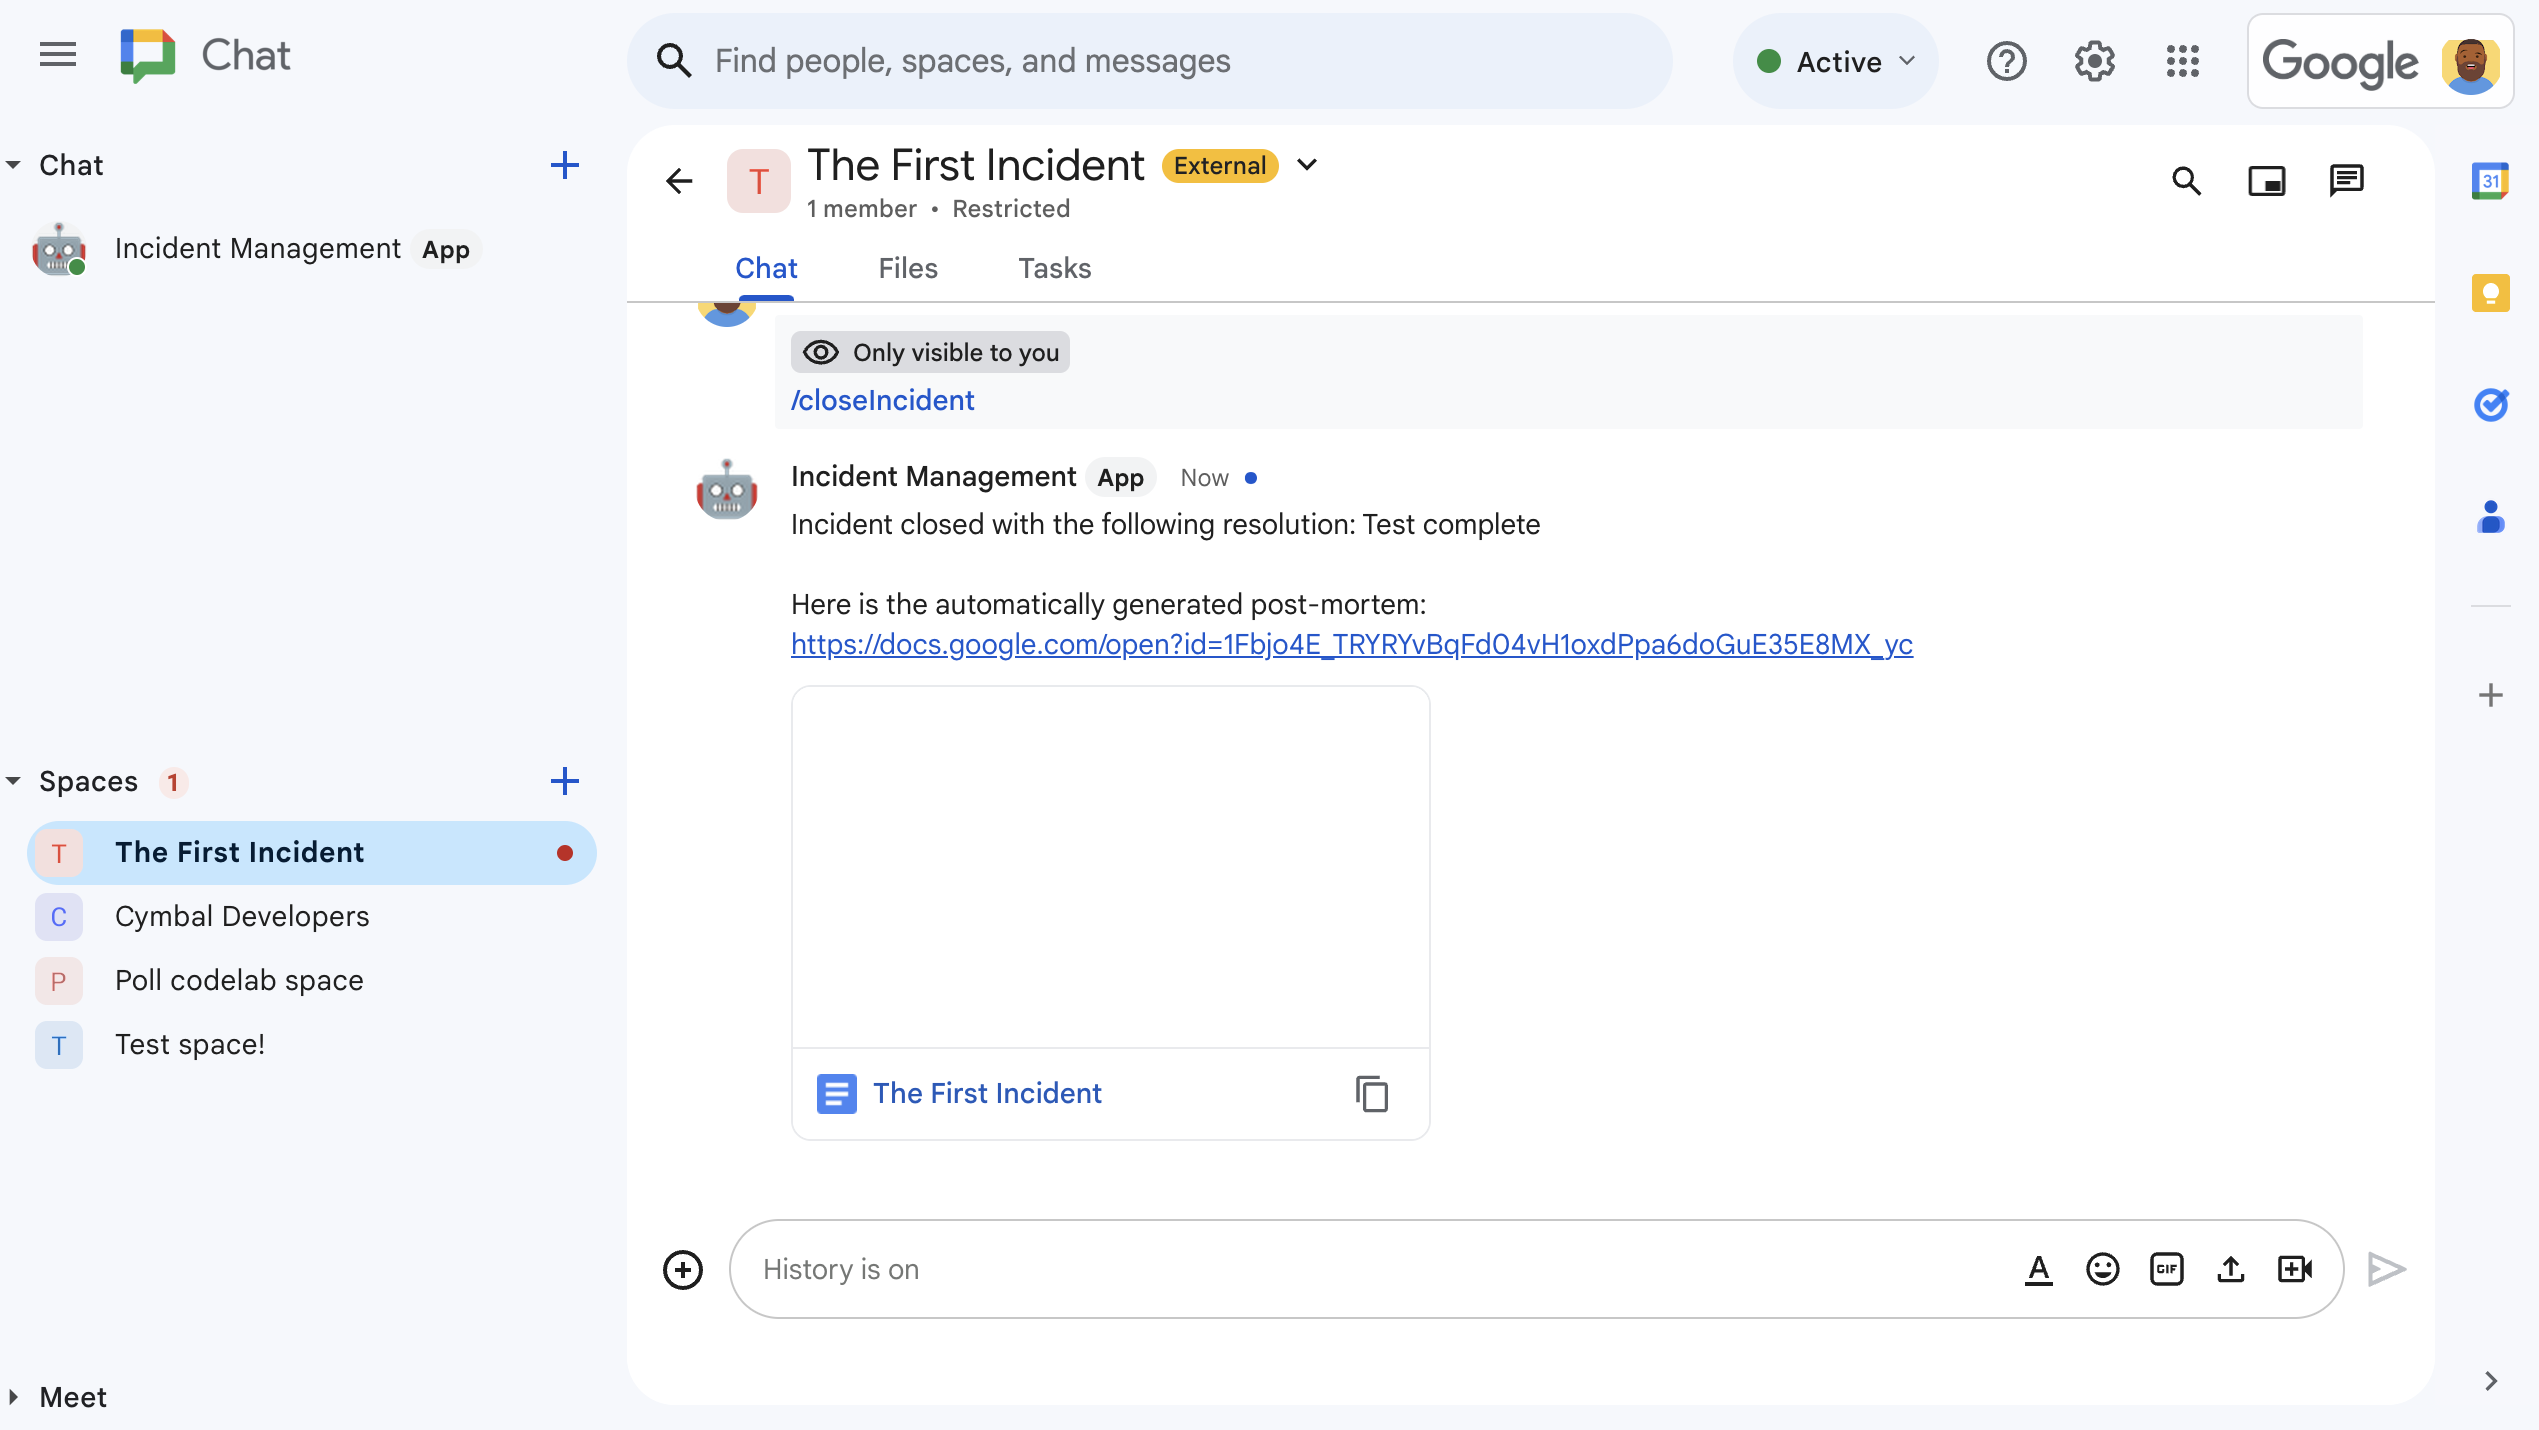
図 6.スペースで共有されているインシデント解決の Google ドキュメント。 -
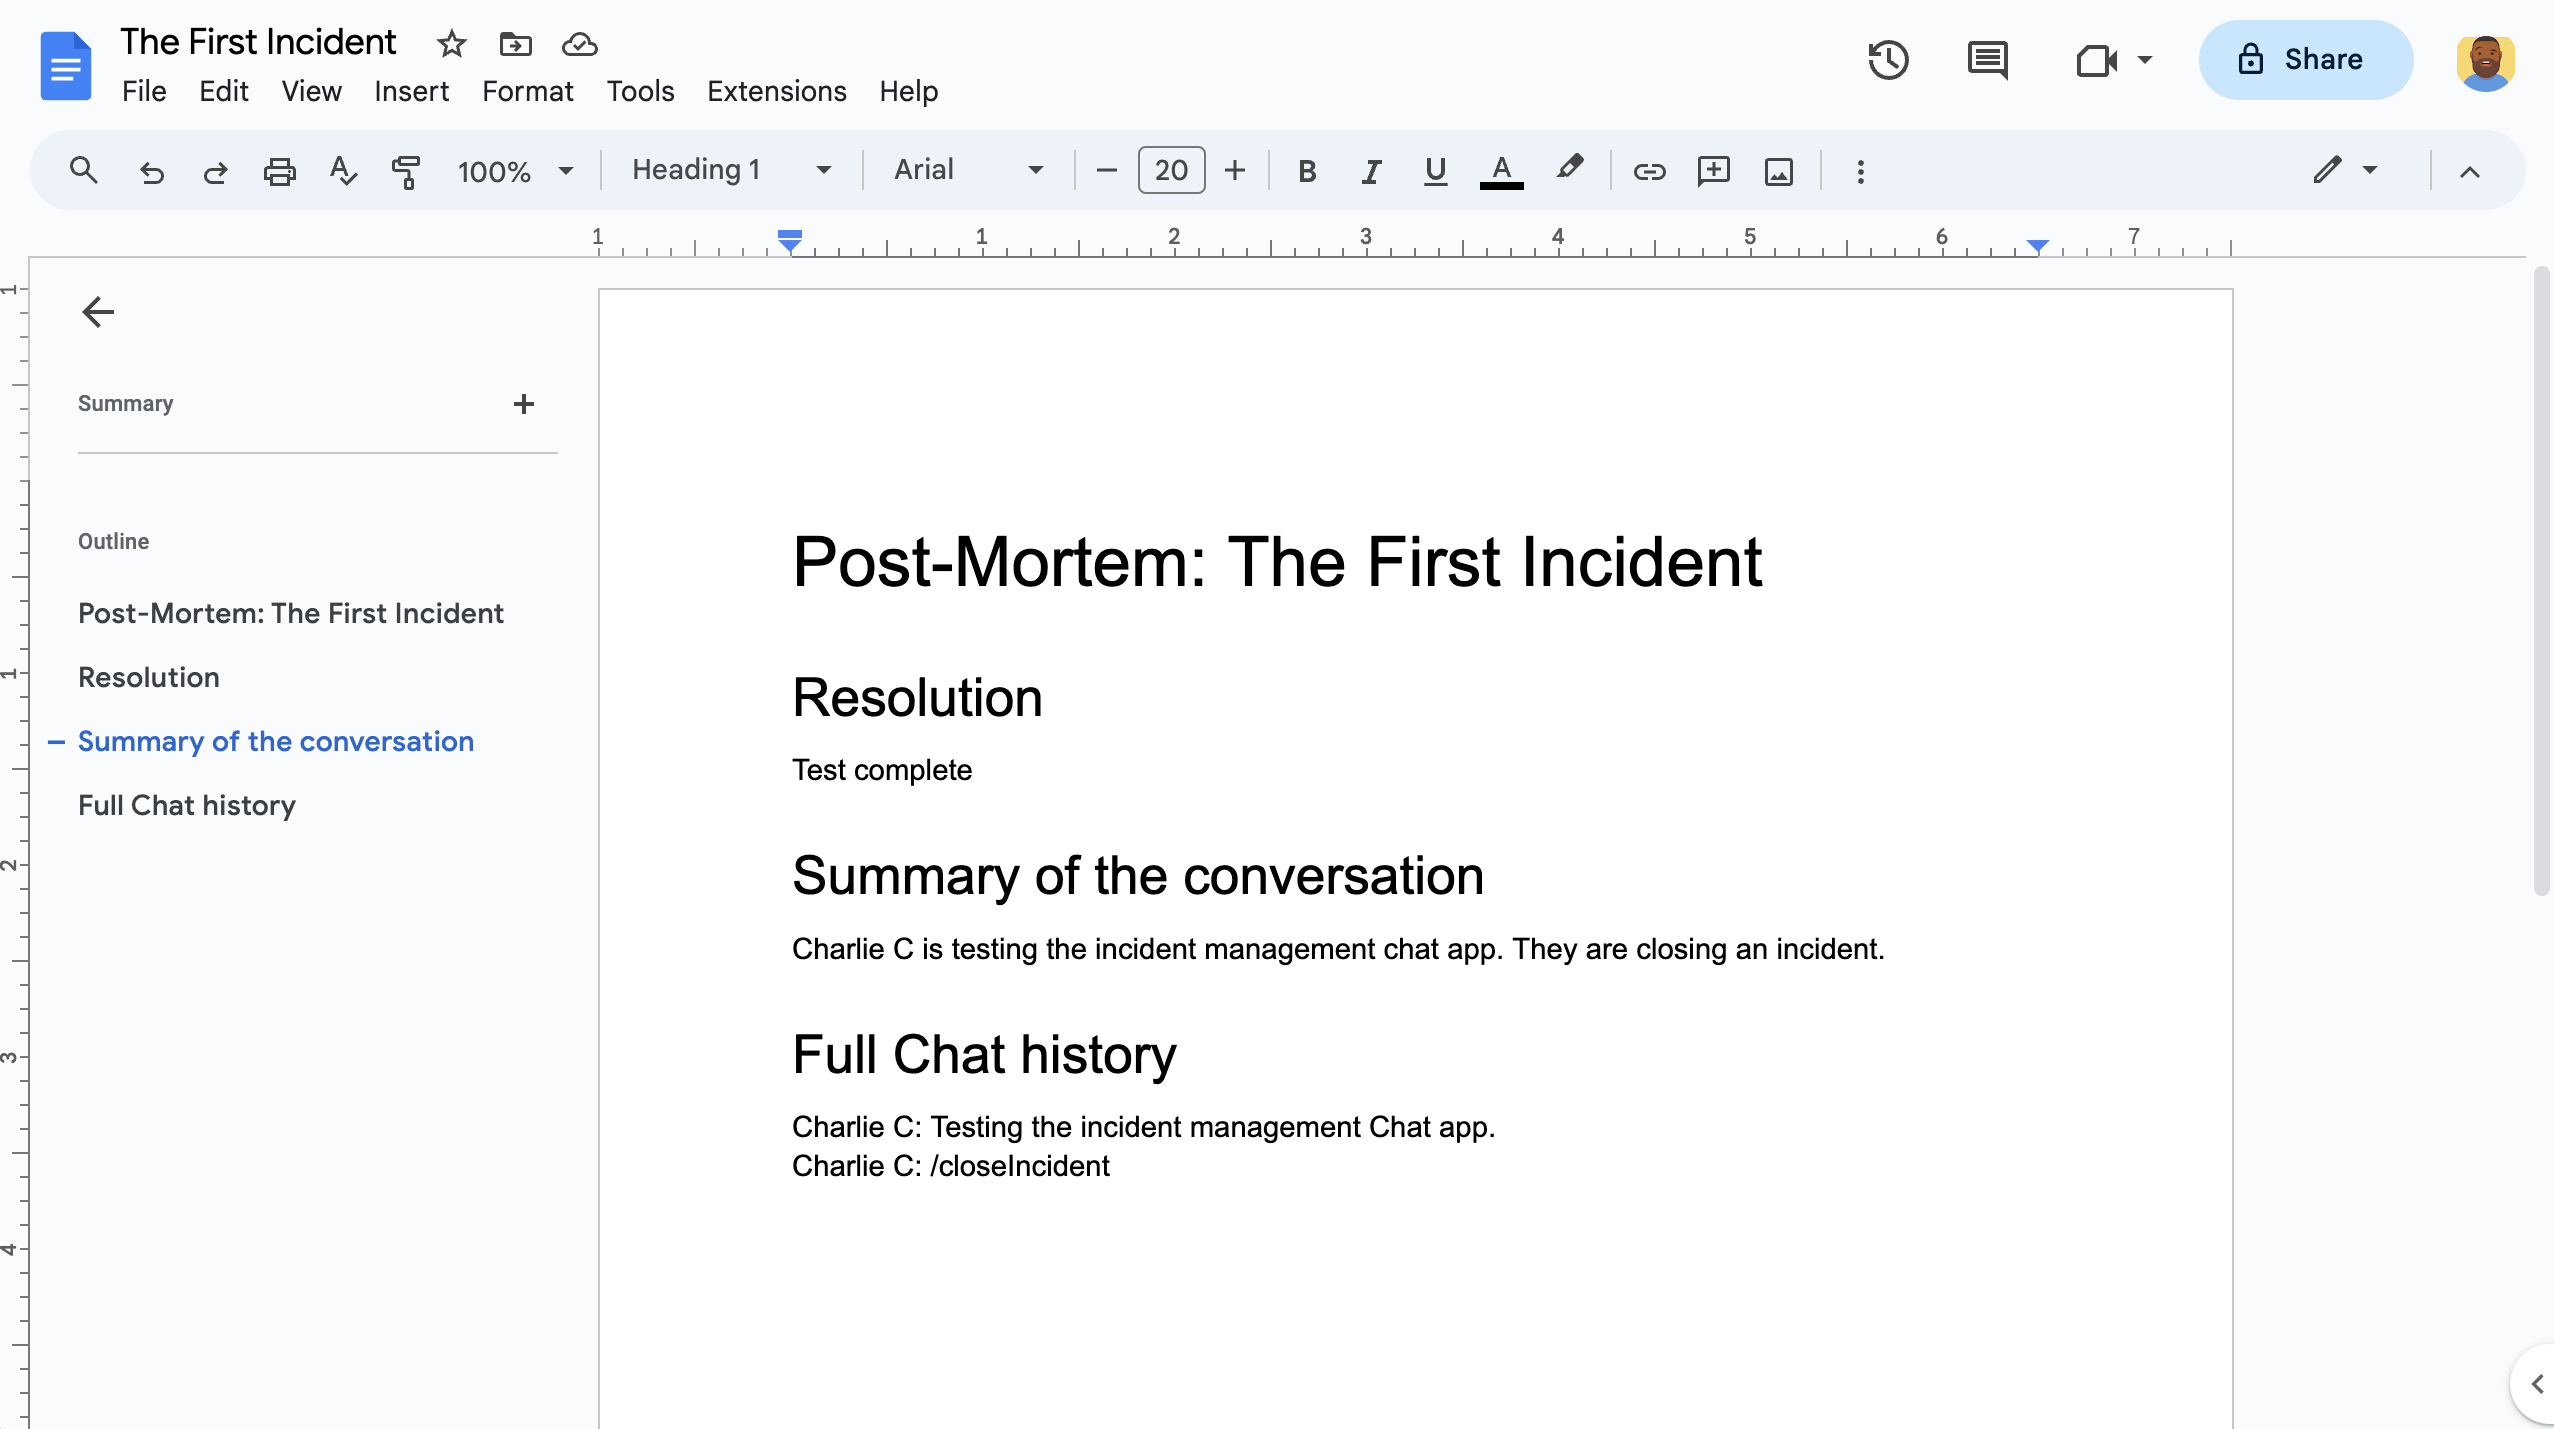
図 7. AI によるインシデント解決の要約に関する Google ドキュメント
前提条件
組織で次の前提条件を有効にする必要がある場合は、Google Workspace 管理者に有効にするよう依頼してください。
- Google Chat へのアクセス権を持つビジネスまたはエンタープライズ Google Workspace アカウント。
- Google Workspace でディレクトリ(連絡先の共有)が有効になっている。インシデント アプリは、ディレクトリを使用して、インシデント対応者の連絡先情報(名前やメールアドレスなど)を検索します。インシデント レスポンダーは、Google Workspace 組織の Google Chat アカウントを持つユーザーである必要があります。
目標
- インシデントに対応する Chat アプリを構築する。
- 次のようにして、お客様がインシデントに対応できるようにします。
- インシデント対応のためのスペースを作成する。
- インシデントや対応をまとめたメッセージを投稿する。
- インタラクティブな Chat アプリ機能によるコラボレーションをサポート。
- Vertex AI を使用して会話と解決策を要約します。
アーキテクチャ
次の図は、インシデント対応の Google Chat アプリで使用される Google Workspace リソースと Google Cloud リソースのアーキテクチャを示しています。
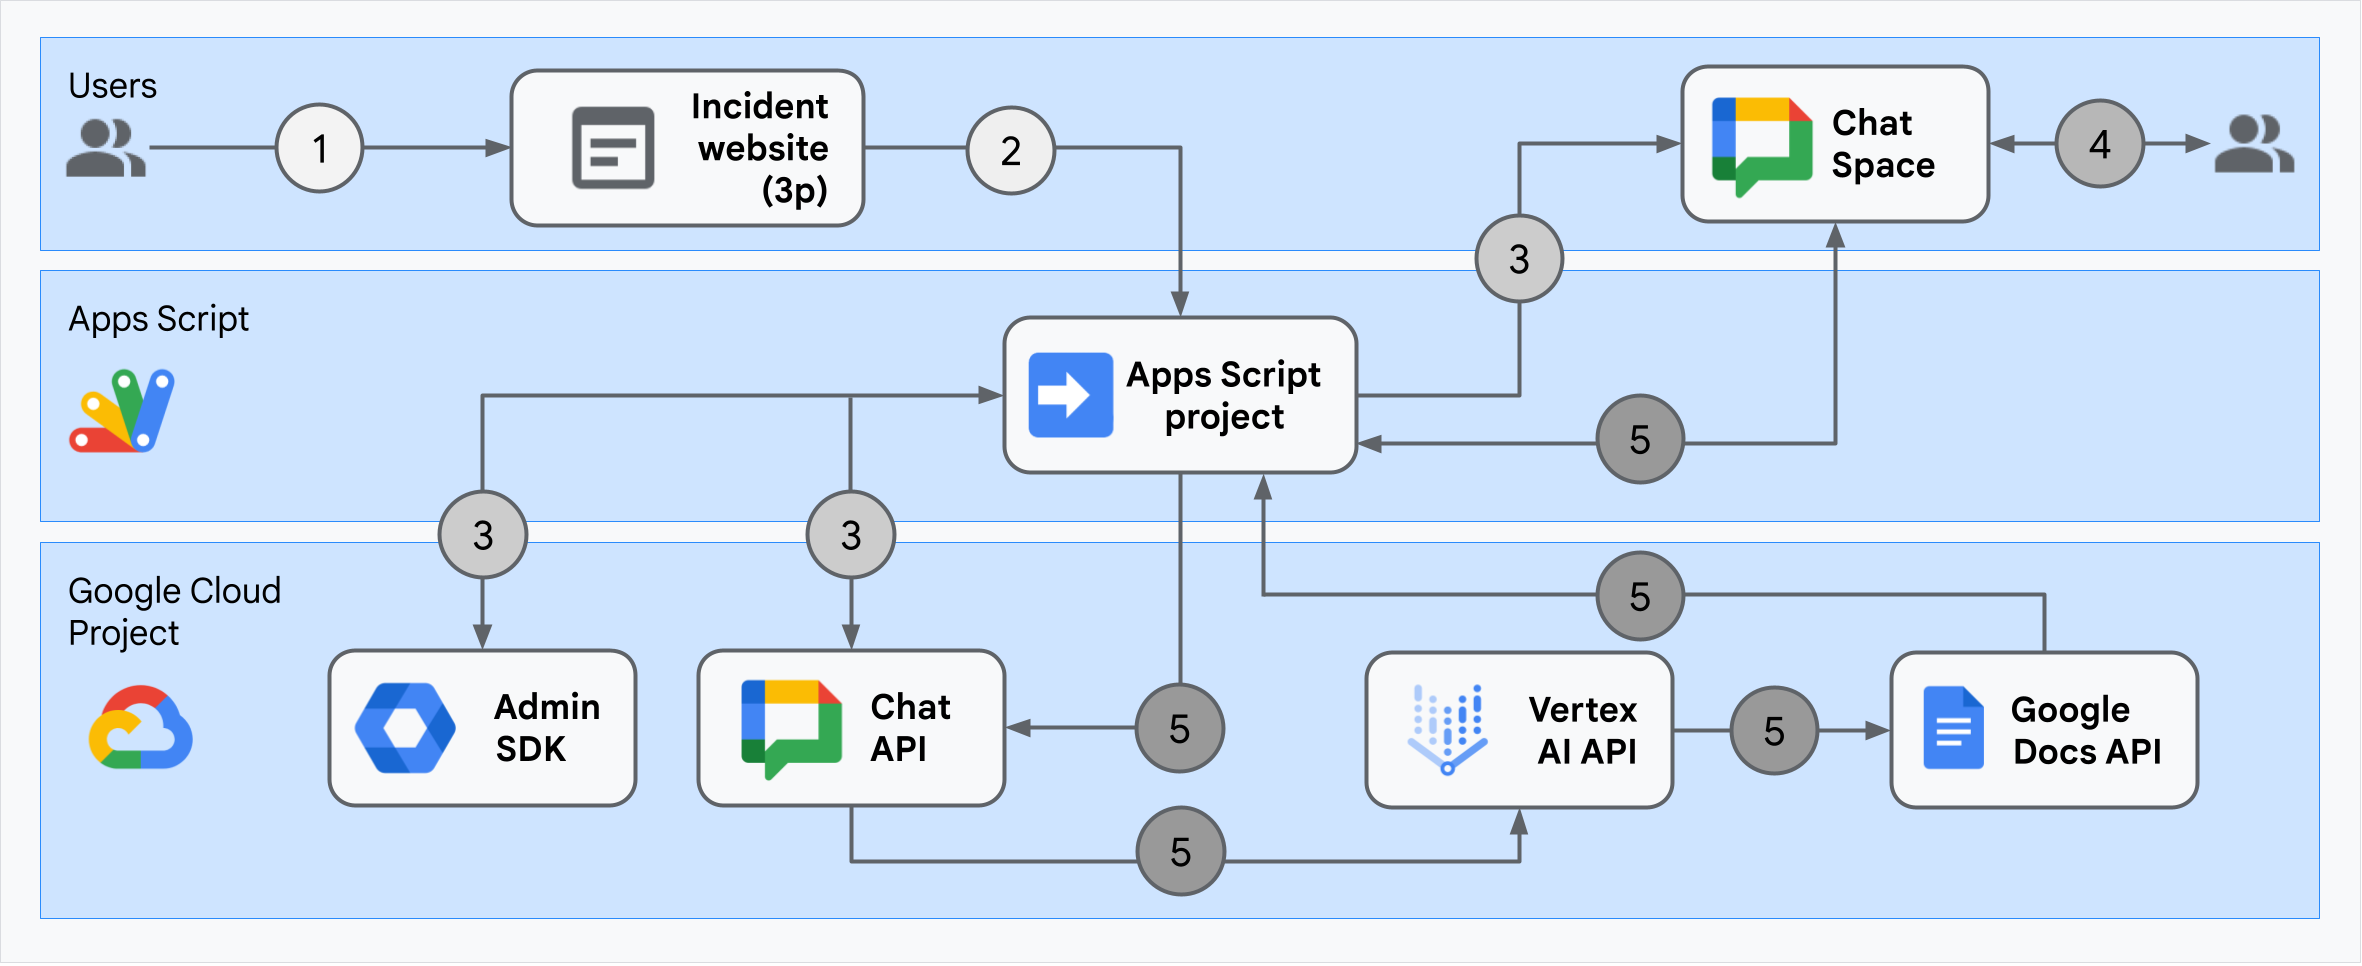
このアーキテクチャは、インシデント対応の Google Chat アプリがインシデントや解決策を処理する方法を示しています。
ユーザーが Apps Script でホストされている外部ウェブサイトからインシデントを開始します。
ウェブサイトから、同じく Apps Script でホストされている Google Chat アプリに非同期の HTTP リクエストが送信されます。
インシデント対応の Google Chat アプリがリクエストを処理します。
Apps Script Admin SDK サービスは、ユーザー ID やメールアドレスなどのチームメンバー情報を取得します。
Apps Script の高度なチャット サービスを使用して Chat API への一連の HTTP リクエストを実行すると、インシデント レスポンス Google Chat アプリがインシデント チャット スペースを作成し、チームメンバーを追加して、スペースにメッセージを送信します。
チームメンバーが Chat スペースでインシデントについて話し合っています。
チームメンバーがスラッシュ コマンドを呼び出して、インシデントの解決を通知します。
Apps Script の高度なチャット サービスを使用して Chat API に HTTP 呼び出しを行うと、Chat スペースのすべてのメッセージが一覧表示されます。
Vertex AI は、リストされたメッセージを受信して要約を生成します。
Apps Script の
DocumentAppサービスは、ドキュメント ドキュメントを作成し、Vertex AI のサマリーをドキュメントに追加します。インシデント レスポンス用の Google Chat アプリが Chat API を呼び出して、概要の Docs ドキュメントへのリンクを共有するメッセージを送信します。
環境を準備する
このセクションでは、Chat アプリ用の Google Cloud プロジェクトを作成して構成する方法について説明します。
Google Cloud プロジェクトを作成する
Google Cloud コンソール
- Google Cloud コンソールで、メニュー > [IAM と管理] > [プロジェクトを作成] に移動します。
-
[プロジェクト名] フィールドに、プロジェクトのわかりやすい名前を入力します。
省略可: プロジェクト ID を編集するには、[編集] をクリックします。プロジェクトの作成後にプロジェクト ID を変更することはできないため、プロジェクトのライフタイムを考慮してニーズに合った ID を選択してください。
- [ロケーション] フィールドで [参照] をクリックして、プロジェクトの可能性のあるロケーションを表示します。[選択] をクリックします。
- [作成] をクリックします。Google Cloud コンソールがダッシュボード ページに移動し、数分以内にプロジェクトが作成されます。
gcloud CLI
次のいずれかの開発環境で、Google Cloud CLI(gcloud)にアクセスします。
-
Cloud Shell: gcloud CLI がすでに設定されているオンライン ターミナルを使用するには、Cloud Shell をアクティブにします。
Cloud Shell を有効にする -
ローカルシェル: ローカル開発環境を使用するには、gcloud CLI をインストールして初期化します。
Cloud プロジェクトを作成するには、gcloud projects createコマンドを使用します。gcloud projects create PROJECT_ID
Cloud プロジェクトの課金を有効にする
Google Cloud コンソール
- Google Cloud コンソールで [お支払い] に移動します。メニュー アイコン > [お支払い] > [マイ プロジェクト] をクリックします。
- [組織を選択] で、Google Cloud プロジェクトに関連付けられている組織を選択します。
- プロジェクトの行で [アクション] メニュー()を開き、[お支払い情報を変更] をクリックして、Cloud 請求先アカウントを選択します。
- [アカウントを設定] をクリックします。
gcloud CLI
- 使用可能な請求先アカウントを一覧表示するには、次のコマンドを実行します。
gcloud billing accounts list - 請求先アカウントを Google Cloud プロジェクトにリンクします。
gcloud billing projects link PROJECT_ID --billing-account=BILLING_ACCOUNT_ID次のように置き換えます。
PROJECT_IDは、課金を有効にする Cloud プロジェクトのプロジェクト ID です。BILLING_ACCOUNT_IDは、Google Cloud プロジェクトにリンクする請求先アカウント ID です。
API を有効にする
Google Cloud コンソール
Google Cloud コンソールで、Google Chat API、Google Docs API、Admin SDK API、Vertex AI API を有効にします。
正しい Cloud プロジェクトで API を有効にしていることを確認し、[次へ] をクリックします。
正しい API を有効にしていることを確認し、[有効にする] をクリックします。
gcloud CLI
必要に応じて、現在の Cloud プロジェクトを
gcloud config set projectコマンドで作成したプロジェクトに設定します。gcloud config set project PROJECT_IDPROJECT_ID は、作成した Cloud プロジェクトのプロジェクト ID に置き換えます。
gcloud services enableコマンドを使用して、Google Chat API、Google Docs API、Admin SDK API、Vertex AI API を有効にします。gcloud services enable chat.googleapis.com docs.googleapis.com admin.googleapis.com aiplatform.googleapis.com
認証と権限付与の設定
認証と認可により、Chat アプリは Google Workspace と Google Cloud のリソースにアクセスしてインシデント レスポンスを処理できます。
このチュートリアルでは、アプリを内部で公開するため、プレースホルダ情報を使用しても問題はありません。アプリを外部に公開する前に、同意画面のプレースホルダ情報を実際の情報に置き換えます。
Google Cloud コンソールで、メニュー > [API とサービス] > [OAuth 同意画面] に移動します。
[ユーザーの種類] で [内部] を選択し、[作成] をクリックします。
[アプリ名] に「
Incident Management」と入力します。[ユーザー サポートメール] で、メールアドレスまたは適切な Google グループを選択します。
[デベロッパーの連絡先情報] にメールアドレスを入力します。
[保存して次へ] をクリックします。
[スコープを追加または削除] をクリックします。Cloud プロジェクトで有効にした各 API のスコープのリストが表示されます。
[スコープを手動で追加] に、次のスコープを貼り付けます。
https://www.googleapis.com/auth/chat.spaces.createhttps://www.googleapis.com/auth/chat.membershipshttps://www.googleapis.com/auth/chat.memberships.apphttps://www.googleapis.com/auth/chat.messageshttps://www.googleapis.com/auth/documentshttps://www.googleapis.com/auth/admin.directory.user.readonlyhttps://www.googleapis.com/auth/script.external_requesthttps://www.googleapis.com/auth/userinfo.emailhttps://www.googleapis.com/auth/cloud-platform
[表に追加] をクリックします。
[更新] をクリックします。
[保存して次へ] をクリックします。
アプリ登録の概要を確認し、[ダッシュボードに戻る] をクリックします。
Chat アプリを作成してデプロイする
次のセクションでは、Chat アプリに必要なすべてのアプリケーション コードを含む Apps Script プロジェクト全体をコピーして更新します。そのため、各ファイルをコピーして貼り付ける必要はありません。
一部の関数には、ChatApp.gs の processSlashCommand_() のように、名前の末尾にアンダースコアが含まれています。アンダースコアを使用すると、ブラウザで開いたインシデント初期化ウェブページから関数が非表示になります。詳細については、非公開関数をご覧ください。
Apps Script は、.gs スクリプトと .html ファイルの 2 種類のファイル形式をサポートしています。このサポートに準拠するため、アプリのクライアントサイド JavaScript は <script /> タグ内に、CSS は HTML ファイル内の <style /> タグ内に含めます。
必要に応じて、GitHub でプロジェクト全体を確認できます。
各ファイルの概要は次のとおりです。
Consts.gsCloud プロジェクト ID、Vertex AI ロケーション ID、インシデントを閉じるためのスラッシュ コマンド ID など、他のコードファイルから参照される定数を定義します。
Consts.gsコードを表示ChatApp.gsメッセージ、カードのクリック数、スラッシュ コマンド、ダイアログなどの Chat 操作イベントを処理します。インシデント解決の詳細を収集するダイアログを開いて、
/closeIncidentスラッシュ コマンドに応答します。Chat API のspaces.messages.listメソッドを呼び出して、スペース内のメッセージを読み取ります。Apps Script で Admin SDK Directory サービスを使用してユーザー ID を取得します。ChatApp.gsコードを表示ChatSpaceCreator.gsユーザーがインシデント初期化ウェブページで入力したフォームデータを受け取り、それを使用して作成と入力を行って Chat スペースを設定し、インシデントに関するメッセージを投稿します。
ChatSpaceCreator.gsコードを表示DocsApi.gsGoogle Docs API を呼び出して、ユーザーの Google ドライブに Google ドキュメントを作成します。また、
VertexAiApi.gsで作成したインシデント情報の概要をドキュメントに書き込みます。DocsApi.gsコードを表示VertexAiApi.gsVertex AI を使用して、Chat スペース内の会話を要約します。この概要は、
DocsAPI.gsの特別に作成されたドキュメントに投稿されます。VertexAiApi.gsコードを表示WebController.gsインシデントの初期化ウェブサイトを提供します。
WebController.gsコードを表示Index.htmlインシデント初期化ウェブサイトを構成する HTML。
Index.htmlコードを表示JavaScript.htmlインシデント初期化ウェブサイトの送信、エラー、消去などのフォームの動作を処理します。これは、
WebController.gsのカスタムinclude関数によってIndex.htmlに含まれます。JavaScript.htmlコードを表示Stylesheet.htmlインシデント初期化ウェブサイトの CSS。これは、
WebController.gsのカスタムinclude関数によってIndex.htmlに含まれています。Stylesheet.htmlコードを表示
Cloud プロジェクトの番号と ID を確認する
Google Cloud コンソールで、Cloud プロジェクトに移動します。
設定とユーティリティ > [プロジェクトの設定] をクリックします。
[プロジェクト番号] フィールドと [プロジェクト ID] フィールドの値をメモします。これらは、次のセクションで使用します。
Apps Script プロジェクトを作成する
Apps Script プロジェクトを作成して Cloud プロジェクトに接続するには:
- 次のボタンをクリックして、Google Chat でインシデントに対応する Apps Script プロジェクトを開きます。
プロジェクトを開く - [概要] をクリックします。
- 概要ページで [
 コピーを作成] をクリックします。
 Apps Script プロジェクトのコピーに名前を付けます。
[Google Chat でインシデントに対応する] をクリックします。
[プロジェクトのタイトル] に「
Incident Management Chat app」と入力します。[名前を変更] をクリックします。
Apps Script プロジェクトのコピーで、
Consts.gsファイルに移動し、YOUR_PROJECT_IDを Cloud プロジェクトの ID に置き換えます。
Apps Script プロジェクトの Cloud プロジェクトを設定する
- Apps Script プロジェクトで、
 [プロジェクトの設定] をクリックします。
 - [Google Cloud Platform(GCP)プロジェクト] で、[プロジェクトを変更] をクリックします。
- [GCP のプロジェクト番号] に、Cloud プロジェクトのプロジェクト番号を貼り付けます。
- [プロジェクトを設定] をクリックします。Cloud プロジェクトと Apps Script プロジェクトが接続されました。
Apps Script のデプロイを作成する
すべてのコードが配置されたので、Apps Script プロジェクトをデプロイします。デプロイ ID は、Google Cloud で Chat アプリを構成するときに使用します。
Apps Script で、インシデント レスポンス アプリのプロジェクトを開きます。
[Deploy] > [New deployment] をクリックします。
[アドオン] と [ウェブアプリ] がまだ選択されていない場合は、[種類の選択] の横にあるデプロイタイプ
をクリックし、[アドオン] と [ウェブアプリ] を選択します。[説明] に、このバージョンの説明(
Complete version of incident management appなど)を入力します。[Execute as] で、[User accessing the web app] を選択します。
[アクセスできるユーザー] で、[Workspace 組織内のすべてのユーザー] を選択します。ここで、「Workspace 組織」は Google Workspace 組織の名前です。
[デプロイ] をクリックします。Apps Script は、デプロイが正常に完了したことを報告し、デプロイ ID とインシデント初期化ウェブページの URL を提供します。
後でインシデントを開始するときにアクセスできるように、ウェブアプリの URL をメモしておきます。デプロイ ID をコピーします。この ID は、Google Cloud コンソールで Chat アプリを構成するときに使用します。
[完了] をクリックします。
Google Cloud コンソールで Chat アプリを構成する
このセクションでは、Google Cloud コンソールで Google Chat API を構成し、Chat アプリに関する情報(Apps Script プロジェクトから作成したデプロイメントの ID など)を設定します。
Google Cloud コンソールで、メニュー > [その他のプロダクト] > [Google Workspace] > [プロダクト ライブラリ] > [Google Chat API] > [管理] > [構成] をクリックします。
[アプリ名] に「
Incident Management」と入力します。[アバターの URL] に「
https://developers.google.com/chat/images/quickstart-app-avatar.png」と入力します。[説明] に「
Responds to incidents.」と入力します。[インタラクティブ機能を有効にする] をクリックしてオンにします。
[機能] で、[1:1 のメッセージを受信する] と [スペースとグループの会話に参加する] を選択します。
[接続設定] で [Apps Script] を選択します。
[Deployment ID] に、Apps Script プロジェクトのデプロイからコピーした Apps Script デプロイ ID を貼り付けます。
完全に実装された Chat アプリで使用するスラッシュ コマンドを登録します。
[スラッシュ コマンド] で [スラッシュ コマンドを追加] をクリックします。
[名前] に「
/closeIncident」と入力します。[コマンド ID] に「
1」と入力します。[説明] に「
Closes the incident being discussed in the space.」と入力します。[ダイアログを開く] を選択します。
[完了] をクリックします。スラッシュ コマンドが登録され、一覧表示されます。
[公開設定] で [Workspace ドメイン内の特定のユーザーとグループにこの Chat アプリの利用を許可する] を選択し、メールアドレスを入力します。
[ログ] で、[エラーを Logging にロギング] を選択します。
[保存] をクリックします。構成が保存されたというメッセージが表示されたら、アプリをテストする準備が整っています。
Chat アプリをテストする
インシデント管理 Chat アプリをテストするには、ウェブページからインシデントを開始し、Chat アプリが想定どおりに動作することを確認します。
Apps Script デプロイのウェブアプリの URL に移動します。
Apps Script からデータへのアクセス権を求められたら、[権限を確認] をクリックし、Google Workspace ドメインの適切な Google アカウントでログインして、[許可] をクリックします。
インシデントの初期化ウェブページが開きます。テスト情報を入力します。
- [Incident title] に「
The First Incident」と入力します。 - 必要に応じて、[インシデント対応担当者] に、他のインシデント対応担当者のメールアドレスを入力します。ユーザーは、Google Workspace 組織の Google Chat アカウントを持つユーザーである必要があります。そうしないと、スペースの作成に失敗します。ご自身のメールアドレスは自動的に入力されるため、入力しないでください。
- [初期メッセージ] に「
Testing the incident management Chat app.」と入力します。
- [Incident title] に「
[Create Chat Space] をクリックします。
creating spaceメッセージが表示されます。スペースが作成されると、
Space created!メッセージが表示されます。[スペースを開く] をクリックすると、Chat でスペースが新しいタブで開きます。必要に応じて、自分と他のインシデント レスポンダーがスペース内でメッセージを送信できます。アプリは Vertex AI を使用してこれらのメッセージを要約し、事後分析ドキュメントを共有します。
インシデント対応を終了して解決プロセスを開始するには、Chat スペースに「
/closeIncident」と入力します。インシデント管理ダイアログが開きます。[インシデントをクローズ] に、インシデントの解決の説明(
Test completeなど)を入力します。[Close Incident](インシデントを閉じる)をクリックします。
インシデント管理アプリは、スペース内のメッセージを一覧表示し、Vertex AI で要約し、要約を Google ドキュメント ドキュメントに貼り付け、ドキュメントをスペースで共有します。
クリーンアップ
このチュートリアルで使用したリソースに対して Google Cloud アカウントで課金されないようにするには、Cloud プロジェクトを削除することをおすすめします。
- Google Cloud コンソールで、[リソースの管理] ページに移動します。メニュー > [IAM と管理] > [リソースを管理] をクリックします。
- プロジェクト リストで、削除するプロジェクトを選択し、[削除] をクリックします。
- ダイアログでプロジェクト ID を入力し、[シャットダウン] をクリックしてプロジェクトを削除します。
関連トピック
- Gemini AI Chat アプリで Chat の会話に基づいて質問に回答する
- Google Chat、Vertex AI、Firestore を使用してプロジェクトを管理する
- インシデント レスポンス アプリは、ユーザー認証情報で認証を行い、API を呼び出して Chat API や Vertex AI API などの Google Cloud サービスを呼び出します。つまり、インシデントを初期化するユーザーには、これらのサービスへのアクセス権が必要です。アプリをより堅牢にするには、
/closeIncidentスラッシュ コマンドを呼び出すユーザーのユーザー認証情報ではなく、サービス アカウントとして Vertex AI API を呼び出すことを検討してください。Vertex AI API のサービス アカウントの構成については、カスタム サービス アカウントを使用するをご覧ください。