This guide explains how to use the Google Docs API to merge information from one or
more external data sources into an existing template document.
A *template* is a type of document containing fixed text and placeholders for
dynamic content. For example, a contract template might contain fixed text with
placeholders for the recipient's name and address. The app then merges
user-specific data into the template to create the finished document.
There are several reasons why this approach is useful:
- Designers can fine-tune a document's design using Google Docs. This is
simpler than tuning parameters in your app to set the rendered layout.
- Separating content from presentation is a well-known design principle with
many benefits.
 **Figure 1.** Merging data into a template to create a document.
## How a document merge works
Here's an example of how you can use the Docs API to merge data into a
document:
1. Create your document using placeholder content to help you with the design
and format. Any text formatting you want to replace is preserved.
2. For each element you'll be inserting, replace the placeholder content with a
tag. Be sure to use strings that are unlikely to occur normally. For
example, `{{account-holder-name}}` might be a
good tag.
3. In your code, use the Google Drive API to make a copy of the document.
4. In your code, use the Docs API's
[`batchUpdate`](https://developers.google.com/workspace/docs/api/reference/rest/v1/documents/batchUpdate)
method with the document name and include a
[`ReplaceAllTextRequest`](https://developers.google.com/workspace/docs/api/reference/rest/v1/documents/request#replacealltextrequest).
Document IDs reference a document and they can be derived from the URL:
```
https://docs.google.com/document/d/DOCUMENT_ID/edit
```
> [!NOTE]
> **Note:** You can perform multiple replacements in the same `batchUpdate` request for efficiency. For more information on how to batch API calls together, see [batch
> request best practices](https://developers.google.com/workspace/docs/api/how-tos/batch).
## Manage templates
For template documents the app defines and owns, create the template using a
dedicated account representing the app. [Service
accounts](https://developers.google.com/identity/protocols/application-default-credentials) are a good choice
and avoid complications with Google Workspace policies that restrict sharing.
When you create instances of documents from templates, always use end-user
credentials. This gives users full control over the resulting document and
prevents scaling issues related to per-user limits in Google Drive.
To create a template using a service account, perform the following steps with
the app credentials:
1. Create a document using [`documents.create`](https://developers.google.com/workspace/docs/api/reference/rest/v1/documents/create) in the Docs API.
2. Update the permissions to allow the document recipients to read it using [`permissions.create`](https://developers.google.com/workspace/drive/api/v3/reference/permissions/create) in the Drive API.
3. Update the permissions to allow template authors to write to it using `permissions.create` in the Drive API.
4. Edit the template as required.
To create an instance of the document, perform the following steps with the user
credentials:
1. Create a copy of the template using [`files.copy`](https://developers.google.com/workspace/drive/v3/reference/files/copy) in the Drive API.
2. Replace values using [`documents.batchUpdate`](https://developers.google.com/workspace/docs/api/reference/rest/v1/documents/batchUpdate) in the Docs API.
## Example: Merge data into a template
The following code sample shows how to replace two fields across all tabs of a
template with real values to generate a finished document:
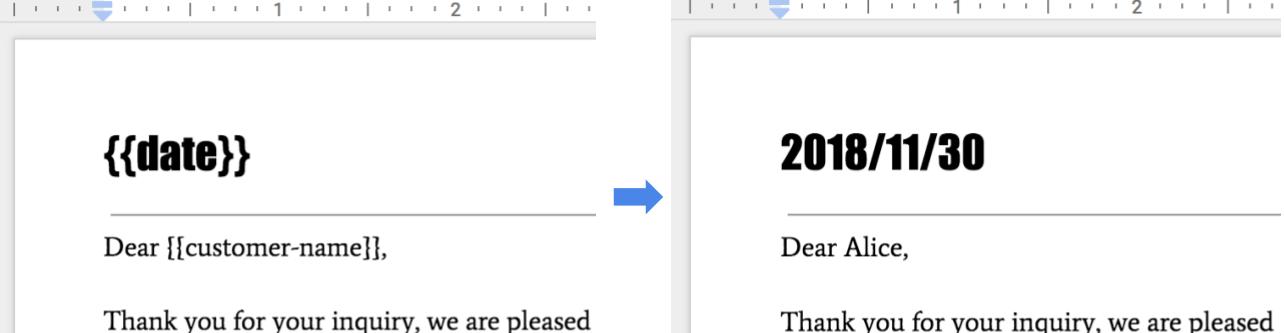 **Figure 2.** Replacing tag placeholders with values.
To perform this merge, use the following code:
### Java
```java
String customerName = "Alice";
DateTimeFormatter formatter = DateTimeFormatter.ofPattern("yyyy/MM/dd");
String date = formatter.format(LocalDate.now());
// Make a copy of the template document using the Drive API.
String copyTitle = "Merged Document";
File copyMetadata = new File().setName(copyTitle);
File documentCopyFile =
driveService.files().copy(DOCUMENT_ID, copyMetadata).execute();
String documentCopyId = documentCopyFile.getId();
List requests = new ArrayList<>();
// One option for replacing all text is to specify all tab IDs.
requests.add(new Request()
.setReplaceAllText(new ReplaceAllTextRequest()
.setContainsText(new SubstringMatchCriteria()
.setText("{{customer-name}}")
.setMatchCase(true))
.setReplaceText(customerName)
.setTabsCriteria(new TabsCriteria()
.addTabIds(TAB_ID_1)
.addTabIds(TAB_ID_2)
.addTabIds(TAB_ID_3))));
// Another option is to omit TabsCriteria if you are replacing across all tabs.
requests.add(new Request()
.setReplaceAllText(new ReplaceAllTextRequest()
.setContainsText(new SubstringMatchCriteria()
.setText("{{date}}")
.setMatchCase(true))
.setReplaceText(date)));
BatchUpdateDocumentRequest body = new BatchUpdateDocumentRequest();
service.documents().batchUpdate(documentCopyId, body.setRequests(requests)).execute();
```
### Node.js
```javascript
let customerName = 'Alice';
let date = yyyymmdd()
let requests = [
// One option for replacing all text is to specify all tab IDs.
{
replaceAllText: {
containsText: {
text: '{{customer-name}}',
matchCase: true,
},
replaceText: customerName,
tabsCriteria: {
tabIds: [TAB_ID_1, TAB_ID_2, TAB_ID_3],
},
},
},
// Another option is to omit TabsCriteria if you are replacing across all tabs.
{
replaceAllText: {
containsText: {
text: '{{date}}',
matchCase: true,
},
replaceText: date,
},
},
];
// Make a copy of the template document using the Drive API.
let copyTitle = 'Merged Document';
driveService.files.copy({
fileId: '1yBx6HSnu_gbV2sk1nChJOFo_g3AizBhr-PpkyKAwcTg',
resource: {
name: copyTitle,
},
}, (err, driveResponse) => {
if (err) return console.log('The Drive API returned an error: ' + err);
let documentCopyId = driveResponse.data.id;
google.options({auth: auth});
google
.discoverAPI(
'https://docs.googleapis.com/$discovery/rest?version=v1&key={YOUR_API_KEY}')
.then(function(docs) {
docs.documents.batchUpdate(
{
documentId: documentCopyId,
resource: {
requests,
},
},
(err, {data}) => {
if (err) return console.log('The API returned an error: ' + err);
console.log(data);
});
});
});
```
### Python
```python
customer_name = 'Alice'
date = datetime.datetime.now().strftime("%y/%m/%d")
# Make a copy of the template document using the Drive API.
copy_title = 'Merged Document'
body = {
'name': copy_title
}
drive_response = drive_service.files().copy(
fileId=DOCUMENT_ID, body=body).execute()
document_copy_id = drive_response.get('id')
requests = [
# One option for replacing all text is to specify all tab IDs.
{
'replaceAllText': {
'containsText': {
'text': '{{customer-name}}',
'matchCase': 'true'
},
'replaceText': customer_name,
'tabsCriteria': {
'tabIds': [TAB_ID_1, TAB_ID_2, TAB_ID_3],
},
}},
# Another option is to omit TabsCriteria if you are replacing across all tabs.
{
'replaceAllText': {
'containsText': {
'text': '{{date}}',
'matchCase': 'true'
},
'replaceText': str(date),
}
}
]
result = service.documents().batchUpdate(
documentId=document_copy_id, body={'requests': requests}).execute()
```
> [!NOTE]
> **Note:** For documents with multiple tabs, [`ReplaceAllTextRequest`](https://developers.google.com/workspace/docs/api/reference/rest/v1/documents/request#replacealltextrequest) by default applies to all [tabs](https://developers.google.com/workspace/docs/api/how-tos/tabs). For more information on how to work with tabs, see the [request
> documentation](https://developers.google.com/workspace/docs/api/reference/rest/v1/documents/request).
## Handle dynamic lists and tables
A standard document merge uses `ReplaceAllTextRequest` to replace individual
one-off placeholders (like `{{customer-name}}` or
`{{date}}`). However, if your data includes
a dynamic list of items (such as lines in an invoice, a list of ordered
products, or a dynamic table), you can't use standard text replacement because
the number of items is unknown during template design.
To handle dynamic list content, use one of the following strategies.
### Option 1: Append rows to a template table
If your template document already contains a formatted table (for example, with
a header row and a single placeholder row), you can dynamically clone and
populate rows for each item in your list:
1. **Read the template structure:** Use the [`documents.get`](https://developers.google.com/workspace/docs/api/reference/rest/v1/documents/get) method to locate the table and identify the [index](https://developers.google.com/workspace/docs/api/concepts/structure#indexes) of the template row.
2. **Insert new rows:** For each item in your data list (excluding the first item, which can reuse the existing template row), call [`InsertTableRowRequest`](https://developers.google.com/workspace/docs/api/reference/rest/v1/documents/request#InsertTableRowRequest) to insert a new row below the template row.
3. **Populate cell data:** Populate the cells in the template row by replacing its placeholders. For the newly created rows, use [`InsertTextRequest`](https://developers.google.com/workspace/docs/api/reference/rest/v1/documents/request#InsertTextRequest) to insert the respective text into each cell's coordinate location.
For examples of how to insert table rows, see [Work with
tables](https://developers.google.com/workspace/docs/api/how-tos/tables#insert-delete-rows).
### Option 2: Replace a tag with a generated table
If you want to build the table from scratch programmatically:
1. **Place a placeholder tag:** Use a single tag (such as `{{invoice-table}}`) in the template document to mark where the list should go.
2. **Locate the placeholder:** Use a search operation to find the [start index](https://developers.google.com/workspace/docs/api/concepts/structure#indexes) of the tag.
3. **Delete the placeholder:** Use [`DeleteContentRangeRequest`](https://developers.google.com/workspace/docs/api/reference/rest/v1/documents/request#deletecontentrangerequest) to remove the `{{invoice-table}}` text.
4. **Insert the table:** Send an [`InsertTableRequest`](https://developers.google.com/workspace/docs/api/reference/rest/v1/documents/request#InsertTableRequest) at that start index, specifying the number of rows and columns based on your data source.
5. **Write values:** Populate each table cell sequentially.
For examples of inserting tables programmatically, see [Work with
tables](https://developers.google.com/workspace/docs/api/how-tos/tables#insert-delete-tables).
## Related topics
- [Mail merge with Docs API](https://developers.google.com/workspace/docs/api/samples/mail-merge)