Google Play 管理版可讓您為您的企業設計及建立商店版面配置 以更全面、準確的方式回答顧客問題 並與顧客自然流暢地對話您可以將應用程式分組為叢集,藉此自訂商店版面配置 設定商店網頁,並加入快速連結 大多數的網頁
使用者在 Google Play 管理版中發布的所有應用程式 商店必須先經過 IT 管理員核准、獲得使用者核准, 資源控制選項有助於 Kubernetes 提升叢集內整體工作負載的效能(詳情請參閱「將應用程式新增至商店版面配置」一文)。 程序)。
商店版面配置元素
商店版面配置通常包含使用者會看到的一系列頁面 Google Play 管理版。每個網頁可能包含一或多個應用程式群組 ( 分解為叢集每個叢集都包含一或多個應用程式。
叢集可讓您將相關的應用程式分組。舉例來說,您可以建立 內含 Essentials 叢集和取得事物的工作相關應用程式 完成叢集。Essentials 叢集可能包含 Notepad+、 Google 簡報等。「完成任務」叢集可能包含應用程式 例如 OneNote、Wunderlist、Any.do,以及其他追蹤、日曆和 會議規劃應用程式 (請見圖 1)。
建立專頁時,你還可以在頁面頂端新增最多 10 個快速連結 頁面。快速連結可讓使用者跳至其他頁面。例如,圖 1 顯示了 商業、通訊和財務網頁的快速連結。
圖 1 顯示了裝置中顯示的商店版面配置的部分主要元素:
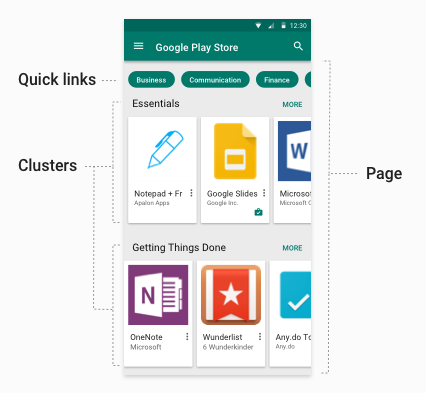
- 快速連結:提供其他網頁的選用連結。快速 連結就會取用他們指向的網頁名稱。
- 頁面:已命名且可垂直捲動的頁面,其中包含應用程式叢集。
- 叢集 (也稱為「集合」):具名且可水平捲動的 應用程式輪轉介面如果網頁含有單一叢集,則會展開成完整頁面 (或 按一下 [更多]才能垂直捲動)。
儲存版面配置元素的限制
為客戶設計及導入商店版面配置時,請遵守 這些限制大多是由優質 UI 設計的原則所造成:
- 每個叢集 100 個應用程式
- 每頁 30 個叢集
- 每頁 10 個快速連結
- 每間商店 100 頁
- 每個企業最多 1,000 項產品 (已核准的應用程式)
本地化頁面和叢集名稱
Google Play 管理版商店版面配置支援商店頁面的本地化名稱 以及儲存叢集建立頁面或叢集時,您必須提供 支援的語言代碼、IETF 語言標記和相關本地化名稱。 如果使用者的語言代碼不在支援清單中,系統會選擇最接近的位置 可用的比對。舉例來說,如果無法取得 en-GB,系統會選擇「en-US」 。如果沒有近似的項目,系統會選擇 在這個範例中就是「花」 以及排在前端的其他字詞
將應用程式新增至商店版面配置
如果「policy.productPolicy」中的應用程式
表示企業使用基本的商店版面配置如果企業使用
商店版面配置,應用程式只會在自訂版面配置和 productPolicy 清單中顯示
顯示在裝置上「policy.productPolicy」中的所有項目都如下
也能在 Play 商店中搜尋
當使用者從 Google Play 管理版商店安裝應用程式 必須與使用者的裝置相容,並符合下列條件:
- 已新增至使用者的許可清單 (使用裝置上的
policy.productPolicy資源),且policy.productAvailabilityPolicy設為WHITELIST, OR 將policy.productAvailabilityPolicy設為ALL(允許搜尋 任何應用程式的安裝和安裝作業)。
使用者可使用 Google Play 管理版內建的搜尋功能尋找並 安裝任何符合這些條件的應用程式。但應用程式只會 顯示在基本的商店版面配置中,或您已在 collection/cluster。
核准的應用程式
管理員可以隨時取消核准應用程式 (撤銷應用程式的核准)。採用以下格式的應用程式: 撤銷的核准仍可新增至叢集和使用者允許清單,但 使用者將不會看見這些應用程式,也無法透過受管理 Google Play 商店。如果撤銷核准的應用程式重新獲得核准,我們就會核准這些應用程式 。
基本商店版面配置
在預設情況下,系統會為您的所有客戶啟用基本商店版面配置。
基本版面配置有 1 個頁面和 1 個叢集,顯示最多 1000 個應用程式。開啟應用程式
網頁會按照 product ID 值排序。如果您要建立
透過設定 storeLayoutType ="custom" 來儲存基本的商店版面配置
已停用。
建立自訂商店版面配置
EMM 可以為每個企業客戶建立自訂商店版面配置。 您可以透過自訂儲存庫版面配置設定應用程式叢集、新增特定叢集 並指定快速連結因為每項元素是由您定義 可將相關應用程式分組 (例如「Essentials」 以及「做事完成」)。使用者只能查看具備權限的應用程式 已接受 IT 管理員核准
Google Play EMM API 參考資料提供了相關資源和 例如您用來建立自訂商店版面配置的相關方法 Storelayoutpages 和 Storelayoutclusters。本節概述的步驟 以下章節將逐一說明基本範例。
程式設計工作
如要為客戶建立自訂的 Google Play 管理版商店版面配置, 必須:
- 建立專頁
- 在頁面中建立一或多個叢集
- 設定首頁
您至少應建立一個頁面,其中須包含一個叢集, 儲存版面配置,且叢集必須包含至少一個應用程式。此外,您還必須設定 例如首頁。如果您建立多個頁面,可以選擇在 這些連結會顯示在每個網頁的頂端。
用於建立自訂 Play 管理版商店版面配置的程式設計工作如下: 然後是商店版面配置的完整範例。
建立專頁
頁面由一或多個叢集組成。每個叢集至少包含一個應用程式。
頁面專為特定企業建立,因此您必須針對
特定的企業執行個體 (enterpriseId)。可以提供容易使用
每個網頁的名稱和本地化資訊,以及 pageId 清單。
方便使用者從網頁存取系統會利用 insert 建立新頁面
作業 (Storelayoutpages.insert),如下所示:
public StorePage createPage(String enterpriseId, String name)
    throws IOException {
  List<LocalizedText> names =
      ImmutableList.of(
          new LocalizedText().setLocale("en").setText(name));
  StorePage storePage = new StorePage();
  storePage.setName(names);
  return androidEnterprise.storelayoutpages()
    .insert(enterpriseId, storePage)
    .execute();
}
建立叢集
叢集包含一組應用程式。叢集會先建立
。如要建立叢集,請叫用insert
Storelayoutclusters 並傳遞以下屬性的值:
- 叢集應包含的
productId清單 (例如productId(Gmail 版本) 為app:com.google.android.gm) - 易記的叢集名稱,例如「Getting Things」 完成
- 應與叢集建立關聯的
enterpriseId pageId(用於包含叢集的頁面)- 網頁上的叢集位置 (第一、第二等等)
範例如下:
private String insertCluster(String enterpriseId, String pageId, String name,
    List<String> productIds, String orderInPage) throws IOException {
  StoreCluster storeCluster = new StoreCluster();
  storeCluster.setName(
      ImmutableList.of(
          new LocalizedText().setLocale("en").setText(name)));
  storeCluster.setProductId(productIds);
  storeCluster.setOrderInPage(orderInPage);
  return androidEnterprise.storelayoutclusters()
    .insert(enterpriseId, pageId, storeCluster)
    .execute()
    .getId();
}
設定首頁
使用者裝置上顯示的 Google Play 管理版第一個頁面是 例如首頁。您可以透過 EMM 為每個客戶定義首頁。 即使頁面空白,系統也會隨時顯示內容,且無法刪除。
在這個範例中,系統會針對指定
enterpriseId:
public StoreLayout getStoreLayout(String enterpriseId) throws IOException {
  return androidEnterprise
    .enterprises()
    .getStoreLayout(enterpriseId)
    .execute();
}
下一個範例會為客戶提供
客戶 enterpriseId 以及該客戶的 pageId
首頁:
public StoreLayout setStoreLayout(String enterpriseId, String homepageId)
    throws IOException {
  StoreLayout storeLayout = new StoreLayout();
  storeLayout.setHomepageId(homepageId);

  return androidEnterprise
    .enterprises()
    .setStoreLayout(enterpriseId, storeLayout)
    .execute();
}
設定快速連結 (選用)
快速連結會顯示在每個網頁頂端,方便使用者瀏覽
顯示在商店的各頁面之間如要使用快速連結,請先取得pageId
網頁 (由 insert 傳回),然後加入頁面連結。舉例來說,如果您在
建立三個頁面,其 pageId 為 p1、p2、p3,就可以新增快速連結
也包含下列內容:
StorePage storePage = new StorePage();
storePage.setName(
    ImmutableList.of(new LocalizedText().setLocale("en").setText(title)));
storePage.setLink(ImmutableList.of("p2", "p3");
return androidEnterprise.storelayoutpages()
  .update(enterpriseId, "p1", storePage)
  .execute();
範例
以下的完整範例會建立基本儲存庫
相互連結的網頁每頁由類似應用程式的叢集組成。每一頁
是指定客戶的 enterpriseId 並設定頁面 name 即可建立
只取得其 pageId,然後用來建立快速連結
頁面。
// Create a basic page and return the pageId.
private String insertPage(String enterpriseId, String title,
    List<String> links) throws IOException {
  List<LocalizedText> names =
      ImmutableList.of(new LocalizedText().setLocale("en").setText(title));
  StorePage page = new StorePage();
  page.setName(names);
  page.setLink(links);
  return enterprise.storelayoutpages().insert(enterpriseId, page).execute().getId();
}

public StoreLayout setStoreLayout(String enterpriseId, String homepageId)
    throws IOException {
  StoreLayout storeLayout = new StoreLayout();
  storeLayout.setHomepageId(homepageId);

  return androidEnterprise
      .enterprises()
      .setStoreLayout(enterpriseId, storeLayout)
      .execute();
}

private String insertCluster(String enterpriseId, String pageId, String name,
    List<String> productIds, String orderInPage) throws IOException {
  StoreCluster cluster = new StoreCluster();
  List<LocalizedText> names =
      ImmutableList.of(new LocalizedText().setLocale("en").setText(name));
  cluster.setName(names);
  cluster.setProductId(productIds);
  cluster.setOrderInPage(orderInPage);
  return androidEnterprise.storelayoutclusters()
      .insert(enterpriseId, pageId, cluster)
      .execute()
      .getId();
}

private void updatePage(String enterpriseId, String pageId, String title,
    List<String> links) throws IOException {
  List<LocalizedText> names =
      ImmutableList.of(new LocalizedText().setLocale("en").setText(title));
  StorePage page = new StorePage();
  page.setName(names);
  page.setLink(links);
  enterprise.storelayoutpages()
      .update(enterpriseId, pageId, page).execute();
}

private void makeStore(String enterpriseId) throws IOException {
  // Create the pages.
  String page1 = insertPage(enterpriseId, "Home");
  String page2 = insertPage(enterpriseId, "Productivity");
  String page3 = insertPage(enterpriseId, "Accounting");

  // Set the homepage (page that displays by default when store is opened).
  setStoreLayout(enterpriseId, page1);

  // Add the links to the pages. This makes a small tree.
  updatePage(enterpriseId, page1, "Home", ImmutableList.of(page2, page3));
  updatePage(enterpriseId, page2, "Productivity", ImmutableList.of(page1));
  updatePage(enterpriseId, page3, "Accounting", ImmutableList.of(page1));

  // Add clusters with contents.
  insertCluster(
      enterpriseId,
      page1,
      "Getting Things Done",
      ImmutableList.of(
          "app:com.mytodolist",
          "app:com.google.android.gm",
          "app:com.google.android.docs"),
      "1");
  insertCluster(
      enterpriseId,
      page1,
      "Strategy",
      ImmutableList.of(
          "app:com.myplanner",
          "app:com.stratego"),
      "2");
  insertCluster(
      enterpriseId,
      page2,
      "Editors",
      ImmutableList.of(
          "app:com.myeditor",
          "app:com.betteredit",
          "app:com.lazyguy"),
      "1");
  insertCluster(
      enterpriseId,
      page2,
      "Time Management",
      ImmutableList.of(
          "app:com.mytimetracker",
          "app:com.lazygal",
          "app:com.lazyguy"),
      "2");
  insertCluster(
      enterpriseId,
      page2,
      "Accounting",
      ImmutableList.of(
          "app:com.mymoney",
          "app:com.taxpro",
          "app:com.balances"),
      "3");
}