
Hướng dẫn này chỉ cho bạn cách thiết lập môi trường để tạo các Hành động bằng cách sử dụng cả SDK Actions (SDK Hành động) và Trình tạo hành động. Bạn sẽ phải thực hiện các tác vụ sau:
- Cài đặt Node.js: Bạn cần có môi trường thời gian chạy này để sử dụng Node.js của chúng tôi thư viện phương thức thực hiện.
- Cài đặt Firebase CLI: Công cụ dòng lệnh này cho phép bạn phát triển và triển khai các phần phụ thuộc của Firebase, chẳng hạn như ứng dụng web cho Canvas tương tác để Lưu trữ Firebase.
- Cài đặt công cụ dòng lệnh g actions:Khi phát triển bằng Actions SDK, bạn sẽ sử dụng công cụ này để tạo, quản lý và triển khai Gói hành động cho Hành động của bạn.
- Tạo dự án Actions: Dự án Actions là vùng chứa logic cho Hành động trò chuyện. Bạn phải tạo một hành động trong Bảng điều khiển Actions trước khi có thể bắt đầu xây dựng.
- Khởi động và triển khai một mẫu: Mẫu đơn giản này cho bạn biết cách để đã bắt đầu tạo Actions hoạt động dựa trên Interactive Canvas.
Sau khi hoàn tất bước bắt đầu nhanh này, bạn có thể đồng bộ hoá dự án Actions của mình giữa môi trường phát triển tại địa phương của bạn và trải nghiệm web của Actions Builder.
Cài đặt Node.js và Firebase CLI
Tải xuống và cài đặt Node.js theo Node.js để sử dụng thư viện phương thức thực hiện của chúng tôi. Bạn cũng có thể cài đặt Node.js cho phép bạn cài đặt Firebase CLI với npm và sau đó, để chạy cục bộ phương thức thực hiện trò chuyện.
Cài đặt và thiết lập Firebase CLI theo tài liệu về Firebase. Firebase CLI cho phép bạn triển khai báo cáo Tương tác Ứng dụng web Canvas sang tính năng Lưu trữ Firebase và nếu cần, hãy triển khai theo cách thủ công phương thức thực hiện cho Cloud Functions cho Firebase.
Cài đặt công cụ dòng lệnh gaction
Cài đặt công cụ giao diện dòng lệnh gHành động (CLI) bằng cách tải một cài đặt gói, giải nén gói đó và định cấu hình đường dẫn thực thi.
Để cài đặt và định cấu hình gHành động, hãy làm theo các bước sau:
Tải gói phù hợp cho hệ điều hành của bạn:
Nền tảng Gói Checksum Windows Tải xuống SHA256 Linux Tải xuống SHA256 Mac OS Tải xuống SHA256 Giải nén gói đó vào vị trí bạn chọn rồi thêm tệp nhị phân vào biến
PATHcủa môi trường. Ngoài ra, hãy trích xuất gói vào một vị trí đã có trong biếnPATH(ví dụ:/usr/local/bin).Trên Linux và Mac, hãy bật quyền thực thi nếu cần:
chmod +x PATH_TO/gactions
Chạy lệnh sau để xác thực CLI. Lệnh này bắt đầu quy trình xác thực và yêu cầu trình duyệt web:
gactions login
Khi luồng hoàn tất, CLI sẽ tự động xác thực.
Tạo và thiết lập dự án
Trước khi có thể sử dụng công cụ dòng lệnh gaction, bạn phải tạo một dự án trong bảng điều khiển Actions và cấp quyền truy cập cho các hành động khác vào dự án. Để tạo và thiết lập cho một dự án, hãy làm như sau:
- Chuyển đến Bảng điều khiển Actions.
- Nhấp vào New project (Dự án mới), nhập tên dự án rồi nhấp vào Create project (Tạo dự án).
- Chọn một danh mục rồi nhấp vào Tiếp theo.
- Chọn Dự án trống rồi nhấp vào Bắt đầu tạo bản dựng.
- Bật Actions API trong bảng điều khiển Google Cloud bằng cách làm theo hướng dẫn sau: các hướng dẫn trong bài viết Bật và tắt API. Thao tác này cho phép các gHành động tương tác với dự án của bạn.
Tải mẫu Hello World
Mẫu tương tác Hello world (Xin chào thế giới) sẽ hướng dẫn bạn cách tạo một Thao tác đơn giản dự án bằng một Hành động được hỗ trợ bởi Interactive Canvas.
Tạo một thư mục trống và khởi chạy mẫu Canvas tương tác trong thư mục đó. Ví dụ: mã sau đây khởi chạy mẫu trong một Thư mục
interactive-canvas-sample/, được dùng làm ví dụ trong tài liệu này:gactions init interactive-canvas --dest interactive-canvas-samplecd interactive-canvas-sampleMở tệp
interactive-canvas-sample/sdk/settings/settings.yamlvà thay đổi giá trị của trườngprojectIdthành mã dự án.
Triển khai và kiểm thử mẫu
Sau khi thiết lập mẫu, bạn có thể triển khai ứng dụng web tương tác Canvas và dự án Actions của bạn. Quá trình này sẽ tạo một phiên bản nháp của Hành động dự án mà bạn có thể triển khai cho Trình mô phỏng hành động để xem trước và thử nghiệm:
Từ thư mục
interactive-canvas-sample/, hãy chạy lệnh sau để triển khai ứng dụng web Canvas tương tác (nội dung củapublic/thư mục).firebase deploy --project PROJECT_ID --only hostingBạn có thể xem phiên bản được hiển thị của ứng dụng web tại URL do Firebase CLI trong trình duyệt:
https://PROJECT_ID.web.app.Mở tệp
interactive-canvas-sample/sdk/webhooks/ActionsOnGoogleFulfillment/index.jsvà thay đổi giá trị của biếnCANVAS_URLthành URL ứng dụng web của dự án.const CANVAS_URL = 'https://PROJECT_ID.web.app';Từ thư mục
interactive-canvas-sample/sdk/, hãy chạy lệnh sau dùng để đẩy phiên bản cục bộ của dự án Actions vào bảng điều khiển dưới dạng phiên bản nháp:gactions pushTừ thư mục
interactive-canvas-sample/sdk/, hãy chạy lệnh sau để kiểm thử dự án Actions trong trình mô phỏng:gactions deploy previewMở đường liên kết mà công cụ dòng lệnh trả về để chuyển đến trình mô phỏng.
Trong trình mô phỏng, hãy nhập "Trò chuyện với mẫu canvas tương tác" để bắt đầu Hành động. Bạn sẽ thấy một hình tam giác đang quay được hỗ trợ bởi ứng dụng web được triển khai lúc
https://PROJECT_ID.web.app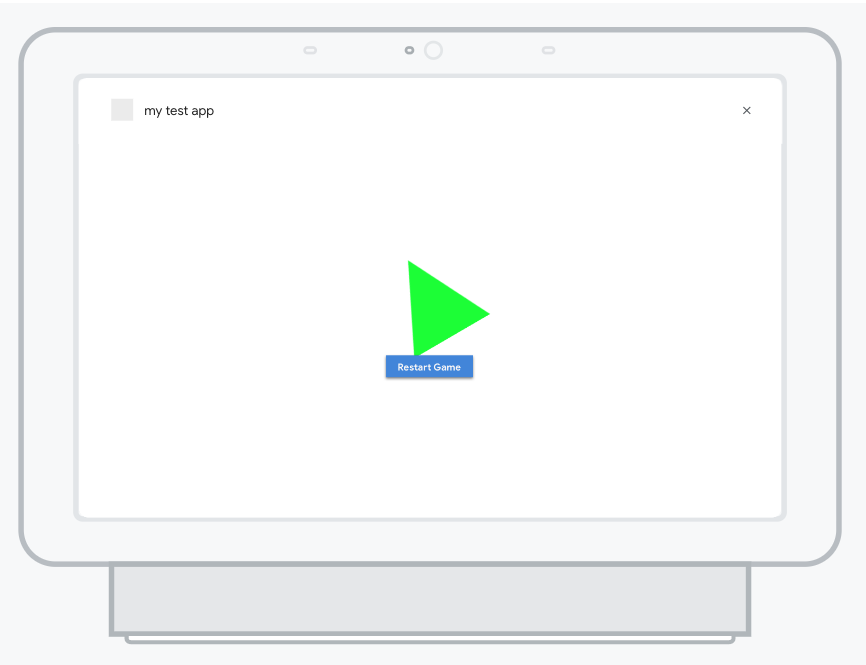
Hình 1. Trình mô phỏng xem trước dự án Actions