
AI-generated Key Takeaways
-
OAuth and Google Sign-In linking type combines Google Sign-In with OAuth for flexible account linking.
-
This linking method starts with Google Sign-In to identify existing users or initiate a standard OAuth flow if the user is not found.
-
You can configure account creation via voice, which creates a new account using Google profile information after validating the ID token, or disallow it and direct users to your website.
-
Account linking with OAuth and Google Sign-In requires configuring your project in the Actions console and implementing an OAuth server to handle authorization and token exchange requests.
-
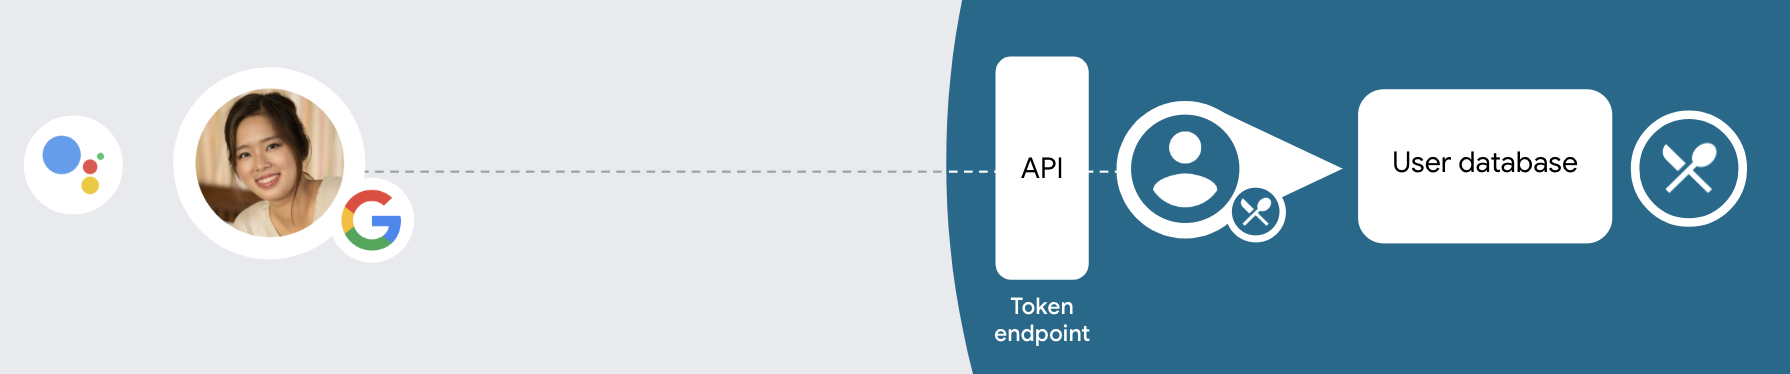
To start the authentication flow, use the Account Sign-in helper intent, and handle data access requests by validating the access token provided in the Assistant request.
The OAuth and Google Sign-In linking type adds Google Sign-In on top of OAuth based account linking. This provides seamless voice-based linking for Google users while also enabling account linking for users who registered to your service with a non-Google identity.
This linking type begins with Google Sign-In, which allows you to check if the user's Google profile information exists in your system. If the user's information isn't found in your system, a standard OAuth flow begins. The user can also choose to create a new account with their Google profile information.
To perform account linking with OAuth and Google Sign-In, follow these general steps:
- First, ask the user to give consent to access their Google profile.
- Use the information in their profile to identify the user.
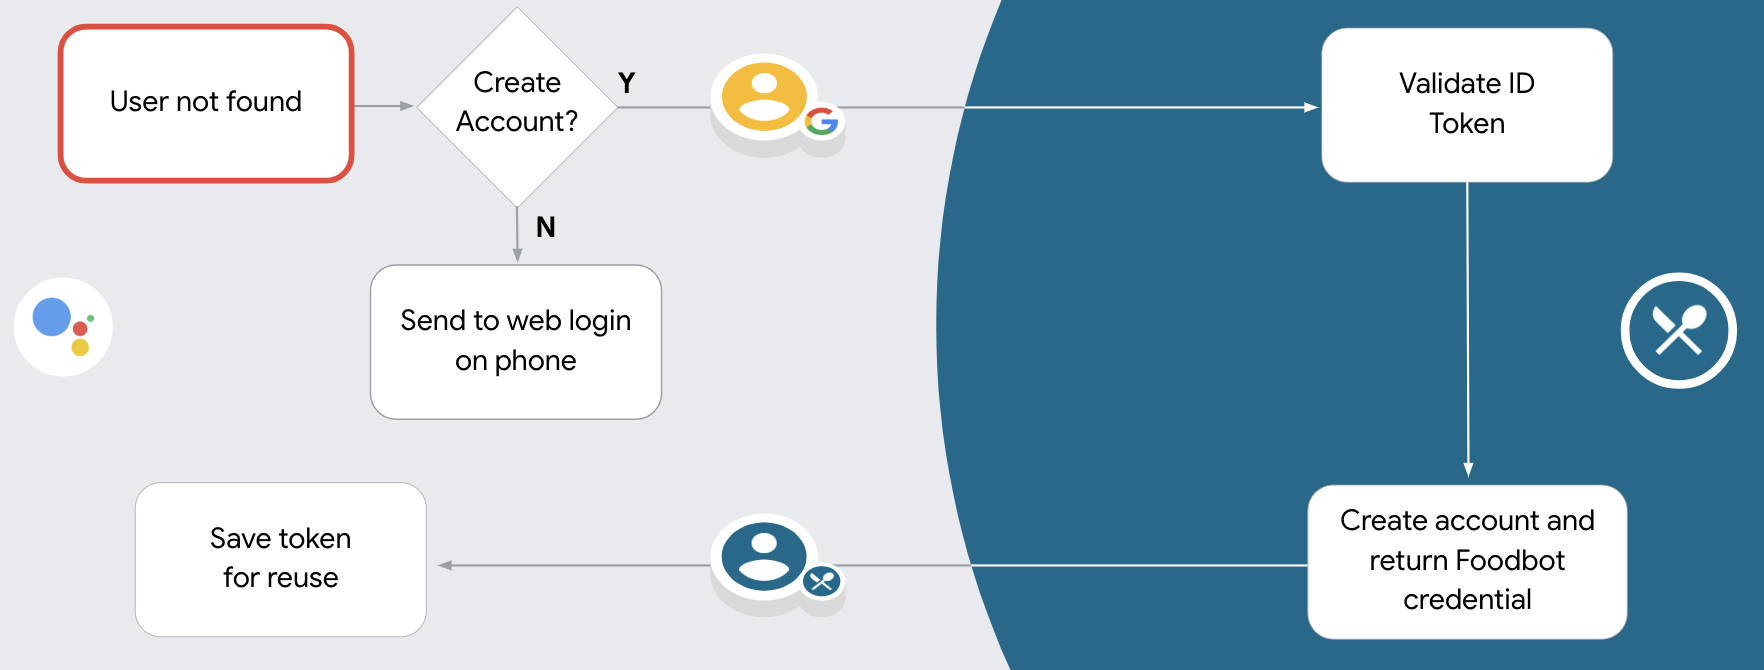
- If you can't find a match for the Google user in your authentication system,
the flow proceeds depending on whether you configured your Actions project
in the Actions console to allow user account creation via voice or only on
your website.
- If you allow account creation via voice, validate the ID token received from Google. You can then create a user based on the profile information contained in the ID token.
- If you don't allow account creation via voice, the user is transferred to a browser where they can load your authorization page and complete the user creation flow.
Support account creation via voice
If you allow user account creation via voice, the Assistant asks the user whether they want to do the following:
- Create a new account on your system using their Google account information, or
- Sign in to your authentication system with a different account if they have an existing non-Google account.
Allowing account creation via voice is recommended if you want to minimize the friction of the account creation flow. The user only needs to leave the voice flow if they want to sign in using an existing non-Google account.
Disallow account creation via voice
If you disallowed user account creation via voice, the Assistant opens the URL to the web site that you provided for user authentication. If the interaction is happening on a device that doesn't have a screen, the Assistant directs the user to a phone to continue the account linking flow.
Disallowing creation is recommended if:
You do not want to allow users that have non-Google accounts to create a new user account and want them to link to their existing user accounts in your authentication system instead. For example, if you offer a loyalty program, you might want to make sure that the user doesn't lose the points accrued on their existing account.
You need to have full control of the account creation flow. For example, you could disallow creation if you need to show your terms of service to the user during account creation.
Implement OAuth and Google Sign-In account linking
Accounts are linked with industry standard OAuth 2.0 flows. Actions on Google supports the implicit and authorization code flows.
In the implicit code flow, Google opens your authorization endpoint in the user's browser. After successful sign in, you return a long-lived access token to Google. This access token is now included in every request sent from the Assistant to your Action.
In the authorization code flow, you need two endpoints:
- The authorization endpoint, which is responsible for presenting the sign-in UI to your users that aren't already signed in and recording consent to the requested access in the form of a short-lived authorization code.
- The token exchange endpoint, which is responsible for two types of exchanges:
- Exchanges an authorization code for a long-lived refresh token and a short-lived access token. This exchange happens when the user goes through the account linking flow.
- Exchanges a long-lived refresh token for a short-lived access token. This exchange happens when Google needs a new access token because the one it had expired.
Although the implicit code flow is simpler to implement, Google recommends that access tokens issued using the implicit flow never expire, because using token expiration with the implicit flow forces the user to link their account again. If you need token expiration for security reasons, you should strongly consider using the auth code flow instead.
Configure the project
To configure your project to use OAuth and Google Sign-In account linking, follow these steps:
- Open the Actions console and select the project you want to use.
- Click on the Develop tab and choose Account linking.
- Enable the switch next to Account linking.
- In the Account creation section, select Yes.
In Linking type, select OAuth & Google Sign In and Implicit.
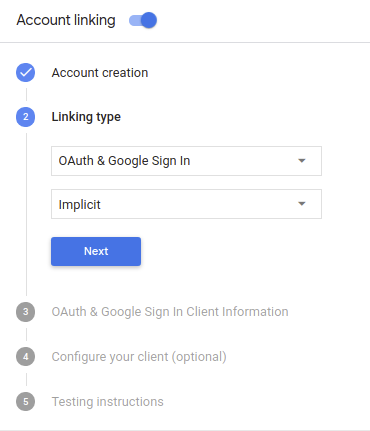
In Client Information, do the following:
- Assign a value to Client ID issued by your Actions to Google to identify requests coming from Google.
- Insert the URLs for your Authorization and Token Exchange endpoints.
Click Save.
Implement your OAuth server
为了支持 OAuth 2.0 隐式流程,您的服务会进行授权 端点。此端点负责 就数据访问征得用户同意。授权端点 向尚未登录的用户显示登录界面,并记录 同意所请求的访问。
当您的 Action 需要调用您的某项授权的 API 时,Google 会使用 此端点来获得用户许可,以在其上调用这些 API 。
由 Google 发起的典型 OAuth 2.0 隐式流会话具有以下特征: 以下流程:
- Google 会在用户的浏览器中打开您的授权端点。通过 如果用户尚未登录,则可以登录,并且授予 Google 访问 通过您的 API 访问其数据(如果尚未授予权限)。
- 您的服务会创建一个访问令牌并将其返回给 通过使用访问令牌将用户的浏览器重定向回 Google, 附件。
- Google 调用您的服务的 API,并使用 。您的服务会验证访问令牌是否向 Google 授予 访问 API 的授权,然后完成 API 调用。
处理授权请求
当您的 Action 需要通过 OAuth2 隐式流程执行账号关联时, Google 会通过包含以下内容的请求将用户发送到您的授权端点: 以下参数:
| 授权端点参数 | |
|---|---|
client_id |
您分配给 Google 的客户 ID。 |
redirect_uri |
此请求的响应发送到的网址。 |
state |
将一个在 重定向 URI。 |
response_type |
要在响应中返回的值的类型。对于 OAuth 2.0 隐式
则响应类型始终为 token。 |
例如,如果您的授权端点可通过 https://myservice.example.com/auth 访问,
请求可能如下所示:
GET https://myservice.example.com/auth?client_id=GOOGLE_CLIENT_ID&redirect_uri=REDIRECT_URI&state=STATE_STRING&response_type=token
为了让授权端点能够处理登录请求,请执行以下步骤:
验证
client_id和redirect_uri值, 防止向意外或配置错误的客户端应用授予访问权限:- 确认
client_id是否与您的客户端 ID 匹配 分配给 Google。 - 确认
redirect_uri指定的网址 参数的格式如下:https://oauth-redirect.googleusercontent.com/r/YOUR_PROJECT_ID
- 确认
检查用户是否已登录您的服务。如果用户未登录 中,完成服务的登录或注册流程。
生成 Google 将用于访问您的 API 的访问令牌。通过 访问令牌可以是任何字符串值,但必须唯一地表示 令牌对应的用户和客户端,且不得被猜到。
发送 HTTP 响应,将用户浏览器重定向到相应网址 由
redirect_uri参数指定。添加所有 以下参数:access_token:您刚刚生成的访问令牌token_type:字符串bearerstate:原始状态的未修改状态值 请求 以下是生成的网址示例:https://oauth-redirect.googleusercontent.com/r/YOUR_PROJECT_ID#access_token=ACCESS_TOKEN&token_type=bearer&state=STATE_STRING
Google 的 OAuth 2.0 重定向处理程序将收到访问令牌并确认
state 值没有更改。在 Google 获得
访问令牌,则 Google 会将该令牌附加到后续调用
作为 AppRequest 的一部分添加到您的 Action。
处理自动关联
在用户同意你的 Action 访问他们的 Google 个人资料后,Google 发送请求,其中包含 Google 用户身份的已签名断言。 该断言包含的信息包括用户的 Google 账号 ID、姓名、 和电子邮件地址。为项目配置的令牌交换端点处理 请求。
如果您的身份验证系统中已经存在相应的 Google 账号,
您的令牌交换端点为用户返回令牌。如果 Google 账号没有
匹配现有用户,您的令牌交换端点会返回 user_not_found 错误。
请求的格式如下:
POST /token HTTP/1.1
Host: oauth2.example.com
Content-Type: application/x-www-form-urlencoded

grant_type=urn:ietf:params:oauth:grant-type:jwt-bearer&intent=get&assertion=JWT&consent_code=CONSENT_CODE&scope=SCOPES
您的令牌交换端点必须能够处理以下参数:
| 令牌端点参数 | |
|---|---|
grant_type |
所交换的令牌的类型。对于这类请求
参数的值为 urn:ietf:params:oauth:grant-type:jwt-bearer。 |
intent |
对于这些请求,此参数的值为 `get`。 |
assertion |
一个 JSON Web 令牌 (JWT),提供 Google 用户身份。JWT 包含的信息包括 账号 ID、名称和电子邮件地址。 |
consent_code |
可选:一个一次性代码(如果存在)用于表明 用户已同意你的 Action 访问指定范围。 |
scope |
可选:您配置 Google 向用户请求的任何范围。 |
当您的令牌交换端点收到关联请求时,它应该 以下:
Validate and decode the JWT assertion
You can validate and decode the JWT assertion by using a JWT-decoding library for your language. Use Google's public keys (available in JWK or PEM format) to verify the token's signature.
When decoded, the JWT assertion looks like the following example:
{
  "sub": 1234567890,        // The unique ID of the user's Google Account
  "iss": "https://accounts.google.com",        // The assertion's issuer
  "aud": "123-abc.apps.googleusercontent.com", // Your server's client ID
  "iat": 233366400,         // Unix timestamp of the assertion's creation time
  "exp": 233370000,         // Unix timestamp of the assertion's expiration time
  "name": "Jan Jansen",
  "given_name": "Jan",
  "family_name": "Jansen",
  "email": "jan@gmail.com", // If present, the user's email address
  "locale": "en_US"
}
In addition to verifying the token's signature, verify that the assertion's issuer
(iss field) is https://accounts.google.com and that the audience (aud field)
is the client ID assigned to your Action.
检查您的身份验证系统中是否已存在该 Google 账号
请检查以下任一条件是否成立:
- Google 账号 ID 可在断言的
sub字段中找到,也可位于您的用户数据库中。 - 断言中的电子邮件地址与用户数据库中的用户匹配。
如果满足上述任一条件,则表明用户已经注册,您可以发出 访问令牌。
如果断言中指定的 Google 账号 ID 和电子邮件地址都没有
与您数据库中的用户匹配,表示该用户尚未注册。在这种情况下,您的
令牌交换端点应回复 HTTP 401 错误,指定 error=user_not_found,
如以下示例中所示:
HTTP/1.1 401 Unauthorized
Content-Type: application/json;charset=UTF-8

{
  "error":"user_not_found",
}
user_not_found 错误的 401 错误响应时,
使用 intent 参数的值调用您的令牌交换端点
设置为 create 并发送包含用户个人资料信息的 ID 令牌
一起发送。
通过 Google 登录功能处理账号创建
当用户需要在您的服务中创建账号时,Google 会
向令牌交换端点发送的请求
intent=create,如以下示例所示:
POST /token HTTP/1.1
Host: oauth2.example.com
Content-Type: application/x-www-form-urlencoded

response_type=token&grant_type=urn:ietf:params:oauth:grant-type:jwt-bearer&scope=SCOPES&intent=create&consent_code=CONSENT_CODE&assertion=JWT[&NEW_ACCOUNT_INFO]
assertion 参数包含 JSON Web 令牌 (JWT),可提供
Google 用户的身份的已签名断言。JWT 包含
其中包含用户的 Google 账号 ID、姓名和电子邮件地址
为您的服务创建一个新账号。
如需响应账号创建请求,您的令牌交换端点必须执行以下操作 以下:
Validate and decode the JWT assertion
You can validate and decode the JWT assertion by using a JWT-decoding library for your language. Use Google's public keys (available in JWK or PEM format) to verify the token's signature.
When decoded, the JWT assertion looks like the following example:
{
  "sub": 1234567890,        // The unique ID of the user's Google Account
  "iss": "https://accounts.google.com",        // The assertion's issuer
  "aud": "123-abc.apps.googleusercontent.com", // Your server's client ID
  "iat": 233366400,         // Unix timestamp of the assertion's creation time
  "exp": 233370000,         // Unix timestamp of the assertion's expiration time
  "name": "Jan Jansen",
  "given_name": "Jan",
  "family_name": "Jansen",
  "email": "jan@gmail.com", // If present, the user's email address
  "locale": "en_US"
}
In addition to verifying the token's signature, verify that the assertion's issuer
(iss field) is https://accounts.google.com and that the audience (aud field)
is the client ID assigned to your Action.
验证用户信息并创建新账号
请检查以下任一条件是否成立:
- Google 账号 ID 可在断言的
sub字段中找到,也可位于您的用户数据库中。 - 断言中的电子邮件地址与用户数据库中的用户匹配。
如果满足上述任一条件,则提示用户将其现有账号关联
通过使用 HTTP 401 错误响应请求
error=linking_error,并将用户的电子邮件地址为 login_hint,如
示例:
HTTP/1.1 401 Unauthorized
Content-Type: application/json;charset=UTF-8

{
  "error":"linking_error",
  "login_hint":"foo@bar.com"
}
如果以上两个条件都不满足,请使用相应信息创建一个新的用户账号 。新账号通常不会设置密码。时间是 建议您将 Google 登录功能添加到其他平台,以便用户能够 在您的应用的各个界面上通过 Google 投放广告。或者,您也可以 通过电子邮件向用户发送链接,启动密码恢复流程,以便用户设置 密码,以便在其他平台上登录。
创建完成后,发出一个访问令牌 并在 HTTPS 响应的正文,如以下示例所示:
{
  "token_type": "Bearer",
  "access_token": "ACCESS_TOKEN",

  "expires_in": SECONDS_TO_EXPIRATION
}
Start the authentication flow
Use the Account Sign-in helper intent to start the authentication flow.
const app = dialogflow({
  // REPLACE THE PLACEHOLDER WITH THE CLIENT_ID OF YOUR ACTIONS PROJECT
  clientId: CLIENT_ID,
})

// Intent that starts the account linking flow.
app.intent('Start Signin', conv => {
  conv.ask(new SignIn('To get your account details'))
})
private String clientId = "<your_client_id>";

@ForIntent("Start Signin")
public ActionResponse text(ActionRequest request) {
  ResponseBuilder rb = getResponseBuilder(request);
  return rb.add(new SignIn().setContext("To get your account details")).build();
}
const app = actionssdk({
  clientId: CLIENT_ID,
})

app.intent('Start Signin', conv => {
  conv.ask(new SignIn('To get your account details'))
})
private String clientId = "<your_client_id>";

@ForIntent("actions.intent.TEXT")
public ActionResponse text(ActionRequest request) {
  ResponseBuilder rb = getResponseBuilder(request);
  return rb.add(new SignIn().setContext("To get your account details")).build();
}
Handle data access requests
If the Assistant request contains an access token, check first that the access token is valid and not expired and then retrieve from your user account database the user account associated with the token.