
OAuth 关联类型支持两种业界标准 OAuth 2.0 流程,即隐式 和授权代码流程。
在隐式代码流程中,Google 会在用户浏览器中打开您的授权端点。成功登录后,系统会向 Google 返回长期访问令牌。现在,从 Google 助理向你的 Action 发送的每个请求中都包含此访问令牌。
在授权代码流程中,您需要两个端点:
- 授权端点,该端点负责向尚未登录的用户显示登录界面,并以短期授权代码的形式记录所请求的访问。
- 令牌交换端点,负责两种类型的交换:
- 将授权代码交换为长期刷新令牌和短期访问令牌。用户完成帐号关联流程后,系统会进行这种交换。
- 将长期刷新令牌换成短期访问令牌。Google 需要新访问令牌时,由于此令牌已过期,因此会进行此交换。
虽然隐式代码流程的实现更简单,但 Google 建议通过隐式流程发出的访问令牌永远不会过期,因为将令牌过期与隐式流程一起使用会强制用户再次关联其帐号。如果出于安全考虑需要令牌到期,强烈建议您考虑使用身份验证代码流程。
实现 OAuth 账号关联
配置项目
要将您的项目配置为使用 OAuth 账号关联,请按以下步骤操作:
- 打开 Actions 控制台,然后选择您要使用的项目。
- 点击开发标签页,然后选择账号关联。
- 启用账号关联旁边的开关。
- 在创建账号部分,选择不,我只想允许在我的网站中创建账号。
在关联类型中,选择 OAuth 和隐式。
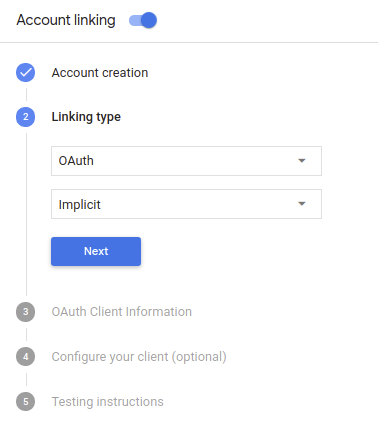
在客户信息中:
- 为 Actions to Google 颁发的客户端 ID 指定一个值,以标识 来自 Google 的请求
- 插入授权端点和令牌交换端点的网址。
- 点击保存。
实现 OAuth 服务器
为了支持 OAuth 2.0 隐式流程,您的服务会进行授权 端点。此端点负责 就数据访问征得用户同意。授权端点 向尚未登录的用户显示登录界面,并记录 同意所请求的访问。
当您的 Action 需要调用您的某项授权的 API 时,Google 会使用 此端点来获得用户许可,以在其上调用这些 API 。
由 Google 发起的典型 OAuth 2.0 隐式流会话具有以下特征: 以下流程:
- Google 会在用户的浏览器中打开您的授权端点。通过 如果用户尚未登录,则可以登录,并且授予 Google 访问 通过您的 API 访问其数据(如果尚未授予权限)。
- 您的服务会创建一个访问令牌并将其返回给 通过使用访问令牌将用户的浏览器重定向回 Google, 附件。
- Google 调用您的服务的 API,并使用 。您的服务会验证访问令牌是否向 Google 授予 访问 API 的授权,然后完成 API 调用。
处理授权请求
当您的 Action 需要通过 OAuth2 隐式流程执行账号关联时, Google 会通过包含以下内容的请求将用户发送到您的授权端点: 以下参数:
| 授权端点参数 | |
|---|---|
client_id |
您分配给 Google 的客户 ID。 |
redirect_uri |
此请求的响应发送到的网址。 |
state |
将一个在 重定向 URI。 |
response_type |
要在响应中返回的值的类型。对于 OAuth 2.0 隐式
则响应类型始终为 token。 |
例如,如果您的授权端点可通过 https://myservice.example.com/auth 访问,
请求可能如下所示:
GET https://myservice.example.com/auth?client_id=GOOGLE_CLIENT_ID&redirect_uri=REDIRECT_URI&state=STATE_STRING&response_type=token
为了让授权端点能够处理登录请求,请执行以下步骤:
验证
client_id和redirect_uri值, 防止向意外或配置错误的客户端应用授予访问权限:- 确认
client_id是否与您的客户端 ID 匹配 分配给 Google。 - 确认
redirect_uri指定的网址 参数的格式如下:https://oauth-redirect.googleusercontent.com/r/YOUR_PROJECT_ID
- 确认
检查用户是否已登录您的服务。如果用户未登录 中,完成服务的登录或注册流程。
生成 Google 将用于访问您的 API 的访问令牌。通过 访问令牌可以是任何字符串值,但必须唯一地表示 令牌对应的用户和客户端,且不得被猜到。
发送 HTTP 响应,将用户浏览器重定向到相应网址 由
redirect_uri参数指定。添加所有 以下参数:access_token:您刚刚生成的访问令牌token_type:字符串bearerstate:原始状态的未修改状态值 请求 以下是生成的网址示例:https://oauth-redirect.googleusercontent.com/r/YOUR_PROJECT_ID#access_token=ACCESS_TOKEN&token_type=bearer&state=STATE_STRING
Google 的 OAuth 2.0 重定向处理程序将收到访问令牌并确认
state 值没有更改。在 Google 获得
访问令牌,则 Google 会将该令牌附加到后续调用
作为 AppRequest 的一部分添加到您的 Action。
启动身份验证流程
使用账号登录帮助程序 intent 启动身份验证流程。以下代码段说明了如何 在 Dialogflow 和 Actions SDK 中发送响应以使用此帮助程序。
Dialogflow:
<ph type="x-smartling-placeholder">const {dialogflow, SignIn} = require('actions-on-google'); const app = dialogflow({ // REPLACE THE PLACEHOLDER WITH THE CLIENT_ID OF YOUR ACTIONS PROJECT clientId: CLIENT_ID, }); // Intent that starts the account linking flow. app.intent('Start Signin', (conv) => { conv.ask(new SignIn('To get your account details')); });
@ForIntent("Start Signin")
public ActionResponse text(ActionRequest request) {
  ResponseBuilder rb = getResponseBuilder(request);
  return rb.add(new SignIn().setContext("To get your account details")).build();
}
{
  "payload": {
    "google": {
      "expectUserResponse": true,
      "richResponse": {
        "items": [
          {
            "simpleResponse": {
              "textToSpeech": "PLACEHOLDER"
            }
          }
        ]
      },
      "userStorage": "{\"data\":{}}",
      "systemIntent": {
        "intent": "actions.intent.SIGN_IN",
        "data": {
          "@type": "type.googleapis.com/google.actions.v2.SignInValueSpec",
          "optContext": "To get your account details"
        }
      }
    }
  },
  "outputContexts": [
    {
      "name": "/contexts/_actions_on_google",
      "lifespanCount": 99,
      "parameters": {
        "data": "{}"
      }
    }
  ]
}
Actions SDK:
<ph type="x-smartling-placeholder">const {actionssdk, SignIn} = require('actions-on-google'); const app = actionssdk({ // REPLACE THE PLACEHOLDER WITH THE CLIENT_ID OF YOUR ACTIONS PROJECT clientId: CLIENT_ID, }); // Intent that starts the account linking flow. app.intent('actions.intent.TEXT', (conv) => { conv.ask(new SignIn('To get your account details')); });
@ForIntent("actions.intent.TEXT")
public ActionResponse text(ActionRequest request) {
  ResponseBuilder rb = getResponseBuilder(request);
  return rb.add(new SignIn().setContext("To get your account details")).build();
}
{
  "expectUserResponse": true,
  "expectedInputs": [
    {
      "inputPrompt": {
        "richInitialPrompt": {
          "items": [
            {
              "simpleResponse": {
                "textToSpeech": "PLACEHOLDER"
              }
            }
          ]
        }
      },
      "possibleIntents": [
        {
          "intent": "actions.intent.SIGN_IN",
          "inputValueData": {
            "@type": "type.googleapis.com/google.actions.v2.SignInValueSpec",
            "optContext": "To get your account details"
          }
        }
      ]
    }
  ],
  "conversationToken": "{\"data\":{}}",
  "userStorage": "{\"data\":{}}"
}
处理数据访问请求
如果 Google 助理请求包含访问令牌, 首先检查访问令牌是否有效(且未过期),然后从数据库中检索关联的用户账号。