對話動作已於 2023 年 6 月 13 日淘汰。詳情請參閱「
對話動作已淘汰」。
推播通知
透過集合功能整理內容
你可以依據偏好儲存及分類內容。
您的動作可適時向使用者推送通知,例如在接近工作的到期日時傳送提醒。
本指南說明如何設定動作的推播通知。
支援的平台
推播通知支援 Android 和 iOS 裝置 (iOS 裝置必須安裝 Google 助理應用程式才能接收推播通知)。聲控音箱、智慧螢幕或其他介面目前不支援這些功能。
必要條件
專案必須包含至少一個全域意圖,當使用者輕觸收到 Google 助理的推播通知時就會叫用此意圖。
開始使用
以下各節將說明如何在動作中設定推播通知。
建立觸發條件
您在本節中建立的意圖會觸發通知流程。如要建立
操作步驟如下:
- 前往 Actions 主控台,然後按一下頂端選單中的「Develop」(開發)。
- 在左側選單中按一下「Intents」(意圖) 展開該部分。
- 按一下清單底部的 add_circle_outline,然後輸入新意圖的名稱。
- 按下
Enter/Return
即可建立新意圖。
新增觸發通知流程的訓練詞組。例如:
Notify me
Send notifications
Subscribe to notifications
按一下 [儲存]。

轉換至系統意圖
如要設定轉換至 Notifications
系統場景,請按照下列步驟操作:
- 在左選單的「Scenes」下方,點選要新增通知訂閱流程的場景。
- 在情境的「User intent handle」(使用者意圖處理) 部分下方,按一下 +,新增意圖處理常式。
- 在「Intent」(意圖) 底下,選取您在上一節建立的意圖。
在「轉換」下方,選取「通知」系統場景。
按一下 [儲存]。

如要設定 Notifications
系統場景,請按照下列步驟操作:
- 在左側選單中,選取「Scenes」下方的「通知」系統場景。
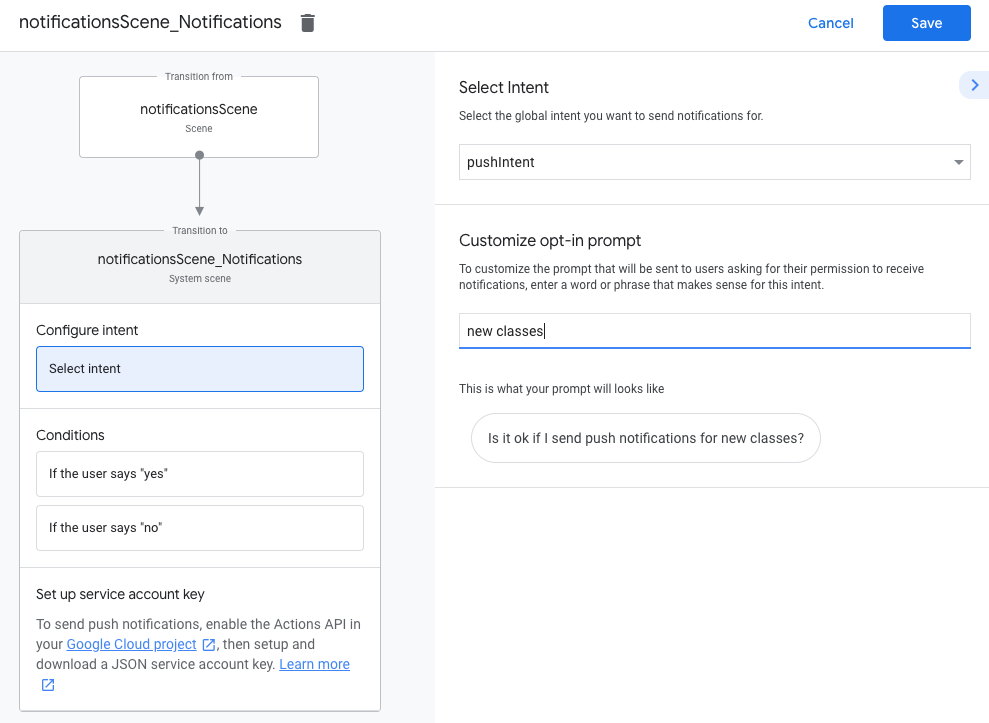
- 在「Configure intent」區段下方,按一下 [Select intent] (選取意圖)。
在「選取意圖」區段下方,選取要在使用者輕觸推播通知時比對的意圖。
在「自訂訂閱提示」部分,輸入要在使用者訂閱推播通知時顯示的提示。提示形式為「如果我傳送 $prompt 的推播通知,請問可以嗎?」
按一下 [儲存]。
如要設定選擇接收推播通知,請按照下列步驟操作:
- 在「情境」下方,選取「通知」系統場景。
- 在「條件」下方選取「如果使用者說出「是」」。
- 啟用「Call your Webhook」,並提供事件處理常式名稱,例如
subscribe_to_notifications
。
啟用「傳送提示」並提供簡單的提示,讓使用者知道系統將傳送通知:
candidates:
- first simple:
variants:
- speech: 'Great, I'll send you notifications.'
選取「轉換」下方的「結束對話」,即可在使用者訂閱通知後結束對話。

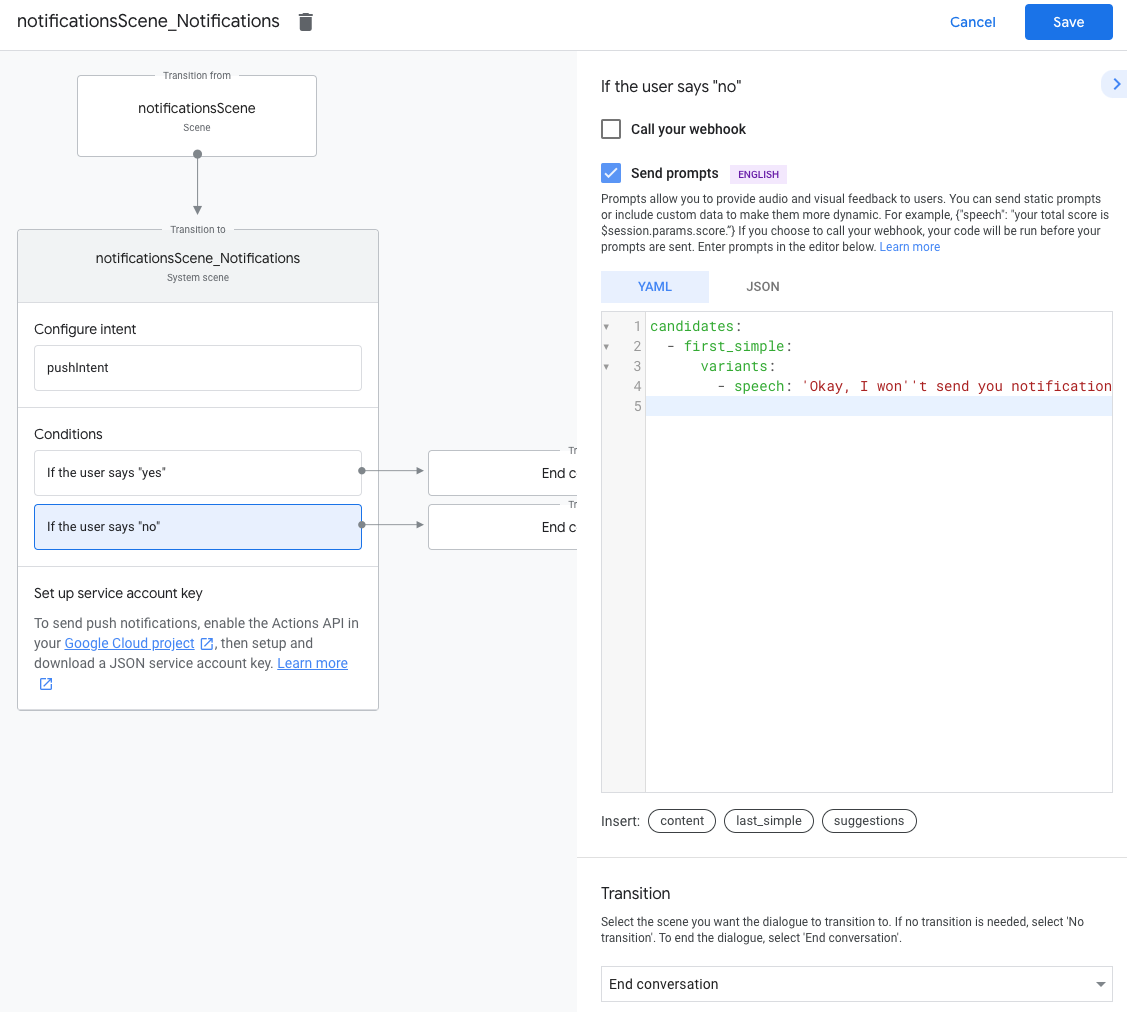
如要設定選擇停用推播通知,請按照下列步驟操作:
- 在「條件」下方,選取「如果使用者說出「否」。
啟用「傳送提示」並提供簡單的提示,讓使用者瞭解系統不會傳送通知:
candidates:
- first simple:
variants:
- speech: Okay, I won't send you notifications.
選取「轉換」下方的「結束對話」,在使用者選擇停止通知後結束對話。

如要設定 Webhook,請按照下列步驟操作:
在 Webhook 中,新增用來儲存 updatesUserId
的意圖處理常式:
app.handle('subscribe_to_notifications', conv => {
const intentName = '<name_of_intent_to_trigger>';
const notificationsSlot = conv.session.params['NotificationSlot_${intentName}'];
if(notificationsSlot.permissionStatus == 'PERMISSION_GRANTED') {
const updateUserId = notificationsSlot.additionalUserData.updateUserId;
// Store the user ID and the notification's target intent for later use.
// (Use a database, like Firestore, for best practice.)
}
});
傳送通知
推播通知會透過 Actions API 傳送給使用者。如要使用這個 API,您必須在 Google Cloud 專案中啟用 API,並設定並下載 JSON 服務帳戶金鑰。
接著,您可以使用 Google OAuth2 用戶端程式庫交換服務帳戶金鑰來取得存取權杖,並使用該權杖驗證對 Actions API 的要求。
取得服務帳戶金鑰
- 前往 Google API 控制台,然後從「選取專案」下拉式選單中選取您的專案。
- 按一下「啟用」,為專案啟用 Actions API。
- 前往 Google Cloud 控制台憑證頁面,然後從「選取專案」下拉式選單中選取您的專案。
- 按一下「Create credentials」(建立憑證) >服務帳戶。
- 輸入服務帳戶名稱,然後點選「建立」。
- 在「請選擇角色」下拉式選單中,依序選取「專案」>擁有者。
- 按一下「繼續」。
- 按一下「建立金鑰」,下載服務帳戶 JSON 檔案。
交換存取權杖的金鑰並傳送通知
如要透過 Actions API 傳送推播通知,您必須交換服務帳戶金鑰來取得存取權杖。為此,建議您使用 Google API 用戶端程式庫。在接下來的一系列程式碼片段中,我們使用 Google API Node.js 用戶端程式庫。
安裝 Google API 用戶端程式庫並要求:
npm install googleapis request --save
請使用以下程式碼,從服務帳戶金鑰取得存取權杖並傳送推播通知:
// Use the Actions API to send a Google Assistant push notification.
let client = auth.fromJSON(require('./service-account.json'));
client.scopes = ['https://www.googleapis.com/auth/actions.fulfillment.conversation'];
let notification = {
userNotification: {
title: 'Example notification title',
},
target: {
userId: '<UPDATES_USER_ID>',
intent: 'Notifications Intent',
},
};
client.authorize((err, tokens) => {
if (err) {
throw new Error('Auth error: ${err}');
}
request.post('https://actions.googleapis.com/v2/conversations:send', {
'auth': {
'bearer': tokens.access_token,
},
'json': true,
'body': {'customPushMessage': notification, 'isInSandbox': true},
}, (err, httpResponse, body) => {
if (err) {
throw new Error('API request error: ${err}');
}
console.log('${httpResponse.statusCode}: ' + '${httpResponse.statusMessage}');
console.log(JSON.stringify(body));
});
});
除非另有註明,否則本頁面中的內容是採用創用 CC 姓名標示 4.0 授權,程式碼範例則為阿帕契 2.0 授權。詳情請參閱《Google Developers 網站政策》。Java 是 Oracle 和/或其關聯企業的註冊商標。
上次更新時間:2025-07-25 (世界標準時間)。
[null,null,["上次更新時間:2025-07-25 (世界標準時間)。"],[[["\u003cp\u003ePush notifications can be sent to Android and iOS users to provide timely reminders or updates from your Action.\u003c/p\u003e\n"],["\u003cp\u003eYou need to create a global intent that will be triggered when the user interacts with the notification.\u003c/p\u003e\n"],["\u003cp\u003eUsers must explicitly opt-in to receive push notifications through a prompt within your Action.\u003c/p\u003e\n"],["\u003cp\u003eSending notifications requires using the Actions API with a service account key for authentication.\u003c/p\u003e\n"],["\u003cp\u003eStore the \u003ccode\u003eupdatesUserId\u003c/code\u003e securely to target specific users with notifications.\u003c/p\u003e\n"]]],[],null,["# Push notifications\n\nYour Action can push notifications to users whenever relevant, such as sending a reminder when the due date for a task is near.\n\nThis guide describes how to set up push notifications for your Action.\n\nSupported surfaces\n------------------\n\nPush notifications are available on Android and iOS devices (iOS devices must have the Assistant app installed to receive push notifications). They are not currently supported on voice-activated speakers, smart displays, or other surfaces.\n\nPrerequisites\n-------------\n\nYour project must contain at least one [global intent](/assistant/conversational/intents#custom_intents), which is invoked when the user taps a push notification received from Assistant.\n\nGet started\n-----------\n\nThe following sections describe how to set up push notifications in your Action.\n\n### Create an intent for triggering\n\nThe intent you create in this section triggers the notifications flow. To create\nthis intent, follow these steps:\n\n1. Go to the [Actions console](//console.actions.google.com/) and click **Develop** in the top menu.\n2. Click **Intents** in the left menu to expand the section.\n3. Click the add_circle_outline at the bottom of the list and enter a name for the new intent.\n4. Press `Enter/Return` to create the new intent.\n5. Add training phrases for triggering the notifications flow. Some examples are:\n\n - `Notify me`\n - `Send notifications`\n - `Subscribe to notifications`\n6. Click **Save**.\n\n### Transition to system intent\n\nTo set up the transition to the `Notifications` system scene, follow these steps:\n\n1. Under **Scenes** in the left menu, click the scene you want to add the notifications subscription flow to.\n2. Under the **User intent handling** section of the scene, click **+** to add a new intent handler.\n3. Under **Intent**, select the intent you created in the previous section.\n4. Under **Transition** , select the **Notifications** system scene.\n\n5. Click **Save**.\n\n### Configure system scene\n\nTo configures the `Notifications` system scene, follow these steps:\n\n1. Under **Scenes** in the left menu, select the new **Notifications** system scene.\n2. Under the **Configure intent** section, click **Select intent**.\n3. Under the **Select intent** section, select the intent you want to be matched when a user taps a push notification.\n\n | **Note:** The intent you choose for this step needs to be a global intent.\n4. For **Customize opt-in prompt**, enter a prompt that is displayed to users when they're asked to subscribe to push notifications. The prompt is in the form of \"Is it ok if I send push notifications for $prompt\".\n\n5. Click **Save**.\n\n### Configure opt-in\n\nTo configure opting in to push notifications, follow these steps:\n\n1. Under **Scenes** , select the **Notifications** system scene.\n2. Under **Conditions** , select **If the user says \"yes\"**.\n3. Enable **Call your webhook** and provide an event handler name, such as `subscribe_to_notifications`.\n4. Enable **Send prompts** and provide a simple prompt to let the user know they'll be sent notifications:\n\n candidates:\n - first simple:\n variants:\n - speech: 'Great, I'll send you notifications.'\n\n5. Under **Transition** , select **End conversation** to end the conversation after a user subscribes to notifications.\n\n### Configure opt-out\n\nTo configure opting out of push notifications, follow these steps:\n\n1. Under **Conditions** , select **If the user says \"no\"**.\n2. Enable **Send prompts** and provide a simple prompt to let the user know they won't be sent notifications:\n\n candidates:\n - first simple:\n variants:\n - speech: Okay, I won't send you notifications.\n\n3. Under **Transition** , select **End conversation** to end the conversation after a user opts out of notifications.\n\n### Configure webhook\n\nTo configure your webhook, follow these steps:\n\n1. In your webhook, add an intent handler for storing the `updatesUserId`:\n\n app.handle('subscribe_to_notifications', conv =\u003e {\n const intentName = '\u003cname_of_intent_to_trigger\u003e';\n const notificationsSlot = conv.session.params['NotificationSlot_${intentName}'];\n if(notificationsSlot.permissionStatus == 'PERMISSION_GRANTED') {\n const updateUserId = notificationsSlot.additionalUserData.updateUserId;\n // Store the user ID and the notification's target intent for later use.\n // (Use a database, like Firestore, for best practice.)\n }\n });\n\nSend notifications\n------------------\n\nPush notifications are sent to users using the Actions API. To use this API, you need to activate the API in your Google Cloud project and set up and download a JSON service account key.\n\nYou can then use the Google OAuth2 client library to exchange the service account key for an access token and use the token to authenticate your requests to the Actions API.\n\n### Get a service account key\n\n1. Go to the [Google API console](//console.developers.google.com/apis/api/actions.googleapis.com/overview) and select your project from the **Select a project** dropdown.\n2. Click **Enable** to enable the Actions API for your project.\n3. Go to the [Google Cloud console credentials page](//console.developers.google.com/apis/credentials) and select your project from the **Select a project** dropdown.\n4. Click **Create credentials \\\u003e Service account**.\n5. Enter a service account name and click **Create**.\n6. From the **Select a role** dropdown, select **Project \\\u003e Owner**.\n7. Click **Continue**.\n8. Click **Create key** to download the service account JSON file.\n\n### Exchange the key for an access token and send a notification\n\nTo send push notifications through the Actions API, you need to exchange the service account key for an access token. We recommend using a Google API client library for this. In the series of code snippets that follow, we use the Google API Node.js client library.\n\n1. Install the Google API client library and request:\n\n `npm install googleapis request --save`\n2. Use the following code to get an access token from the service account key and send a push notification:\n\n // Use the Actions API to send a Google Assistant push notification.\n let client = auth.fromJSON(require('./service-account.json'));\n client.scopes = ['https://www.googleapis.com/auth/actions.fulfillment.conversation'];\n let notification = {\n userNotification: {\n title: 'Example notification title',\n },\n target: {\n userId: '\u003cUPDATES_USER_ID\u003e',\n intent: 'Notifications Intent',\n },\n };\n client.authorize((err, tokens) =\u003e {\n if (err) {\n throw new Error('Auth error: ${err}');\n }\n request.post('https://actions.googleapis.com/v2/conversations:send', {\n 'auth': {\n 'bearer': tokens.access_token,\n },\n 'json': true,\n 'body': {'customPushMessage': notification, 'isInSandbox': true},\n }, (err, httpResponse, body) =\u003e {\n if (err) {\n throw new Error('API request error: ${err}');\n }\n console.log('${httpResponse.statusCode}: ' + '${httpResponse.statusMessage}');\n console.log(JSON.stringify(body));\n });\n });"]]