1. Обзор

В этом практическом занятии вы узнаете, как модифицировать существующее приложение для просмотра видео на Android, чтобы оно транслировало контент на устройство с поддержкой Google Cast .
Что такое Google Cast?
Google Cast позволяет пользователям транслировать контент с мобильного устройства на телевизор. Затем пользователи могут использовать свое мобильное устройство в качестве пульта дистанционного управления для воспроизведения мультимедиа на телевизоре.
SDK Google Cast позволяет расширить функциональность вашего приложения для управления телевизором или звуковой системой. SDK Cast позволяет добавлять необходимые компоненты пользовательского интерфейса в соответствии с контрольным списком дизайна Google Cast .
Контрольный список по дизайну Google Cast предназначен для того, чтобы сделать взаимодействие с Cast простым и предсказуемым на всех поддерживаемых платформах.
Что мы будем строить?
После завершения этого практического занятия у вас будет приложение для Android, позволяющее транслировать видео на устройство с поддержкой Google Cast.
Что вы узнаете
- Как добавить SDK Google Cast в пример видеоприложения.
- Как добавить кнопку Cast для выбора устройства Google Cast.
- Как подключиться к устройству Cast и запустить медиаплеер.
- Как организовать кастинг видео.
- Как добавить контроллер Cast mini в ваше приложение.
- Как обеспечить поддержку уведомлений о воспроизведении мультимедиа и элементов управления на экране блокировки.
- Как добавить расширенный контроллер.
- Как создать вступительный текст.
- Как настроить виджеты Cast.
- Как интегрировать Cast Connect
Что вам понадобится
- Последняя версия Android SDK .
- Android Studio версии 3.2+
- Одно мобильное устройство с операционной системой Android 4.1+ Jelly Bean (уровень API 16).
- USB-кабель для передачи данных, позволяющий подключить мобильное устройство к компьютеру для разработки.
- Устройство Google Cast, такое как Chromecast или Android TV, с подключением к интернету.
- Телевизор или монитор с HDMI-входом.
- Для тестирования интеграции Cast Connect требуется Chromecast с Google TV, но для остальных заданий Codelab он необязателен. Если у вас его нет, можете пропустить шаг добавления поддержки Cast Connect в конце этого руководства.
Опыт
- Вам потребуются предварительные знания Kotlin и разработки под Android.
- Вам также понадобятся предварительные знания о просмотре телевизора :)
Как вы будете использовать этот учебный материал?
Как бы вы оценили свой опыт разработки приложений для Android?
Как бы вы оценили свой опыт просмотра телевизора?
2. Получите пример кода.
Вы можете загрузить весь примерный код на свой компьютер...
и распакуйте загруженный zip-файл.
3. Запустите демонстрационное приложение.

Для начала давайте посмотрим, как выглядит готовый пример приложения. Это простой видеоплеер. Пользователь может выбрать видео из списка, а затем воспроизвести его локально на устройстве или транслировать на устройство Google Cast.
После загрузки кода, следующие инструкции описывают, как открыть и запустить готовое демонстрационное приложение в Android Studio :
Выберите пункт «Импорт проекта» на экране приветствия или выберите пункт меню «Файл» > «Создать» > «Импорт проекта...» .
Выберите  Перейдите в папку с примерами кода и запустите команду
 app-done , затем нажмите `OK`.
Нажмите Файл >  Синхронизация проекта с файлами Gradle .
Включите отладку по USB на вашем устройстве Android — в Android 4.2 и выше экран «Параметры разработчика» по умолчанию скрыт. Чтобы сделать его видимым, перейдите в «Настройки» > «О телефоне» и семь раз нажмите на номер сборки . Вернитесь на предыдущий экран, перейдите в «Система» > «Дополнительно» и нажмите «Параметры разработчика» внизу, затем нажмите «Отладка по USB» , чтобы включить её.
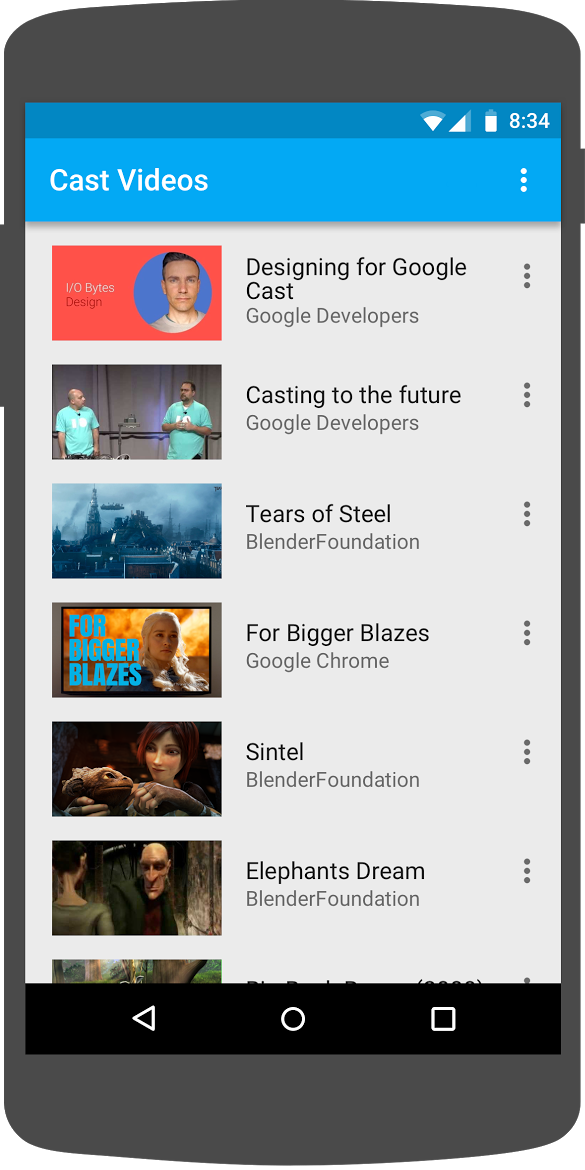
Подключите ваше устройство Android и нажмите  В Android Studio должна появиться кнопка «Запустить» . Через несколько секунд должно появиться видеоприложение под названием Cast Videos .
Нажмите кнопку «Трансляция» в приложении для просмотра видео и выберите устройство Google Cast.
Выберите видео и нажмите кнопку воспроизведения.
Видео начнет воспроизводиться на вашем устройстве Google Cast.
На экране отобразится расширенное меню управления. Для управления воспроизведением можно использовать кнопку воспроизведения/паузы.
Вернитесь к списку видеороликов.
В нижней части экрана теперь виден мини-контроллер. 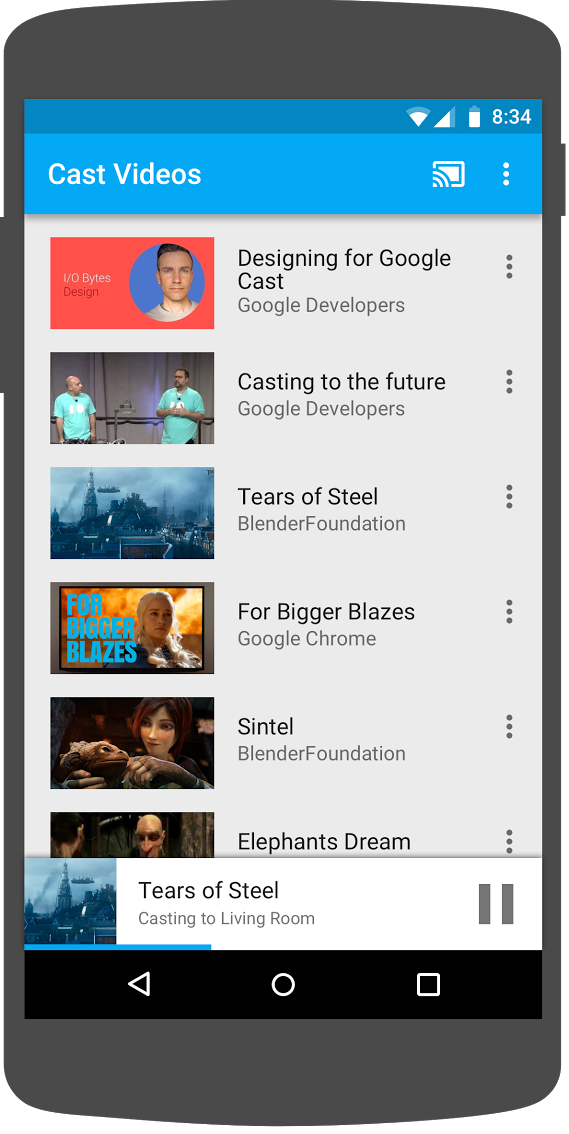
Нажмите кнопку паузы на мини-контроллере, чтобы приостановить воспроизведение видео на ресивере. Нажмите кнопку воспроизведения на мини-контроллере, чтобы возобновить воспроизведение видео.
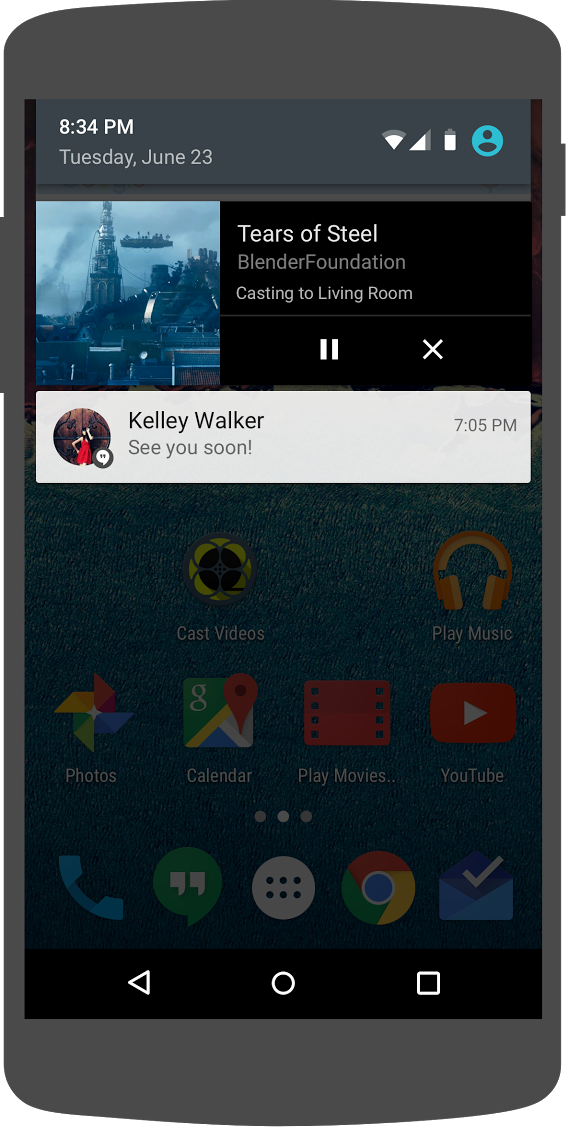
Нажмите кнопку «Домой» на мобильном устройстве. Прокрутите вниз до раздела «Уведомления», и вы увидите уведомление о сеансе Cast.
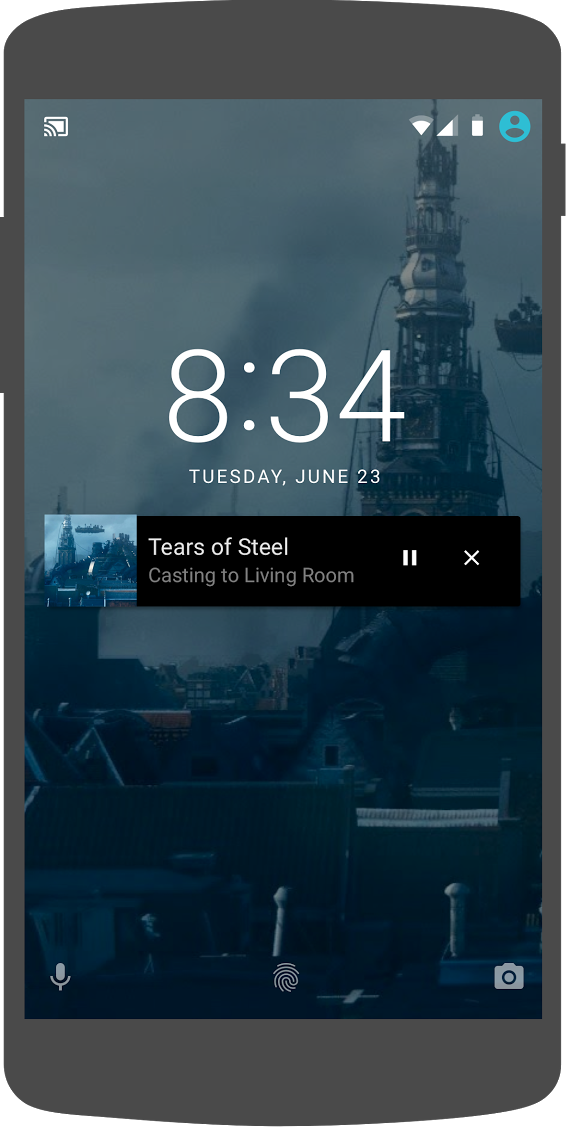
Заблокируйте телефон, и после разблокировки на экране блокировки должно появиться уведомление с возможностью управления воспроизведением мультимедиа или остановки трансляции.
Вернитесь в приложение для просмотра видео и нажмите кнопку «Трансляция», чтобы остановить трансляцию на устройстве Google Cast.
Часто задаваемые вопросы
4. Подготовьте стартовый проект.
Нам необходимо добавить поддержку Google Cast в загруженное вами стартовое приложение. Вот некоторые термины, связанные с Google Cast, которые мы будем использовать в этом практическом занятии:
- Приложение отправителя работает на мобильном устройстве или ноутбуке.
- Приложение- приемник работает на устройстве Google Cast.
Теперь вы готовы продолжить разработку на основе стартового проекта, используя Android Studio:
- Выберите Выберите каталог
app-startиз загруженного вами примера кода (на экране приветствия выберите «Импорт проекта» или пункт меню « Файл > Новый > Импорт проекта...» ). - Нажмите
 Кнопка «Синхронизировать проект с файлами Gradle» .
 - Нажмите Нажмите кнопку «Запустить» , чтобы запустить приложение и изучить пользовательский интерфейс.
дизайн приложения
Приложение получает список видеороликов с удаленного веб-сервера и предоставляет пользователю возможность просмотреть его. Пользователи могут выбрать видео, чтобы увидеть подробную информацию, или воспроизвести видео локально на мобильном устройстве.
Приложение состоит из двух основных активностей: VideoBrowserActivity и LocalPlayerActivity . Для интеграции функциональности Google Cast активности должны наследовать либо от AppCompatActivity , либо от родительского класса FragmentActivity . Это ограничение существует, поскольку нам потребуется добавить MediaRouteButton (предоставляемый библиотекой поддержки MediaRouter ) в качестве MediaRouteActionProvider , и это будет работать только в том случае, если активность наследует от вышеупомянутых классов. Библиотека поддержки MediaRouter зависит от библиотеки поддержки AppCompat , которая предоставляет необходимые классы.
VideoBrowserActivity
Эта активность содержит Fragment ( VideoBrowserFragment ). Этот список поддерживается ArrayAdapter ( VideoListAdapter ). Список видео и связанные с ними метаданные размещены на удаленном сервере в виде JSON- файла. AsyncTaskLoader ( VideoItemLoader ) получает этот JSON и обрабатывает его для создания списка объектов MediaItem .
Объект MediaItem моделирует видео и связанные с ним метаданные, такие как заголовок, описание, URL-адрес потока, URL-адрес вспомогательных изображений и связанные текстовые дорожки (для субтитров), если таковые имеются. Объект MediaItem передается между активностями, поэтому MediaItem есть вспомогательные методы для преобразования его в Bundle и наоборот.
Когда загрузчик формирует список MediaItems , он передает этот список в VideoListAdapter , который затем отображает список MediaItems в VideoBrowserFragment . Пользователю отображается список миниатюр видео с кратким описанием для каждого видео. При выборе элемента соответствующий MediaItem преобразуется в Bundle и передается в LocalPlayerActivity .
LocalPlayerActivity
Эта функция отображает метаданные о конкретном видео и позволяет пользователю воспроизвести видео локально на мобильном устройстве.
В этом окне отображается VideoView , элементы управления воспроизведением и текстовое поле для описания выбранного видео. Плеер занимает верхнюю часть экрана, оставляя место для подробного описания видео ниже. Пользователь может воспроизводить/приостанавливать или перематывать воспроизведение видео.
Зависимости
Поскольку мы используем AppCompatActivity , нам необходима библиотека поддержки AppCompat. Для управления списком видео и асинхронного получения изображений для списка мы используем библиотеку Volley .
Часто задаваемые вопросы
5. Добавление кнопки трансляции.
Приложение с поддержкой Cast отображает кнопку Cast в каждом из своих действий. Нажатие на кнопку Cast отображает список устройств Cast, которые пользователь может выбрать. Если пользователь воспроизводил контент локально на устройстве-отправителе, выбор устройства Cast запускает или возобновляет воспроизведение на этом устройстве Cast. В любой момент во время сеанса Cast пользователь может нажать на кнопку Cast и остановить трансляцию вашего приложения на устройство Cast. Пользователь должен иметь возможность подключаться к устройству Cast или отключаться от него в любом действии вашего приложения, как описано в контрольном списке Google Cast Design Checklist .
Зависимости
Обновите файл build.gradle приложения, добавив необходимые зависимости библиотек:
dependencies {
    implementation 'androidx.appcompat:appcompat:1.5.0'
    implementation 'androidx.mediarouter:mediarouter:1.3.1'
    implementation 'androidx.recyclerview:recyclerview:1.2.1'
    implementation 'com.google.android.gms:play-services-cast-framework:21.1.0'
    implementation 'com.android.volley:volley:1.2.1'
    implementation "androidx.core:core-ktx:1.8.0"
    implementation "org.jetbrains.kotlin:kotlin-stdlib-jdk8:$kotlin_version"
}
Синхронизируйте проект, чтобы убедиться, что сборка проекта проходит без ошибок.
Инициализация
В фреймворке Cast используется глобальный объект-синглтон, CastContext , который координирует все взаимодействия Cast.
Для инициализации CastContext CastOptions реализовать интерфейс OptionsProvider . Наиболее важным параметром является идентификатор приложения-приемника, который используется для фильтрации результатов обнаружения устройств Cast и для запуска приложения-приемника при запуске сеанса Cast.
При разработке собственного приложения с поддержкой Cast вам необходимо зарегистрироваться в качестве разработчика Cast, а затем получить идентификатор приложения. В этом практическом занятии мы будем использовать пример идентификатора приложения.
Добавьте следующий новый файл CastOptionsProvider.kt в пакет com.google.sample.cast.refplayer проекта:
package com.google.sample.cast.refplayer

import android.content.Context
import com.google.android.gms.cast.framework.OptionsProvider
import com.google.android.gms.cast.framework.CastOptions
import com.google.android.gms.cast.framework.SessionProvider

class CastOptionsProvider : OptionsProvider {
    override fun getCastOptions(context: Context): CastOptions {
        return CastOptions.Builder()
                .setReceiverApplicationId(context.getString(R.string.app_id))
                .build()
    }

    override fun getAdditionalSessionProviders(context: Context): List<SessionProvider>? {
        return null
    }
}
Теперь объявите OptionsProvider внутри тега " application " в файле AndroidManifest.xml приложения:
<meta-data
    android:name="com.google.android.gms.cast.framework.OPTIONS_PROVIDER_CLASS_NAME"
    android:value="com.google.sample.cast.refplayer.CastOptionsProvider" />
Лениво инициализируйте CastContext в методе onCreate класса VideoBrowserActivity :
import com.google.android.gms.cast.framework.CastContext

private var mCastContext: CastContext? = null

override fun onCreate(savedInstanceState: Bundle?) {
    super.onCreate(savedInstanceState)
    setContentView(R.layout.video_browser)
    setupActionBar()

    mCastContext = CastContext.getSharedInstance(this)
}
Добавьте ту же логику инициализации в LocalPlayerActivity .
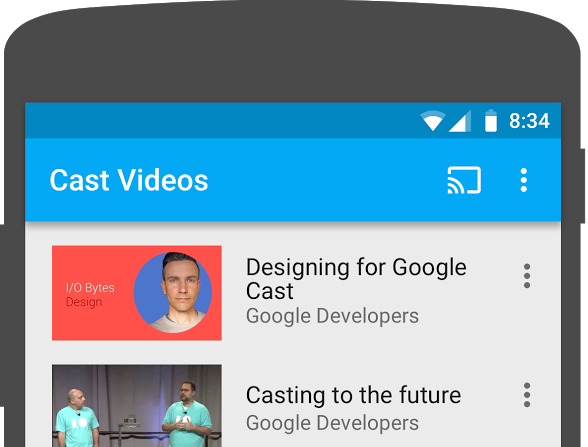
кнопка трансляции
Теперь, когда CastContext инициализирован, нам нужно добавить кнопку Cast, чтобы пользователь мог выбрать устройство Cast. Кнопка Cast реализована с помощью MediaRouteButton из библиотеки поддержки MediaRouter . Как и любой значок действия, который вы можете добавить в свою активность (используя ActionBar или Toolbar ), сначала вам нужно добавить соответствующий пункт меню в ваше меню.
Отредактируйте файл res/menu/browse.xml и добавьте пункт MediaRouteActionProvider в меню перед пунктом settings:
<item
    android:id="@+id/media_route_menu_item"
    android:title="@string/media_route_menu_title"
    app:actionProviderClass="androidx.mediarouter.app.MediaRouteActionProvider"
    app:showAsAction="always"/>
Переопределите метод onCreateOptionsMenu() класса VideoBrowserActivity , используя CastButtonFactory для подключения MediaRouteButton к фреймворку Cast:
import com.google.android.gms.cast.framework.CastButtonFactory

private var mediaRouteMenuItem: MenuItem? = null

override fun onCreateOptionsMenu(menu: Menu): Boolean {
     super.onCreateOptionsMenu(menu)
     menuInflater.inflate(R.menu.browse, menu)
     mediaRouteMenuItem = CastButtonFactory.setUpMediaRouteButton(getApplicationContext(), menu,
                R.id.media_route_menu_item)
     return true
}
Аналогичным образом переопределите onCreateOptionsMenu в LocalPlayerActivity .
Нажмите Нажмите кнопку «Запустить», чтобы запустить приложение на вашем мобильном устройстве. В панели действий приложения вы увидите кнопку Cast, и при нажатии на нее отобразится список устройств Cast в вашей локальной сети. Обнаружение устройств осуществляется автоматически с помощью CastContext . Выберите ваше устройство Cast, и на нем загрузится пример приложения-приемника. Вы можете переключаться между окном просмотра и окном локального проигрывателя, при этом состояние кнопки Cast синхронизируется.
Мы пока не добавили поддержку воспроизведения мультимедиа, поэтому вы не сможете воспроизводить видео на устройстве Cast. Нажмите кнопку Cast, чтобы отключиться.
6. Подбор видеоконтента
Мы расширим функциональность тестового приложения, чтобы оно также воспроизводило видео удаленно на устройстве Cast. Для этого нам нужно отслеживать различные события, генерируемые фреймворком Cast.
СМИ для кастинга
В общих чертах, чтобы воспроизвести медиафайл на устройстве Cast, вам необходимо выполнить следующие действия:
- Создайте объект
MediaInfo, который моделирует медиафайл. - Подключитесь к устройству Cast и запустите приложение вашего ресивера.
- Загрузите объект
MediaInfoв свой ресивер и воспроизведите контент. - Отслеживайте статус в СМИ.
- Отправляйте команды воспроизведения на приемник в зависимости от действий пользователя.
Шаг 2 мы уже выполнили в предыдущем разделе. Шаг 3 легко выполнить с помощью фреймворка Cast. Шаг 1 сводится к сопоставлению одного объекта с другим; MediaInfo — это то, что понимает фреймворк Cast, а MediaItem — это инкапсуляция медиафайла в нашем приложении; мы можем легко сопоставить MediaItem с MediaInfo .
В примере приложения LocalPlayerActivity уже реализовано различие между локальным и удалённым воспроизведением с помощью следующего перечисления:
private var mLocation: PlaybackLocation? = null

enum class PlaybackLocation {
    LOCAL, REMOTE
}

enum class PlaybackState {
    PLAYING, PAUSED, BUFFERING, IDLE
}
В рамках этого практического занятия вам не обязательно точно понимать всю логику работы тестового проигрывателя. Важно понимать, что медиаплеер вашего приложения необходимо будет модифицировать таким образом, чтобы он учитывал два места воспроизведения аналогичным образом.
В данный момент локальный плеер всегда находится в состоянии локального воспроизведения, поскольку он ещё ничего не знает о состояниях Casting. Нам необходимо обновлять пользовательский интерфейс на основе переходов состояний, происходящих в фреймворке Cast. Например, если мы начинаем трансляцию, нам нужно остановить локальное воспроизведение и отключить некоторые элементы управления. Аналогично, если мы останавливаем трансляцию, находясь в этом активном окне, нам нужно перейти к локальному воспроизведению. Для этого нам необходимо отслеживать различные события, генерируемые фреймворком Cast.
управление кастингом
В рамках платформы Cast сессия Cast объединяет этапы подключения к устройству, запуска (или присоединения) и подключения к приложению-приемнику, а также инициализации канала управления мультимедиа, если это необходимо. Канал управления мультимедиа — это способ, с помощью которого платформа Cast отправляет и получает сообщения от медиаплеера-приемника.
Сеанс Cast будет запускаться автоматически при выборе пользователем устройства с помощью кнопки Cast и автоматически останавливаться при отключении пользователя. Повторное подключение к сеансу приемника из-за проблем с сетью также автоматически обрабатывается SDK Cast.
Добавим SessionManagerListener в LocalPlayerActivity :
import com.google.android.gms.cast.framework.CastSession
import com.google.android.gms.cast.framework.SessionManagerListener
...

private var mSessionManagerListener: SessionManagerListener<CastSession>? = null
private var mCastSession: CastSession? = null
...

private fun setupCastListener() {
    mSessionManagerListener = object : SessionManagerListener<CastSession> {
        override fun onSessionEnded(session: CastSession, error: Int) {
            onApplicationDisconnected()
        }

        override fun onSessionResumed(session: CastSession, wasSuspended: Boolean) {
            onApplicationConnected(session)
        }

        override fun onSessionResumeFailed(session: CastSession, error: Int) {
            onApplicationDisconnected()
        }

        override fun onSessionStarted(session: CastSession, sessionId: String) {
            onApplicationConnected(session)
        }

        override fun onSessionStartFailed(session: CastSession, error: Int) {
            onApplicationDisconnected()
        }

        override fun onSessionStarting(session: CastSession) {}
        override fun onSessionEnding(session: CastSession) {}
        override fun onSessionResuming(session: CastSession, sessionId: String) {}
        override fun onSessionSuspended(session: CastSession, reason: Int) {}
        private fun onApplicationConnected(castSession: CastSession) {
            mCastSession = castSession
            if (null != mSelectedMedia) {
                if (mPlaybackState == PlaybackState.PLAYING) {
                    mVideoView!!.pause()
                    loadRemoteMedia(mSeekbar!!.progress, true)
                    return
                } else {
                    mPlaybackState = PlaybackState.IDLE
                    updatePlaybackLocation(PlaybackLocation.REMOTE)
                }
            }
            updatePlayButton(mPlaybackState)
            invalidateOptionsMenu()
        }

        private fun onApplicationDisconnected() {
            updatePlaybackLocation(PlaybackLocation.LOCAL)
            mPlaybackState = PlaybackState.IDLE
            mLocation = PlaybackLocation.LOCAL
            updatePlayButton(mPlaybackState)
            invalidateOptionsMenu()
       }
   }
}
В активности LocalPlayerActivity нас интересует получение уведомлений о подключении или отключении от устройства Cast, чтобы мы могли переключаться между локальным и локальным плеером. Обратите внимание, что соединение может быть нарушено не только экземпляром вашего приложения, работающим на мобильном устройстве, но и другим экземпляром вашего (или другого) приложения, работающим на другом мобильном устройстве.
Текущая активная сессия доступна по адресу SessionManager.getCurrentSession() . Сессии создаются и закрываются автоматически в ответ на взаимодействие пользователя с диалоговыми окнами Cast.
Нам нужно зарегистрировать слушатель сессии и инициализировать несколько переменных, которые мы будем использовать в активности. Измените метод onCreate LocalPlayerActivity следующим образом:
import com.google.android.gms.cast.framework.CastContext
...

private var mCastContext: CastContext? = null
...

override fun onCreate(savedInstanceState: Bundle?) {
    ...
    mCastContext = CastContext.getSharedInstance(this)
    mCastSession = mCastContext!!.sessionManager.currentCastSession
    setupCastListener()
    ...
    loadViews()
    ...
    val bundle = intent.extras
    if (bundle != null) {
        ....
        if (shouldStartPlayback) {
              ....

        } else {
            if (mCastSession != null && mCastSession!!.isConnected()) {
                updatePlaybackLocation(PlaybackLocation.REMOTE)
            } else {
                updatePlaybackLocation(PlaybackLocation.LOCAL)
            }
            mPlaybackState = PlaybackState.IDLE
            updatePlayButton(mPlaybackState)
        }
    }
    ...
}
Загрузка медиафайлов
В Cast SDK компонент RemoteMediaClient предоставляет набор удобных API для управления воспроизведением удаленного мультимедиа на ресивере. Для CastSession , поддерживающего воспроизведение мультимедиа, SDK автоматически создаст экземпляр RemoteMediaClient . Доступ к нему можно получить, вызвав метод getRemoteMediaClient() у экземпляра CastSession . Добавьте следующие методы в LocalPlayerActivity , чтобы загрузить текущее выбранное видео на ресивере:
import com.google.android.gms.cast.framework.media.RemoteMediaClient
import com.google.android.gms.cast.MediaInfo
import com.google.android.gms.cast.MediaLoadOptions
import com.google.android.gms.cast.MediaMetadata
import com.google.android.gms.common.images.WebImage
import com.google.android.gms.cast.MediaLoadRequestData

private fun loadRemoteMedia(position: Int, autoPlay: Boolean) {
    if (mCastSession == null) {
        return
    }
    val remoteMediaClient = mCastSession!!.remoteMediaClient ?: return
    remoteMediaClient.load( MediaLoadRequestData.Builder()
                .setMediaInfo(buildMediaInfo())
                .setAutoplay(autoPlay)
                .setCurrentTime(position.toLong()).build())
}

private fun buildMediaInfo(): MediaInfo? {
    val movieMetadata = MediaMetadata(MediaMetadata.MEDIA_TYPE_MOVIE)
    mSelectedMedia?.studio?.let { movieMetadata.putString(MediaMetadata.KEY_SUBTITLE, it) }
    mSelectedMedia?.title?.let { movieMetadata.putString(MediaMetadata.KEY_TITLE, it) }
    movieMetadata.addImage(WebImage(Uri.parse(mSelectedMedia!!.getImage(0))))
    movieMetadata.addImage(WebImage(Uri.parse(mSelectedMedia!!.getImage(1))))
    return mSelectedMedia!!.url?.let {
        MediaInfo.Builder(it)
            .setStreamType(MediaInfo.STREAM_TYPE_BUFFERED)
            .setContentType("videos/mp4")
            .setMetadata(movieMetadata)
            .setStreamDuration((mSelectedMedia!!.duration * 1000).toLong())
            .build()
    }
}
Теперь обновите различные существующие методы, чтобы они использовали логику сессии Cast для поддержки удаленного воспроизведения:
private fun play(position: Int) {
    startControllersTimer()
    when (mLocation) {
        PlaybackLocation.LOCAL -> {
            mVideoView!!.seekTo(position)
            mVideoView!!.start()
        }
        PlaybackLocation.REMOTE -> {
            mPlaybackState = PlaybackState.BUFFERING
            updatePlayButton(mPlaybackState)
            //seek to a new position within the current media item's new position
            //which is in milliseconds from the beginning of the stream
            mCastSession!!.remoteMediaClient?.seek(position.toLong())
        }
        else -> {}
    }
    restartTrickplayTimer()
}
private fun togglePlayback() {
    ...
    PlaybackState.IDLE -> when (mLocation) {
        ...
        PlaybackLocation.REMOTE -> {
            if (mCastSession != null && mCastSession!!.isConnected) {
                loadRemoteMedia(mSeekbar!!.progress, true)
            }
        }
        else -> {}
    }
    ...
}
override fun onPause() {
    ...
    mCastContext!!.sessionManager.removeSessionManagerListener(
                mSessionManagerListener!!, CastSession::class.java)
}
override fun onResume() {
    Log.d(TAG, "onResume() was called")
    mCastContext!!.sessionManager.addSessionManagerListener(
            mSessionManagerListener!!, CastSession::class.java)
    if (mCastSession != null && mCastSession!!.isConnected) {
        updatePlaybackLocation(PlaybackLocation.REMOTE)
    } else {
        updatePlaybackLocation(PlaybackLocation.LOCAL)
    }
    super.onResume()
}
В методе updatePlayButton измените значение переменной isConnected :
private fun updatePlayButton(state: PlaybackState?) {
    ...
    val isConnected = (mCastSession != null
                && (mCastSession!!.isConnected || mCastSession!!.isConnecting))
    ...
}
Теперь нажмите на Нажмите кнопку «Запустить», чтобы запустить приложение на вашем мобильном устройстве. Подключитесь к устройству Cast и начните воспроизведение видео. Вы должны увидеть видео на приемнике.
7. Мини-контроллер
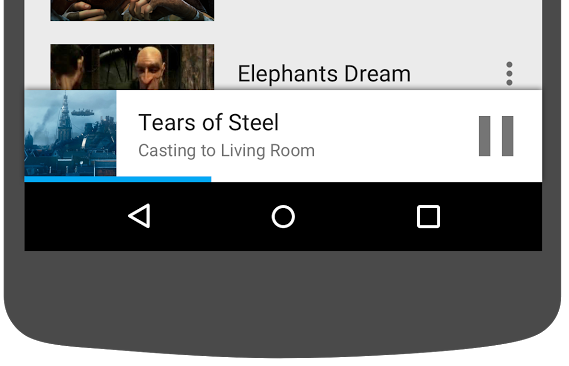
В соответствии с контрольным списком дизайна Cast, все приложения Cast должны содержать мини-контроллер , который появляется при переходе пользователя с текущей страницы контента. Мини-контроллер обеспечивает мгновенный доступ и видимое напоминание о текущей сессии Cast.
SDK Cast предоставляет настраиваемое представление MiniControllerFragment , которое можно добавить в файл разметки приложения тех активностей, в которых вы хотите отобразить мини-контроллер.
Добавьте следующее определение фрагмента в конец файлов res/layout/player_activity.xml и res/layout/video_browser.xml :
<fragment
    android:id="@+id/castMiniController"
    android:layout_width="fill_parent"
    android:layout_height="wrap_content"
    android:layout_alignParentBottom="true"
    android:visibility="gone"
    class="com.google.android.gms.cast.framework.media.widget.MiniControllerFragment"/>
Нажмите Кнопка «Запустить» запускает приложение и позволяет транслировать видео. Когда воспроизведение на приемнике начнется, в нижней части каждого окна должен появиться мини-контроллер. Вы можете управлять воспроизведением с помощью мини-контроллера. При переключении между окном просмотра и окном локального проигрывателя состояние мини-контроллера должно оставаться синхронизированным со статусом воспроизведения мультимедиа на приемнике.
8. Уведомления и экран блокировки
В соответствии с требованиями Google Cast, приложение-отправитель должно реализовать управление воспроизведением медиафайлов из уведомлений и с экрана блокировки .
SDK Cast предоставляет MediaNotificationService , который помогает приложению-отправителю создавать элементы управления воспроизведением мультимедиа для уведомлений и экрана блокировки. Этот сервис автоматически добавляется в манифест вашего приложения с помощью Gradle.
Сервис MediaNotificationService будет работать в фоновом режиме, пока отправитель осуществляет трансляцию, и будет отображать уведомление с миниатюрой изображения и метаданными о текущем транслируемом элементе, кнопкой воспроизведения/паузы и кнопкой остановки.
Управление уведомлениями и экраном блокировки можно включить с помощью CastOptions при инициализации CastContext . Управление воспроизведением мультимедиа для уведомлений и экрана блокировки включено по умолчанию. Функция экрана блокировки включена до тех пор, пока включено управление уведомлениями.
Отредактируйте CastOptionsProvider и измените реализацию метода getCastOptions в соответствии со следующим кодом:
import com.google.android.gms.cast.framework.media.CastMediaOptions
import com.google.android.gms.cast.framework.media.NotificationOptions

override fun getCastOptions(context: Context): CastOptions {
   val notificationOptions = NotificationOptions.Builder()
            .setTargetActivityClassName(VideoBrowserActivity::class.java.name)
            .build()
    val mediaOptions = CastMediaOptions.Builder()
            .setNotificationOptions(notificationOptions)
            .build()
   return CastOptions.Builder()
                .setReceiverApplicationId(context.getString(R.string.app_id))
                .setCastMediaOptions(mediaOptions)
                .build()
}
Нажмите Нажмите кнопку «Запустить», чтобы запустить приложение на вашем мобильном устройстве. Транслируйте видео и закройте демонстрационное приложение. Должно появиться уведомление о видео, воспроизводимом в данный момент на приемнике. Заблокируйте мобильное устройство, и на экране блокировки должны отобразиться элементы управления воспроизведением мультимедиа на устройстве Cast.
9. Вводное наложение
В соответствии с требованиями Google Cast, приложение-отправитель должно представить кнопку Cast существующим пользователям, чтобы сообщить им о поддержке трансляции, а также помочь новым пользователям Google Cast.
SDK Cast предоставляет настраиваемое представление IntroductoryOverlay , которое можно использовать для выделения кнопки Cast при ее первом показе пользователям. Добавьте следующий код в VideoBrowserActivity :
import com.google.android.gms.cast.framework.IntroductoryOverlay
import android.os.Looper

private var mIntroductoryOverlay: IntroductoryOverlay? = null

private fun showIntroductoryOverlay() {
    mIntroductoryOverlay?.remove()
    if (mediaRouteMenuItem?.isVisible == true) {
       Looper.myLooper().run {
           mIntroductoryOverlay = com.google.android.gms.cast.framework.IntroductoryOverlay.Builder(
                    this@VideoBrowserActivity, mediaRouteMenuItem!!)
                   .setTitleText("Introducing Cast")
                   .setSingleTime()
                   .setOnOverlayDismissedListener(
                           object : IntroductoryOverlay.OnOverlayDismissedListener {
                               override fun onOverlayDismissed() {
                                   mIntroductoryOverlay = null
                               }
                          })
                   .build()
          mIntroductoryOverlay!!.show()
        }
    }
}
Теперь добавьте CastStateListener и вызовите метод showIntroductoryOverlay , когда устройство Cast станет доступно, изменив метод onCreate и переопределив методы onResume и onPause в соответствии со следующим:
import com.google.android.gms.cast.framework.CastState
import com.google.android.gms.cast.framework.CastStateListener

private var mCastStateListener: CastStateListener? = null

override fun onCreate(savedInstanceState: Bundle?) {
    super.onCreate(savedInstanceState)
    setContentView(R.layout.video_browser)
    setupActionBar()
    mCastStateListener = object : CastStateListener {
            override fun onCastStateChanged(newState: Int) {
                if (newState != CastState.NO_DEVICES_AVAILABLE) {
                    showIntroductoryOverlay()
                }
            }
        }
    mCastContext = CastContext.getSharedInstance(this)
}

override fun onResume() {
    super.onResume()
    mCastContext?.addCastStateListener(mCastStateListener!!)
}

override fun onPause() {
    super.onPause()
    mCastContext?.removeCastStateListener(mCastStateListener!!)
}
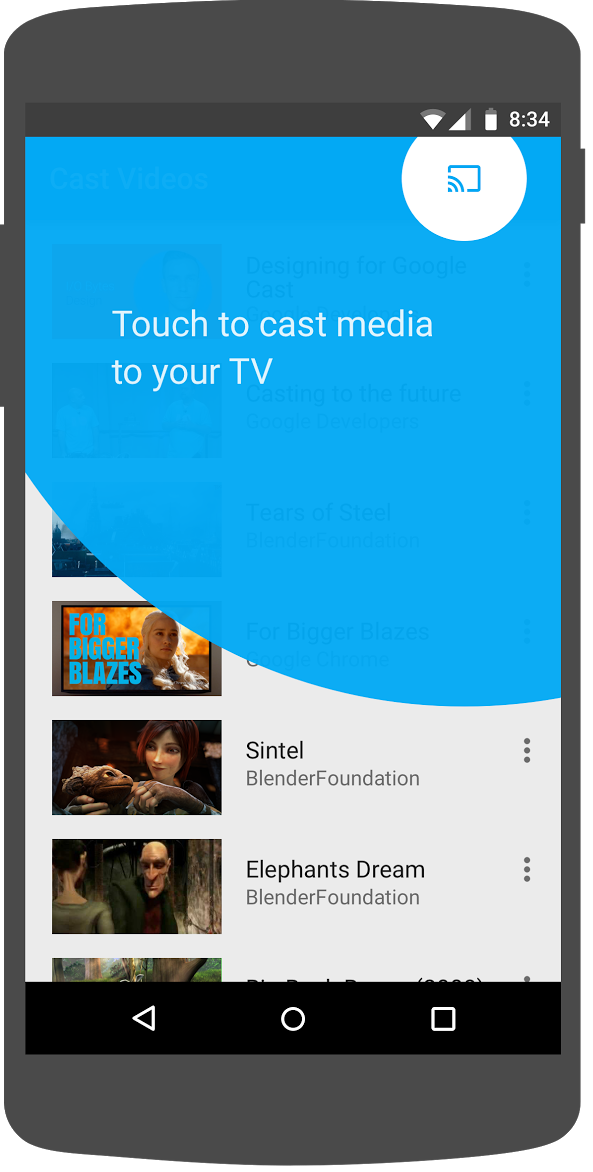
Очистите данные приложения или удалите его с устройства. Затем нажмите Нажмите кнопку «Запустить», чтобы запустить приложение на вашем мобильном устройстве, и вы должны увидеть вступительное сообщение (если сообщение не отображается, очистите данные приложения).
10. Расширенный контроллер
В соответствии с требованиями Google Cast, приложение-отправитель должно предоставлять расширенный контроллер для транслируемого медиаконтента. Расширенный контроллер представляет собой полноэкранную версию мини-контроллера.
SDK Cast предоставляет виджет для расширенного контроллера, называемый ExpandedControllerActivity . Это абстрактный класс, который необходимо наследовать, чтобы добавить кнопку Cast.
Во-первых, создайте новый файл ресурсов меню с именем expanded_controller.xml для расширенного контроллера, чтобы он содержал кнопку Cast:
<?xml version="1.0" encoding="utf-8"?>

<menu xmlns:android="http://schemas.android.com/apk/res/android"
      xmlns:app="http://schemas.android.com/apk/res-auto">

    <item
            android:id="@+id/media_route_menu_item"
            android:title="@string/media_route_menu_title"
            app:actionProviderClass="androidx.mediarouter.app.MediaRouteActionProvider"
            app:showAsAction="always"/>

</menu>
Создайте новый пакет expandedcontrols в пакете com.google.sample.cast.refplayer . Затем создайте новый файл с именем ExpandedControlsActivity.kt в пакете com.google.sample.cast.refplayer.expandedcontrols .
package com.google.sample.cast.refplayer.expandedcontrols

import android.view.Menu
import com.google.android.gms.cast.framework.media.widget.ExpandedControllerActivity
import com.google.sample.cast.refplayer.R
import com.google.android.gms.cast.framework.CastButtonFactory

class ExpandedControlsActivity : ExpandedControllerActivity() {
    override fun onCreateOptionsMenu(menu: Menu): Boolean {
        super.onCreateOptionsMenu(menu)
        menuInflater.inflate(R.menu.expanded_controller, menu)
        CastButtonFactory.setUpMediaRouteButton(this, menu, R.id.media_route_menu_item)
        return true
    }
}
Теперь объявите класс ExpandedControlsActivity в файле AndroidManifest.xml внутри тега application , расположенного выше OPTIONS_PROVIDER_CLASS_NAME :
<application>
    ...
    <activity
        android:name="com.google.sample.cast.refplayer.expandedcontrols.ExpandedControlsActivity"
        android:label="@string/app_name"
        android:launchMode="singleTask"
        android:theme="@style/Theme.CastVideosDark"
        android:screenOrientation="portrait"
        android:exported="true">
        <intent-filter>
            <action android:name="android.intent.action.MAIN"/>
        </intent-filter>
        <meta-data
            android:name="android.support.PARENT_ACTIVITY"
            android:value="com.google.sample.cast.refplayer.VideoBrowserActivity"/>
    </activity>
    ...
</application>
Отредактируйте CastOptionsProvider и измените значения NotificationOptions и CastMediaOptions , чтобы установить целевое действие на ExpandedControlsActivity :
import com.google.sample.cast.refplayer.expandedcontrols.ExpandedControlsActivity

override fun getCastOptions(context: Context): CastOptions {
    val notificationOptions = NotificationOptions.Builder()
            .setTargetActivityClassName(ExpandedControlsActivity::class.java.name)
            .build()
    val mediaOptions = CastMediaOptions.Builder()
            .setNotificationOptions(notificationOptions)
            .setExpandedControllerActivityClassName(ExpandedControlsActivity::class.java.name)
            .build()
    return CastOptions.Builder()
            .setReceiverApplicationId(context.getString(R.string.app_id))
            .setCastMediaOptions(mediaOptions)
            .build()
}
Обновите метод loadRemoteMedia LocalPlayerActivity , чтобы при загрузке удаленного медиафайла отображалось окно ExpandedControlsActivity :
import com.google.sample.cast.refplayer.expandedcontrols.ExpandedControlsActivity

private fun loadRemoteMedia(position: Int, autoPlay: Boolean) {
    if (mCastSession == null) {
        return
    }
    val remoteMediaClient = mCastSession!!.remoteMediaClient ?: return
    remoteMediaClient.registerCallback(object : RemoteMediaClient.Callback() {
        override fun onStatusUpdated() {
            val intent = Intent(this@LocalPlayerActivity, ExpandedControlsActivity::class.java)
            startActivity(intent)
            remoteMediaClient.unregisterCallback(this)
        }
    })
    remoteMediaClient.load(MediaLoadRequestData.Builder()
                .setMediaInfo(buildMediaInfo())
                .setAutoplay(autoPlay)
                .setCurrentTime(position.toLong()).build())
}
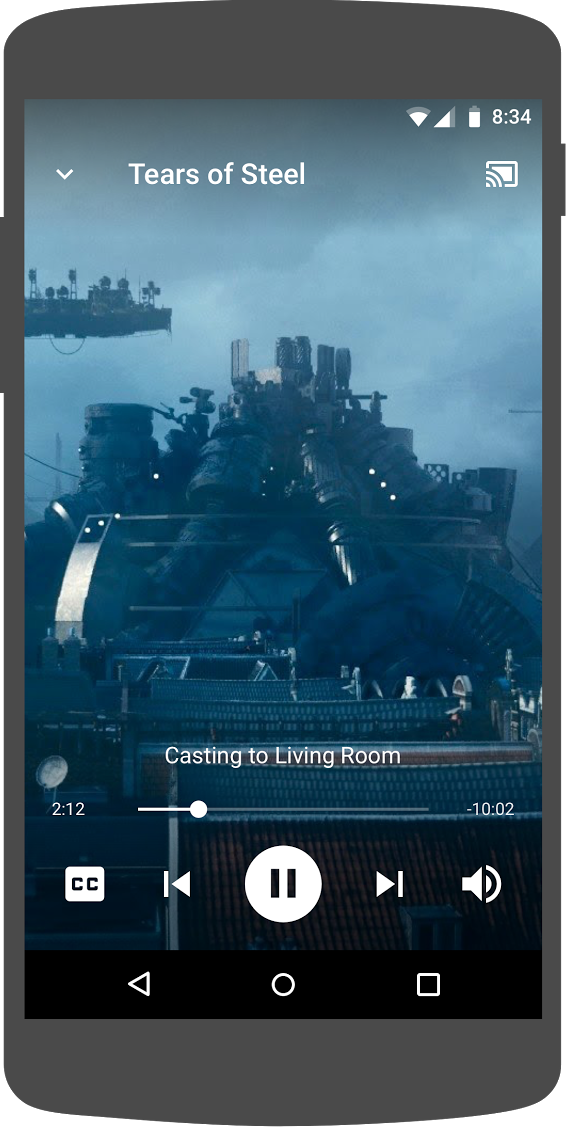
Нажмите Нажмите кнопку «Запустить», чтобы запустить приложение на мобильном устройстве и транслировать видео. Вы должны увидеть развернутый контроллер. Вернитесь к списку видео, и при нажатии на мини-контроллер снова загрузится развернутый контроллер. Выйдите из приложения, чтобы увидеть уведомление. Нажмите на изображение уведомления, чтобы загрузить развернутый контроллер.
11. Добавить поддержку Cast Connect.
Библиотека Cast Connect позволяет существующим приложениям-отправителям взаимодействовать с приложениями Android TV через протокол Cast. Cast Connect строится на основе инфраструктуры Cast, при этом ваше приложение Android TV выступает в качестве приемника.
Зависимости
Примечание: Для реализации Cast Connect требуется версия play-services-cast-framework 19.0.0 или выше.
LaunchOptions
Для запуска приложения Android TV, также называемого Android-приемником, необходимо установить флаг setAndroidReceiverCompatible в значение true в объекте LaunchOptions . Этот объект LaunchOptions определяет способ запуска приемника и передается в CastOptions возвращаемый классом CastOptionsProvider . Установка указанного выше флага в значение false запустит веб-приемник для определенного идентификатора приложения в консоли разработчика Cast.
В файле CastOptionsProvider.kt добавьте следующее в метод getCastOptions :
import com.google.android.gms.cast.LaunchOptions
...
val launchOptions = LaunchOptions.Builder()
            .setAndroidReceiverCompatible(true)
            .build()
return new CastOptions.Builder()
        .setLaunchOptions(launchOptions)
        ...
        .build()
Установить учетные данные для запуска
На стороне отправителя вы можете указать CredentialsData , представляющую того, кто присоединяется к сессии. credentials представляют собой строку, которую может задать пользователь, если ваше приложение для Android TV может ее распознать. CredentialsData передается в ваше приложение Android TV только во время запуска или присоединения. Если вы установите ее снова во время подключения, она не будет передана в ваше приложение Android TV.
Для установки учетных данных запуска необходимо определить CredentialsData и передать их в объект LaunchOptions . Добавьте следующий код в метод getCastOptions в файле CastOptionsProvider.kt :
import com.google.android.gms.cast.CredentialsData
...

val credentialsData = CredentialsData.Builder()
        .setCredentials("{\"userId\": \"abc\"}")
        .build()
val launchOptions = LaunchOptions.Builder()
       ...
       .setCredentialsData(credentialsData)
       .build()
Установить учетные данные для запроса на загрузку (LoadRequest).
Если ваше приложение Web Receiver и приложение для Android TV обрабатывают credentials по-разному, вам может потребоваться определить отдельные credentials для каждого из них. Для этого добавьте следующий код в файл LocalPlayerActivity.kt в функцию loadRemoteMedia :
remoteMediaClient.load(MediaLoadRequestData.Builder()
       ...
       .setCredentials("user-credentials")
       .setAtvCredentials("atv-user-credentials")
       .build())
В зависимости от того, какое приложение-получатель отправляет данные, SDK теперь будет автоматически определять, какие учетные данные использовать для текущей сессии.
Тестирование Cast Connect
Инструкция по установке APK-файла Android TV на Chromecast с Google TV.
- Узнайте IP-адрес вашего устройства Android TV. Обычно он находится в разделе «Настройки» > «Сеть и интернет» > (Название сети, к которой подключено ваше устройство) . Справа отобразятся подробные сведения и IP-адрес вашего устройства в этой сети.
- Используйте IP-адрес вашего устройства для подключения к нему через ADB с помощью терминала:
$ adb connect <device_ip_address>:5555
- В окне терминала перейдите в корневую папку, содержащую примеры кода, которые вы скачали в начале этого задания. Например:
$ cd Desktop/android_codelab_src
- Установите файл .apk из этой папки на свой Android TV, выполнив следующую команду:
$ adb -s <device_ip_address>:5555 install android-tv-app.apk
- Теперь в меню «Ваши приложения» на вашем устройстве Android TV должно отображаться приложение под названием Cast Videos .
- Вернитесь к своему проекту Android Studio и нажмите кнопку «Запустить», чтобы установить и запустить приложение-отправитель на вашем мобильном устройстве. В правом верхнем углу нажмите значок трансляции и выберите ваше устройство Android TV из доступных вариантов. Теперь вы должны увидеть запущенное приложение Android TV на вашем устройстве Android TV, и воспроизведение видео должно позволить вам управлять воспроизведением видео с помощью пульта дистанционного управления Android TV.
12. Настройка виджетов Cast
Вы можете настроить виджеты Cast , задав цвета, стиль кнопок, текста и внешнего вида миниатюр, а также выбрав типы отображаемых кнопок.
Обновите файл res/values/styles_castvideo.xml
<style name="Theme.CastVideosTheme" parent="Theme.AppCompat.Light.NoActionBar">
    ...
    <item name="mediaRouteTheme">@style/CustomMediaRouterTheme</item>
    <item name="castIntroOverlayStyle">@style/CustomCastIntroOverlay</item>
    <item name="castMiniControllerStyle">@style/CustomCastMiniController</item>
    <item name="castExpandedControllerStyle">@style/CustomCastExpandedController</item>
    <item name="castExpandedControllerToolbarStyle">
        @style/ThemeOverlay.AppCompat.ActionBar
    </item>
    ...
</style>
Объявите следующие пользовательские темы:
<!-- Customize Cast Button -->
<style name="CustomMediaRouterTheme" parent="Theme.MediaRouter">
    <item name="mediaRouteButtonStyle">@style/CustomMediaRouteButtonStyle</item>
</style>
<style name="CustomMediaRouteButtonStyle" parent="Widget.MediaRouter.Light.MediaRouteButton">
    <item name="mediaRouteButtonTint">#EEFF41</item>
</style>

<!-- Customize Introductory Overlay -->
<style name="CustomCastIntroOverlay" parent="CastIntroOverlay">
    <item name="castButtonTextAppearance">@style/TextAppearance.CustomCastIntroOverlay.Button</item>
    <item name="castTitleTextAppearance">@style/TextAppearance.CustomCastIntroOverlay.Title</item>
</style>
<style name="TextAppearance.CustomCastIntroOverlay.Button" parent="android:style/TextAppearance">
    <item name="android:textColor">#FFFFFF</item>
</style>
<style name="TextAppearance.CustomCastIntroOverlay.Title" parent="android:style/TextAppearance.Large">
    <item name="android:textColor">#FFFFFF</item>
</style>

<!-- Customize Mini Controller -->
<style name="CustomCastMiniController" parent="CastMiniController">
    <item name="castShowImageThumbnail">true</item>
    <item name="castTitleTextAppearance">@style/TextAppearance.AppCompat.Subhead</item>
    <item name="castSubtitleTextAppearance">@style/TextAppearance.AppCompat.Caption</item>
    <item name="castBackground">@color/accent</item>
    <item name="castProgressBarColor">@color/orange</item>
</style>

<!-- Customize Expanded Controller -->
<style name="CustomCastExpandedController" parent="CastExpandedController">
    <item name="castButtonColor">#FFFFFF</item>
    <item name="castPlayButtonDrawable">@drawable/cast_ic_expanded_controller_play</item>
    <item name="castPauseButtonDrawable">@drawable/cast_ic_expanded_controller_pause</item>
    <item name="castStopButtonDrawable">@drawable/cast_ic_expanded_controller_stop</item>
</style>
13. Поздравляем!
Теперь вы знаете, как включить функцию Cast для видеоприложения с помощью виджетов Cast SDK на Android.
Для получения более подробной информации см. руководство разработчика Android Sender .