คู่มือนี้จะกล่าวถึงการสร้างไฟล์แนบของส่วนเสริมในเว็บไซต์หรือแอปพลิเคชัน การโต้ตอบจะคล้ายกับการสร้างงานโดยใช้ปลายทาง CourseWork API ใช้เส้นทางนี้เพื่ออนุญาตให้ผู้ใช้สร้างไฟล์แนบของส่วนเสริมจากเว็บไซต์หรือแอปพลิเคชัน
ขั้นตอนการทำงาน
ขั้นตอนการสร้างไฟล์แนบในระดับสูงจะเป็นไปตามลำดับต่อไปนี้
- ผู้ใช้ที่เป็นครูเปิดเว็บไซต์หรือแอปของคุณ แล้วเลือกเนื้อหาที่จะมอบหมายให้นักเรียน
- ตรวจสอบว่าผู้ใช้สร้างไฟล์แนบของส่วนเสริมได้
- หากผู้ใช้สร้างไฟล์แนบของส่วนเสริมไม่ได้ ให้สร้างงานใน Coursework ที่มี URL ไปยังเนื้อหาที่เลือกเป็นเนื้อหาลิงก์
- หากผู้ใช้สามารถสร้างไฟล์แนบของส่วนเสริม ให้ทำดังนี้
- สร้างงาน
- สร้างไฟล์แนบส่วนเสริมที่ลิงก์กับเนื้อหาที่เลือกและเชื่อมโยงกับงานใหม่
- แจ้งให้ครูทราบว่าสร้างงานเรียบร้อยแล้ว
การดำเนินการแต่ละรายการจะอธิบายไว้ในส่วนต่อไปนี้
ตรวจสอบว่าผู้ใช้สามารถสร้างไฟล์แนบของส่วนเสริมได้หรือไม่
คุณสามารถสร้างไฟล์แนบของส่วนเสริมในนามของผู้ใช้ที่มีสิทธิ์ได้ ผู้ใช้ที่มีสิทธิ์คือผู้ใช้ที่เป็นครูในหลักสูตรที่คุณพยายามสร้างงานใน Coursework และได้รับมอบหมายใบอนุญาตรุ่น Teaching and Learning หรือ Education Plus ของ Google Workspace for Education
เริ่มต้นด้วยการพิจารณาว่าผู้ใช้สามารถสร้างไฟล์แนบของส่วนเสริมได้หรือไม่ โดยส่งคำขอไปยังปลายทาง userProfiles.checkUserCapability พร้อมพารามิเตอร์ความสามารถ CREATE_ADD_ON_ATTACHMENT ตรวจสอบฟิลด์บูลีน allowed ในคำตอบ ค่า true บ่งบอกว่าผู้ใช้มีสิทธิ์สร้างไฟล์แนบของส่วนเสริม
Python
eligibility_response = (
  classroom_service.userProfiles()
  .checkUserCapability(
    userId="me",
    capability="CREATE_ADD_ON_ATTACHMENT",
    # The previewVersion is necessary while the method is available in the
    # Workspace Developer Preview Program.
    previewVersion="V1_20240930_PREVIEW",
  ).execute()
)
is_create_attachment_eligible = (
  eligibility_response.get('allowed')
)
print(f'User eligibility for course {course_id}'
      f': {is_create_attachment_eligible}.')
กําหนดเส้นทางของผู้ใช้ตามการมีสิทธิ์
การมีสิทธิ์จะเป็นตัวกำหนดว่าคุณสามารถสร้างไฟล์แนบของส่วนเสริมให้กับผู้ใช้ได้หรือไม่
ผู้ใช้ที่ไม่มีสิทธิ์
หากผู้ใช้สร้างไฟล์แนบของส่วนเสริมไม่ได้ ให้สร้างCourseWorkงานใหม่โดยแนบ URL ของเนื้อหาที่ผู้ใช้เลือกเป็น Link
Python
if not is_create_attachment_eligible:
  coursework = {
    'title': 'My CourseWork Assignment with Link Material',
    'description': 'Created using the Classroom CourseWork API.',
    'workType': 'ASSIGNMENT',
    'state': 'DRAFT',  # Set to 'PUBLISHED' to assign to students.
    'maxPoints': 100,
    'materials': [
      {'link': {'url': my_content_url}}
    ]
  }

  assignment = (
    service.courses()
    .courseWork()
    .create(courseId=course_id, body=coursework)
    .execute()
  )

  print(
    f'Link Material assignment created with ID: {assignment.get("id")}'
  )
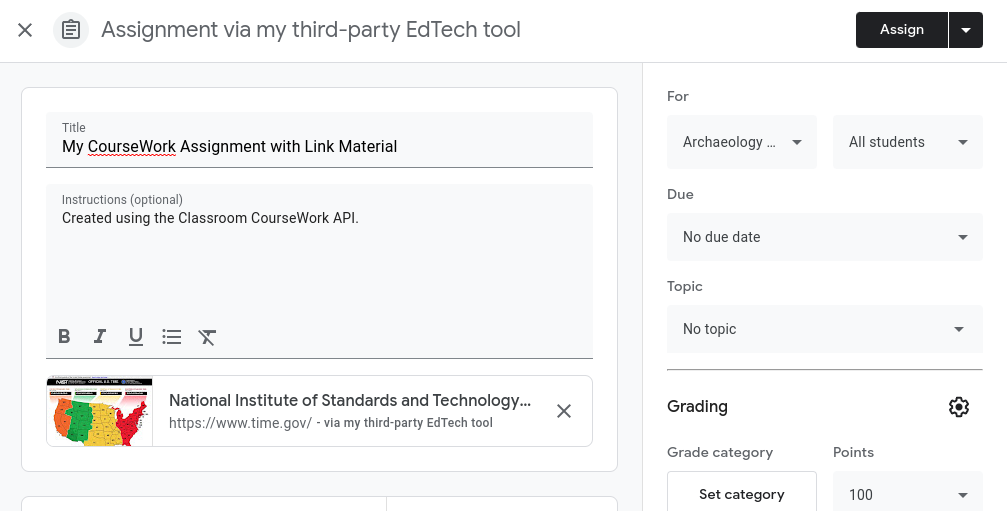
การตอบกลับจะมีงานในหลักสูตรที่ขอพร้อมเนื้อหาที่แนบมา ผู้ใช้สามารถคลิก Link เพื่อเปิดเนื้อหาในเว็บไซต์ของคุณในแท็บใหม่

รูปที่ 1 มุมมองของครูสำหรับงานในชั้นเรียนฉบับร่างที่มีเนื้อหาลิงก์
ผู้ใช้ที่มีสิทธิ์
ทําดังนี้หากผู้ใช้สามารถสร้างไฟล์แนบของส่วนเสริมได้
- สร้างงาน
CourseWorkใหม่โดยไม่มีไฟล์แนบ - สร้างไฟล์แนบของส่วนเสริม
- ตั้งค่า
itemIdของAddOnAttachmentเป็นidของงานที่สร้างขึ้นใหม่ - ตรวจสอบว่าคุณระบุ URL ไปยังเนื้อหาที่ผู้ใช้เลือกสำหรับมุมมองแต่ละรายการที่รองรับ
- ตั้งค่า
Python
if is_create_attachment_eligible:
  coursework = {
    'title': 'My CourseWork Assignment with Add-on Attachment',
    'description': 'Created using the Classroom CourseWork API.',
    'workType': 'ASSIGNMENT',
    'state': 'DRAFT',  # Set to 'PUBLISHED' to assign to students.
    'maxPoints': 100,
  }

  assignment = (
    classroom_service.courses()
    .courseWork()
    .create(courseId=course_id, body=coursework)
    .execute()
  )

  print(
    f'Empty assignment created with ID: {assignment.get("id")}'
  )

  attachment = {
    'teacherViewUri': {'uri': teacher_view_url},
    'studentViewUri': {'uri': student_view_url},
    'studentWorkReviewUri': {'uri': grade_student_work_url},
    'title': f'Test Attachment {test_label}',
  }

  add_on_attachment = (
    service.courses()
    .courseWork()
    .addOnAttachments()
    .create(
      courseId=course_id,
      itemId=assignment.get("id"),  # ID of the new assignment.
      body=attachment,
    )
    .execute()
  )

  print(
    f'Add-on attachment created with ID: {add_on_attachment.get("id")}'
  )
ส่วนเสริมจะปรากฏเป็นการ์ดไฟล์แนบใน Classroom URL ที่ระบุในคําขอจะเปิดใน iframe ที่เหมาะสมสําหรับแต่ละมุมมอง
