
นี่คือคำแนะนำแบบทีละขั้นตอนที่ 4 ในชุดคำแนะนำแบบทีละขั้นตอนสำหรับส่วนเสริมของ Classroom
ในคำแนะนำแบบทีละขั้นนี้ คุณจะโต้ตอบกับ Google Classroom API เพื่อสร้าง ไฟล์แนบ คุณต้องระบุเส้นทางให้ผู้ใช้ดูเนื้อหาของไฟล์แนบ มุมมองจะแตกต่างกันไปตามบทบาทของผู้ใช้ในชั้นเรียน คำแนะนำแบบทีละขั้นนี้ครอบคลุมไฟล์แนบประเภทเนื้อหา ซึ่งไม่จำเป็นต้องให้นักเรียนส่ง
ในคำแนะนำแบบทีละขั้นนี้ คุณจะทำสิ่งต่อไปนี้
- เรียกข้อมูลและใช้พารามิเตอร์การค้นหาของส่วนเสริมต่อไปนี้
addOnToken: โทเค็นการให้สิทธิ์ที่ส่งไปยังมุมมองการค้นพบไฟล์แนบitemId: ตัวระบุที่ไม่ซ้ำกันสำหรับการบ้านและรายงาน สื่อการเรียนการสอนของชั้นเรียน หรือ ประกาศที่ได้รับไฟล์แนบของส่วนเสริมitemType: "courseWork", "courseWorkMaterials" หรือ "announcement"courseId: ตัวระบุที่ไม่ซ้ำกันสำหรับหลักสูตร Google Classroom ที่มีการสร้างงานattachmentId: ตัวระบุที่ไม่ซ้ำกันซึ่ง Google Classroom กําหนดให้กับ ไฟล์แนบส่วนเสริมหลังจากสร้าง
- ใช้พื้นที่เก็บข้อมูลถาวรสำหรับไฟล์แนบประเภทเนื้อหา
- ระบุเส้นทางเพื่อสร้างไฟล์แนบและแสดง iframe ของมุมมองครูและมุมมองนักเรียน
- ส่งคำขอต่อไปนี้ไปยัง Google Classroom Add-ons API
- สร้างไฟล์แนบใหม่
- รับบริบทของส่วนเสริม ซึ่งจะระบุว่าผู้ใช้ที่เข้าสู่ระบบเป็น นักเรียน/นักศึกษาหรือครู
เมื่อเสร็จแล้ว คุณจะสร้างไฟล์แนบประเภทเนื้อหาในงานผ่าน UI ของ Google Classroom ได้เมื่อเข้าสู่ระบบในฐานะครู ครูและนักเรียนใน ชั้นเรียนจะดูเนื้อหาได้เช่นกัน
เปิดใช้ Classroom API
ทำการเรียกไปยัง Classroom API โดยเริ่มจากขั้นตอนนี้ คุณต้องเปิดใช้ API สำหรับโปรเจ็กต์ Google Cloud ก่อนจึงจะเรียกใช้ API ได้ ไปที่รายการไลบรารีของ Google Classroom API แล้วเลือกเปิดใช้
จัดการพารามิเตอร์การค้นหาของมุมมองการค้นหาไฟล์แนบ
ดังที่ได้กล่าวไว้ก่อนหน้านี้ Google Classroom จะส่งพารามิเตอร์การค้นหาเมื่อ โหลดมุมมองการค้นพบไฟล์แนบใน iframe
courseId: รหัสของหลักสูตร Classroom ปัจจุบันitemId: ตัวระบุที่ไม่ซ้ำกันสำหรับการบ้านและรายงาน สื่อการเรียนการสอนของชั้นเรียน หรือ ประกาศที่ได้รับไฟล์แนบของส่วนเสริมitemType: "courseWork", "courseWorkMaterials" หรือ "announcement"addOnToken: โทเค็นที่ใช้เพื่อให้สิทธิ์การดำเนินการบางอย่างของส่วนเสริม Classroomlogin_hint: รหัส Google ของผู้ใช้ปัจจุบัน
คำแนะนำแบบทีละขั้นนี้จะอธิบาย courseId, itemId, itemType และ addOnToken
เก็บไว้และส่งต่อเมื่อเรียกใช้ Classroom API
เช่นเดียวกับขั้นตอนการฝึกปฏิบัติก่อนหน้า ให้จัดเก็บค่าพารามิเตอร์การค้นหาที่ส่งในเซสชัน เราจึงต้องดำเนินการดังกล่าวเมื่อเปิดมุมมองการค้นพบไฟล์แนบเป็นครั้งแรก เนื่องจากเป็นโอกาสเดียวที่ Classroom จะส่งพารามิเตอร์การค้นหาเหล่านี้ได้
Python
ไปที่ไฟล์เซิร์ฟเวอร์ Flask ที่มีเส้นทางสำหรับมุมมองการค้นพบไฟล์แนบ (attachment-discovery-routes.py หากคุณทำตามตัวอย่างที่เราให้ไว้
) ที่ด้านบนของเส้นทางการเปลี่ยนเส้นทางของส่วนเสริม
(/classroom-addon ในตัวอย่างที่เราให้ไว้) ให้เรียกข้อมูลและจัดเก็บพารามิเตอร์การค้นหา courseId, itemId, itemType และ addOnToken
# Retrieve the itemId, courseId, and addOnToken query parameters.
if flask.request.args.get("itemId"):
    flask.session["itemId"] = flask.request.args.get("itemId")
if flask.request.args.get("itemType"):
    flask.session["itemType"] = flask.request.args.get("itemType")
if flask.request.args.get("courseId"):
    flask.session["courseId"] = flask.request.args.get("courseId")
if flask.request.args.get("addOnToken"):
    flask.session["addOnToken"] = flask.request.args.get("addOnToken")
เขียนค่าเหล่านี้ลงในเซสชันเฉพาะในกรณีที่มีค่าอยู่เท่านั้น โดยจะไม่ส่งค่าเหล่านี้อีกครั้งหากผู้ใช้กลับมาที่มุมมองการค้นพบไฟล์แนบในภายหลังโดยไม่ได้ปิด iframe
เพิ่มพื้นที่เก็บข้อมูลถาวรสำหรับไฟล์แนบประเภทเนื้อหา
คุณต้องมีบันทึกไฟล์แนบที่สร้างขึ้นในเครื่อง ซึ่งช่วยให้คุณค้นหาเนื้อหาที่ครูเลือกได้โดยใช้ตัวระบุที่ Classroom ระบุ
ตั้งค่าสคีมาฐานข้อมูลสำหรับ Attachment ตัวอย่างที่เราให้มาแสดงไฟล์แนบที่มีรูปภาพและคำบรรยายภาพ
Attachment มีแอตทริบิวต์ต่อไปนี้
attachment_id: ตัวระบุที่ไม่ซ้ำกันสำหรับไฟล์แนบ กำหนดโดย Classroom และส่งคืนในการตอบกลับเมื่อสร้างไฟล์แนบimage_filename: ชื่อไฟล์ในเครื่องของรูปภาพที่จะแสดงimage_caption: คำบรรยายที่จะแสดงพร้อมกับรูปภาพ
Python
ขยายการใช้งาน SQLite และ flask_sqlalchemy จากขั้นตอนก่อนหน้า
ไปที่ไฟล์ที่คุณกำหนดตารางผู้ใช้ (models.py
หากคุณทำตามตัวอย่างที่เราให้ไว้) เพิ่มโค้ดต่อไปนี้ที่ด้านล่าง
ของไฟล์ใต้คลาส User
class Attachment(db.Model):
    # The attachmentId is the unique identifier for the attachment.
    attachment_id = db.Column(db.String(120), primary_key=True)

    # The image filename to store.
    image_filename = db.Column(db.String(120))

    # The image caption to store.
    image_caption = db.Column(db.String(120))
นำเข้าคลาส Attachment ใหม่ลงในไฟล์เซิร์ฟเวอร์ที่มีเส้นทางการจัดการไฟล์แนบ
ตั้งค่าเส้นทางใหม่
เริ่มต้นคำแนะนำแบบทีละขั้นนี้ด้วยการตั้งค่าหน้าใหม่บางหน้าในแอปพลิเคชันของเรา ซึ่งจะช่วยให้ผู้ใช้สร้างและดูเนื้อหาผ่านส่วนเสริมของเราได้
เพิ่มเส้นทางการสร้างไฟล์แนบ
คุณต้องมีหน้าเว็บเพื่อให้ครูเลือกเนื้อหาและส่งคำขอสร้างไฟล์แนบได้
ใช้/attachment-optionsเส้นทางเพื่อแสดงตัวเลือกเนื้อหา
ให้ครูเลือก นอกจากนี้ คุณยังต้องมีเทมเพลตสำหรับหน้าการเลือกเนื้อหาและหน้ายืนยันการสร้างด้วย ตัวอย่างที่เราให้ไว้มีเทมเพลตสำหรับสิ่งเหล่านี้
และยังแสดงคำขอและการตอบกลับจาก
Classroom API ได้ด้วย
โปรดทราบว่าคุณอาจแก้ไขหน้า Landing Page ของมุมมองการค้นพบไฟล์แนบที่มีอยู่เพื่อแสดงตัวเลือกเนื้อหาแทนการสร้างหน้า /attachment-options ใหม่ได้ เราขอแนะนำให้สร้างหน้าใหม่เพื่อวัตถุประสงค์ของแบบฝึกหัดนี้ เพื่อให้คุณรักษาลักษณะการทำงานของ SSO ที่ใช้ในคำแนะนำแบบทีละขั้นที่ 2 ไว้ เช่น การเพิกถอนสิทธิ์ของแอป ซึ่งควรมีประโยชน์ในขณะที่คุณสร้างและทดสอบส่วนเสริม
ครูสามารถเลือกจากชุดรูปภาพที่มีคำบรรยายแทนเสียงขนาดเล็กในตัวอย่างที่เราให้ไว้ เราได้จัดเตรียมรูปภาพสถานที่สำคัญที่มีชื่อเสียง 4 รูป ซึ่งมีคำบรรยายที่ ได้มาจากชื่อไฟล์
Python
ในตัวอย่างที่เราให้ไว้ ข้อมูลนี้จะอยู่ในไฟล์ webapp/attachment_routes.py
@app.route("/attachment-options", methods=["GET", "POST"])
def attachment_options():
    """
    Render the attachment options page from the "attachment-options.html"
    template.

    This page displays a grid of images that the user can select using
    checkboxes.
    """

    # A list of the filenames in the static/images directory.
    image_filenames = os.listdir(os.path.join(app.static_folder, "images"))

    # The image_list_form_builder method creates a form that displays a grid
    # of images, checkboxes, and captions with a Submit button. All images
    # passed in image_filenames will be shown, and the captions will be the
    # title-cased filenames.

    # The form must be built dynamically due to limitations in WTForms. The
    # image_list_form_builder method therefore also returns a list of
    # attribute names in the form, which will be used by the HTML template
    # to properly render the form.
    form, var_names = image_list_form_builder(image_filenames)

    # If the form was submitted, validate the input and create the attachments.
    if form.validate_on_submit():

        # Build a dictionary that maps image filenames to captions.
        # There will be one dictionary entry per selected item in the form.
        filename_caption_pairs = construct_filename_caption_dictionary_list(
            form)

        # Check that the user selected at least one image, then proceed to
        # make requests to the Classroom API.
        if len(filename_caption_pairs) > 0:
            return create_attachments(filename_caption_pairs)
        else:
            return flask.render_template(
                "create-attachment.html",
                message="You didn't select any images.",
                form=form,
                var_names=var_names)

    return flask.render_template(
        "attachment-options.html",
        message=("You've reached the attachment options page. "
                "Select one or more images and click 'Create Attachment'."),
        form=form,
        var_names=var_names,
    )
ซึ่งจะสร้างหน้า "สร้างไฟล์แนบ" ที่มีลักษณะดังนี้
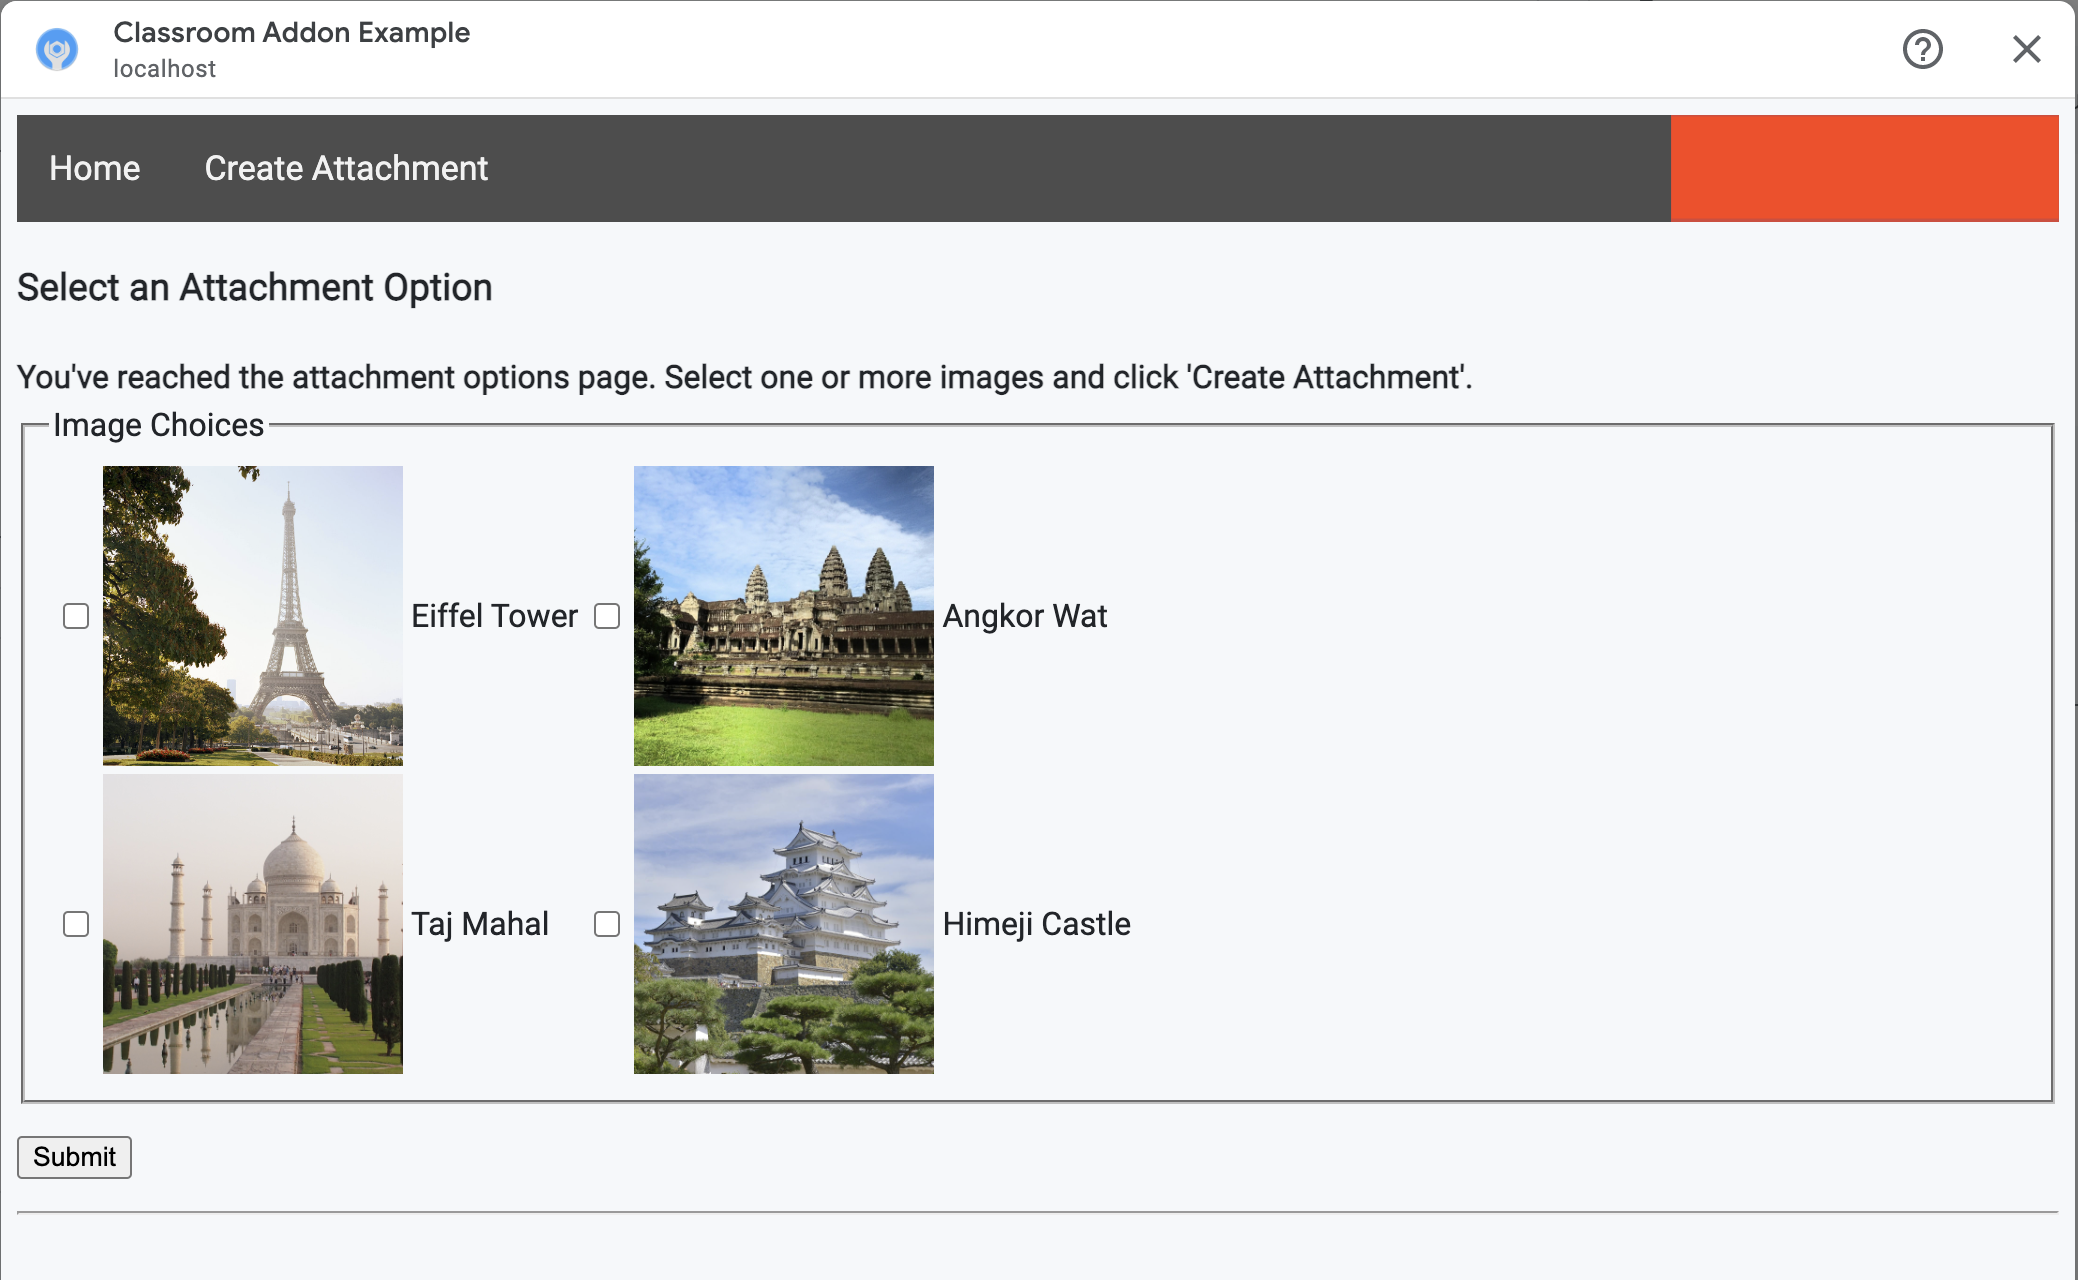
ครูสามารถเลือกรูปภาพได้หลายรูป สร้างไฟล์แนบ 1 ไฟล์สำหรับรูปภาพแต่ละรูป
ที่ครูเลือกในcreate_attachmentsวิธี
ส่งคำขอสร้างไฟล์แนบของปัญหา
ตอนนี้คุณทราบแล้วว่าครูต้องการแนบเนื้อหาส่วนใด ให้ส่งคำขอไปยัง Classroom API เพื่อสร้างไฟล์แนบใน งาน จัดเก็บรายละเอียดไฟล์แนบในฐานข้อมูลหลังจากได้รับ การตอบกลับจาก Classroom API
เริ่มต้นด้วยการรับอินสแตนซ์ของบริการ Classroom
Python
ในตัวอย่างที่เราให้ไว้ ข้อมูลนี้จะอยู่ในไฟล์ webapp/attachment_routes.py
def create_attachments(filename_caption_pairs):
    """
    Create attachments and show an acknowledgement page.

    Args:
        filename_caption_pairs: A dictionary that maps image filenames to
            captions.
    """
    # Get the Google Classroom service.
    classroom_service = googleapiclient.discovery.build(
        serviceName="classroom",
        version="v1",
        credentials=credentials)
ส่งคำขอ CREATE ไปยังปลายทาง courses.courseWork.addOnAttachments สำหรับรูปภาพแต่ละรูปที่ครูเลือก ให้สร้างAddOnAttachmentออบเจ็กต์ก่อน
Python
ในตัวอย่างที่เราให้ไว้ นี่คือส่วนต่อจากcreate_attachments
method
# Create a new attachment for each image that was selected.
attachment_count = 0
for key, value in filename_caption_pairs.items():
    attachment_count += 1

    # Create a dictionary with values for the AddOnAttachment object fields.
    attachment = {
        # Specifies the route for a teacher user.
        "teacherViewUri": {
            "uri":
                flask.url_for(
                    "load_content_attachment", _scheme='https', _external=True),
        },
        # Specifies the route for a student user.
        "studentViewUri": {
            "uri":
                flask.url_for(
                    "load_content_attachment", _scheme='https', _external=True)
        },
        # The title of the attachment.
        "title": f"Attachment {attachment_count}",
    }
ต้องระบุฟิลด์ teacherViewUri, studentViewUri และ title อย่างน้อยสำหรับไฟล์แนบแต่ละรายการ teacherViewUri และ studentViewUri
แสดง URL ที่โหลดเมื่อผู้ใช้ประเภทนั้นๆ เปิดไฟล์แนบ
ส่งออบเจ็กต์ AddOnAttachment ในเนื้อหาของคำขอไปยังปลายทาง addOnAttachments ที่เหมาะสม ระบุตัวระบุ courseId, itemId, itemType และ addOnToken พร้อมกับคำขอแต่ละรายการ
Python
ในตัวอย่างที่เราให้ไว้ นี่คือส่วนต่อจากcreate_attachments
method
# Use the itemType to determine which stream item type the teacher created
match flask.session["itemType"]:
    case "announcements":
        parent = classroom_service.courses().announcements()
    case "courseWorkMaterials":
        parent = classroom_service.courses().courseWorkMaterials()
    case _:
        parent = classroom_service.courses().courseWork()

# Issue a request to create the attachment.
resp = parent.addOnAttachments().create(
    courseId=flask.session["courseId"],
    itemId=flask.session["itemId"],
    addOnToken=flask.session["addOnToken"],
    body=attachment).execute()
สร้างรายการสำหรับไฟล์แนบนี้ในฐานข้อมูลในเครื่องเพื่อให้คุณโหลดเนื้อหาที่ถูกต้องได้ในภายหลัง
Classroom จะแสดงค่า id ที่ไม่ซ้ำกัน
ในการตอบกลับคำขอสร้าง ดังนั้นให้ใช้ค่านี้เป็นคีย์หลักในฐานข้อมูล
ของเรา โปรดทราบว่า Classroom จะส่งพารามิเตอร์attachmentId
คำค้นหาเมื่อเปิดมุมมองครูและนักเรียน
Python
ในตัวอย่างที่เราให้ไว้ นี่คือส่วนต่อจากcreate_attachments
method
# Store the value by id.
new_attachment = Attachment(
    # The new attachment's unique ID, returned in the CREATE response.
    attachment_id=resp.get("id"),
    image_filename=key,
    image_caption=value)
db.session.add(new_attachment)
db.session.commit()
พิจารณาเปลี่ยนเส้นทางผู้ใช้ไปยังหน้ายืนยันในตอนนี้เพื่อรับทราบว่าผู้ใช้สร้างไฟล์แนบสำเร็จแล้ว
อนุญาตไฟล์แนบจากส่วนเสริม
ตอนนี้เป็นโอกาสที่ดีในการเพิ่มที่อยู่ที่เหมาะสมลงในฟิลด์คำนำหน้า URI ของไฟล์แนบที่อนุญาต ในหน้าการกำหนดค่าแอป ของ SDK สำหรับ Google Workspace Marketplace ส่วนเสริมจะสร้างไฟล์แนบได้จากคำนำหน้า URI อย่างใดอย่างหนึ่งที่แสดงในหน้านี้เท่านั้น ซึ่งเป็นมาตรการรักษาความปลอดภัยเพื่อช่วยลดโอกาส ในการโจมตีแบบแทรกกลางของบุคคลภายนอก (MITM)
วิธีที่ง่ายที่สุดคือการระบุโดเมนระดับบนสุดในช่องนี้ เช่น https://example.com https://localhost:<your port number>/จะใช้ได้หากคุณใช้เครื่องในพื้นที่เป็นเว็บเซิร์ฟเวอร์
เพิ่มเส้นทางสำหรับมุมมองของครูและนักเรียน
มี iframe 4 รายการที่อาจโหลดส่วนเสริมของ Google Classroom คุณสร้างเส้นทางที่แสดง iframe ของมุมมองการค้นพบไฟล์แนบเท่านั้นจนถึงตอนนี้ จากนั้นเพิ่มเส้นทางเพื่อแสดง iframe ของมุมมองครูและนักเรียนด้วย
ต้องใช้ iframe ของมุมมองของครูเพื่อแสดงตัวอย่างประสบการณ์ของนักเรียน แต่จะรวมข้อมูลเพิ่มเติมหรือฟีเจอร์การแก้ไขก็ได้
มุมมองของนักเรียนคือหน้าที่แสดงต่อนักเรียนแต่ละคนเมื่อเปิดไฟล์แนบส่วนเสริม
สำหรับการฝึกหัดนี้ ให้สร้าง/load-content-attachment เส้นทางเดียวที่แสดงทั้งมุมมองของครูและนักเรียน/นักศึกษา ใช้วิธีการของ Classroom API เพื่อพิจารณาว่าผู้ใช้เป็นครูหรือนักเรียนนักศึกษาเมื่อหน้าเว็บโหลด
Python
ในตัวอย่างที่เราให้ไว้ ข้อมูลนี้จะอยู่ในไฟล์ webapp/attachment_routes.py
@app.route("/load-content-attachment")
def load_content_attachment():
    """
    Load the attachment for the user's role."""

    # Since this is a landing page for the Teacher and Student View iframes, we
    # need to preserve the incoming query parameters.
    if flask.request.args.get("itemId"):
        flask.session["itemId"] = flask.request.args.get("itemId")
    if flask.request.args.get("itemType"):
        flask.session["itemType"] = flask.request.args.get("itemType")
    if flask.request.args.get("courseId"):
        flask.session["courseId"] = flask.request.args.get("courseId")
    if flask.request.args.get("attachmentId"):
        flask.session["attachmentId"] = flask.request.args.get("attachmentId")
โปรดทราบว่าคุณควรตรวจสอบสิทธิ์ผู้ใช้ในขั้นตอนนี้ด้วย นอกจากนี้ คุณควรจัดการพารามิเตอร์การค้นหา login_hint ที่นี่ และกำหนดเส้นทางให้ผู้ใช้ไปยังขั้นตอนการให้สิทธิ์หากจำเป็น ดูข้อมูลเพิ่มเติมเกี่ยวกับขั้นตอนการทำงานนี้ได้ที่รายละเอียดคำแนะนำในการเข้าสู่ระบบที่กล่าวถึง
ในคำแนะนำแบบทีละขั้นตอนก่อนหน้านี้
จากนั้นส่งคำขอไปยังปลายทาง getAddOnContext ที่ตรงกับประเภทรายการ
Python
ในตัวอย่างที่เราให้ไว้ วิธีนี้เป็นการต่อยอดจากload_content_attachment วิธี
# Create an instance of the Classroom service.
classroom_service = googleapiclient.discovery.build(
    serviceName="classroom"
    version="v1",
    credentials=credentials)

# Use the itemType to determine which stream item type the teacher created
match flask.session["itemType"]:
    case "announcements":
        parent = classroom_service.courses().announcements()
    case "courseWorkMaterials":
        parent = classroom_service.courses().courseWorkMaterials()
    case _:
        parent = classroom_service.courses().courseWork()

addon_context_response = parent.getAddOnContext(
    courseId=flask.session["courseId"],
    itemId=flask.session["itemId"]).execute()
เมธอดนี้จะแสดงข้อมูลเกี่ยวกับบทบาทของผู้ใช้ปัจจุบันในชั้นเรียน
ปรับเปลี่ยนมุมมองที่แสดงต่อผู้ใช้ตามบทบาทของผู้ใช้ ระบบจะป้อนข้อมูลในฟิลด์ studentContext หรือ teacherContext อย่างใดอย่างหนึ่งในออบเจ็กต์การตอบกลับ ตรวจสอบข้อมูลเหล่านี้เพื่อพิจารณาวิธีติดต่อผู้ใช้
ไม่ว่าจะในกรณีใด ให้ใช้ค่าพารามิเตอร์การค้นหา attachmentId เพื่อดูว่าควรดึงไฟล์แนบใดจากฐานข้อมูลของเรา พารามิเตอร์การค้นหานี้จะระบุเมื่อ
เปิด URI ของมุมมองครูหรือนักเรียน
Python
ในตัวอย่างที่เราให้ไว้ วิธีนี้เป็นการต่อยอดจากload_content_attachment วิธี
# Determine which view we are in by testing the returned context type.
user_context = "student" if addon_context_response.get(
    "studentContext") else "teacher"

# Look up the attachment in the database.
attachment = Attachment.query.get(flask.session["attachmentId"])

# Set the text for the next page depending on the user's role.
message_str = f"I see that you're a {user_context}! "
message_str += (
    f"I've loaded the attachment with ID {attachment.attachment_id}. "
    if user_context == "teacher" else
    "Please enjoy this image of a famous landmark!")

# Show the content with the customized message text.
return flask.render_template(
    "show-content-attachment.html",
    message=message_str,
    image_filename=attachment.image_filename,
    image_caption=attachment.image_caption,
    responses=response_strings)
ทดสอบส่วนเสริม
ทำตามขั้นตอนต่อไปนี้เพื่อทดสอบการสร้างไฟล์แนบ
- ลงชื่อเข้าใช้ [Google Classroom] ในฐานะผู้ใช้ทดสอบที่เป็นครู
- ไปที่แท็บงานของชั้นเรียน แล้วสร้างงานใหม่
- คลิกปุ่มส่วนเสริมใต้พื้นที่ข้อความ แล้วเลือกส่วนเสริม iframe จะเปิดขึ้นและส่วนเสริมจะโหลด URI การตั้งค่าไฟล์แนบที่คุณระบุในหน้าการกำหนดค่าแอปของ SDK สำหรับ Google Workspace Marketplace
- เลือกเนื้อหาที่จะแนบไปกับงาน
- ปิด iframe หลังจากขั้นตอนการสร้างไฟล์แนบเสร็จสมบูรณ์
คุณควรเห็นการ์ดไฟล์แนบปรากฏใน UI การสร้างงานใน Google Google Classroom คลิกการ์ดเพื่อเปิด iframe ของมุมมองครูและยืนยัน ว่าไฟล์แนบที่ถูกต้องปรากฏขึ้น คลิกปุ่มมอบหมาย
ทำตามขั้นตอนต่อไปนี้เพื่อทดสอบประสบการณ์การใช้งานของนักเรียน/นักศึกษา
- จากนั้นลงชื่อเข้าใช้ Classroom ในฐานะผู้ใช้ทดสอบที่เป็นนักเรียนในชั้นเรียนเดียวกับผู้ใช้ทดสอบที่เป็นครู
- ค้นหางานที่เป็นแบบทดสอบในแท็บงานของชั้นเรียน
- ขยายงานแล้วคลิกการ์ดไฟล์แนบเพื่อเปิด iframe มุมมองของนักเรียน
ตรวจสอบว่าไฟล์แนบที่ถูกต้องปรากฏต่อนักเรียน
ยินดีด้วย คุณพร้อมที่จะไปยังขั้นตอนถัดไปแล้ว นั่นคือการสร้าง ไฟล์แนบประเภทกิจกรรม