
1. 简介
Google Chat 应用可将服务和资源直接引入 Chat,让用户无需离开对话即可获取信息和执行操作。
在此 Codelab 中,您将学习如何创建一款 Chat 应用(“Attendance Chat app”),该应用可在 Gmail 中设置休假回复,并在 Google 日历中安排会议。通过使用 Google Apps 脚本构建出席情况聊天应用,您可以轻松访问其他 Google 服务,例如云端硬盘、Gmail、日历、文档、表格等。
学习内容
- 如何在 Chat 引发的事件中添加处理程序
- 如何解析从 Chat 发送的事件对象
- 如何使用卡片格式的响应回复 Chat
- 如何定义和响应卡片中按钮点击的自定义操作
所需条件
- 可连接到互联网的计算机和网络浏览器。
- 拥有可访问 Google Chat 的 Google Workspace 账号。
- 具备基本的 JavaScript 技能 - Google Apps 脚本仅支持 JavaScript。
2. 获取示例代码
您可以下载 ZIP 文件,也可以克隆 GitHub 代码库,以查看此示例中每个步骤的代码。
apps-script/attendance-chat-app 下的 step-NN 文件夹包含此 Codelab 的每个步骤的结束状态。这些内容可供参考。
下载代码
如需下载此 Codelab 的代码,请点击以下按钮:
解压下载的 ZIP 文件。这将解压根文件夹 (google-chat-samples),其中包含本 Codelab 的每个步骤的一个文件夹(位于 apps-script/attendance-chat-app 下)。
克隆 GitHub 代码库
如需克隆此 Codelab 的 GitHub 代码库,请运行以下命令:
git clone https://github.com/googleworkspace/google-chat-samples
3. 为 Google Chat 事件创建处理脚本
创建 Apps 脚本项目
如需创建 Apps 脚本项目,请执行以下步骤:
- 前往 script.new。
- 点击未命名项目。
- 将脚本重命名为 Attendance Chat app,然后点击重命名。
Google Chat 中的事件
Apps 脚本与 Chat 的大多数互动都是由事件驱动的。用户、Google Chat 应用和 Google Chat 通常按照以下顺序进行互动:
- 用户发起一项操作,例如将 Chat 应用添加到聊天室、向 Chat 应用发送私信 (DM) 或从聊天室中移除 Chat 应用。
- 该操作会触发一个事件,其目标直指 Chat 中的 Chat 应用。
- Chat 会调用 Chat 应用脚本中定义的相应事件处理脚本。
Chat 会触发 4 种可由应用监听的事件:
ADDED_TO_SPACE:如果真人用户将 Chat 应用添加到聊天室或私信 (DM) 中,此事件就会发生。在 Apps 脚本中,请定义一个onAddToSpace()函数来处理此事件。REMOVED_FROM_SPACE:当用户从聊天室或私信中移除 Chat 应用时,会发生此事件。此事件不会将回复回传到 Chat。在 Apps 脚本中,请定义一个onRemoveFromSpace()函数来处理此事件。MESSAGE:用户直接在私信中或在聊天室中以 @mention 形式向 Chat 应用发送消息时,会发生此事件。在 Apps 脚本中,请定义一个onMessage()函数来响应此事件。CARD_CLICKED:当用户点击分配有自定义操作的按钮时,系统会触发此事件。在 Apps 脚本中,请定义一个onCardClick()函数来响应此事件。
将 Code.gs 文件的内容替换为以下代码,该代码定义了 ADDED_TO_SPACE 和 REMOVE_FROM_SPACE 事件的处理脚本。(您将在本 Codelab 的后面部分添加 MESSAGE 和 CARD_CLICKED 事件的处理脚本。)
Code.gs
/**
 * Responds to an ADDED_TO_SPACE event in Google Chat.
 * @param {object} event the event object from Google Chat
 * @return {object} JSON-formatted response
 * @see https://developers.google.com/workspace/chat/receive-respond-interactions
 */
function onAddToSpace(event) {
  console.info(event);
  var message = 'Thank you for adding me to ';
  if (event.space.type === 'DM') {
    message += 'a DM, ' + event.user.displayName + '!';
  } else {
    message += event.space.displayName;
  }
  return { text: message };
}

/**
 * Responds to a REMOVED_FROM_SPACE event in Google Chat.
 * @param {object} event the event object from Google Chat
 * @see https://developers.google.com/workspace/chat/receive-respond-interactions
 */
function onRemoveFromSpace(event) {
  console.info(event);
  console.log('Chat app removed from ', event.space.name);
}
4. 发布并测试 Chat 应用
更新脚本清单文件
您必须先更新脚本清单,然后才能将应用发布到 Chat。
- 点击项目设置
 。
。 - 选中在编辑器中显示“appsscript.json”清单文件复选框。
- 点击编辑器
 。
。 - 点击
appsscript.json文件。 - 将
"chat": {}行添加到清单文件中。
您的清单文件应类似于以下示例。
appsscript.json
{
  "timeZone": "America/Los_Angeles",
  "dependencies": {
  },
  "chat": {}
}
创建 Google Cloud 项目
您必须先创建 Google Cloud 项目、启用和配置 Chat API,并将您的 Chat 应用发布到 Google Workspace 组织,然后才能运行和测试 Chat 应用。
- 在 Google Cloud 控制台中,依次前往“菜单”图标
 > IAM 和管理 > 创建项目。
 - 在项目名称中,输入一个描述性名称。
- 如果系统提示,请选择组织和结算账号。
- 点击创建。
- 项目创建完成后,页面右上角会显示一则通知。点击“创建项目:<项目名称>”条目,打开项目。
- 点击“菜单”图标 > API 和服务 > 凭据。
- 点击 OAuth 同意屏幕。
- 对于应用名称,输入 Attendance Chat 应用。
- 如果系统提示,请输入用户支持电子邮件地址和开发者联系信息。
- 点击保存并继续。
- 点击“设置和实用程序”图标
 > 项目设置。
 - 复制项目编号。
- 返回到 App 脚本编辑器,然后点击项目设置 。
- 在 Google Cloud Platform (GCP) 项目下,点击更改项目。
- 点击 GCP 项目编号,然后输入项目编号。
- 点击设置项目。
将应用发布到 Chat
如需将 Chat 应用发布到 Google Chat,请执行以下操作:
- 在 Apps 脚本编辑器中,依次点击部署 > 新部署。
- 点击选择类型旁边的“启用部署类型”图标 。
- 选择插件,然后点击部署。
- 复制部署 ID,然后点击完成。
- 在 Google Cloud 控制台中,依次前往“菜单”图标 > API 和服务 > 库。
- 搜索 Google Chat API。从结果列表中选择相应 API。
- 在 Google Chat API 页面上,点击启用。
- 启用 API 后,点击配置。忽略要求您创建凭据的所有消息。
- 在配置页面上,执行以下操作:
- 取消选中将此 Chat 扩展应用构建为 Workspace 插件,然后点击停用进行确认。
- 对于应用名称,输入 Attendance Chat 应用。
- 在头像网址中,输入 https://goo.gl/kv2ENA。
- 在说明中,输入 Apps 脚本 Codelab Chat 应用。
- 在功能下,选择接收一对一消息。
- 在连接设置下,选择 Apps 脚本项目,然后将脚本的部署 ID 粘贴到文本框中。
- 在权限下方,选择您网域中的特定人员和群组。在下拉菜单下方的文本框中,输入与您的 Google Workspace 组织关联的电子邮件地址。
- 点击保存。
保存更改后,请确认 Google Chat API 页面上的状态将应用状态显示为已上线 - 可供用户使用。
测试 Chat 应用
如需在 Google Chat 中测试应用,请执行以下操作:
- 打开 Google Chat。
- 点击“发起聊天”图标
 > 查找应用,向 Chat 应用发送新的私信。
 - 在“查找应用”页面上,搜索“Attendance Chat”应用。
- 点击出席聊天应用旁边的添加> 聊天。
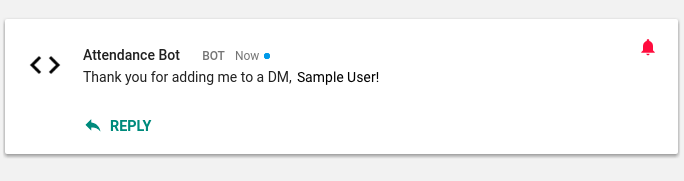
打开私信话题后,您应该会看到一条 Chat 应用发来的消息,感谢您将其添加到私信中,如下图所示。
5. 定义卡片格式的回答
在上一步中,您的应用通过简单的文本响应来响应 Google Chat 事件。在此步骤中,您将更新应用以使用卡片来响应。
卡片响应
Google Chat 支持使用卡片进行回答。卡片是一种可视化容器,可用于将一组界面 widget 分组在一起。卡片可以显示标题、文本段落、按钮集、图片和键值对文本。您的应用可以在向 Google Chat 发出的 JSON 响应中定义一张或多张卡片,然后卡片会将您的响应转换为相应的界面元素。
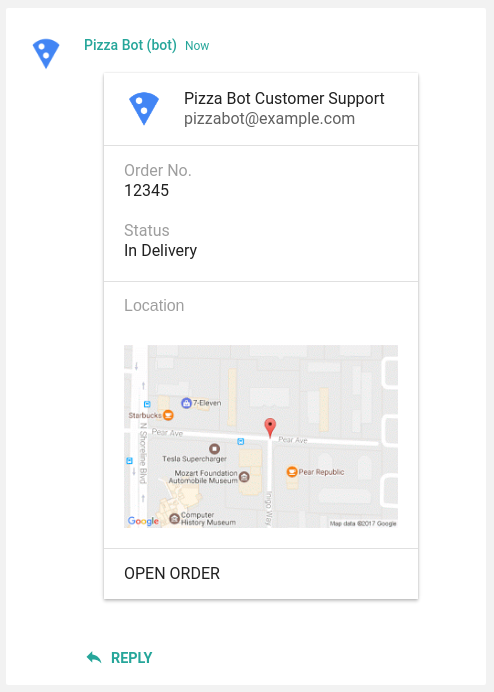
下图显示了包含三个部分的卡片响应,其中包括标题、键值对微件、图片微件和文本按钮。
如需使用卡片响应来回复用户消息,请将以下代码添加到 Chat 应用的 Code.gs 文件中。
Code.gs
const DEFAULT_IMAGE_URL = 'https://goo.gl/bMqzYS';
const HEADER = {
  header: {
    title : 'Attendance Chat app',
    subtitle : 'Log your vacation time',
    imageUrl : DEFAULT_IMAGE_URL
  }
};

/**
 * Creates a card-formatted response.
 * @param {object} widgets the UI components to send
 * @return {object} JSON-formatted response
 */
function createCardResponse(widgets) {
  return {
    cards: [HEADER, {
      sections: [{
        widgets: widgets
      }]
    }]
  };
}

/**
 * Responds to a MESSAGE event triggered
 * in Google Chat.
 *
 * @param event the event object from Google Chat
 * @return JSON-formatted response
 */
function onMessage(event) {
  const userMessage = event.message.text;

  const widgets = [{
    "textParagraph": {
      "text": "You said: " + userMessage
    }
  }];

  return createCardResponse(widgets);
}
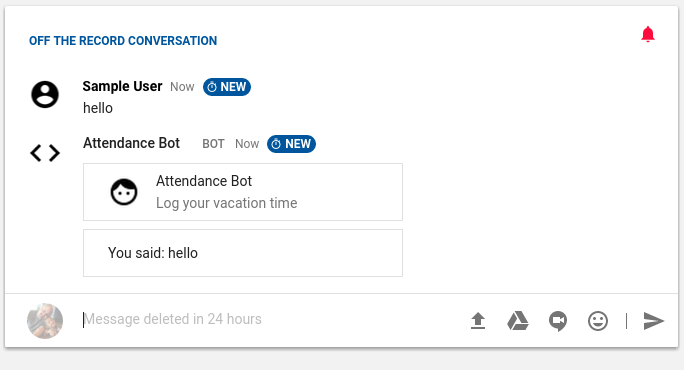
在此步骤中添加的 onMessage() 函数会读取用户的原始消息,并将响应构建为一个简单的 TextParagragh 微件。然后,onMessage() 函数会调用 createCardResponse(),该函数会将 TextParagraph widget 放置在单个卡片的部分中。Chat 应用会将使用卡片响应构建的 JavaScript 对象返回给 Google Chat。
测试 Chat 应用
如需测试此应用,请返回 Google Chat 中与该应用的私信对话,然后输入一条消息(任何消息都可以)。
请注意,onMessage() 事件处理脚本会解析 Google Chat 传递给它的事件对象以提取用户的原始消息。您还可以获取与事件相关的其他类型的信息,包括发起事件的用户的名称、用户的电子邮件地址、发生事件的聊天室的名称等等。
如需详细了解 Google Chat 发送的事件对象的结构,请参阅事件格式参考文档。
6. 对卡片中的按钮点击做出反应
在上一步中,您的 Chat 应用响应了用户发送的消息(MESSAGE 事件),其中包含一张带有 TextParagragh 微件的简单卡片。在此步骤中,您将创建包含按钮的响应,其中每个按钮都定义了一项自定义操作。
互动卡片
卡片响应可以包含两种类型之一的按钮:文本按钮微件(用于显示纯文本按钮),以及 ImageButton 微件(用于显示带有不含文本的简单图标或图片的按钮)。TextButton 和 ImageButton 微件均支持两种 onClick 行为之一(如发送回 Google Chat 的 JSON 响应中所定义):openLink 或 action。顾名思义,openLink 会在新浏览器标签页中打开指定链接。
action 对象用于指定按钮要执行的自定义操作。您可以在操作对象中指定多个任意值,包括唯一的 actionMethodName 和一组键 / 值参数对。
为按钮指定 action 对象会创建互动式卡片。当用户点击消息中的按钮时,Google Chat 会引发 CARD_CLICKED 事件,并将请求发送回发送原始消息的应用。然后,应用需要处理 Google Chat 引发的事件,并将回复返回到相应聊天室。
将 Code.gs 中的 onMessage() 函数替换为以下代码。此代码会在发送给 Google Chat 的卡片中创建 2 个按钮,分别是 Set vacation in Gmail 和 Block out day in Calendar。
Code.gs
const REASON = {
  SICK: 'Out sick',
  OTHER: 'Out of office'
};
/**
 * Responds to a MESSAGE event triggered in Google Chat.
 * @param {object} event the event object from Google Chat
 * @return {object} JSON-formatted response
 */
function onMessage(event) {
  console.info(event);
  const reason = REASON.OTHER;
  const name = event.user.displayName;
  const userMessage = event.message.text;

  // If the user said that they were 'sick', adjust the image in the
  // header sent in response.
  if (userMessage.indexOf('sick') > -1) {
    // Hospital material icon
    HEADER.header.imageUrl = 'https://goo.gl/mnZ37b';
    reason = REASON.SICK;
  } else if (userMessage.indexOf('vacation') > -1) {
    // Spa material icon
    HEADER.header.imageUrl = 'https://goo.gl/EbgHuc';
  }

  const widgets = [{
    textParagraph: {
      text: 'Hello, ' + name + '.<br/>Are you taking time off today?'
    }
  }, {
    buttons: [{
      textButton: {
        text: 'Set vacation in Gmail',
        onClick: {
          action: {
            actionMethodName: 'turnOnAutoResponder',
            parameters: [{
              key: 'reason',
              value: reason
            }]
          }
        }
      }
    }, {
      textButton: {
        text: 'Block out day in Calendar',
        onClick: {
          action: {
            actionMethodName: 'blockOutCalendar',
            parameters: [{
              key: 'reason',
              value: reason
            }]
          }
        }
      }
    }]
  }];
  return createCardResponse(widgets);
}
如需处理 CARD_CLICKED 事件,必须将 onCardClick() 函数添加到 Chat 应用的脚本中。添加以下代码,用于定义 onCardClick() 函数 Code.gs。
Code.gs
/**
 * Responds to a CARD_CLICKED event triggered in Google Chat.
 * @param {object} event the event object from Google Chat
 * @return {object} JSON-formatted response
 * @see https://developers.google.com/workspace/chat/receive-respond-interactions
 */
function onCardClick(event) {
  console.info(event);
  let message = '';
  const reason = event.action.parameters[0].value;
  if (event.action.actionMethodName == 'turnOnAutoResponder') {
    turnOnAutoResponder(reason);
    message = 'Turned on vacation settings.';
  } else if (event.action.actionMethodName == 'blockOutCalendar') {
    blockOutCalendar(reason);
    message = 'Blocked out your calendar for the day.';
  } else {
    message = "I'm sorry; I'm not sure which button you clicked.";
  }
  return { text: message };
}
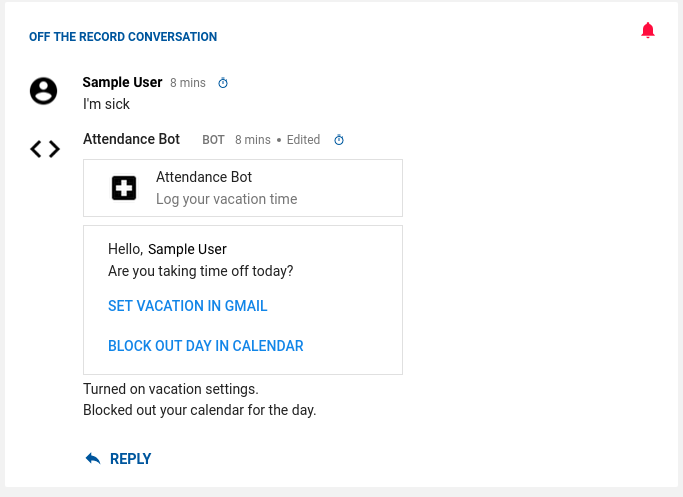
在响应用户点击时,Chat 应用现在会执行以下两项操作之一:将用户在 Gmail 中的外出回复设置为不在办公室时的自动邮件回复,或者在用户的日历上安排一场全天举行的会议。为了完成这些任务,该应用会调用 Gmail 高级服务和日历服务。
将以下代码添加到您的脚本中,以便将 Chat 应用与 Gmail 和日历集成。
Code.gs
const ONE_DAY_MILLIS = 24 * 60 * 60 * 1000;
/**
 * Turns on the user's vacation response for today in Gmail.
 * @param {string} reason the reason for vacation, either REASON.SICK or REASON.OTHER
 */
function turnOnAutoResponder(reason) {
  let currentTime = (new Date()).getTime();
  Gmail.Users.Settings.updateVacation({
    enableAutoReply: true,
    responseSubject: reason,
    responseBodyHtml: "I'm out of the office today; will be back on the next business day.<br><br><i>Created by Attendance Chat app!</i>",
    restrictToContacts: true,
    restrictToDomain: true,
    startTime: currentTime,
    endTime: currentTime + ONE_DAY_MILLIS
  }, 'me');
}

/**
 * Places an all-day meeting on the user's Calendar.
 * @param {string} reason the reason for vacation, either REASON.SICK or REASON.OTHER
 */
function blockOutCalendar(reason) {
  CalendarApp.createAllDayEvent(reason, new Date(), new Date(Date.now() + ONE_DAY_MILLIS));
}
最后,您必须在项目中启用 Gmail 高级服务。如需启用 Gmail API,请执行以下操作:
- 在 Apps 脚本编辑器中,点击服务旁边的“添加服务”图标 。
- 选择 Gmail API。
- 点击下方的 Google Cloud Platform API 信息中心,以打开 Google Cloud 控制台。
- 点击启用 API 和服务。
- 搜索 Gmail API,然后点击“Gmail API”。
- 在 Gmail API 页面上,点击启用。
测试 Chat 应用
如需测试此版本的 Chat 应用,请在 Google Chat 中打开您在上述步骤中发起的私信,然后输入我打算休假。应用应返回类似于下图所示的卡片。
注意:如果系统要求您提供应用访问权限,您可能需要再次输入消息。
7. 恭喜!
现在,Chat 应用可以回复用户消息、在 Gmail 中设置外出回复,以及在用户的日历中安排全天活动。
所学内容
- 使用 Apps 脚本创建并发布了 Google Chat 应用
- 使用简单回复回应用户消息
- 通过 Chat 应用代表用户与其他 Google Workspace 服务互动