
1. 事前準備
本程式碼研究室將說明如何將 Places SDK for Android 整合到應用程式,並使用各項功能。

必要條件
- 具備 Kotlin 和 Android 開發作業的基本知識
課程內容
- 如何安裝 Places SDK for Android Kotlin 擴充功能。
- 如何載入特定地點的 Place Details。
- 如何在應用程式中加入「地點自動完成」小工具。
- 如何根據裝置回報的目前位置載入 Current Place。
軟硬體需求
如要完成本程式碼研究室,您需要下列帳戶、服務和工具:
- 已啟用計費功能的 Google 帳戶。
- Android Studio Bumblebee 以上版本。
- 在 Android Studio 中安裝 Google Play 服務。
- 搭載 Android 8 以上版本的 Android 裝置或 Android 模擬器 (如需安裝步驟,請參閱「在 Android 模擬器上執行應用程式」)。
2. 做好準備
在下方的啟用步驟中,請啟用 Places API 和 Maps SDK for Android。
設定 Google 地圖平台
如果您尚未建立 Google Cloud Platform 帳戶,以及啟用計費功能的專案,請參閱「開始使用 Google 地圖平台」指南,建立帳單帳戶和專案。
- 在 Cloud 控制台中,按一下專案下拉式選單,然後選取要用於本程式碼研究室的專案。

- 在 Google Cloud Marketplace 中,啟用本程式碼研究室所需的 Google 地圖平台 API 和 SDK。如要瞭解如何操作,請觀看這部影片或參閱這份說明文件。
- 在 Cloud Console 的「憑證」頁面中產生 API 金鑰。你可以按照這部影片或這份文件中的步驟操作。所有 Google 地圖平台要求都需要 API 金鑰。
3. 快速入門
如要盡快上手,請下載範例程式碼,以便您跟著本程式碼實驗室的說明操作。歡迎直接跳到解決方案,但如果您想按照所有步驟自行建構,請繼續閱讀。
- 如果已安裝
git,請複製存放區。
git clone https://github.com/googlemaps/codelab-places-101-android-kotlin.git
或者,您也可以點選這個按鈕下載原始碼。
- 下載程式碼後,請在 Android Studio 中開啟
/starter目錄內的專案。這個專案包含完成程式碼研究室所需的基本檔案結構。所有工作所需項目都位於/starter目錄中。
如要查看完整的解決方案程式碼,請前往 /solution 目錄。
4. 將 API 金鑰加進專案
本節將說明如何儲存 API 金鑰,讓應用程式以安全的方式參照金鑰。API 金鑰不應該登錄在版本管控系統中;我們建議將金鑰儲存在 secrets.properties 檔案內,該檔案會放在專案根目錄的本機副本中。如要進一步瞭解 secrets.properties 檔案,請參閱「Gradle 屬性檔案」。
建議您使用 Secrets Gradle Plugin for Android 來簡化這項工作。
如要在 Google 地圖專案中安裝 Secrets Gradle Plugin for Android,請按照下列步驟操作:
- 在 Android Studio 中開啟頂層的
build.gradle.kts或build.gradle檔案,然後將下列程式碼加進buildscript下方的dependencies元素。
如果使用 build.gradle.kts,請新增:
buildscript {
    dependencies {
        classpath("com.google.android.libraries.mapsplatform.secrets-gradle-plugin:secrets-gradle-plugin:2.0.1")
    }
}
如果使用 build.gradle,請新增:
buildscript {
    dependencies {
        classpath "com.google.android.libraries.mapsplatform.secrets-gradle-plugin:secrets-gradle-plugin:2.0.1"
    }
}
- 開啟模組層級的
build.gradle.kts或build.gradle檔案,然後將下列程式碼加進plugins元素。
如果使用 build.gradle.kts,請新增:
plugins {
    // ...
    id("com.google.android.libraries.mapsplatform.secrets-gradle-plugin")
}
如果使用 build.gradle,請新增:
plugins {
    // ...
    id 'com.google.android.libraries.mapsplatform.secrets-gradle-plugin'
}
- 在模組層級的
build.gradle.kts或build.gradle檔案中,確認targetSdk和compileSdk已設為 34。 - 儲存檔案,然後使用 Gradle 同步處理專案。
- 開啟頂層目錄中的
secrets.properties檔案,並加入下列程式碼,然後將YOUR_API_KEY替換成您的 API 金鑰。secrets.properties不會登錄在版本管控系統中,因此請將金鑰儲存至該檔案。
PLACES_API_KEY=YOUR_API_KEY
- 儲存檔案。
- 在頂層目錄 (與
secrets.properties檔案相同的資料夾) 中建立local.defaults.properties檔案,然後加入下列程式碼。
PLACES_API_KEY=DEFAULT_API_KEY
如果找不到 secrets.properties 檔案,這個檔案便可做為 API 金鑰的備份位置,以確保建置程序不會失敗。如果您從略過 secrets.properties 的版本管控系統複製應用程式,且尚未在本機建立 secrets.properties 檔案來提供 API 金鑰,就可能會發生這種情況。
- 儲存檔案。
- 在 Android Studio 中開啟模組層級的
build.gradle.kts或build.gradle檔案,然後編輯secrets屬性。如果沒有secrets屬性,請新增該屬性。
編輯外掛程式的屬性,將 propertiesFileName 設為 secrets.properties、將 defaultPropertiesFileName 設為 local.defaults.properties,並設定任何其他屬性。
secrets {
    // Optionally specify a different file name containing your secrets.
    // The plugin defaults to "local.properties"
    propertiesFileName = "secrets.properties"

    // A properties file containing default secret values. This file can be
    // checked in version control.
    defaultPropertiesFileName = "local.defaults.properties"
}
5. 安裝 Places SDK for Android
在本節中,您會將 Places SDK for Android 新增至應用程式的依附元件。
- 現在應用程式可以存取 API 金鑰,請將 Places SDK for Android 依附元件新增至應用程式的
build.gradle檔案。
修改應用程式層級的 build.gradle 檔案,加入 Places SDK for Android 的依附元件:
應用程式層級 build.gradle
dependencies {
   // Dependency to include Places SDK for Android
   implementation 'com.google.android.libraries.places:places:3.4.0'
}
- 執行應用程式。
現在您應該會看到應用程式,但畫面是空白的。繼續在這個畫面中填入三個試用版。
6. 安裝 Places Android KTX
如果 Kotlin 應用程式使用一或多個 Google 地圖平台 Android SDK,Kotlin 擴充功能 (KTX) 程式庫可讓您充分利用 Kotlin 語言功能,例如協同程式、擴充屬性/函式等。每個 Google 地圖 SDK 都有對應的 KTX 程式庫,如下所示:

在這項工作中,您會使用 Places Android KTX 程式庫,在應用程式中使用 Kotlin 專屬語言功能。
新增 Places Android KTX 依附元件
如要使用 Kotlin 專屬功能,請在應用程式層級的 build.gradle 檔案中,加入這個 SDK 的對應 KTX 程式庫。
build.gradle
dependencies {
    // ...

    // Places SDK for Android KTX Library
    implementation 'com.google.maps.android:places-ktx:3.1.1'
}
7. 初始化 Places 用戶端
初始化應用程式範圍的 Places SDK
在 app/src/main/java/com/google/codelabs/maps/placesdemo 資料夾的 DemoApplication.kt 檔案中,初始化 Places SDK for Android。在 onCreate 函式的結尾貼上下列程式碼:
        // Initialize the SDK with the Google Maps Platform API key
        Places.initialize(this, BuildConfig.PLACES_API_KEY)
建構應用程式時,Secrets Gradle Plugin for Android 會將 secrets.properties 檔案中的 API 金鑰當成 BuildConfig.PLACES_API_KEY 使用。
將應用程式檔案新增至資訊清單
由於您已透過 DemoApplication 擴充 Application,因此必須更新資訊清單。在 app/src/main 中的 AndroidManifest.xml 檔案,將 android:name 屬性新增至 application 元素:
    <application
        android:name=".DemoApplication"
        ...
    </application>
這段程式碼會將應用程式資訊清單指向 src/main/java/com/google/codelabs/maps/placesdemo/ 資料夾中的 DemoApplication 類別。
8. 擷取地點詳細資料
建立「詳細資料」畫面
app/src/main/res/layout/ 資料夾中提供空白 LinearLayout 的 activity_details.xml 版面配置。在中括號 <LinearLayout> 之間加入下列程式碼,填入線性版面配置。
    <com.google.android.material.textfield.TextInputLayout
        android:layout_width="match_parent"
        android:layout_height="wrap_content">

        <com.google.android.material.textfield.TextInputEditText
            android:id="@+id/details_input"
            android:layout_width="match_parent"
            android:layout_height="wrap_content"
            android:hint="@string/details_input_hint"
            android:text="@string/details_input_default" />

    </com.google.android.material.textfield.TextInputLayout>

    <Button
        android:id="@+id/details_button"
        android:layout_width="match_parent"
        android:layout_height="wrap_content"
        android:text="@string/button_details" />

    <TextView
        android:id="@+id/details_response_content"
        android:layout_width="match_parent"
        android:layout_height="wrap_content"
        android:paddingTop="16dp"
        android:textIsSelectable="true" />
這段程式碼會新增文字輸入欄位,供使用者輸入任何地點 ID 或使用預設值;新增按鈕,用於啟動 Place Details 要求;以及新增 TextView,用於顯示回應中的資訊。系統會在 src/main/res/values/strings.xml 檔案中為您定義相關聯的字串。
建立「詳細資料」活動
- 在
src/main/java/com/google/codelabs/maps/placesdemo/資料夾中建立DetailsActivity.kt檔案,並將其與您剛建立的版面配置建立關聯。將下列程式碼貼到檔案中:
@ExperimentalCoroutinesApi
class DetailsActivity : AppCompatActivity() {
    private lateinit var placesClient: PlacesClient
    private lateinit var detailsButton: Button
    private lateinit var detailsInput: TextInputEditText
    private lateinit var responseView: TextView

    override fun onCreate(savedInstanceState: Bundle?) {
        super.onCreate(savedInstanceState)
        setContentView(R.layout.activity_details)

        // Set up view objects
        detailsInput = findViewById(R.id.details_input)
        detailsButton = findViewById(R.id.details_button)
        responseView = findViewById(R.id.details_response_content)

        val apiKey = BuildConfig.PLACES_API_KEY

        // Log an error if apiKey is not set.
        if (apiKey.isEmpty() || apiKey == "DEFAULT_API_KEY") {
            Log.e(TAG, "No api key")
            finish()
            return
        }
    }
}
- 建立地點用戶端,以用於這項活動。在
onCreate函式中,將這段程式碼貼到檢查 API 金鑰的程式碼後方。
        // Retrieve a PlacesClient (previously initialized - see DemoApplication)
        placesClient = Places.createClient(this)
- 設定 Places Client 後,請將點按事件監聽器附加到按鈕。在
onCreate函式中建立 Places Client 後,貼上這段程式碼。
        // Upon button click, fetch and display the Place Details
        detailsButton.setOnClickListener { button ->
            button.isEnabled = false
            val placeId = detailsInput.text.toString()
            val placeFields = listOf(
                Place.Field.NAME,
                Place.Field.ID,
                Place.Field.LAT_LNG,
                Place.Field.ADDRESS
            )
            lifecycleScope.launch {
                try {
                    val response = placesClient.awaitFetchPlace(placeId, placeFields)
                    responseView.text = response.prettyPrint()
                } catch (e: Exception) {
                    e.printStackTrace()
                    responseView.text = e.message
                }
                button.isEnabled = true
            }
        }
這段程式碼會擷取輸入欄位中輸入的地點 ID、定義要為該地點要求哪些欄位、建立 FetchPlaceRequest、啟動工作,並監聽成功或失敗。如果要求成功,函式會使用要求的詳細資料填入 TextView。
將「詳細資料」活動新增至資訊清單
在 app/src/main 中的 AndroidManifest.xml 檔案中,將 <activity> 元素新增為 <application> 元素的子項,做為 DetailsActivity:
<activity android:name=".DetailsActivity" android:label="@string/details_demo_title" />
將「詳細資料」活動新增至試用版選單
系統會提供空白的 Demo 模組,在主畫面上列出可用的試用版。建立「Place Details」活動後,請使用下列程式碼,將活動新增至 src/main/java/com/google/codelabs/maps/placesdemo/ 資料夾中的 Demo.kt 檔案:
    DETAILS_FRAGMENT_DEMO(
        R.string.details_demo_title,
        R.string.details_demo_description,
        DetailsActivity::class.java
    ),
相關聯的字串定義在 src/main/res/values/strings.xml 檔案中。
檢查 MainActivity.kt,並觀察它是否建立 ListView,且透過疊代 Demo 模組的內容填入資料。如果使用者輕觸清單中的項目,點擊事件監聽器就會開啟相關聯的活動。
執行應用程式
- 執行應用程式。這次清單中應該會顯示一個項目,呈現 Place Details 示範。
- 輕觸「地點詳細資料」文字。您應該會看到自己建立的檢視區塊,當中包含輸入欄位和按鈕。
- 輕觸「查看詳細資料」按鈕。如果您使用預設地點 ID,應該會看到顯示地點名稱、地址和地圖座標,如圖 1 所示。

圖 1. 顯示回應的 Place Details 活動。
9. 新增 Place Autocomplete
建立自動完成畫面
app/src/main/res/layout/ 資料夾中提供空白的 LinearLayout activity_autocomplete.xml 版面配置。在 <LinearLayout> 括號之間新增這段程式碼,填入線性版面配置。
    <androidx.fragment.app.FragmentContainerView
        android:id="@+id/autocomplete_fragment"
        android:background="@android:color/white"
        android:name="com.google.android.libraries.places.widget.AutocompleteSupportFragment"
        android:layout_width="match_parent"
        android:layout_height="wrap_content" />

    <TextView
        android:id="@+id/autocomplete_response_content"
        android:layout_width="match_parent"
        android:layout_height="wrap_content"
        android:paddingTop="16dp"
        android:textIsSelectable="true" />
這段程式碼會新增 AutocompleteSupportFragment 小工具,以及用於顯示回應資訊的 TextView。相關聯的字串定義在 src/main/res/values/strings.xml 檔案中。
建立自動完成活動
- 在
src/main/java/com/google/codelabs/maps/placesdemo/資料夾中建立AutocompleteActivity.kt檔案,並使用下列程式碼定義該檔案:
@ExperimentalCoroutinesApi
class AutocompleteActivity : AppCompatActivity() {
    private lateinit var responseView: TextView

    override fun onCreate(savedInstanceState: Bundle?) {
        super.onCreate(savedInstanceState)
        setContentView(R.layout.activity_autocomplete)

        // Set up view objects
        responseView = findViewById(R.id.autocomplete_response_content)
        val autocompleteFragment =
            supportFragmentManager.findFragmentById(R.id.autocomplete_fragment)
                    as AutocompleteSupportFragment
    }
}
這段程式碼會將活動與您在版面配置檔案中定義的檢視區塊和 AutocompleteSupportFramgent 建立關聯。
- 接著,定義使用者選取 Place Autocomplete 顯示的其中一個預測結果時,會發生什麼情況。將這段程式碼新增至
onCreate函式結尾:
        val placeFields: List<Place.Field> =
            listOf(Place.Field.NAME, Place.Field.ID, Place.Field.ADDRESS, Place.Field.LAT_LNG)
        autocompleteFragment.setPlaceFields(placeFields)

        // Listen to place selection events
        lifecycleScope.launchWhenCreated {
            autocompleteFragment.placeSelectionEvents().collect { event ->
                when (event) {
                    is PlaceSelectionSuccess -> {
                        val place = event.place
                        responseView.text = prettyPrintAutocompleteWidget(place, false)
                    }

                    is PlaceSelectionError -> Toast.makeText(
                        this@AutocompleteActivity,
                        "Failed to get place '${event.status.statusMessage}'",
                        Toast.LENGTH_SHORT
                    ).show()
                }
            }
        }
這段程式碼會定義要為地點要求哪些欄位、監聽地點選取事件,以及監聽成功或失敗。如果要求成功,函式會將地點詳細資料填入 TextView。請注意,Place Autocomplete 會傳回 Place 物件,因此使用 Place Autocomplete 小工具時,不必另外發出 Place Details 要求。
將 Autocomplete 活動新增至資訊清單
在 app/src/main 中的 AndroidManifest.xml 檔案中,將 <activity> 元素新增為 <application> 元素的子項,做為 AutocompleteActivity:
<activity android:name=".AutocompleteActivity" android:label="@string/autocomplete_fragment_demo_title" />
在示範選單中新增 Autocomplete 活動
與先前一樣,將 Place Autocomplete 示範加入 Demo 模組的清單,即可新增至主畫面。建立 Place Autocomplete 活動後,請將其新增至 src/main/java/com/google/codelabs/maps/placesdemo/ 資料夾中的 Demo.kt 檔案。在 DETAILS_FRAGMENT_DEMO 項目後方貼上這段程式碼:
    AUTOCOMPLETE_FRAGMENT_DEMO(
        R.string.autocomplete_fragment_demo_title,
        R.string.autocomplete_fragment_demo_description,
        AutocompleteActivity::class.java
    ),
相關聯的字串定義在 src/main/res/values/strings.xml 檔案中。
執行應用程式
- 執行應用程式。這次主畫面清單中應該會顯示兩個項目。
- 輕觸「Place Autocomplete」列。您應該會看到 Place Autocomplete 輸入彈出式視窗,如圖 2 所示。
- 開始輸入地點名稱。可以是建築物名稱、地址或地理區域。輸入文字時,系統應會顯示預測結果。
- 選取其中一個預測結果。預測結果應會消失,TextView 現在應會顯示所選地點的詳細資料,如圖 3 所示。

圖 2. 使用者輕觸輸入欄位後,自動完成活動。

圖 3. 使用者輸入並選取「Niagara Falls」後,自動完成活動會顯示地點詳細資料。
10. 取得裝置的目前地點
建立「目前位置」畫面
app/src/main/res/layout/ 資料夾中已提供空白的 LinearLayout activity_current.xml 版面配置。在 <LinearLayout> 中括號之間加入下列程式碼,填入線性版面配置。
    <Button
        android:id="@+id/current_button"
        android:layout_width="match_parent"
        android:layout_height="wrap_content"
        android:text="@string/current_button" />

    <TextView
        android:id="@+id/current_response_content"
        android:layout_width="match_parent"
        android:layout_height="wrap_content"
        android:paddingTop="16dp"
        android:scrollbars = "vertical"
        android:textIsSelectable="true" />
建立「目前位置」活動
- 在
src/main/java/com/google/codelabs/maps/placesdemo/資料夾中建立CurrentPlaceActivity.kt檔案,並使用下列程式碼定義該檔案:
@ExperimentalCoroutinesApi
class CurrentPlaceActivity : AppCompatActivity(), OnMapReadyCallback {
    private lateinit var placesClient: PlacesClient
    private lateinit var currentButton: Button
    private lateinit var responseView: TextView

    override fun onCreate(savedInstanceState: Bundle?) {
        super.onCreate(savedInstanceState)
        setContentView(R.layout.activity_current)

        // Retrieve a PlacesClient (previously initialized - see DemoApplication)
        placesClient = Places.createClient(this)

        // Set view objects
        currentButton = findViewById(R.id.current_button)
        responseView = findViewById(R.id.current_response_content)

        // Set listener for initiating Current Place
        currentButton.setOnClickListener {
            checkPermissionThenFindCurrentPlace()
        }
    }
}
這段程式碼會將活動與您在版面配置檔案中定義的檢視區塊建立關聯。此外,它還會將點擊事件監聽器新增至按鈕,以便在點選按鈕時呼叫 checkPermissionThenFindCurrentPlace 函式。
- 定義
checkPermissionThenFindCurrentPlace(),檢查是否已授予精細位置資訊權限,如果尚未授予,則要求權限。將這段程式碼貼到onCreate函式後方。
    /**
     * Checks that the user has granted permission for fine or coarse location.
     * If granted, finds current Place.
     * If not yet granted, launches the permission request.
     * See https://developer.android.com/training/permissions/requesting
     */
    private fun checkPermissionThenFindCurrentPlace() {
        when {
            (ContextCompat.checkSelfPermission(
                this,
                ACCESS_FINE_LOCATION
            ) == PackageManager.PERMISSION_GRANTED || ContextCompat.checkSelfPermission(
                this,
                ACCESS_COARSE_LOCATION
            ) == PackageManager.PERMISSION_GRANTED) -> {
                // You can use the API that requires the permission.
                findCurrentPlace()
            }

            shouldShowRequestPermissionRationale(ACCESS_FINE_LOCATION)
            -> {
                Log.d(TAG, "Showing permission rationale dialog")
                // TODO: In an educational UI, explain to the user why your app requires this
                // permission for a specific feature to behave as expected. In this UI,
                // include a "cancel" or "no thanks" button that allows the user to
                // continue using your app without granting the permission.
            }

            else -> {
                // Ask for both the ACCESS_FINE_LOCATION and ACCESS_COARSE_LOCATION permissions.
                ActivityCompat.requestPermissions(
                    this,
                    arrayOf(
                        ACCESS_FINE_LOCATION,
                        ACCESS_COARSE_LOCATION
                    ),
                    PERMISSION_REQUEST_CODE
                )
            }
        }
    }

    companion object {
        private const val TAG = "CurrentPlaceActivity"
        private const val PERMISSION_REQUEST_CODE = 9
    }
- 當
checkPermissionThenFindCurrentPlace函式的else分支呼叫requestPermissions時,應用程式會向使用者顯示權限要求對話方塊。如果使用者裝置搭載的作業系統版本低於 Android 12,則只能授予精確位置資訊權限。如果使用者裝置搭載 Android 12 以上版本,系統會提供概略位置 (粗略) 選項,而非精確位置 (精細),如圖 4 所示。

圖 4. 在搭載 Android 12 以上版本的裝置上要求使用者授權時,系統會提供授予精確或大概位置存取權的選項。
使用者回應系統權限對話方塊後,系統就會叫用應用程式的 onRequestPermissionsResult 實作。系統會傳入使用者對權限對話方塊做出的回應,以及您定義的要求代碼。將下列程式碼貼到 checkPermissionThenFindCurrentPlace 下方,覆寫 onRequestPermissionResult,處理與這項「目前所在位置」活動相關的位置存取權要求代碼。
    @SuppressLint("MissingPermission")
    override fun onRequestPermissionsResult(
        requestCode: Int,
        permissions: Array<String>, grantResults: IntArray
    ) {
        if (requestCode != PERMISSION_REQUEST_CODE) {
            super.onRequestPermissionsResult(
                requestCode,
                permissions,
                grantResults
            )
            return
        } else if (
            permissions.toList().zip(grantResults.toList())
                .firstOrNull { (permission, grantResult) ->
                    grantResult == PackageManager.PERMISSION_GRANTED && (permission == ACCESS_FINE_LOCATION || permission == ACCESS_COARSE_LOCATION)
                } != null
        )
        // At least one location permission has been granted, so proceed with Find Current Place
        findCurrentPlace()
    }
- 授予權限後,系統會執行
findCurrentPlace函式。在onRequestPermissionsResult函式之後,使用這段程式碼定義函式。
    /**
     * Fetches a list of [PlaceLikelihood] instances that represent the Places the user is
     * most likely to be at currently.
     */
    @RequiresPermission(anyOf = [ACCESS_COARSE_LOCATION, ACCESS_FINE_LOCATION])
    private fun findCurrentPlace() {
        // Use fields to define the data types to return.
        val placeFields: List<Place.Field> =
            listOf(Place.Field.NAME, Place.Field.ID, Place.Field.ADDRESS, Place.Field.LAT_LNG)

        // Call findCurrentPlace and handle the response (first check that the user has granted permission).
        if (ContextCompat.checkSelfPermission(this, ACCESS_FINE_LOCATION) ==
            PackageManager.PERMISSION_GRANTED ||
            ContextCompat.checkSelfPermission(this, ACCESS_COARSE_LOCATION) ==
            PackageManager.PERMISSION_GRANTED
        ) {
            // Retrieve likely places based on the device's current location
            currentButton.isEnabled = false
            lifecycleScope.launch {
                val response = placesClient.awaitFindCurrentPlace(placeFields)

                responseView.text = response.prettyPrint()

                // Enable scrolling on the long list of likely places
                val movementMethod = ScrollingMovementMethod()
                responseView.movementMethod = movementMethod
            }
        } else {
            Log.d(TAG, "LOCATION permission not granted")
            checkPermissionThenFindCurrentPlace()
        }
    }
這段程式碼會定義要為可能地點要求哪些欄位、建立 FindCurrentPlaceRequest、啟動工作,並在 TextView 中填入要求的詳細資料。
將「目前地點」活動新增至資訊清單
在 app/src/main 中的 AndroidManifest.xml 檔案中,將 <activity> 元素新增為 <application> 元素的子項,做為 CurrentPlaceActivity:
<activity android:name=".CurrentPlaceActivity" android:label="@string/current_demo_title" />
在示範選單中新增「目前地點」活動
與先前一樣,將 Current Place 示範應用程式附加至 Demo 模組中的清單,即可新增至主畫面。建立「目前地點」活動後,請將其新增至 src/main/java/com/google/codelabs/maps/placesdemo/ 資料夾中的 Demo.kt 檔案。在 AUTOCOMPLETE_FRAGMENT_DEMO 項目後方貼上這段程式碼:
    CURRENT_FRAGMENT_DEMO(
        R.string.current_demo_title,
        R.string.current_demo_description,
        CurrentPlaceActivity::class.java
    ),
相關聯的字串定義在 src/main/res/values/strings.xml 檔案中。
執行應用程式
- 執行應用程式。這次主畫面清單中應該會顯示三個項目。
- 輕觸「目前位置」列。畫面上應該會顯示按鈕。
- 輕觸按鈕。如果您先前未授予這項應用程式位置資訊存取權,系統應會彈出權限要求。
- 授予應用程式裝置位置資訊的存取權。
- 再次輕觸按鈕。這次應該會顯示最多 20 個附近地點的清單,以及這些地點成為使用者目前位置的機率,如圖 5 所示。

圖 5. 顯示裝置回報位置的可能「目前地點」比對結果。
11. 在地圖上顯示目前位置
新增地圖依附元件
在模組層級 build.gradle 檔案中,加入 Maps SDK for Android 的 Google Play 服務依附元件。
app/build.gradle
dependencies {
    // ...
    implementation 'com.google.android.gms:play-services-maps:18.2.0'
}
更新 Android 資訊清單,加入地圖相關設定
在 application 元素中加入下列 meta-data 元素。
這些會嵌入用來編譯應用程式的 Google Play 服務版本,並指定您的 API 金鑰。
AndroidManifest.xml
        <meta-data
            android:name="com.google.android.gms.version"
            android:value="@integer/google_play_services_version" />

        <meta-data
            android:name="com.google.android.geo.API_KEY"
            android:value="${MAPS_API_KEY}" />
在 secrets.properties 中加入 API 金鑰
開啟頂層目錄中的 secrets.properties 檔案,並加入下列程式碼,然後將 YOUR_API_KEY 替換成您的 API 金鑰。
MAPS_API_KEY=YOUR_API_KEY
開啟頂層目錄中的 local.defaults.properties 檔案 (與 secrets.properties 檔案相同的資料夾),然後加入下列程式碼。
MAPS_API_KEY=DEFAULT_API_KEY
檢查 API 金鑰
在 onCreate() 中,應用程式會檢查地圖 API 金鑰,並初始化地圖支援片段。getMapAsync() 用於註冊地圖回呼。
新增下列程式碼即可完成這項操作。
CurrentPlaceActivity.kt
    override fun onCreate(savedInstanceState: Bundle?) {
        super.onCreate(savedInstanceState)
        setContentView(R.layout.activity_current)

        val apiKey = BuildConfig.MAPS_API_KEY

        // Log an error if apiKey is not set.
        if (apiKey.isEmpty() || apiKey == "DEFAULT_API_KEY") {
            Log.e("Places test", "No api key")
            finish()
            return
        }

        // Retrieve a PlacesClient (previously initialized - see DemoApplication)
        placesClient = Places.createClient(this)
        (supportFragmentManager
            .findFragmentById(R.id.map) as SupportMapFragment?)?.getMapAsync(this)

        // ...
    }
建立地圖版面配置
- 在
app/src/main/res/layout/資料夾中建立版面配置檔案fragment_map.xml,並填入下列程式碼。
res/layout/fragment_map.xml
<?xml version="1.0" encoding="utf-8"?>
<androidx.fragment.app.FragmentContainerView
    xmlns:android="http://schemas.android.com/apk/res/android"
    xmlns:tools="http://schemas.android.com/tools"
    android:id="@+id/map"
    android:name="com.google.android.gms.maps.SupportMapFragment"
    android:layout_width="match_parent"
    android:layout_height="wrap_content"
    tools:context="com.google.codelabs.maps.placesdemo.CurrentPlaceActivity" />
這會將 SupportMapFragment 定義為地圖的容器,並提供 GoogleMap 物件的存取權。
- 在
app/src/main/res/layout/資料夾的activity_current.xml版面配置中,將下列程式碼新增至線性版面配置底部。
res/layout/activity_current.xml
    <TextView
        android:layout_width="match_parent"
        android:layout_height="wrap_content"
        android:paddingTop="16dp"
        android:paddingBottom="16dp"
        android:text="@string/showing_most_likely_place"
        style="@style/TextAppearance.AppCompat.Title"/>

    <include layout="@layout/fragment_map"/>
新增的 TextView 參照需要建立的新字串資源。
- 在
app/src/main/res/values/strings.xml中新增下列字串資源。
res/values/strings.xml
<string name="showing_most_likely_place">Showing most likely place</string>
由於地圖新增了其他檢視區塊,因此顯示地點清單的 TextView 必須設定高度,才能確保這些檢視區塊保持可見。
- 在
TextView中新增 ID 為current_response_content的maxHeight屬性
res/layout/activity_current.xml
android:maxHeight="200dp"
導入 OnMapReadyCallback
將 OnMapReadyCallback 介面新增至類別宣告,並覆寫 onMapReady() 方法,以便在 GoogleMap 物件可用時設定地圖:
CurrentPlaceActivity.kt
class CurrentPlaceActivity : AppCompatActivity(), OnMapReadyCallback {
在類別結尾處新增下列程式碼:
CurrentPlaceActivity.kt
    override fun onMapReady(map: GoogleMap) {
        this.map = map
        lastKnownLocation?.let { location ->
            map.moveCamera(
                CameraUpdateFactory.newLatLngZoom(
                    location,
                    DEFAULT_ZOOM
                )
            )
        }
    }
回呼需要一些類別變數才能正常運作。在類別標頭後方立即新增下列內容:
CurrentPlaceActivity.kt
private var map: GoogleMap? = null
private var lastKnownLocation: LatLng? = null
在類別伴生物件中新增下列程式碼:
CurrentPlaceActivity.kt
private const val DEFAULT_ZOOM = 15f
執行應用程式
- 執行應用程式。
- 輕觸「目前位置」列。畫面上應該會顯示按鈕。
- 輕觸按鈕。如果您先前未授予這項應用程式位置資訊存取權,系統應會彈出權限要求。
- 授予應用程式裝置位置資訊的存取權。
- 再次輕觸按鈕。地圖隨即顯示。
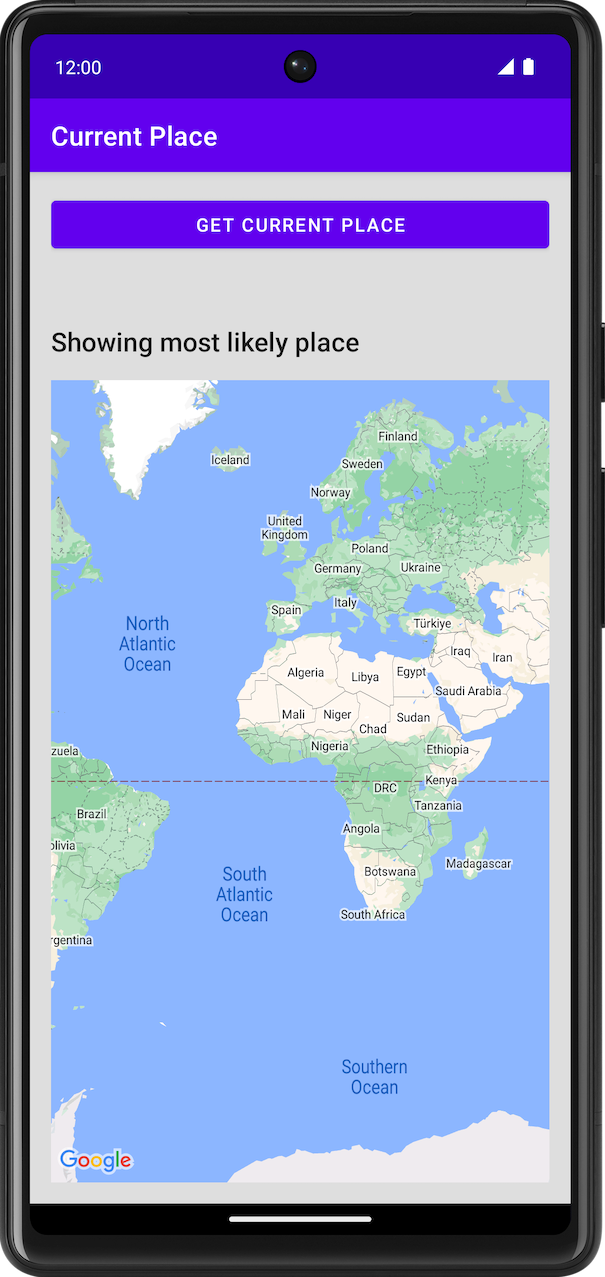
圖 6. 顯示地圖的「目前位置」活動。
在地圖上更新地點
在類別結尾處新增下列程式碼:
CurrentPlaceActivity.kt
private data class LikelyPlace(
    val name: String,
    val address: String,
    val attribution: List<String>,
    val latLng: LatLng
)

private fun PlaceLikelihood.toLikelyPlace(): LikelyPlace? {
    val name = this.place.name
    val address = this.place.address
    val latLng = this.place.latLng
    val attributions = this.place.attributions ?: emptyList()

    return if (name != null && address != null && latLng != null) {
        LikelyPlace(name, address, attributions, latLng)
    } else {
        null
    }
}
這些屬性可用來儲存地點的資料並設定格式。
在類別開頭新增下列程式碼,建立用於儲存傳回地點資料的變數。
CurrentPlaceActivity.kt
private val likelyPlaces = mutableListOf<LikelyPlace>()
在這個步驟中,您將變更程式碼,讓使用者看到地點清單,並選擇要在地圖上顯示的地點。畫面會顯示所有「地點」資料的清單。
在 findCurrentPlace 函式中,於這行程式碼之前的 lifecycleScope.launch 區塊中
CurrentPlaceActivity.kt
responseView.text = response.prettyPrint()
加入下列程式碼:
CurrentPlaceActivity.kt
                likelyPlaces.clear()

                likelyPlaces.addAll(
                    response.placeLikelihoods.take(M_MAX_ENTRIES).mapNotNull { placeLikelihood ->
                        placeLikelihood.toLikelyPlace()
                    }
                )

                openPlacesDialog()
這段程式碼需要常數,才能設定顯示地點的數量上限。
在伴生物件中,新增該常數的程式碼。
CurrentPlaceActivity.kt
private const val M_MAX_ENTRIES = 5
加入下列程式碼,建立可供使用者選取地點的對話方塊。
CurrentPlaceActivity.kt
    /**
     * Displays a form allowing the user to select a place from a list of likely places.
     */
    private fun openPlacesDialog() {
        // Ask the user to choose the place where they are now.
        val listener =
            DialogInterface.OnClickListener { _, which -> // The "which" argument contains the position of the selected item.
                val likelyPlace = likelyPlaces[which]
                lastKnownLocation = likelyPlace.latLng

                val snippet = buildString {
                    append(likelyPlace.address)
                    if (likelyPlace.attribution.isNotEmpty()) {
                        append("\n")
                        append(likelyPlace.attribution.joinToString(", "))
                    }
                }

                val place = Place.builder().apply {
                    name = likelyPlace.name
                    latLng = likelyPlace.latLng
                }.build()

                map?.clear()

                setPlaceOnMap(place, snippet)
            }

        // Display the dialog.
        AlertDialog.Builder(this)
            .setTitle(R.string.pick_place)
            .setItems(likelyPlaces.map { it.name }.toTypedArray(), listener)
            .setOnDismissListener {
                currentButton.isEnabled = true
            }
            .show()
    }
按照 Android 最佳做法,對話方塊會參照字串資源,因此需要將該資源新增至 app/src/main/res/values/ 資料夾中的 strings.xml 資源檔案。
在 strings.xml 中新增下列內容:
res/values/strings.xml
<string name="pick_place">Choose a place</string>
這些函式隨後會呼叫 setPlaceOnMap 函式,移動攝影機並在所選位置放置標記。
加入下列程式碼︰
CurrentPlaceActivity.kt
    private fun setPlaceOnMap(place: Place?, markerSnippet: String?) {
        val latLng = place?.latLng ?: defaultLocation
        map?.moveCamera(
            CameraUpdateFactory.newLatLngZoom(
                latLng,
                DEFAULT_ZOOM
            )
        )
        map?.addMarker(
            MarkerOptions()
                .position(latLng)
                .title(place?.name)
                .snippet(markerSnippet)
        )
    }
建議您也儲存及還原地圖狀態。
如要儲存狀態,請覆寫 onSaveInstanceState 函式並加入下列程式碼:
CurrentPlaceActivity.kt
    /**
     * Saves the state of the map when the activity is paused.
     */
    override fun onSaveInstanceState(outState: Bundle) {
        outState.putParcelable(KEY_LOCATION, lastKnownLocation)
        super.onSaveInstanceState(outState)
    }
如要還原狀態,請在 onCreate 中,於呼叫 setContentView 後新增下列程式碼:
CurrentPlaceActivity.kt
        if (savedInstanceState != null) {
            lastKnownLocation = savedInstanceState.getParcelable(KEY_LOCATION)
        }
儲存及還原需要金鑰,這是來自伴生物件的常數。
在隨附物件區塊中,新增下列項目:
CurrentPlaceActivity.kt
        // Key for storing activity state.
        private const val KEY_LOCATION = "location"
執行應用程式
- 執行應用程式。
- 輕觸「目前位置」列。畫面上應該會顯示按鈕。
- 輕觸按鈕。如果您先前未授予這項應用程式位置資訊存取權,系統應會彈出權限要求。
- 授予應用程式裝置位置資訊的存取權。
- 再次輕觸按鈕。
- 輕觸所需地點。地圖會放大並以所選位置為中心,且該位置會加上標記。

圖 7. 地圖,所選位置有標記。
12. 恭喜
您已使用 Places SDK for Android 成功建構 Android 應用程式。
您學到的內容
- 安裝及設定 Places SDK for Android。
- 為 Places SDK for Android 安裝 Kotlin 擴充功能。
- 正在載入「地點詳細資料」。
- 新增 Place Autocomplete。
- 取得「Current Place」。
後續步驟
- 如需更多靈感,請探索或建立
android-places-demosGitHub 存放區的分支,當中提供範例和示範。 - 如要瞭解如何使用 Google 地圖平台建構 Android 應用程式,請參閱更多 Kotlin 程式碼研究室。
- 請回答下列問題,協助我們製作最實用的內容:
你還想看到哪些程式碼研究室?
找不到想要的程式碼研究室嗎?請在這裡提出新的問題。