Java クイック スタート
コレクションでコンテンツを整理
必要に応じて、コンテンツの保存と分類を行います。
このプロジェクトでは、Terraform で簡単な
Google Mirror API の主要な機能のデモを行います
クイック スタート プロジェクトの完全デモ版を見るには、次のページにアクセスしてください:
https://glass-python-starter-demo.appspot.com.
それ以外の場合は、この後、独自のバージョンをデプロイする方法を説明します。
GitHub でダウンロード
前提条件
システムがクイック スタート プロジェクトの次の前提条件を満たしていることを確認します。
Google API Console プロジェクトを作成する
次に、Google Mirror API へのアクセスを有効にします。
- Google API Console に移動して、新しい API プロジェクトを作成します。
- [サービス] をクリックし、新しいプロジェクトで Google Mirror API を有効にします。

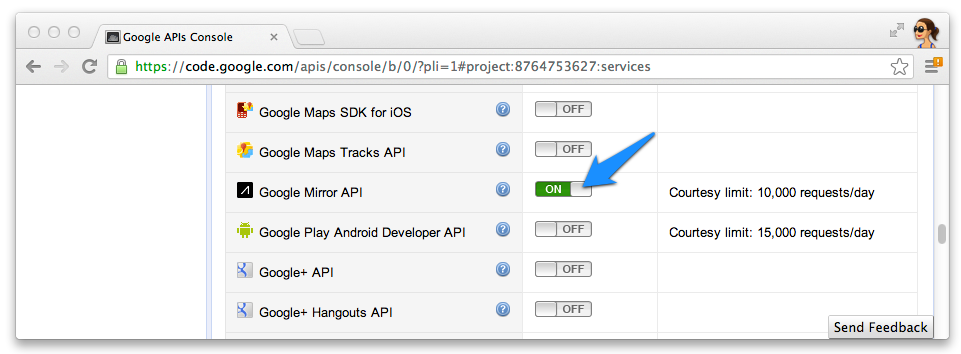
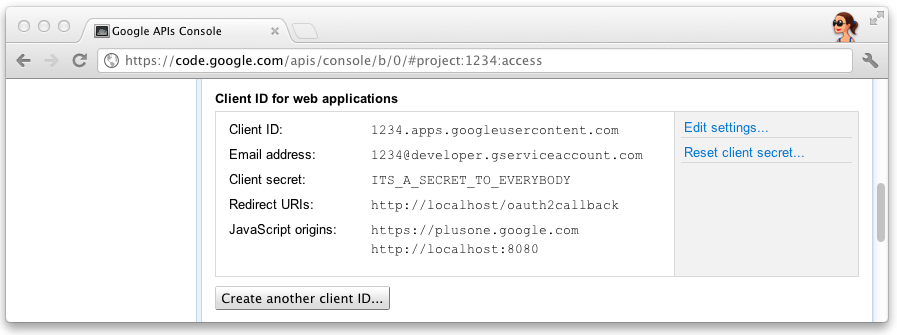
- [API Access] をクリックして、ウェブ アプリケーション用の OAuth 2.0 クライアント ID を作成します。
![Google API Console の [API Access] セクション](https://developers.google.cn/static/glass/images/api-console-client-id.png?hl=ja)
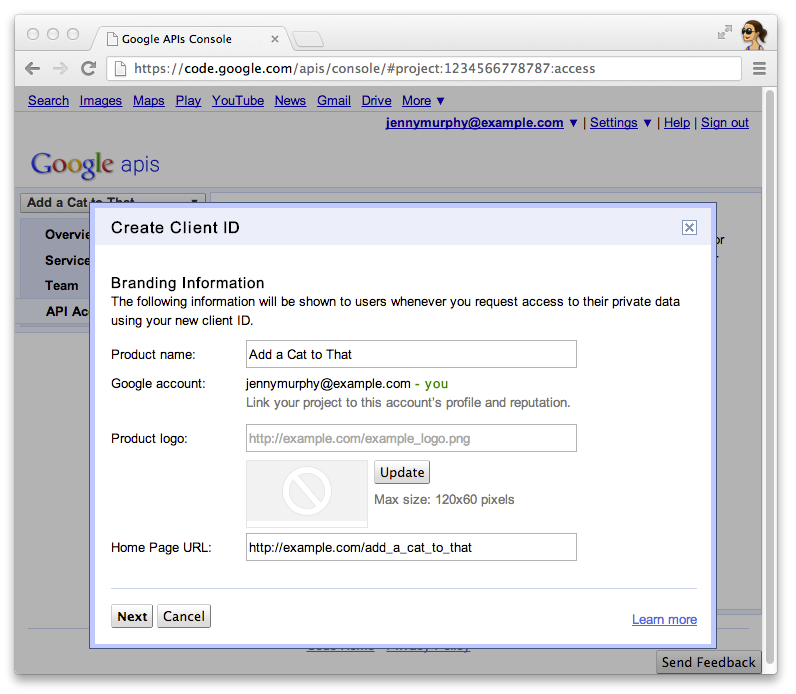
- Glassware の製品名とアイコンを指定します。これらのフィールドは OAuth 権限付与に表示される
画面に表示されます

- [ウェブ アプリケーション] を選択し、ホスト名に任意の値(
localhost
など)を指定します。

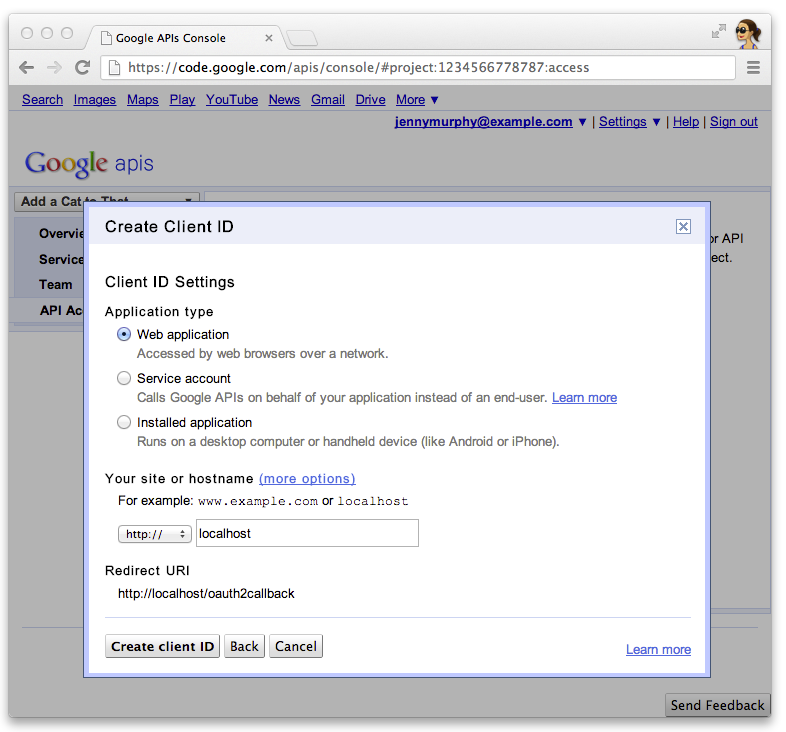
- クライアント ID の [設定を編集...] をクリックして、リダイレクト URI を指定します。コールバック URL を指定する
ローカル開発用ウェブサーバー(
http://localhost:8080/oauth2callback
など)
(例: https://example.com/oauth2callback
)。

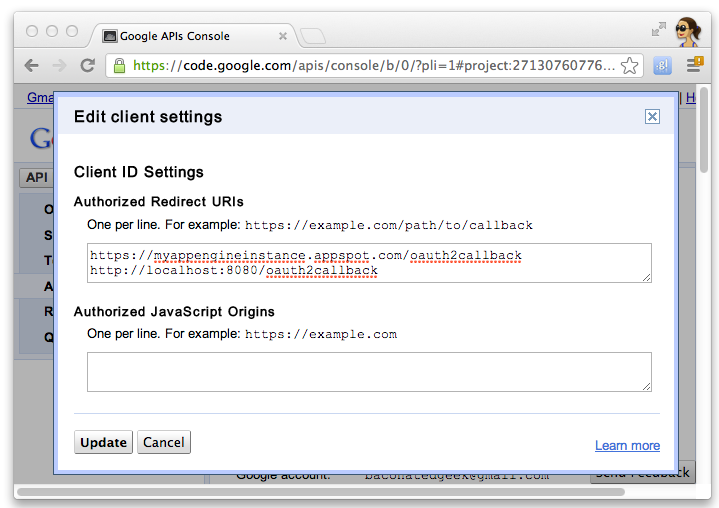
- Google API コンソールのクライアント ID とシークレットをメモします。必要なもの
クイック スタート プロジェクトを構成します。

クライアント ID と API クライアント情報を入力し、API クライアント情報を使用するように Quick Start プロジェクトを構成します。
src/main/resources/oauth.properties
に Secret:
# Replace these with values for your project from the Google API Console:
# https://developers.google.com/console
client_id=3141592653589793238462643383279
client_secret=ITS_A_SECRET_TO_EVERYBODY
プロジェクトのインポート
次の手順では、クイックスタート プロジェクトのソースを IntelliJ にインポートし、
エクリプス。
IntelliJ
- [ファイル] >プロジェクトをインポート...。
- 抽出したディレクトリにカーソルを合わせます。
- [Import from existing model >] を選択します。Maven
Eclipse
m2e
プラグインをインストールして、Maven pom ファイルからのインポートを有効にします。
- [ファイル] >インポート...>Maven >既存の Maven プロジェクトをご覧ください。
- 抽出されたディレクトリにカーソルを合わせて、プロジェクトをインポートします。
ローカル開発用サーバーの実行
ローカルの開発用サーバーでクイック スタート プロジェクトを実行してテストできます。
$ mvn jetty:run
クイック スタート プロジェクトをデプロイする
Maven を使用してこのプロジェクトの war ファイルを作成できます。
$ mvn war:war
特に記載のない限り、このページのコンテンツはクリエイティブ・コモンズの表示 4.0 ライセンスにより使用許諾されます。コードサンプルは Apache 2.0 ライセンスにより使用許諾されます。詳しくは、Google Developers サイトのポリシーをご覧ください。Java は Oracle および関連会社の登録商標です。
最終更新日 2025-07-25 UTC。
[null,null,["最終更新日 2025-07-25 UTC。"],[[["\u003cp\u003eThis project provides a simple implementation of Glassware demonstrating core Google Mirror API functionality.\u003c/p\u003e\n"],["\u003cp\u003eIt requires Java 1.6, Apache Maven, and a Google APIs Console project with the Google Mirror API enabled and OAuth 2.0 client ID created.\u003c/p\u003e\n"],["\u003cp\u003eThe project can be configured using your API client information, imported into IntelliJ or Eclipse, and run on a local development server using Maven.\u003c/p\u003e\n"],["\u003cp\u003eA deployable WAR file can be built using Maven for production deployment.\u003c/p\u003e\n"],["\u003cp\u003eA fully-working demo is available at \u003ca href=\"https://glass-java-starter-demo.appspot.com\"\u003ehttps://glass-java-starter-demo.appspot.com\u003c/a\u003e.\u003c/p\u003e\n"]]],[],null,["# Java Quick Start\n\nThis project shows you how to implement a simple\npiece of Glassware that demos the major functionality of the Google Mirror API.\n\nTo see a fully-working demo of the quick start project, go to\n[https://glass-python-starter-demo.appspot.com](https://glass-java-starter-demo.appspot.com).\nOtherwise, read on to see how to deploy your own version.\n\n[Download on GitHub](https://github.com/googleglass/mirror-quickstart-java)\n\nPrerequisites\n-------------\n\nEnsure your system meets the following prerequisites for the quick start project:\n\n- Java 1.6\n- [Apache Maven](http://maven.apache.org/) - used for part of the build process.\n\nCreating a Google APIs Console project\n--------------------------------------\n\nNext, enable access to the Google Mirror API:\n\n1. Go to the [Google APIs console](https://code.google.com/apis/console/) and create a new API project.\n2. Click **Services** and enable the Google Mirror API for your new project.\n3. Click **API Access** and create an OAuth 2.0 client ID for a web application.\n4. Specify the product name and icon for your Glassware. These fields appear on the OAuth grant screen presented to your users.\n5. Select **Web application** and specify any value for the hostname, such as `localhost`\n6. Click **Edit settings...** for the client ID to specify redirect URIs. Specify the callback URLs for your local development web server, for example `http://localhost:8080/oauth2callback`, and for your deployed web server, for example `https://example.com/oauth2callback`.\n7. Make note of the client ID and secret from the Google APIs Console. You'll need it to configure the quick start project.\n\nConfiguring the Quick Start project\n-----------------------------------\n\nConfigure the Quick Start project to use your API client information by entering your client ID and\nsecret into `src/main/resources/oauth.properties`: \n\n # Replace these with values for your project from the Google API Console:\n # https://developers.google.com/console\n\n client_id=3141592653589793238462643383279\n client_secret=ITS_A_SECRET_TO_EVERYBODY\n\nImporting the project\n---------------------\n\nThe following instructions show you to import the Quick Start project source into IntelliJ and\nEclipse.\n\n### IntelliJ\n\n1. Click **File \\\u003e Import Project...**.\n2. Point to the extracted directory.\n3. Select **Import from existing model \\\u003e Maven**\n\n### Eclipse\n\n1. Install the [`m2e`](http://eclipse.org/m2e/) plugin to enable import from a maven pom file.\n2. Click **File \\\u003e Import... \\\u003e Maven \\\u003e Existing Maven Project**.\n3. Point to the extracted directory and import the project.\n\nRunning a local development server\n----------------------------------\n\nYou can run the Quick Start project on a local development server for testing: \n\n $ mvn jetty:run\n\nDeploying the Quick Start project\n---------------------------------\n\nYou can build a war file for this project using Maven: \n\n $ mvn war:war"]]