Java Hızlı Başlangıç
Koleksiyonlar ile düzeninizi koruyun
İçeriği tercihlerinize göre kaydedin ve kategorilere ayırın.
Bu proje, size basit bir
öğeyi nasıl uygulayacağınızı
gösteren bir cam yazılımıdır.
Hızlı başlangıç projesinin tam işlevli demosunu görmek için şu adrese gidin:
https://glass-python-starter-demo.appspot.com.
Kendi sürümünüzü nasıl dağıtacağınızı öğrenmek için okumaya devam edin.
GitHub'dan indir
Ön koşullar
Sisteminizin hızlı başlangıç projesi için aşağıdaki ön koşulları karşıladığından emin olun:
- Java 1.6
- Apache Maven: Derleme işleminin bir bölümü için kullanılır.
Google API'leri Konsolu projesi oluşturma
Ardından, Google Mirror API'ye erişimi etkinleştirin:
- Google APIs Console'a (Google API'leri Konsolu) gidin ve yeni bir API projesi oluşturun.
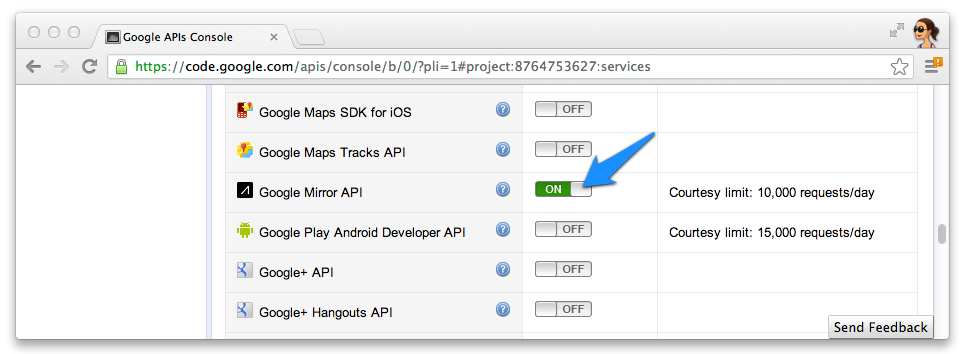
- Hizmetler'i tıklayın ve yeni projeniz için Google Mirror API'yi etkinleştirin.

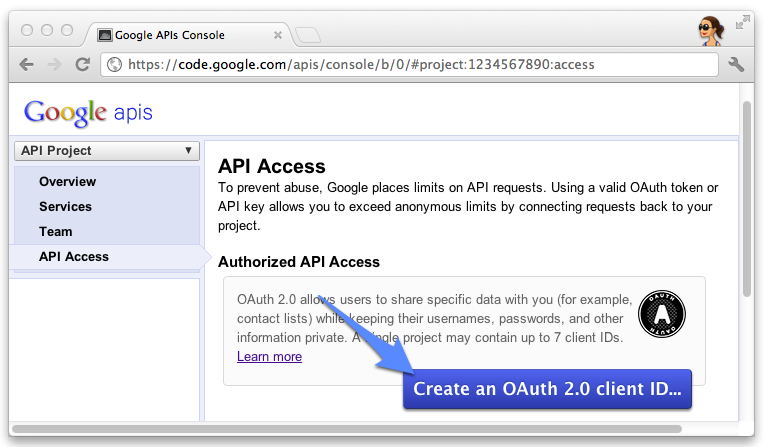
- API Erişimi'ni tıklayın ve bir web uygulaması için bir OAuth 2.0 istemci kimliği oluşturun.

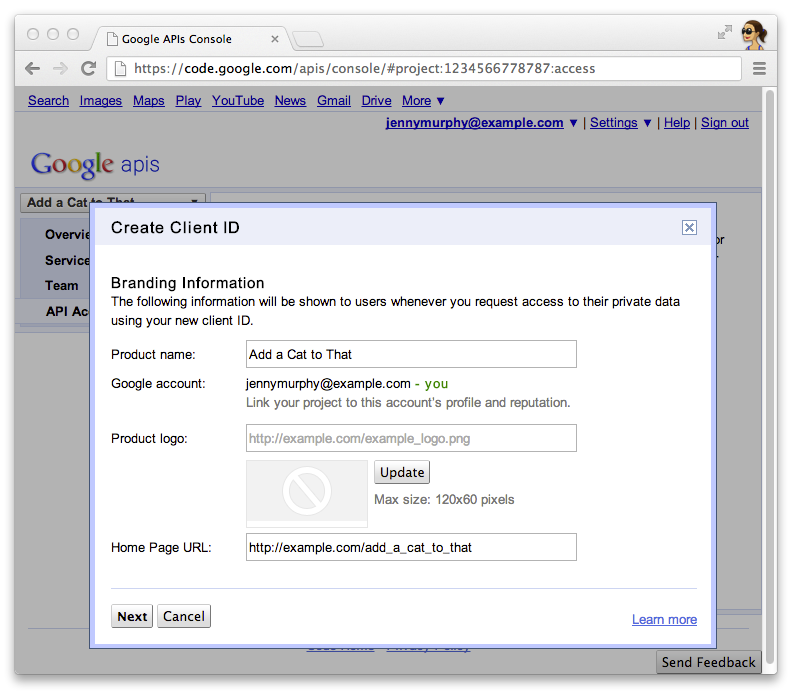
- Bardak ürününüz için ürün adını ve simgesini belirtin. Bu alanlar OAuth izninde görünür
kullanıcılarınıza sunma ekranı.
.
- Web uygulaması'nı seçin ve ana makine adı için
localhost
gibi bir değer belirleyin.

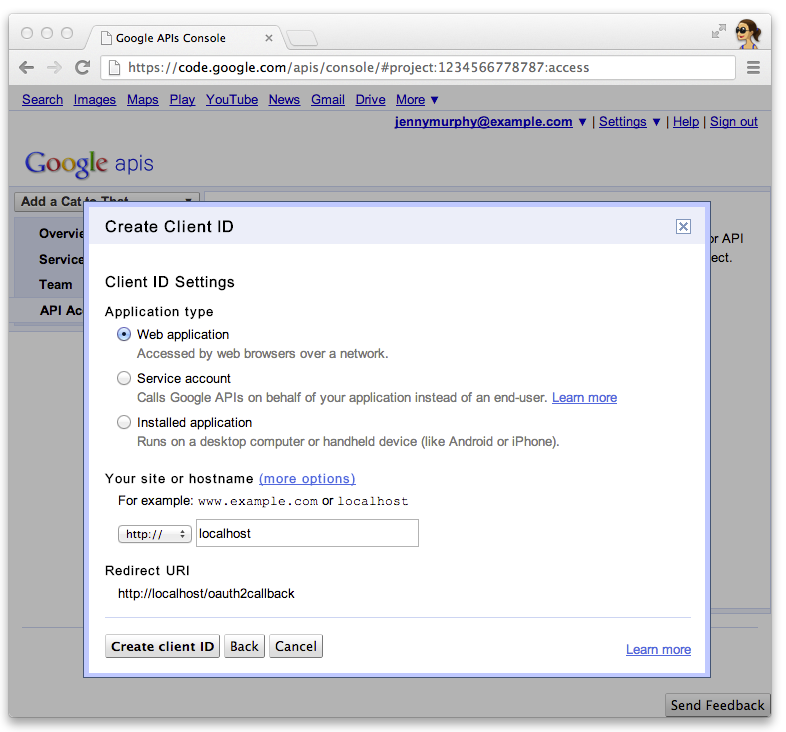
- Yönlendirme URI'lerini belirtmek üzere istemci kimliğine ilişkin Ayarları düzenle... seçeneğini tıklayın. Geri çağırma URL'lerini belirtin
yerel geliştirme web sunucunuz için (örneğin,
http://localhost:8080/oauth2callback
ve
dağıttığınız web sunucusudur (ör. https://example.com/oauth2callback
).

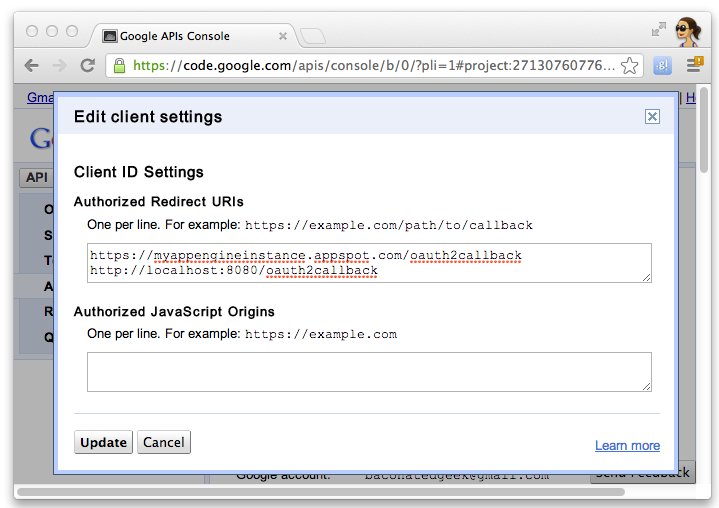
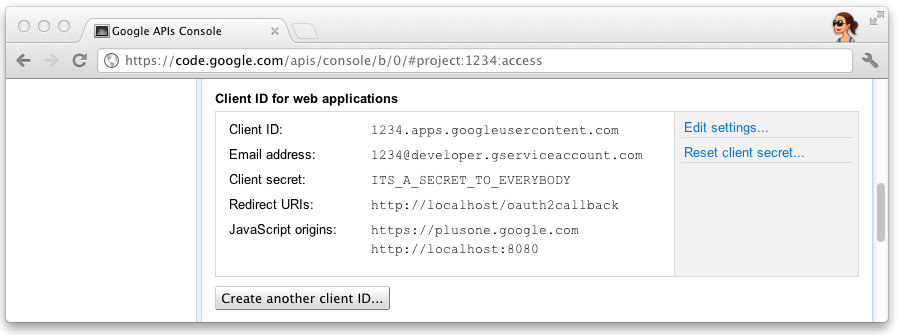
- Google API'leri Konsolu'ndaki istemci kimliğini ve sırrı not edin. Şunlar gerekir:
hızlı başlangıç projesini yapılandırmak için kullanılır.
.
Hızlı Başlangıç projesini, API istemci bilgilerinizi kullanacak şekilde yapılandırın. Bunun için istemci kimliğinizi ve
src/main/resources/oauth.properties
gizli anahtarı:
# Replace these with values for your project from the Google API Console:
# https://developers.google.com/console
client_id=3141592653589793238462643383279
client_secret=ITS_A_SECRET_TO_EVERYBODY
Projeyi içe aktarma
Aşağıdaki talimatlarda, Hızlı Başlangıç proje kaynağını IntelliJ ve
Güneş ve ay tutulması.
IntelliJ
- Dosya > Projeyi İçe Aktar...
- Çıkarılan dizinin üzerine gelin.
- Mevcut modelden içe aktar > Maven
Güneş/ay tutulması
- Bir maven pom dosyasından içe aktarmayı etkinleştirmek için
m2e
eklentisini yükleyin.
- Dosya > İçe aktar... > Maven > Mevcut Maven Projesi.
- Çıkarılan dizinin üzerine gelin ve projeyi içe aktarın.
Yerel geliştirme sunucusu çalıştırma
Test etmek için Hızlı Başlangıç projesini yerel bir geliştirme sunucusunda çalıştırabilirsiniz:
$ mvn jetty:run
Hızlı Başlangıç projesini dağıtma
Maven'i kullanarak bu proje için bir savaş dosyası oluşturabilirsiniz:
$ mvn war:war
Aksi belirtilmediği sürece bu sayfanın içeriği Creative Commons Atıf 4.0 Lisansı altında ve kod örnekleri Apache 2.0 Lisansı altında lisanslanmıştır. Ayrıntılı bilgi için Google Developers Site Politikaları'na göz atın. Java, Oracle ve/veya satış ortaklarının tescilli ticari markasıdır.
Son güncelleme tarihi: 2025-07-25 UTC.
[null,null,["Son güncelleme tarihi: 2025-07-25 UTC."],[[["\u003cp\u003eThis project provides a simple implementation of Glassware demonstrating core Google Mirror API functionality.\u003c/p\u003e\n"],["\u003cp\u003eIt requires Java 1.6, Apache Maven, and a Google APIs Console project with the Google Mirror API enabled and OAuth 2.0 client ID created.\u003c/p\u003e\n"],["\u003cp\u003eThe project can be configured using your API client information, imported into IntelliJ or Eclipse, and run on a local development server using Maven.\u003c/p\u003e\n"],["\u003cp\u003eA deployable WAR file can be built using Maven for production deployment.\u003c/p\u003e\n"],["\u003cp\u003eA fully-working demo is available at \u003ca href=\"https://glass-java-starter-demo.appspot.com\"\u003ehttps://glass-java-starter-demo.appspot.com\u003c/a\u003e.\u003c/p\u003e\n"]]],[],null,["# Java Quick Start\n\nThis project shows you how to implement a simple\npiece of Glassware that demos the major functionality of the Google Mirror API.\n\nTo see a fully-working demo of the quick start project, go to\n[https://glass-python-starter-demo.appspot.com](https://glass-java-starter-demo.appspot.com).\nOtherwise, read on to see how to deploy your own version.\n\n[Download on GitHub](https://github.com/googleglass/mirror-quickstart-java)\n\nPrerequisites\n-------------\n\nEnsure your system meets the following prerequisites for the quick start project:\n\n- Java 1.6\n- [Apache Maven](http://maven.apache.org/) - used for part of the build process.\n\nCreating a Google APIs Console project\n--------------------------------------\n\nNext, enable access to the Google Mirror API:\n\n1. Go to the [Google APIs console](https://code.google.com/apis/console/) and create a new API project.\n2. Click **Services** and enable the Google Mirror API for your new project.\n3. Click **API Access** and create an OAuth 2.0 client ID for a web application.\n4. Specify the product name and icon for your Glassware. These fields appear on the OAuth grant screen presented to your users.\n5. Select **Web application** and specify any value for the hostname, such as `localhost`\n6. Click **Edit settings...** for the client ID to specify redirect URIs. Specify the callback URLs for your local development web server, for example `http://localhost:8080/oauth2callback`, and for your deployed web server, for example `https://example.com/oauth2callback`.\n7. Make note of the client ID and secret from the Google APIs Console. You'll need it to configure the quick start project.\n\nConfiguring the Quick Start project\n-----------------------------------\n\nConfigure the Quick Start project to use your API client information by entering your client ID and\nsecret into `src/main/resources/oauth.properties`: \n\n # Replace these with values for your project from the Google API Console:\n # https://developers.google.com/console\n\n client_id=3141592653589793238462643383279\n client_secret=ITS_A_SECRET_TO_EVERYBODY\n\nImporting the project\n---------------------\n\nThe following instructions show you to import the Quick Start project source into IntelliJ and\nEclipse.\n\n### IntelliJ\n\n1. Click **File \\\u003e Import Project...**.\n2. Point to the extracted directory.\n3. Select **Import from existing model \\\u003e Maven**\n\n### Eclipse\n\n1. Install the [`m2e`](http://eclipse.org/m2e/) plugin to enable import from a maven pom file.\n2. Click **File \\\u003e Import... \\\u003e Maven \\\u003e Existing Maven Project**.\n3. Point to the extracted directory and import the project.\n\nRunning a local development server\n----------------------------------\n\nYou can run the Quick Start project on a local development server for testing: \n\n $ mvn jetty:run\n\nDeploying the Quick Start project\n---------------------------------\n\nYou can build a war file for this project using Maven: \n\n $ mvn war:war"]]