Java 快速入門
透過集合功能整理內容
你可以依據偏好儲存及分類內容。
本專案會說明如何
展示 Google Mirror API 主要功能的 Glassware。
如要查看快速入門專案的完整示範,請前往
https://glass-python-starter-demo.appspot.com.
否則,請繼續閱讀,瞭解如何部署自己的版本。
前往 GitHub 下載
必要條件
確認您的系統符合快速入門專案的下列必要條件:
建立 Google API 控制台專案
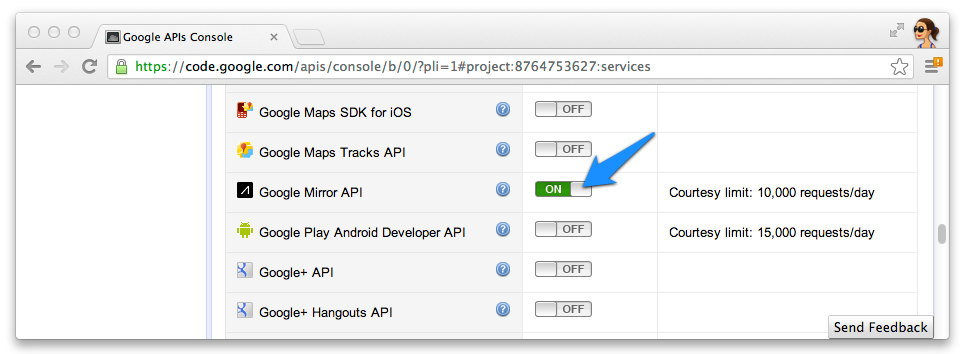
接著,啟用 Google Mirror API 的存取權:
- 前往 Google API 控制台,建立新的 API 專案。
- 按一下「服務」,然後為新專案啟用 Google Mirror API。

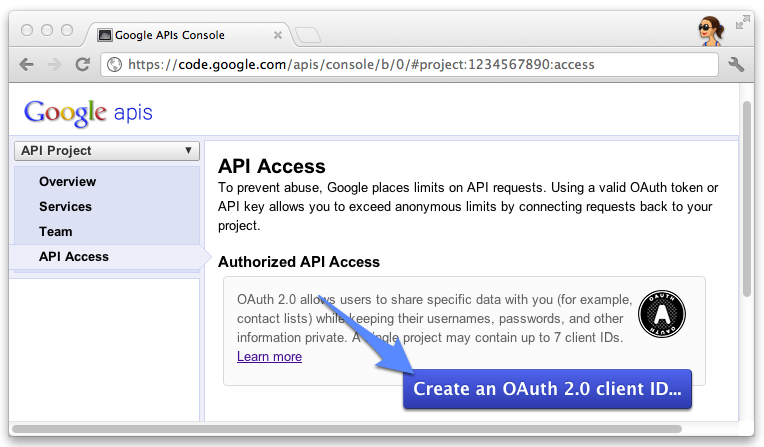
- 按一下「API Access」(API 存取權),然後為網頁應用程式建立 OAuth 2.0 用戶端 ID。

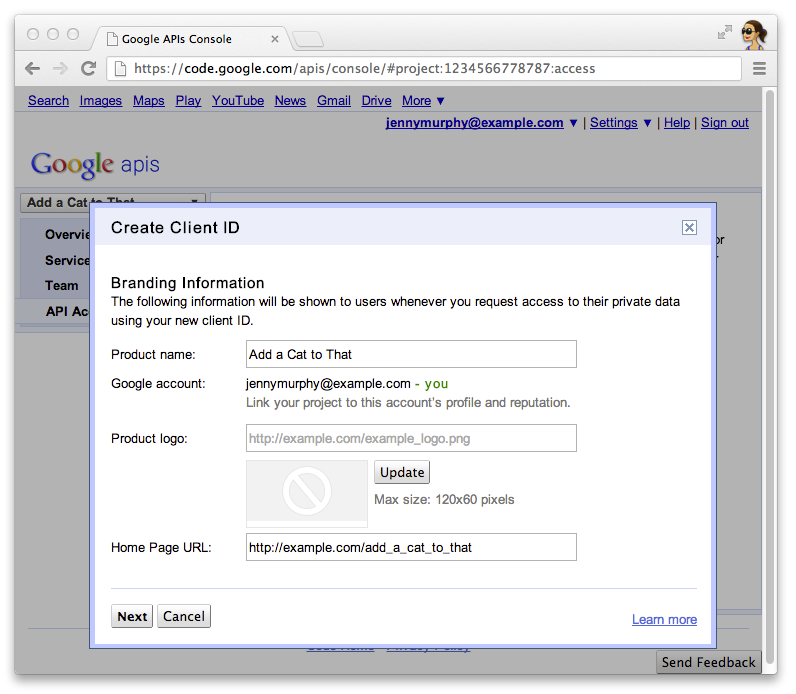
- 指定 Glassware 的產品名稱和圖示。這些欄位會顯示在 OAuth 授權中
向使用者顯示的螢幕畫面

- 選取「網頁應用程式」,並指定主機名稱的任何值,例如
localhost

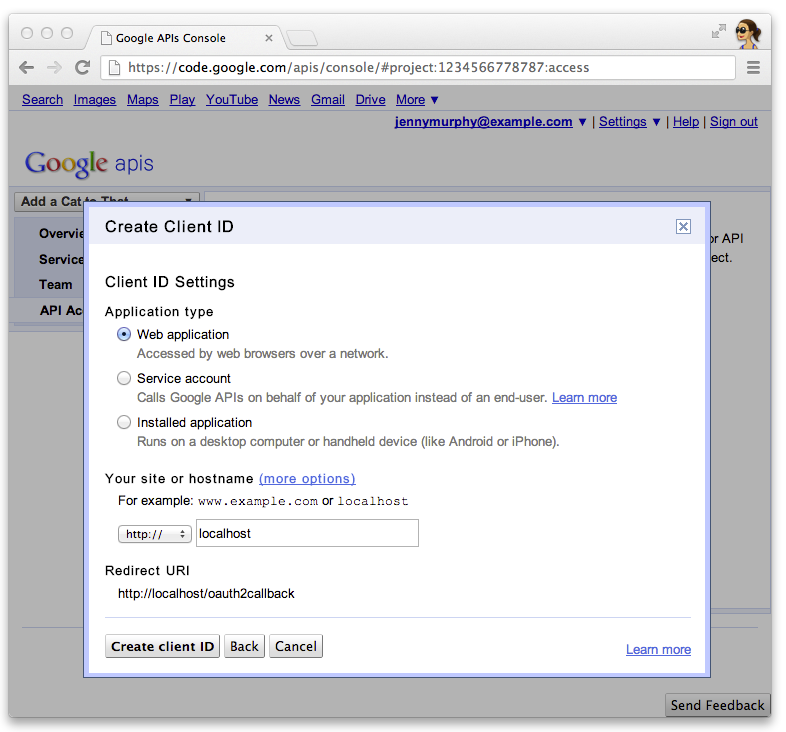
- 按一下用戶端 ID 的 [Edit settings...],指定重新導向 URI。指定回呼網址
用於本機開發網路伺服器,例如
http://localhost:8080/oauth2callback
;而
或是已部署的網路伺服器
例如 https://example.com/oauth2callback

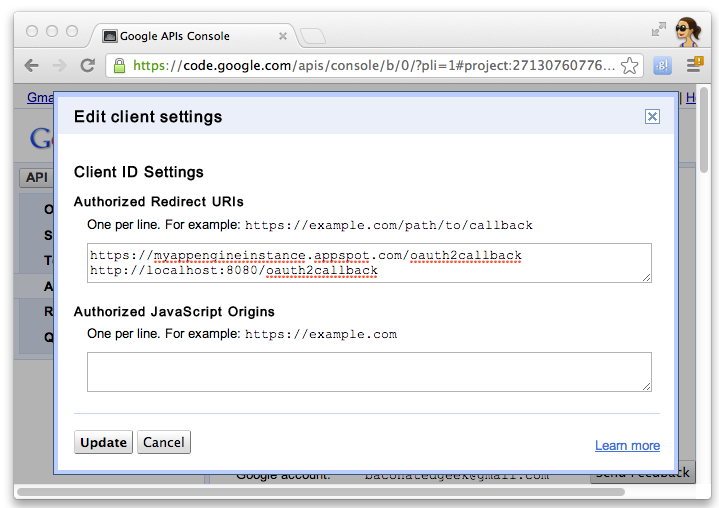
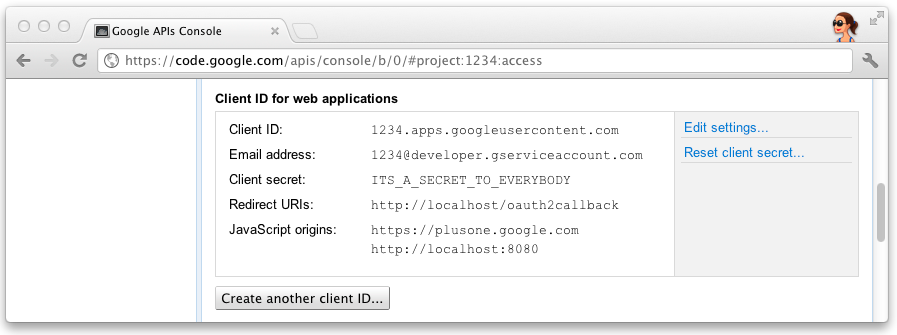
- 記下 Google API 控制台中的用戶端 ID 和密鑰。你需要準備
來設定快速入門專案

設定「快速入門」專案以使用您的 API 用戶端資訊,方法是輸入您的用戶端 ID,並
將密鑰放入 src/main/resources/oauth.properties
:
# Replace these with values for your project from the Google API Console:
# https://developers.google.com/console
client_id=3141592653589793238462643383279
client_secret=ITS_A_SECRET_TO_EVERYBODY
匯入專案
以下操作說明會說明如何將 Quick Start 專案來源匯入 IntelliJ,並
Eclipse。
IntelliJ
- 按一下「檔案」>匯入專案...。
- 指向擷取的目錄。
- 選取「從現有模型匯入」>「匯入模型」Maven
Eclipse
- 安裝
m2e
外掛程式,即可從 maven pom 檔案匯入。
- 按一下「檔案」>匯入...>Maven >現有 Maven 專案。
- 將遊標移至擷取的目錄,然後匯入專案。
執行本機開發伺服器
您可以在本機開發伺服器上執行「快速入門」專案來進行測試:
$ mvn jetty:run
部署「快速入門」專案
您可以使用 Maven 為這項專案建立 war 檔案:
$ mvn war:war
除非另有註明,否則本頁面中的內容是採用創用 CC 姓名標示 4.0 授權,程式碼範例則為阿帕契 2.0 授權。詳情請參閱《Google Developers 網站政策》。Java 是 Oracle 和/或其關聯企業的註冊商標。
上次更新時間:2025-07-25 (世界標準時間)。
[null,null,["上次更新時間:2025-07-25 (世界標準時間)。"],[[["\u003cp\u003eThis project provides a simple implementation of Glassware demonstrating core Google Mirror API functionality.\u003c/p\u003e\n"],["\u003cp\u003eIt requires Java 1.6, Apache Maven, and a Google APIs Console project with the Google Mirror API enabled and OAuth 2.0 client ID created.\u003c/p\u003e\n"],["\u003cp\u003eThe project can be configured using your API client information, imported into IntelliJ or Eclipse, and run on a local development server using Maven.\u003c/p\u003e\n"],["\u003cp\u003eA deployable WAR file can be built using Maven for production deployment.\u003c/p\u003e\n"],["\u003cp\u003eA fully-working demo is available at \u003ca href=\"https://glass-java-starter-demo.appspot.com\"\u003ehttps://glass-java-starter-demo.appspot.com\u003c/a\u003e.\u003c/p\u003e\n"]]],[],null,["# Java Quick Start\n\nThis project shows you how to implement a simple\npiece of Glassware that demos the major functionality of the Google Mirror API.\n\nTo see a fully-working demo of the quick start project, go to\n[https://glass-python-starter-demo.appspot.com](https://glass-java-starter-demo.appspot.com).\nOtherwise, read on to see how to deploy your own version.\n\n[Download on GitHub](https://github.com/googleglass/mirror-quickstart-java)\n\nPrerequisites\n-------------\n\nEnsure your system meets the following prerequisites for the quick start project:\n\n- Java 1.6\n- [Apache Maven](http://maven.apache.org/) - used for part of the build process.\n\nCreating a Google APIs Console project\n--------------------------------------\n\nNext, enable access to the Google Mirror API:\n\n1. Go to the [Google APIs console](https://code.google.com/apis/console/) and create a new API project.\n2. Click **Services** and enable the Google Mirror API for your new project.\n3. Click **API Access** and create an OAuth 2.0 client ID for a web application.\n4. Specify the product name and icon for your Glassware. These fields appear on the OAuth grant screen presented to your users.\n5. Select **Web application** and specify any value for the hostname, such as `localhost`\n6. Click **Edit settings...** for the client ID to specify redirect URIs. Specify the callback URLs for your local development web server, for example `http://localhost:8080/oauth2callback`, and for your deployed web server, for example `https://example.com/oauth2callback`.\n7. Make note of the client ID and secret from the Google APIs Console. You'll need it to configure the quick start project.\n\nConfiguring the Quick Start project\n-----------------------------------\n\nConfigure the Quick Start project to use your API client information by entering your client ID and\nsecret into `src/main/resources/oauth.properties`: \n\n # Replace these with values for your project from the Google API Console:\n # https://developers.google.com/console\n\n client_id=3141592653589793238462643383279\n client_secret=ITS_A_SECRET_TO_EVERYBODY\n\nImporting the project\n---------------------\n\nThe following instructions show you to import the Quick Start project source into IntelliJ and\nEclipse.\n\n### IntelliJ\n\n1. Click **File \\\u003e Import Project...**.\n2. Point to the extracted directory.\n3. Select **Import from existing model \\\u003e Maven**\n\n### Eclipse\n\n1. Install the [`m2e`](http://eclipse.org/m2e/) plugin to enable import from a maven pom file.\n2. Click **File \\\u003e Import... \\\u003e Maven \\\u003e Existing Maven Project**.\n3. Point to the extracted directory and import the project.\n\nRunning a local development server\n----------------------------------\n\nYou can run the Quick Start project on a local development server for testing: \n\n $ mvn jetty:run\n\nDeploying the Quick Start project\n---------------------------------\n\nYou can build a war file for this project using Maven: \n\n $ mvn war:war"]]