البدء السريع باستخدام Python
تنظيم صفحاتك في مجموعات
يمكنك حفظ المحتوى وتصنيفه حسب إعداداتك المفضّلة.
يوضح لك هذا المشروع كيفية تنفيذ طريقة
Glassware الذي يعرض الوظيفة الرئيسية لواجهة برمجة تطبيقات Google Mirror.
للاطّلاع على عرض توضيحي يعمل بشكل كامل لمشروع البدء السريع، انتقِل إلى
https://glass-python-starter-demo.appspot.com.
أو يمكنك متابعة القراءة لمعرفة كيفية نشر الإصدار الخاص بك.
التنزيل من GitHub
المتطلبات الأساسية
حزمة تطوير البرامج (SDK) لـ App Engine الخاصة بـ Python -
يتم تنفيذ مشروع البدء السريع في بايثون باستخدام محرك التطبيقات. أنت بحاجة إلى
SDK لـ Python App Engine لتطوير مشروعك ونشره.
شغِّل أداة التثبيت إذا كان ذلك مناسبًا لنظامك الأساسي، أو استخرِج ملف ZIP
في مكان مناسب.
إنشاء مثيل Google App Engine
ستحتاج إلى استضافة مشروع البدء السريع على مثيل من Google App Engine:
- انتقِل إلى http://appspot.com.
- انقر على إنشاء تطبيق وأنشئ نسخة افتراضية من Google App Engine تتم استضافتها على
appspot.com
.
- امنح التطبيق معرِّف التطبيق واترك المصادقة مفتوحة لجميع Google
مستخدمو الحسابات: ستحتاج إلى معرّف التطبيق لاحقًا لضبط مشروع البدء السريع.
إنشاء مشروع على Google APIs Console
بعد ذلك، فعِّل الوصول إلى Google Mirror API:
- انتقِل إلى وحدة تحكُّم Google APIs وأنشئ مشروع واجهة برمجة تطبيقات جديدًا.
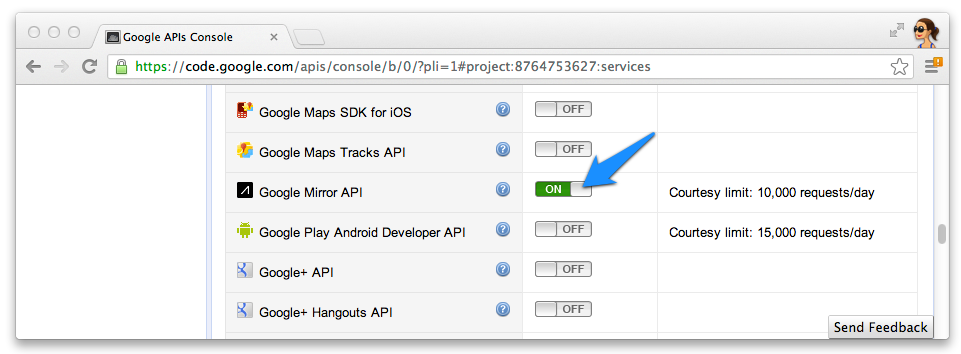
- انقر على الخدمات وفعِّل Google Mirror API لمشروعك الجديد.

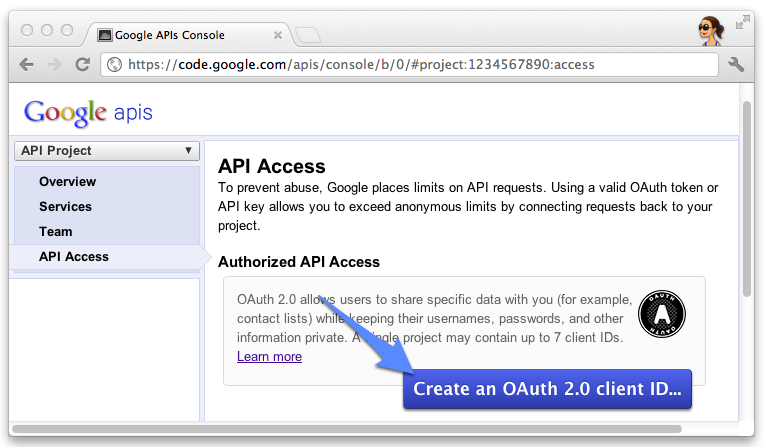
- انقر على الوصول إلى واجهة برمجة التطبيقات وأنشِئ معرِّف عميل OAuth 2.0 لتطبيق ويب.

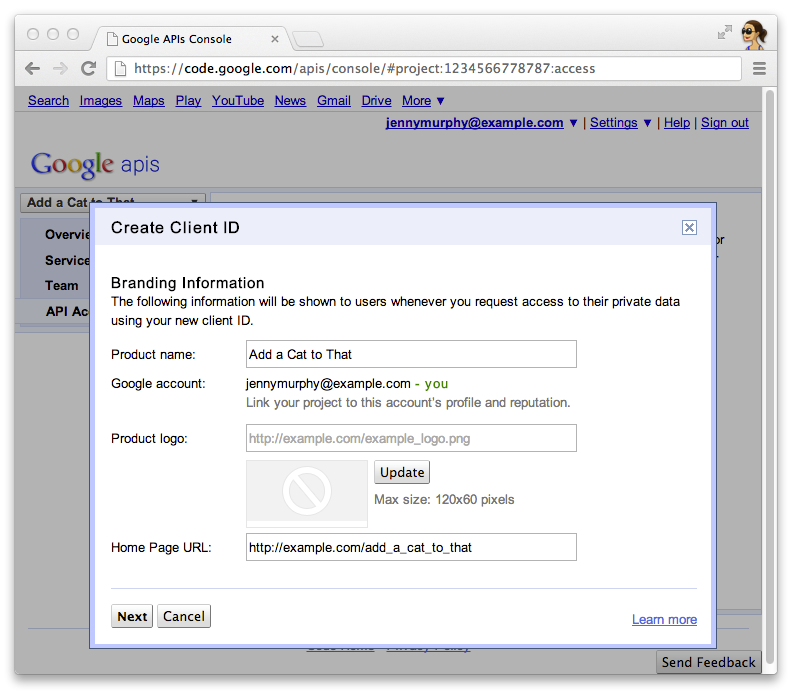
- حدد اسم المنتج ورمزه لـ Glassware. تظهر هذه الحقول في طلب منح بروتوكول OAuth.
الشاشة المقدمة للمستخدمين.

- اختَر تطبيق الويب وحدِّد أي قيمة لاسم المضيف، مثل
localhost
.

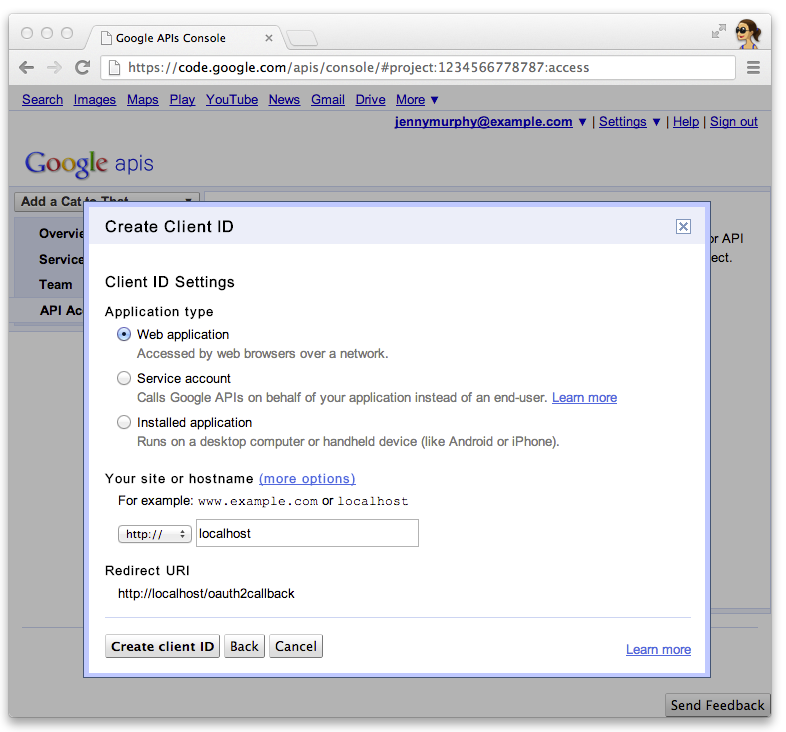
- انقر على تعديل الإعدادات... لمعرِّف العميل لتحديد معرِّفات الموارد المنتظمة (URI) لإعادة التوجيه. يُرجى التحديد
http://localhost:8080/oauth2callback
وعنوان URL لرد الاتصال لـ App Engine
على سبيل المثال، https://myappengineinstance.appspot.com/oauth2callback
.

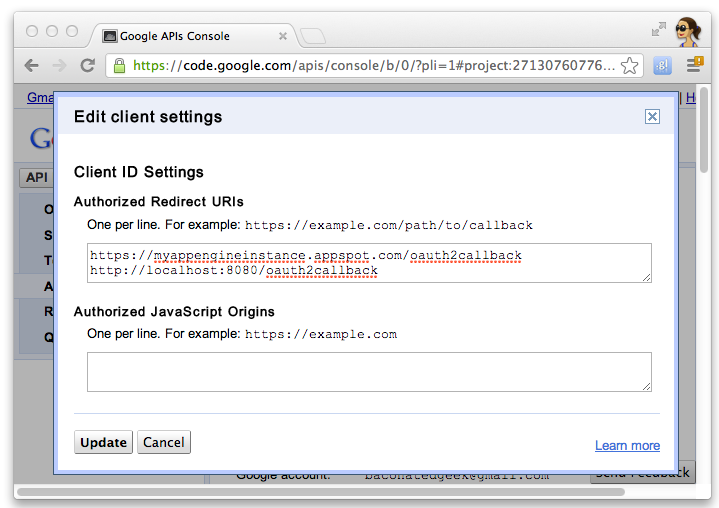
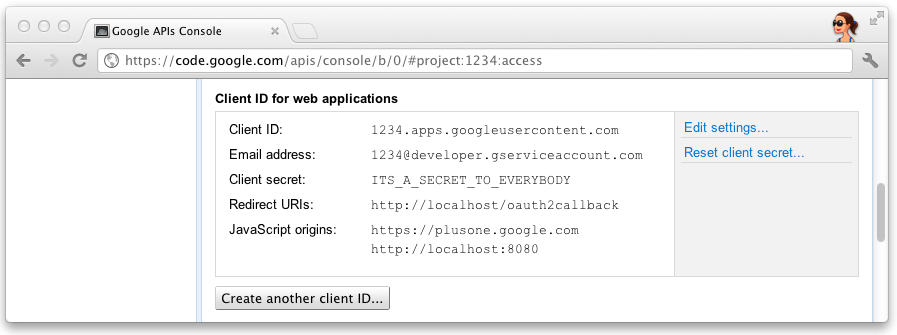
- دوِّن معرِّف العميل وسره من وحدة تحكُّم Google APIs. ستحتاج إلى
لتهيئة مشروع البدء السريع.

ضبط المشروع
اضبط مشروع "البدء السريع" لاستخدام معلومات عميل واجهة برمجة التطبيقات:
- يُرجى إدخال معرّف العميل وسر العميل في
client_secrets.json
:
{
"web": {
"client_id": "1234.apps.googleusercontent.com",
"client_secret": "ITS_A_SECRET_TO_EVERYBODY",
"redirect_uris": [
],
"auth_uri": "https://accounts.google.com/o/oauth2/auth",
"token_uri": "https://accounts.google.com/o/oauth2/token"
}
}
- إنشاء ملف
session.secret
لتخزين ملفات تعريف الارتباط الخاصة بالجلسة:
$ python -c "import os; print os.urandom(64)" > session.secret
- تعديل
app.yaml
لإدخال معرّف تطبيق App Engine:
application: your_app_engine_application_id
version: 1
runtime: python27
api_version: 1
threadsafe: true
...
نشر المشروع
اضغط على الزر الأزرق نشر في واجهة واجهة المستخدم الرسومية (GUI) لتشغيل App Engine أو شغّل هذا القسم
الأمر لنشر التعليمة البرمجية:
$ appcfg.py --oauth2 update .
إنّ محتوى هذه الصفحة مرخّص بموجب ترخيص Creative Commons Attribution 4.0 ما لم يُنصّ على خلاف ذلك، ونماذج الرموز مرخّصة بموجب ترخيص Apache 2.0. للاطّلاع على التفاصيل، يُرجى مراجعة سياسات موقع Google Developers. إنّ Java هي علامة تجارية مسجَّلة لشركة Oracle و/أو شركائها التابعين.
تاريخ التعديل الأخير: 2025-07-25 (حسب التوقيت العالمي المتفَّق عليه)
[null,null,["تاريخ التعديل الأخير: 2025-07-25 (حسب التوقيت العالمي المتفَّق عليه)"],[[["\u003cp\u003eThis project provides a simple implementation of Glassware demonstrating the core functionality of the Google Mirror API.\u003c/p\u003e\n"],["\u003cp\u003eTo run the project, you need the App Engine SDK for Python, a Google App Engine instance, and a Google APIs Console project with the Google Mirror API enabled.\u003c/p\u003e\n"],["\u003cp\u003eConfiguration involves setting up your client ID and secret, generating a session secret file, and updating the \u003ccode\u003eapp.yaml\u003c/code\u003e with your App Engine application ID.\u003c/p\u003e\n"],["\u003cp\u003eDeploy the project using the App Engine Launcher GUI or the \u003ccode\u003eappcfg.py\u003c/code\u003e command-line tool.\u003c/p\u003e\n"]]],[],null,["# Python Quick Start\n\nThis project shows you how to implement a simple\npiece of Glassware that demos the major functionality of the Google Mirror API.\n\nTo see a fully-working demo of the quick start project, go to\n[https://glass-python-starter-demo.appspot.com](https://glass-java-starter-demo.appspot.com).\nOtherwise, read on to see how to deploy your own version.\n\n[Download on GitHub](https://github.com/googleglass/mirror-quickstart-python)\n\nPrerequisites\n-------------\n\n[The App Engine SDK for Python](/appengine/downloads#Google_App_Engine_SDK_for_Python) -\nThe Python quick start project is implemented using App Engine. You need\nthe Python App Engine SDK to develop and deploy your project.\nRun the installer if appropriate for your platform, or extract the zip file\nin a convenient place.\n\nCreating a Google App Engine instance\n-------------------------------------\n\nYou'll need to host the quick start project on an instance of Google App Engine:\n\n1. Go to \u003chttp://appspot.com\u003e.\n2. Click **Create Application** and create a public Google App Engine instance hosted on `appspot.com`.\n3. Give the application an **Application Identifier** and leave the authentication **Open to all Google\n Accounts users**. You'll need the application identifier later to configure the quick start project.\n\nCreating a Google APIs Console project\n--------------------------------------\n\nNext, enable access to the Google Mirror API:\n\n1. Go to the [Google APIs console](https://code.google.com/apis/console/) and create a new API project.\n2. Click **Services** and enable the Google Mirror API for your new project.\n3. Click **API Access** and create an OAuth 2.0 client ID for a web application.\n4. Specify the product name and icon for your Glassware. These fields appear on the OAuth grant screen presented to your users.\n5. Select **Web application** and specify any value for the hostname, such as `localhost`\n6. Click **Edit settings...** for the client ID to specify redirect URIs. Specify `http://localhost:8080/oauth2callback` and the callback URL for your App Engine instance, for example, `https://myappengineinstance.appspot.com/oauth2callback`.\n7. Make note of the client ID and secret from the Google APIs Console. You'll need it to configure the quick start project.\n\nConfiguring the project\n-----------------------\n\nConfigure the Quick Start project to use your API client information:\n\n1. Enter your client ID and secret in `client_secrets.json`: \n\n ```python\n {\n \"web\": {\n \"client_id\": \"1234.apps.googleusercontent.com\",\n \"client_secret\": \"ITS_A_SECRET_TO_EVERYBODY\",\n \"redirect_uris\": [\n ],\n \"auth_uri\": \"https://accounts.google.com/o/oauth2/auth\",\n \"token_uri\": \"https://accounts.google.com/o/oauth2/token\"\n }\n }\n ```\n2. Generate a `session.secret` file to store session cookies: \n\n ```python\n $ python -c \"import os; print os.urandom(64)\" \u003e session.secret\n ```\n3. Edit `app.yaml` to enter your App Engine application ID: \n\n ```python\n application: your_app_engine_application_id\n version: 1\n runtime: python27\n api_version: 1\n threadsafe: true\n ...\n ```\n\nDeploying the project\n---------------------\n\nPress the blue **Deploy** button in the App Engine Launch GUI interface or run this shell\ncommand to deploy your code: \n\n $ appcfg.py --oauth2 update ."]]