পাইথন কুইক স্টার্ট
সেভ করা পৃষ্ঠা গুছিয়ে রাখতে 'সংগ্রহ' ব্যবহার করুন
আপনার পছন্দ অনুযায়ী কন্টেন্ট সেভ করুন ও সঠিক বিভাগে রাখুন।
এই প্রজেক্টটি আপনাকে দেখায় কিভাবে একটি সাধারণ কাঁচের জিনিসপত্র বাস্তবায়ন করতে হয় যা Google Mirror API-এর প্রধান কার্যকারিতা প্রদর্শন করে।
দ্রুত সূচনা প্রকল্পের একটি সম্পূর্ণ-কার্যকর ডেমো দেখতে, https://glass-python-starter-demo.appspot.com এ যান। অন্যথায়, কীভাবে আপনার নিজস্ব সংস্করণ স্থাপন করবেন তা দেখতে পড়ুন।
GitHub এ ডাউনলোড করুন
পূর্বশর্ত
পাইথনের জন্য অ্যাপ ইঞ্জিন SDK - পাইথন দ্রুত শুরু প্রকল্পটি অ্যাপ ইঞ্জিন ব্যবহার করে বাস্তবায়িত হয়। আপনার প্রোজেক্ট ডেভেলপ এবং ডিপ্লয় করার জন্য আপনার পাইথন অ্যাপ ইঞ্জিন SDK দরকার। আপনার প্ল্যাটফর্মের জন্য উপযুক্ত হলে ইনস্টলারটি চালান, অথবা একটি সুবিধাজনক জায়গায় জিপ ফাইলটি বের করুন৷
একটি Google অ্যাপ ইঞ্জিন উদাহরণ তৈরি করা হচ্ছে
আপনাকে Google অ্যাপ ইঞ্জিনের একটি উদাহরণে দ্রুত শুরু প্রকল্পটি হোস্ট করতে হবে:
- http://appspot.com এ যান।
- অ্যাপ্লিকেশন তৈরি করুন ক্লিক করুন এবং
appspot.com
এ হোস্ট করা একটি সর্বজনীন Google অ্যাপ ইঞ্জিন উদাহরণ তৈরি করুন। - অ্যাপ্লিকেশনটিকে একটি অ্যাপ্লিকেশন শনাক্তকারী দিন এবং প্রমাণীকরণটি সমস্ত Google অ্যাকাউন্ট ব্যবহারকারীদের জন্য খোলা রেখে দিন৷ দ্রুত শুরু প্রকল্পটি কনফিগার করতে আপনার পরে অ্যাপ্লিকেশন শনাক্তকারীর প্রয়োজন হবে৷
একটি Google APIs কনসোল প্রকল্প তৈরি করা হচ্ছে
এরপরে, গুগল মিরর এপিআইতে অ্যাক্সেস সক্ষম করুন:
- Google APIs কনসোলে যান এবং একটি নতুন API প্রকল্প তৈরি করুন।
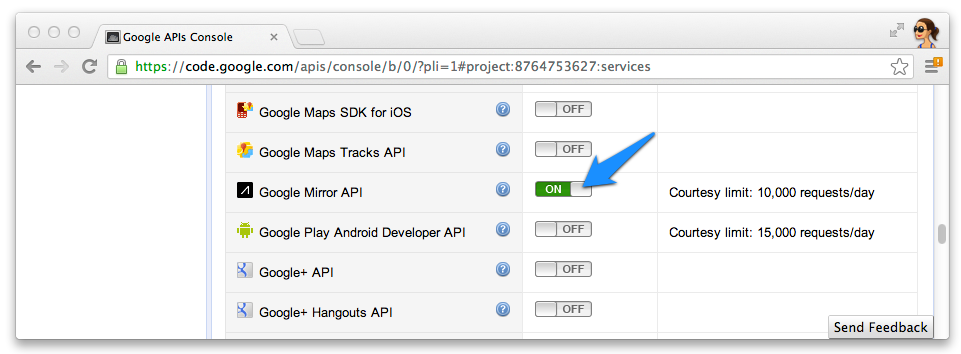
- পরিষেবাগুলিতে ক্লিক করুন এবং আপনার নতুন প্রকল্পের জন্য Google মিরর API সক্ষম করুন৷

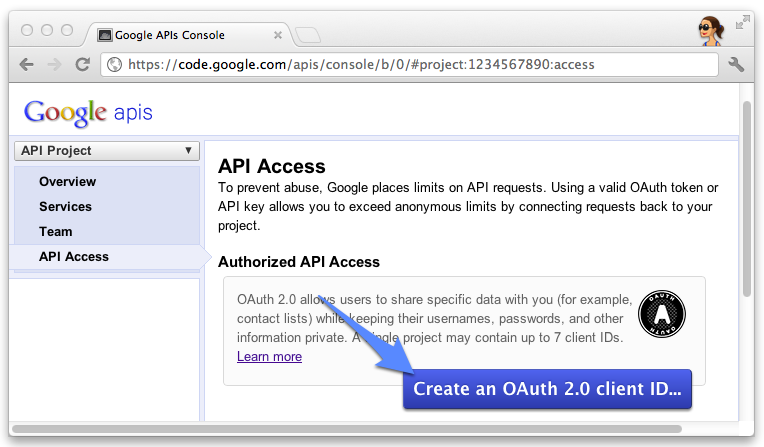
- API অ্যাক্সেস ক্লিক করুন এবং একটি ওয়েব অ্যাপ্লিকেশনের জন্য একটি OAuth 2.0 ক্লায়েন্ট আইডি তৈরি করুন৷

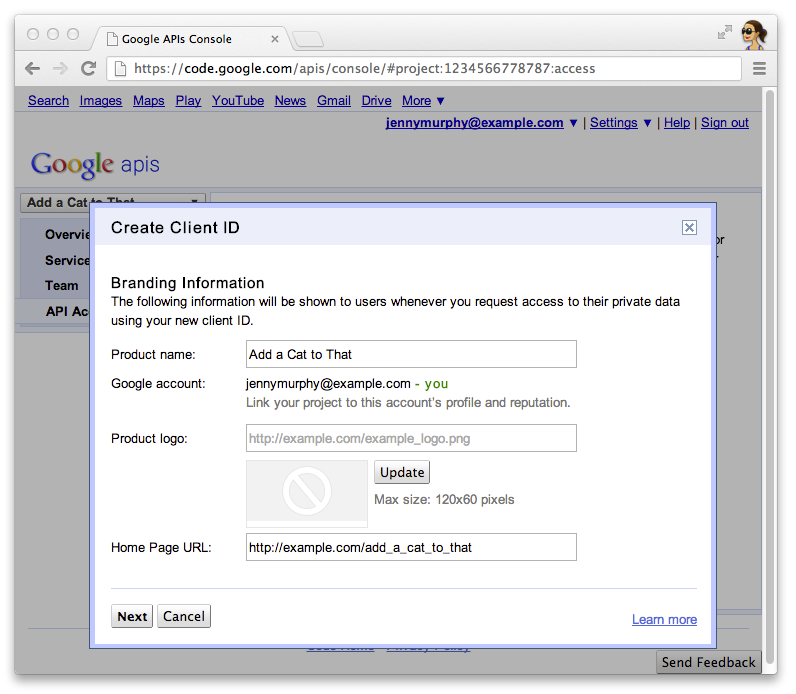
- আপনার গ্লাসওয়্যারের জন্য পণ্যের নাম এবং আইকন নির্দিষ্ট করুন। এই ক্ষেত্রগুলি আপনার ব্যবহারকারীদের কাছে উপস্থাপিত OAuth অনুদান স্ক্রিনে উপস্থিত হয়৷

- ওয়েব অ্যাপ্লিকেশন নির্বাচন করুন এবং হোস্টনামের জন্য যেকোনো মান নির্দিষ্ট করুন, যেমন
localhost

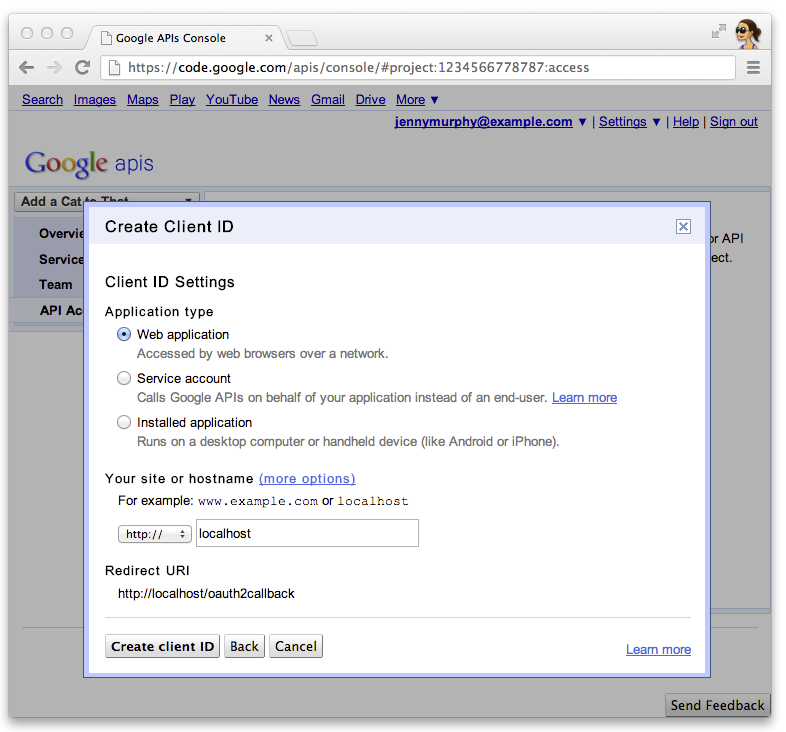
- ক্লায়েন্ট আইডির জন্য রিডাইরেক্ট ইউআরআই নির্দিষ্ট করতে সেটিংস সম্পাদনা করুন... এ ক্লিক করুন। আপনার অ্যাপ ইঞ্জিন উদাহরণের জন্য
http://localhost:8080/oauth2callback
এবং কলব্যাক URL নির্দিষ্ট করুন, উদাহরণস্বরূপ, https://myappengineinstance.appspot.com/oauth2callback
। 
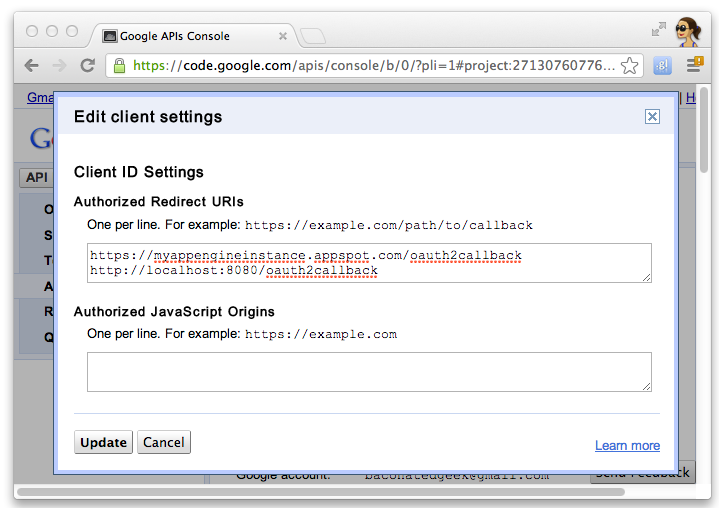
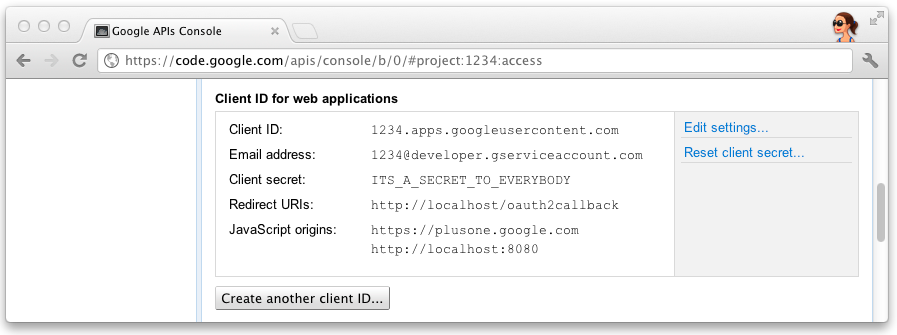
- Google APIs কনসোল থেকে ক্লায়েন্ট আইডি এবং গোপনীয়তা নোট করুন। দ্রুত শুরু প্রকল্পটি কনফিগার করতে আপনার এটির প্রয়োজন হবে।

প্রকল্পটি কনফিগার করা হচ্ছে
আপনার API ক্লায়েন্ট তথ্য ব্যবহার করতে দ্রুত শুরু প্রকল্প কনফিগার করুন:
-
client_secrets.json
এ আপনার ক্লায়েন্ট আইডি এবং গোপনীয়তা লিখুন: {
"web": {
"client_id": "1234.apps.googleusercontent.com",
"client_secret": "ITS_A_SECRET_TO_EVERYBODY",
"redirect_uris": [
],
"auth_uri": "https://accounts.google.com/o/oauth2/auth",
"token_uri": "https://accounts.google.com/o/oauth2/token"
}
}
- সেশন কুকি সংরক্ষণ করতে একটি
session.secret
ফাইল তৈরি করুন: $ python -c "import os; print os.urandom(64)" > session.secret
- আপনার অ্যাপ ইঞ্জিন অ্যাপ্লিকেশন আইডি প্রবেশ করতে
app.yaml
সম্পাদনা করুন: application: your_app_engine_application_id
version: 1
runtime: python27
api_version: 1
threadsafe: true
...
প্রকল্প স্থাপন
অ্যাপ ইঞ্জিন লঞ্চ GUI ইন্টারফেসে নীল ডিপ্লোয় বোতাম টিপুন বা আপনার কোড স্থাপন করতে এই শেল কমান্ডটি চালান:
$ appcfg.py --oauth2 update .
অন্য কিছু উল্লেখ না করা থাকলে, এই পৃষ্ঠার কন্টেন্ট Creative Commons Attribution 4.0 License-এর অধীনে এবং কোডের নমুনাগুলি Apache 2.0 License-এর অধীনে লাইসেন্স প্রাপ্ত। আরও জানতে, Google Developers সাইট নীতি দেখুন। Java হল Oracle এবং/অথবা তার অ্যাফিলিয়েট সংস্থার রেজিস্টার্ড ট্রেডমার্ক।
2025-07-24 UTC-তে শেষবার আপডেট করা হয়েছে।
[null,null,["2025-07-24 UTC-তে শেষবার আপডেট করা হয়েছে।"],[[["\u003cp\u003eThis project provides a simple implementation of Glassware demonstrating the core functionality of the Google Mirror API.\u003c/p\u003e\n"],["\u003cp\u003eTo run the project, you need the App Engine SDK for Python, a Google App Engine instance, and a Google APIs Console project with the Google Mirror API enabled.\u003c/p\u003e\n"],["\u003cp\u003eConfiguration involves setting up your client ID and secret, generating a session secret file, and updating the \u003ccode\u003eapp.yaml\u003c/code\u003e with your App Engine application ID.\u003c/p\u003e\n"],["\u003cp\u003eDeploy the project using the App Engine Launcher GUI or the \u003ccode\u003eappcfg.py\u003c/code\u003e command-line tool.\u003c/p\u003e\n"]]],[],null,["# Python Quick Start\n\nThis project shows you how to implement a simple\npiece of Glassware that demos the major functionality of the Google Mirror API.\n\nTo see a fully-working demo of the quick start project, go to\n[https://glass-python-starter-demo.appspot.com](https://glass-java-starter-demo.appspot.com).\nOtherwise, read on to see how to deploy your own version.\n\n[Download on GitHub](https://github.com/googleglass/mirror-quickstart-python)\n\nPrerequisites\n-------------\n\n[The App Engine SDK for Python](/appengine/downloads#Google_App_Engine_SDK_for_Python) -\nThe Python quick start project is implemented using App Engine. You need\nthe Python App Engine SDK to develop and deploy your project.\nRun the installer if appropriate for your platform, or extract the zip file\nin a convenient place.\n\nCreating a Google App Engine instance\n-------------------------------------\n\nYou'll need to host the quick start project on an instance of Google App Engine:\n\n1. Go to \u003chttp://appspot.com\u003e.\n2. Click **Create Application** and create a public Google App Engine instance hosted on `appspot.com`.\n3. Give the application an **Application Identifier** and leave the authentication **Open to all Google\n Accounts users**. You'll need the application identifier later to configure the quick start project.\n\nCreating a Google APIs Console project\n--------------------------------------\n\nNext, enable access to the Google Mirror API:\n\n1. Go to the [Google APIs console](https://code.google.com/apis/console/) and create a new API project.\n2. Click **Services** and enable the Google Mirror API for your new project.\n3. Click **API Access** and create an OAuth 2.0 client ID for a web application.\n4. Specify the product name and icon for your Glassware. These fields appear on the OAuth grant screen presented to your users.\n5. Select **Web application** and specify any value for the hostname, such as `localhost`\n6. Click **Edit settings...** for the client ID to specify redirect URIs. Specify `http://localhost:8080/oauth2callback` and the callback URL for your App Engine instance, for example, `https://myappengineinstance.appspot.com/oauth2callback`.\n7. Make note of the client ID and secret from the Google APIs Console. You'll need it to configure the quick start project.\n\nConfiguring the project\n-----------------------\n\nConfigure the Quick Start project to use your API client information:\n\n1. Enter your client ID and secret in `client_secrets.json`: \n\n ```python\n {\n \"web\": {\n \"client_id\": \"1234.apps.googleusercontent.com\",\n \"client_secret\": \"ITS_A_SECRET_TO_EVERYBODY\",\n \"redirect_uris\": [\n ],\n \"auth_uri\": \"https://accounts.google.com/o/oauth2/auth\",\n \"token_uri\": \"https://accounts.google.com/o/oauth2/token\"\n }\n }\n ```\n2. Generate a `session.secret` file to store session cookies: \n\n ```python\n $ python -c \"import os; print os.urandom(64)\" \u003e session.secret\n ```\n3. Edit `app.yaml` to enter your App Engine application ID: \n\n ```python\n application: your_app_engine_application_id\n version: 1\n runtime: python27\n api_version: 1\n threadsafe: true\n ...\n ```\n\nDeploying the project\n---------------------\n\nPress the blue **Deploy** button in the App Engine Launch GUI interface or run this shell\ncommand to deploy your code: \n\n $ appcfg.py --oauth2 update ."]]