Python-Kurzanleitung
Mit Sammlungen den Überblick behalten
Sie können Inhalte basierend auf Ihren Einstellungen speichern und kategorisieren.
In diesem Projekt erfahren Sie, wie Sie ein einfaches
eine Glassware, die die Hauptfunktionen der Google Mirror API demonstriert.
Eine vollständige Demo des Schnellstartprojekts finden Sie unter
https://glass-python-starter-demo.appspot.com.
Andernfalls lesen Sie weiter, um zu erfahren, wie Sie Ihre eigene Version bereitstellen.
Auf GitHub herunterladen
Vorbereitung
Das App Engine SDK für Python:
Das Python-Schnellstartprojekt wird mithilfe von App Engine implementiert. Du brauchst
das Python App Engine SDK, um Ihr Projekt zu entwickeln und bereitzustellen.
Führen Sie das Installationsprogramm aus, falls dies für Ihre Plattform erforderlich ist, oder extrahieren Sie die ZIP-Datei.
an einem geeigneten Ort auf.
Google App Engine-Instanz erstellen
Sie müssen das Schnellstartprojekt auf einer Instanz von Google App Engine hosten:
- Rufen Sie http://appspot.com auf.
- Klicken Sie auf Anwendung erstellen und erstellen Sie eine öffentliche Google App Engine-Instanz, die auf
appspot.com
gehostet wird.
- Weisen Sie der Anwendung eine Anwendungs-ID zu und lassen Sie die Authentifizierung Offen für alle Google
Kontonutzer. Sie benötigen die Anwendungs-ID später, um das Schnellstartprojekt zu konfigurieren.
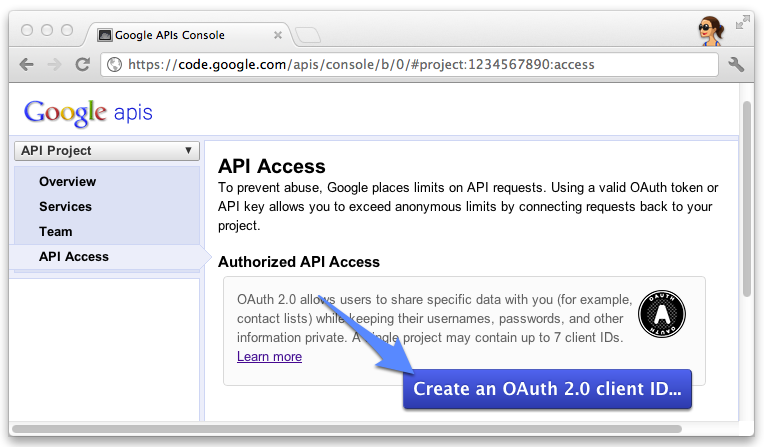
Google APIs Console-Projekt erstellen
Aktivieren Sie als Nächstes den Zugriff auf die Google Mirror API:
- Rufen Sie die Google APIs-Konsole auf und erstellen Sie ein neues API-Projekt.
- Klicken Sie auf Dienste und aktivieren Sie die Google Mirror API für Ihr neues Projekt.

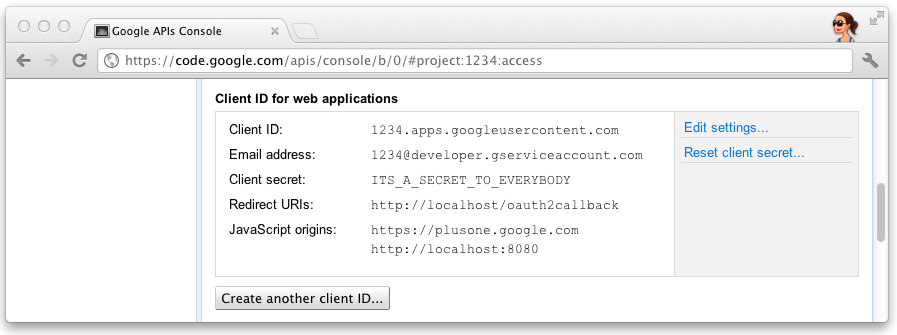
- Klicken Sie auf API-Zugriff und erstellen Sie eine OAuth 2.0-Client-ID für eine Webanwendung.

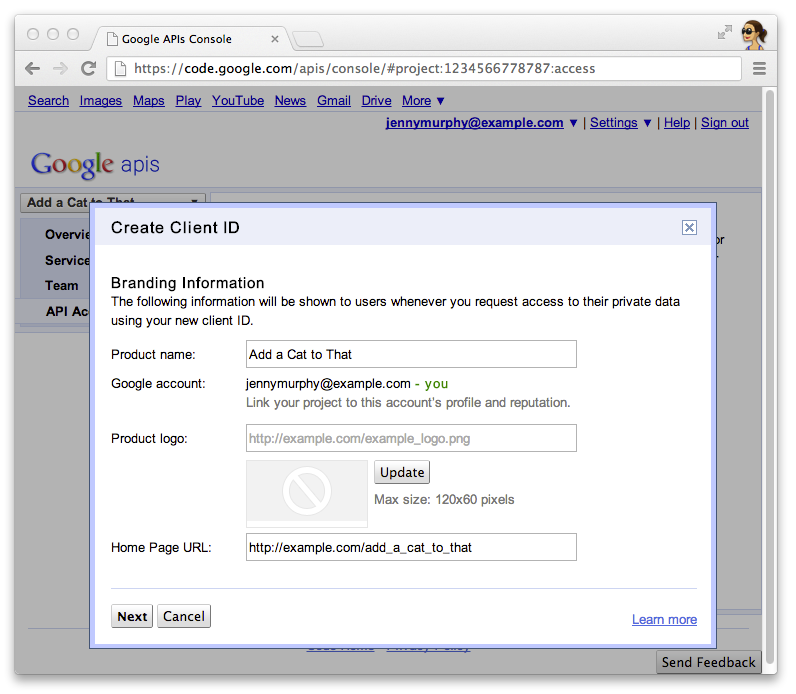
- Geben Sie den Produktnamen und das Symbol für Ihre Glassware an. Diese Felder werden in der OAuth-Zustimmung angezeigt.
Bildschirm, der den Nutzenden angezeigt wird.

- Wählen Sie Webanwendung aus und geben Sie einen beliebigen Wert für den Hostnamen an, zum Beispiel
localhost
.

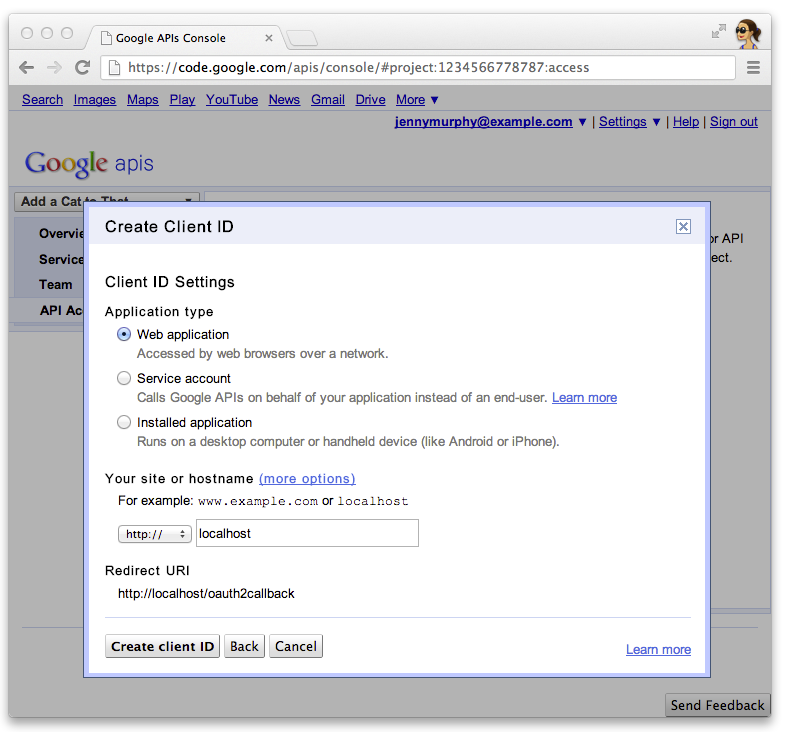
- Klicken Sie für die Client-ID auf Einstellungen bearbeiten..., um Weiterleitungs-URIs anzugeben. Definieren
http://localhost:8080/oauth2callback
und die Callback-URL für Ihre App Engine
z. B. https://myappengineinstance.appspot.com/oauth2callback
.

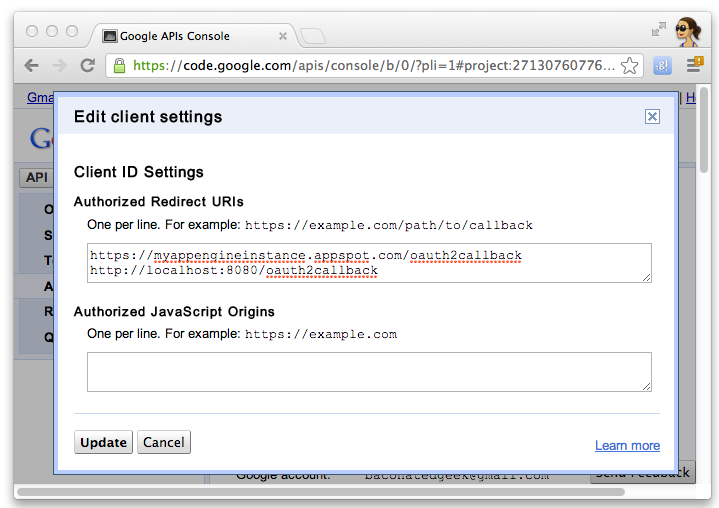
- Notieren Sie sich die Client-ID und das Secret aus der Google APIs-Konsole. Sie benötigen
um das Schnellstartprojekt zu konfigurieren.

Projekt konfigurieren
Konfigurieren Sie das Schnellstartprojekt für die Verwendung Ihrer API-Clientinformationen:
- Gib deine Client-ID und dein Secret in
client_secrets.json
ein:
{
"web": {
"client_id": "1234.apps.googleusercontent.com",
"client_secret": "ITS_A_SECRET_TO_EVERYBODY",
"redirect_uris": [
],
"auth_uri": "https://accounts.google.com/o/oauth2/auth",
"token_uri": "https://accounts.google.com/o/oauth2/token"
}
}
- Generiere eine
session.secret
-Datei, um Sitzungscookies zu speichern:
$ python -c "import os; print os.urandom(64)" > session.secret
- Bearbeiten Sie
app.yaml
, um Ihre App Engine-Anwendungs-ID einzugeben:
application: your_app_engine_application_id
version: 1
runtime: python27
api_version: 1
threadsafe: true
...
Projekt bereitstellen
Klicken Sie auf der Benutzeroberfläche zum Starten der App Engine auf die blaue Schaltfläche Deploy (Bereitstellen) oder führen Sie diese Shell aus.
, um Ihren Code bereitzustellen:
$ appcfg.py --oauth2 update .
Sofern nicht anders angegeben, sind die Inhalte dieser Seite unter der Creative Commons Attribution 4.0 License und Codebeispiele unter der Apache 2.0 License lizenziert. Weitere Informationen finden Sie in den Websiterichtlinien von Google Developers. Java ist eine eingetragene Marke von Oracle und/oder seinen Partnern.
Zuletzt aktualisiert: 2025-07-25 (UTC).
[null,null,["Zuletzt aktualisiert: 2025-07-25 (UTC)."],[[["\u003cp\u003eThis project provides a simple implementation of Glassware demonstrating the core functionality of the Google Mirror API.\u003c/p\u003e\n"],["\u003cp\u003eTo run the project, you need the App Engine SDK for Python, a Google App Engine instance, and a Google APIs Console project with the Google Mirror API enabled.\u003c/p\u003e\n"],["\u003cp\u003eConfiguration involves setting up your client ID and secret, generating a session secret file, and updating the \u003ccode\u003eapp.yaml\u003c/code\u003e with your App Engine application ID.\u003c/p\u003e\n"],["\u003cp\u003eDeploy the project using the App Engine Launcher GUI or the \u003ccode\u003eappcfg.py\u003c/code\u003e command-line tool.\u003c/p\u003e\n"]]],[],null,["# Python Quick Start\n\nThis project shows you how to implement a simple\npiece of Glassware that demos the major functionality of the Google Mirror API.\n\nTo see a fully-working demo of the quick start project, go to\n[https://glass-python-starter-demo.appspot.com](https://glass-java-starter-demo.appspot.com).\nOtherwise, read on to see how to deploy your own version.\n\n[Download on GitHub](https://github.com/googleglass/mirror-quickstart-python)\n\nPrerequisites\n-------------\n\n[The App Engine SDK for Python](/appengine/downloads#Google_App_Engine_SDK_for_Python) -\nThe Python quick start project is implemented using App Engine. You need\nthe Python App Engine SDK to develop and deploy your project.\nRun the installer if appropriate for your platform, or extract the zip file\nin a convenient place.\n\nCreating a Google App Engine instance\n-------------------------------------\n\nYou'll need to host the quick start project on an instance of Google App Engine:\n\n1. Go to \u003chttp://appspot.com\u003e.\n2. Click **Create Application** and create a public Google App Engine instance hosted on `appspot.com`.\n3. Give the application an **Application Identifier** and leave the authentication **Open to all Google\n Accounts users**. You'll need the application identifier later to configure the quick start project.\n\nCreating a Google APIs Console project\n--------------------------------------\n\nNext, enable access to the Google Mirror API:\n\n1. Go to the [Google APIs console](https://code.google.com/apis/console/) and create a new API project.\n2. Click **Services** and enable the Google Mirror API for your new project.\n3. Click **API Access** and create an OAuth 2.0 client ID for a web application.\n4. Specify the product name and icon for your Glassware. These fields appear on the OAuth grant screen presented to your users.\n5. Select **Web application** and specify any value for the hostname, such as `localhost`\n6. Click **Edit settings...** for the client ID to specify redirect URIs. Specify `http://localhost:8080/oauth2callback` and the callback URL for your App Engine instance, for example, `https://myappengineinstance.appspot.com/oauth2callback`.\n7. Make note of the client ID and secret from the Google APIs Console. You'll need it to configure the quick start project.\n\nConfiguring the project\n-----------------------\n\nConfigure the Quick Start project to use your API client information:\n\n1. Enter your client ID and secret in `client_secrets.json`: \n\n ```python\n {\n \"web\": {\n \"client_id\": \"1234.apps.googleusercontent.com\",\n \"client_secret\": \"ITS_A_SECRET_TO_EVERYBODY\",\n \"redirect_uris\": [\n ],\n \"auth_uri\": \"https://accounts.google.com/o/oauth2/auth\",\n \"token_uri\": \"https://accounts.google.com/o/oauth2/token\"\n }\n }\n ```\n2. Generate a `session.secret` file to store session cookies: \n\n ```python\n $ python -c \"import os; print os.urandom(64)\" \u003e session.secret\n ```\n3. Edit `app.yaml` to enter your App Engine application ID: \n\n ```python\n application: your_app_engine_application_id\n version: 1\n runtime: python27\n api_version: 1\n threadsafe: true\n ...\n ```\n\nDeploying the project\n---------------------\n\nPress the blue **Deploy** button in the App Engine Launch GUI interface or run this shell\ncommand to deploy your code: \n\n $ appcfg.py --oauth2 update ."]]